Last edit by: IB Advertising
See related guides and technical advice from our community experts:
Browse all: Steering and Suspension
- IS GS: How to Install Lowering Springs
Step by step instructions for do-it-yourself repairs
Browse all: Steering and Suspension
DIY Guide: 2014 GS350 F-Sport Lowering Spring Install Guide
#48
Pole Position
Only if you go with full coilovers. Lowering springs do not affect the adaptive suspension which adjusts the shocks only.
#49
Driver School Candidate
Join Date: May 2015
Location: Florida
Posts: 1
Likes: 0
Received 0 Likes
on
0 Posts
Hi Jeff/ group
I found your DIY post on the 2014 gs 350 f sport. It was tremendously helpful! Was wondering if I could pick your brain on an issue I'm having. I'm selling my 2014 F sport and my shop re-installed the factory springs. For some reason the rear is sitting up very high after the install. They've pulled the springs off 3 times trying to figure out what's causing it but they can't find anything. I've even shorn them your post to follow. Would you know what would cause the rear to sit high? Springs are installed correctly, skinny on top, wide on bottom.
Any advice you could offer would be greatly appreciated.
Thank you for your time
Sean
#50
Hi Jeff/ group
I found your DIY post on the 2014 gs 350 f sport. It was tremendously helpful! Was wondering if I could pick your brain on an issue I'm having. I'm selling my 2014 F sport and my shop re-installed the factory springs. For some reason the rear is sitting up very high after the install. They've pulled the springs off 3 times trying to figure out what's causing it but they can't find anything. I've even shorn them your post to follow. Would you know what would cause the rear to sit high? Springs are installed correctly, skinny on top, wide on bottom.
Any advice you could offer would be greatly appreciated.
Thank you for your time
Sean
I found your DIY post on the 2014 gs 350 f sport. It was tremendously helpful! Was wondering if I could pick your brain on an issue I'm having. I'm selling my 2014 F sport and my shop re-installed the factory springs. For some reason the rear is sitting up very high after the install. They've pulled the springs off 3 times trying to figure out what's causing it but they can't find anything. I've even shorn them your post to follow. Would you know what would cause the rear to sit high? Springs are installed correctly, skinny on top, wide on bottom.
Any advice you could offer would be greatly appreciated.
Thank you for your time
Sean
After installing the driver's side rear spring, I lowered the car and I swear the height was the same as stock or even higher. I likely used every colorful metaphor in the book. Second corner sat perfect after install, so I was pissed and confused.
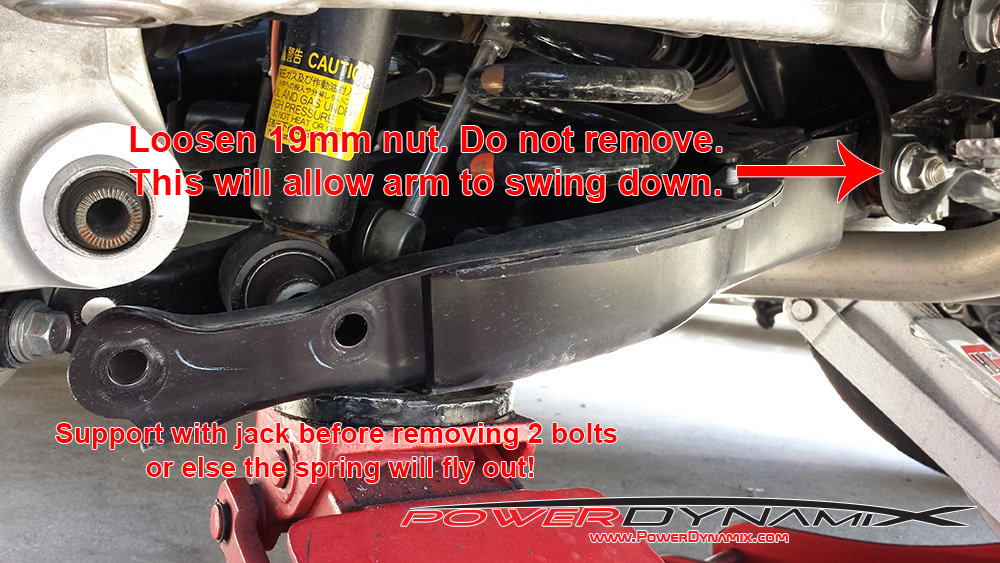
I'm 99% sure I know what I did wrong: I torqued while not under load. See OP's post where he begins rear install (pic pasted below). I torqued the inner 19mm bolt while the assembly was under zero load. I wondered: If loosening the nut allows the arm to swing down, maybe tightening the nut with the arm in the wrong location prevents the arm's swing up?
Loosened the inner nut back up, and the squat matched as expected on both sides.
I did a major happy dance.
OP's image:

#51
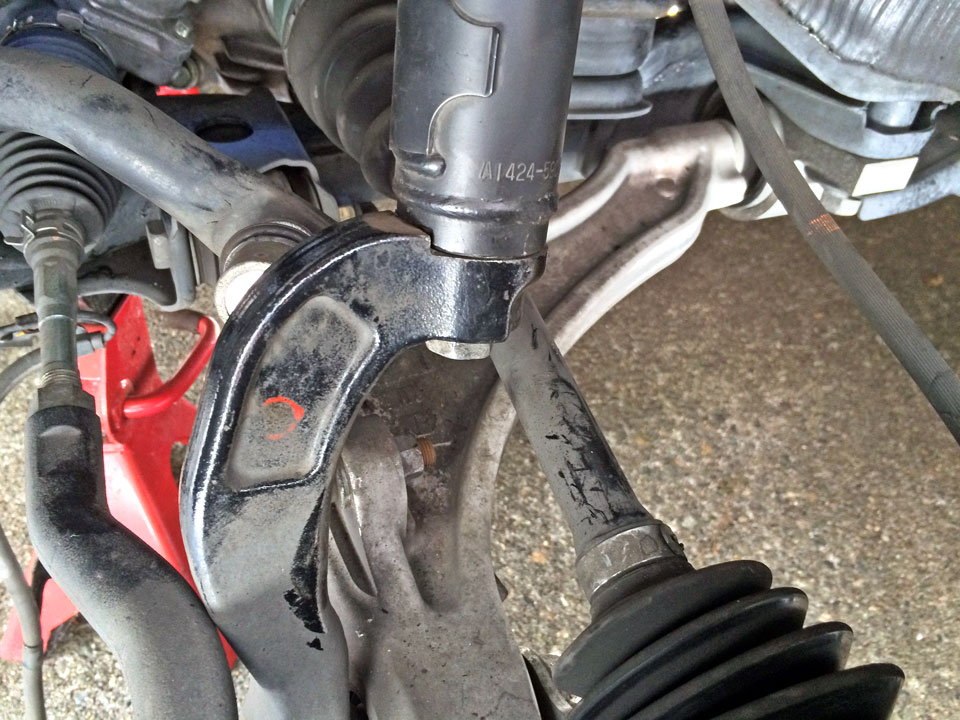
Here is the assembly in an AWD. Bottom of the strut is held attached to the C-shaped bracket with a 19mm bolt. Use a jack to raise the assembly and remove it while under load; you should be able to remove it with your fingers (after breaking it loose).

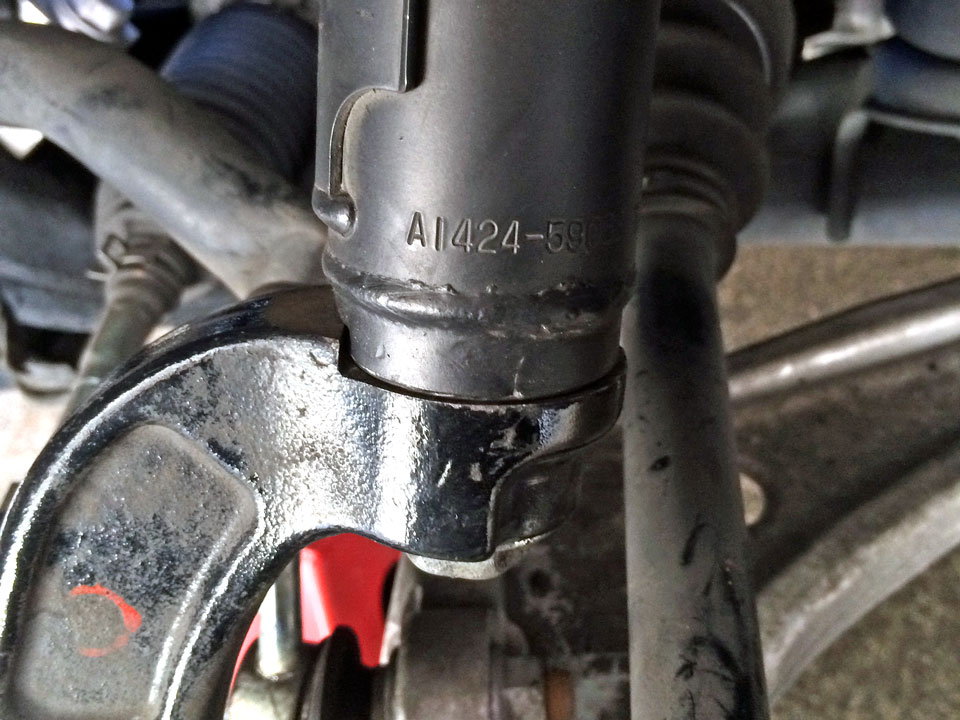
Make note: there is a notch on the bottom of the strut that must match up with the arm during reassembly. If this is off by even 1/16th of an inch these wont match up, the strut won't seat in the mount, and you'll have to re-compress the spring to re-align the strut assembly.

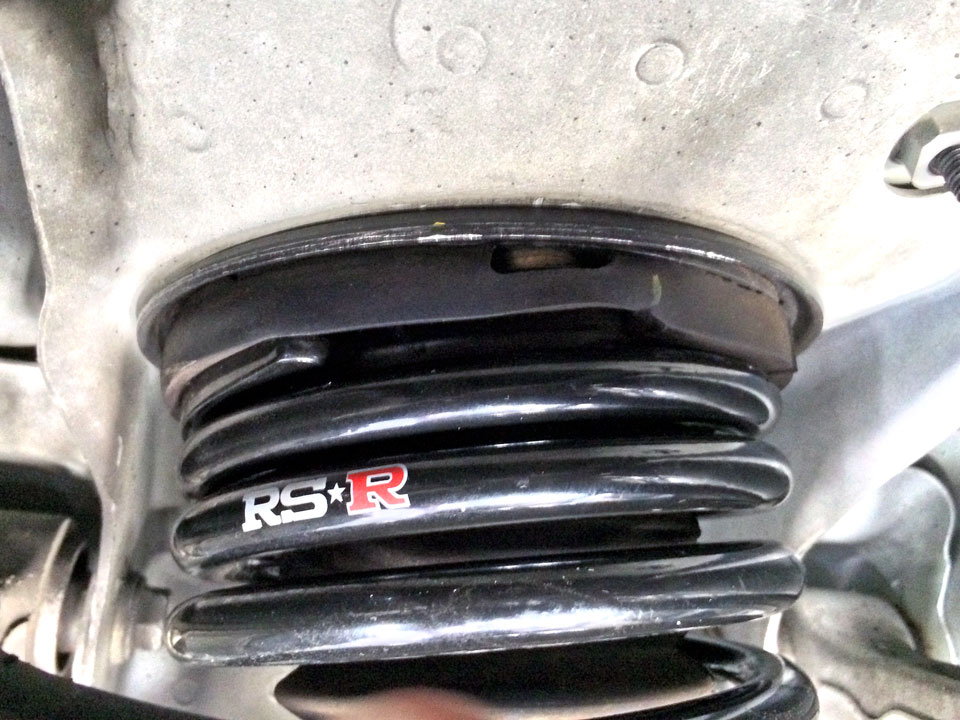
Fun fact: While the bottom of the new spring obviously fits in the indentions in spring seat left by the stock spring, don't assume the upper mount will as it might not. For the RS-R Super-Downs, the indentions in the upper strut mount do not match up with the top of the spring. It is as if the length of the rod used in the coil is about an inch and a half shorter than the stock spring.
In the image below, the indention in the upper mount left from the stock spring is marked (faintly) with a yellow grease pencil; you can see where the RS-R Super-Downs spring ends. Marking the relation of the upper strut mount to the spring seat as exact as you can will reduce the chances of having to re-compress and re-align the assembly many times.

The following users liked this post:
SneakySt3v (04-21-17)
#53
Advanced
iTrader: (5)
Thanks for DIY details... just got done dropping my GS...
I took me just 2hrs for front and 1.5hrs for rear, appeared much easier then I thought...
I will create new thread with whole restoration process of my GS


Custom painted front bumper

I took me just 2hrs for front and 1.5hrs for rear, appeared much easier then I thought...
I will create new thread with whole restoration process of my GS


Custom painted front bumper

Last edited by shurik74; 12-28-15 at 08:14 AM.
The following users liked this post:
Biggsnuff (11-29-17)
#56
Driver School Candidate
I have an question for those of you who lower the car. When you remove the front stunt top nut after you compress spring, was the nut loosen or tighten? Was wondering and the F+ mode how that knuckle turn for F+ and normal mode. Just order the spring so was just doing some research so I can be ready to knock it out.....
#57
I have an question for those of you who lower the car. When you remove the front stunt top nut after you compress spring, was the nut loosen or tighten? Was wondering and the F+ mode how that knuckle turn for F+ and normal mode. Just order the spring so was just doing some research so I can be ready to knock it out.....
Last edited by NebulaGrey; 01-29-16 at 02:40 PM.
#59
If you meant sway bar, yes (our cars don't have front strut bars). If you don't detach it, the control arm wont swing low enough to get the strut out. It's easy to do, you just unbolt it, jack the control arm up level (as if it were sitting on the ground) and the end links come right out. Just make sure when you re-install it to only finger-tighten the nuts. You want to torque the sway bar with the car on the ground, under full load. Car ramps will make this easier.
The following users liked this post:
MrHarris (09-08-22)
#60
Lead Lap
iTrader: (1)
thanks for replying so quickly, jayemko.
you're right, i meant sway bar. i ask because i tried doing this about a month and a half ago and couldn't unbolt it because i didn't have an 17mm open socket wrench or a hex socket to keep the damn bolt in the middle from constantly spinning. i'm assuming you used these?
you're right, i meant sway bar. i ask because i tried doing this about a month and a half ago and couldn't unbolt it because i didn't have an 17mm open socket wrench or a hex socket to keep the damn bolt in the middle from constantly spinning. i'm assuming you used these?


