DIY: 3IS Spring Installation! Picture intensive
 01-31-15, 11:09 PM
#1
Pole Position
Thread Starter
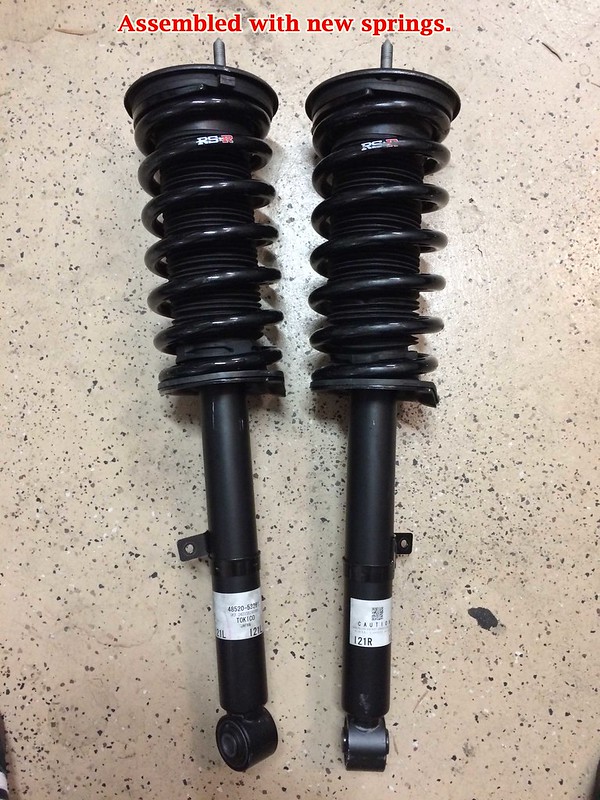
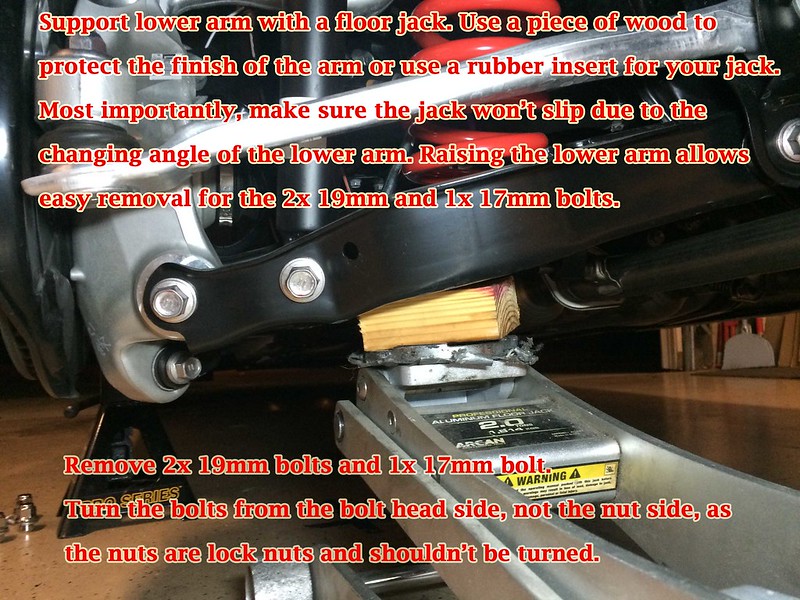
DIY Spring Install on a 2015 IS350 base RWD changing from Tanabe NF210 springs to RSR Half Downs. This same procedure should work for all other 2014-16 IS250/350 RWD with minor differences possible for AWD models.
Notes:
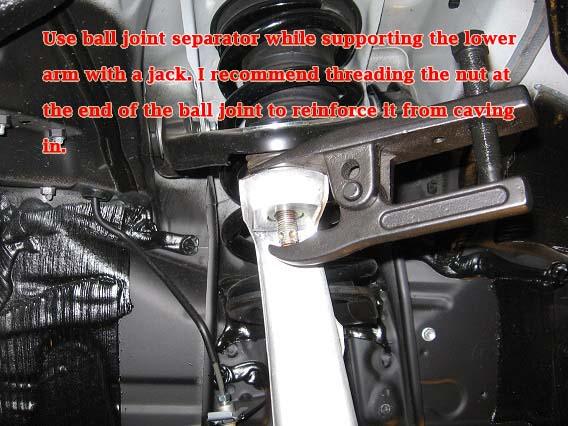
1. This DIY shows 2 different methods to removing the stock front suspension, both using a ball joint separator and without using one.
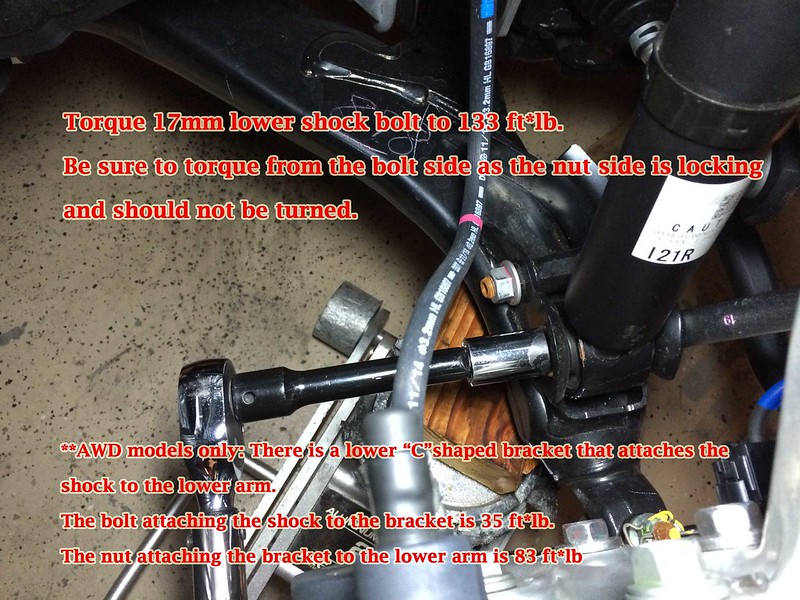
2. AWD cars may vary. I included a provision for what I saw as the only difference in procedure/torque spec between RWD and AWD, but I can NOT guarantee anything!
3. This DIY was done on a non-AVS equipped car, so hopefully I covered everything from the borrowed pictures.
Safety:
1. Springs under tension can be deadly! be careful, if you do not know what you're doing, take your car to a professional.
2. When jacking up and suspending your car in the air, always take the proper safety precautions. ALWAYS use jack stands and a good working Jack. Having friends close by helps too, in case of emergencies.
Perform this DIY at your own risk!
Tools Needed:
Floor Jack + block of wood
2 jackstands (4 if you want to do all 4 corners at once)
Ramps (to get your jack out after the install if you are dropping your car really low)
Torque Wrench (capable of 20 ft*lb minimum to 133 ft*lb maximum)
Breaker Bar *optional
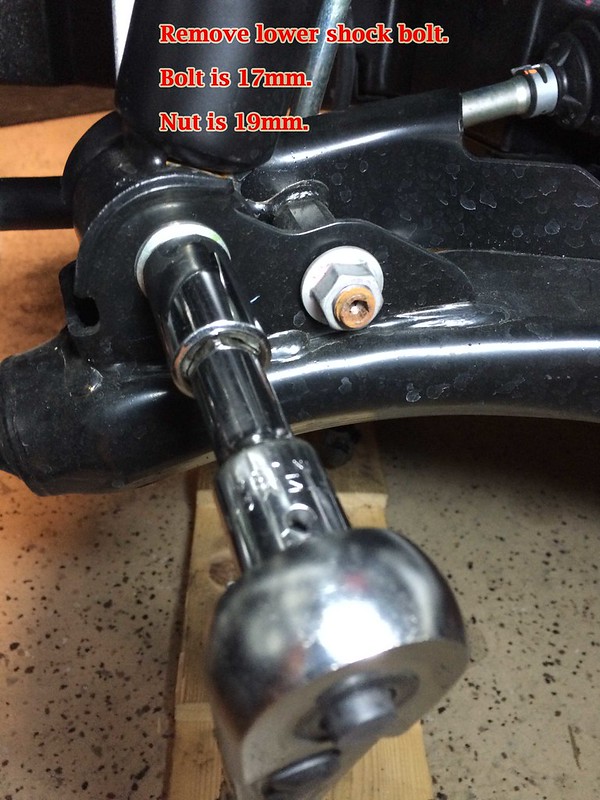
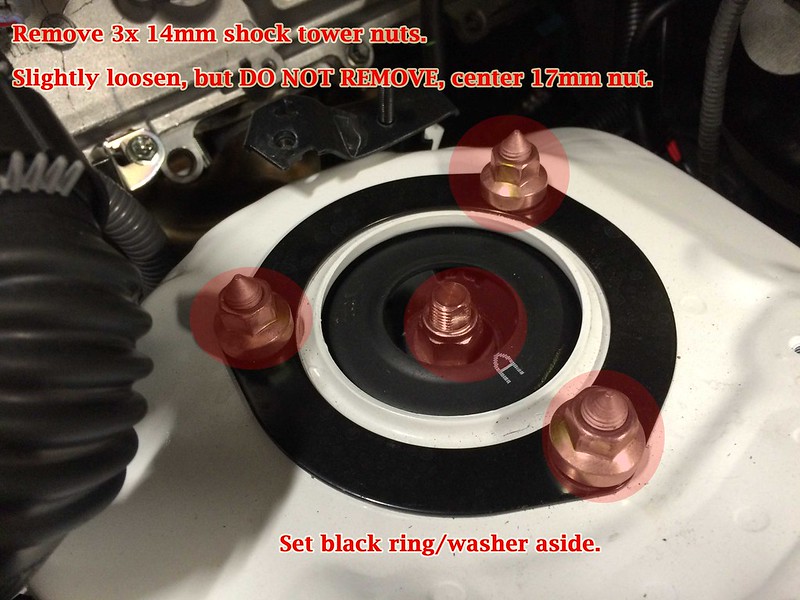
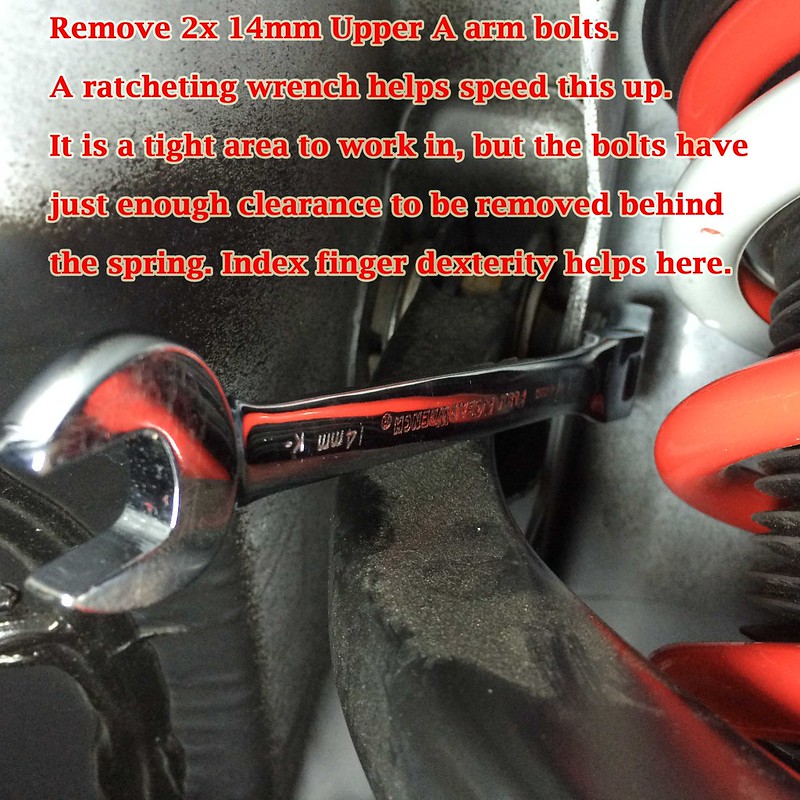
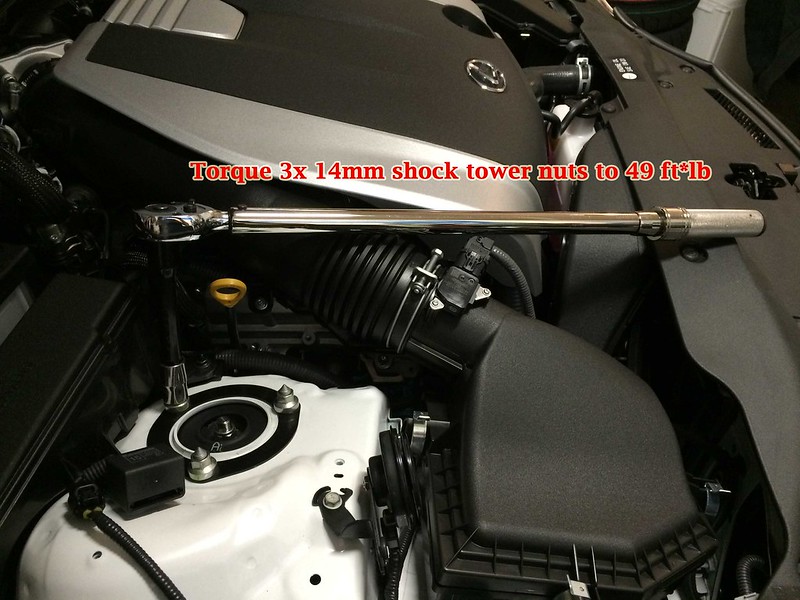
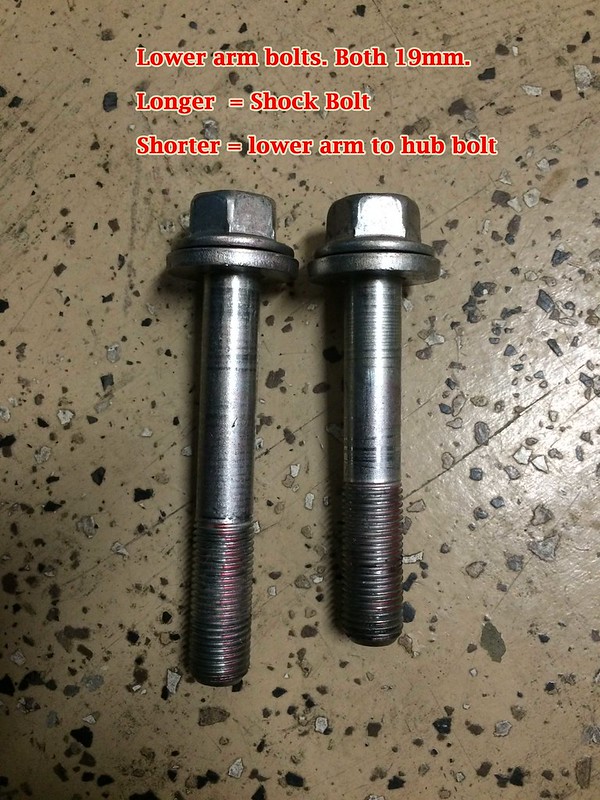
19mm, 17mm, 14mm, 10mm sockets/box wrenches/ratcheting wrenches
Spring Compressor
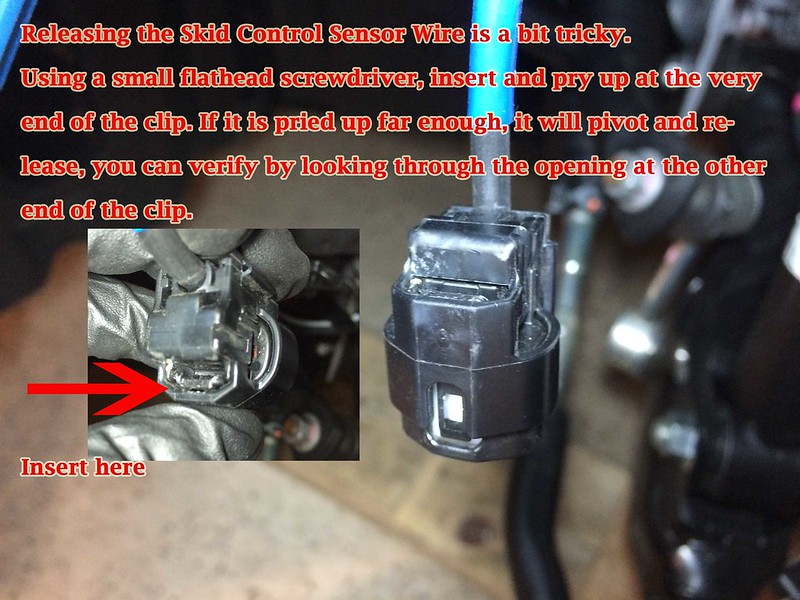
Small flathead screwdriver
Ball Joint separator (optional)
***I'm borrowing a few pictures from 2 other users JeffTsai and IS350S2K which i hope is OK***
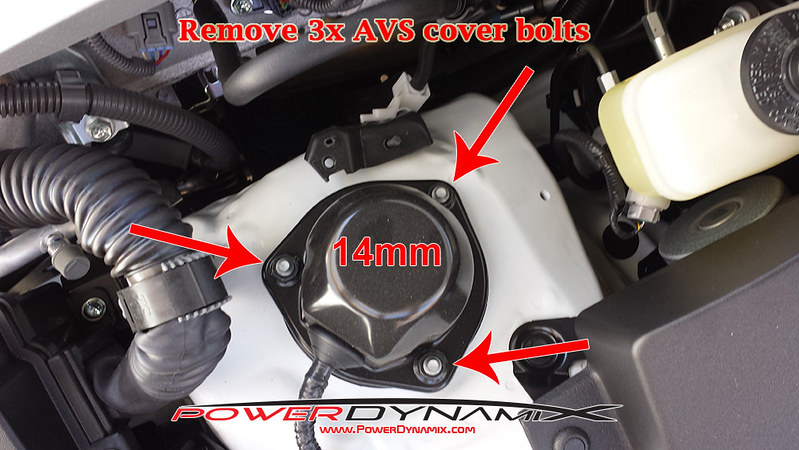
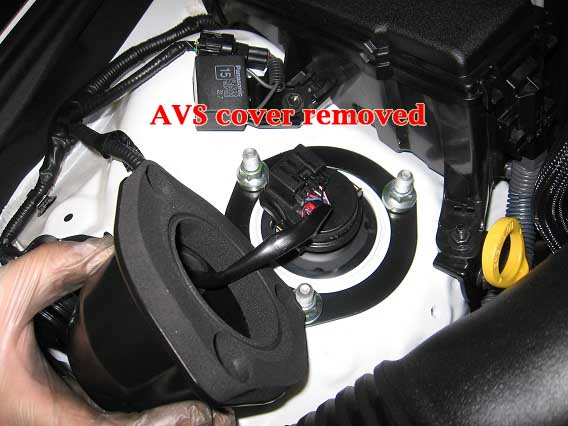
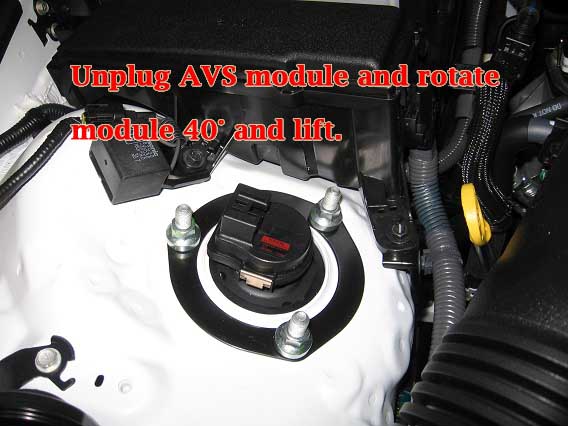
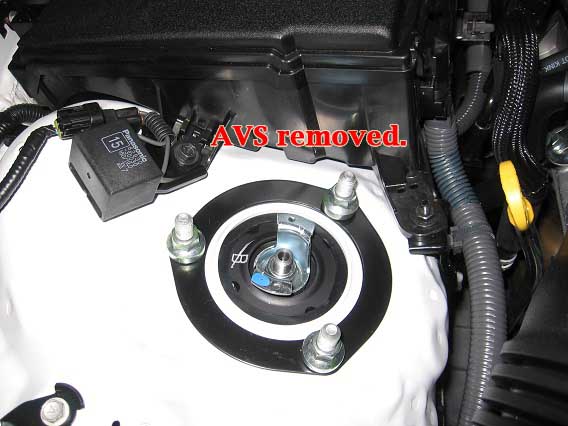
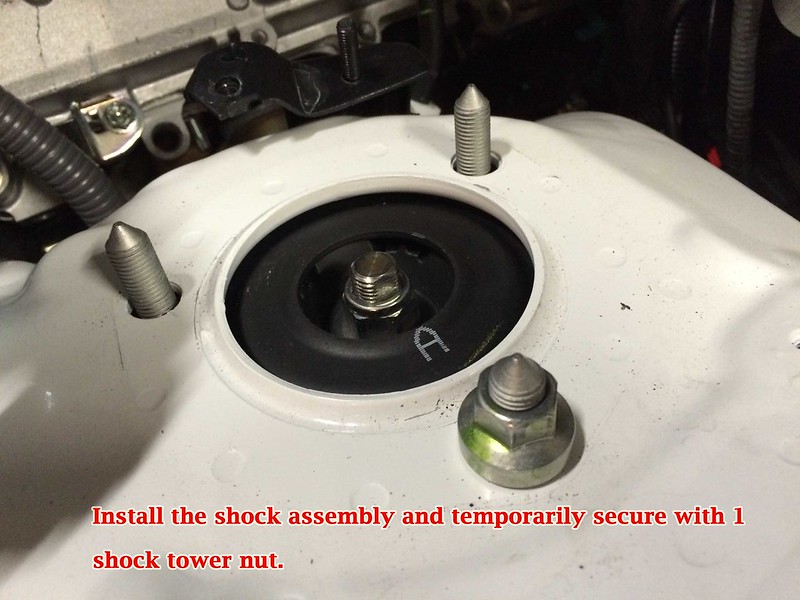
="5"%Front suspension, for AVS equipped vehicles, start here, otherwise start below.
="5"%Front suspension, start here for non-AVS equipped vehicles:


="5"%At this point, if you have a ball joint separator, use that. If not, move on to the next image.
Notes:
1. This DIY shows 2 different methods to removing the stock front suspension, both using a ball joint separator and without using one.
2. AWD cars may vary. I included a provision for what I saw as the only difference in procedure/torque spec between RWD and AWD, but I can NOT guarantee anything!
3. This DIY was done on a non-AVS equipped car, so hopefully I covered everything from the borrowed pictures.
Safety:
1. Springs under tension can be deadly! be careful, if you do not know what you're doing, take your car to a professional.
2. When jacking up and suspending your car in the air, always take the proper safety precautions. ALWAYS use jack stands and a good working Jack. Having friends close by helps too, in case of emergencies.
Perform this DIY at your own risk!
Tools Needed:
Floor Jack + block of wood
2 jackstands (4 if you want to do all 4 corners at once)
Ramps (to get your jack out after the install if you are dropping your car really low)
Torque Wrench (capable of 20 ft*lb minimum to 133 ft*lb maximum)
Breaker Bar *optional
19mm, 17mm, 14mm, 10mm sockets/box wrenches/ratcheting wrenches
Spring Compressor
Small flathead screwdriver
Ball Joint separator (optional)
***I'm borrowing a few pictures from 2 other users JeffTsai and IS350S2K which i hope is OK***
="5"%Front suspension, for AVS equipped vehicles, start here, otherwise start below.
="5"%Front suspension, start here for non-AVS equipped vehicles:
="5"%At this point, if you have a ball joint separator, use that. If not, move on to the next image.
Last edited by CLUM; 04-15-20 at 04:21 PM.

The following users liked this post:
whoismiked (02-14-20)
01-31-15, 11:09 PM
#2
Pole Position
Thread Starter
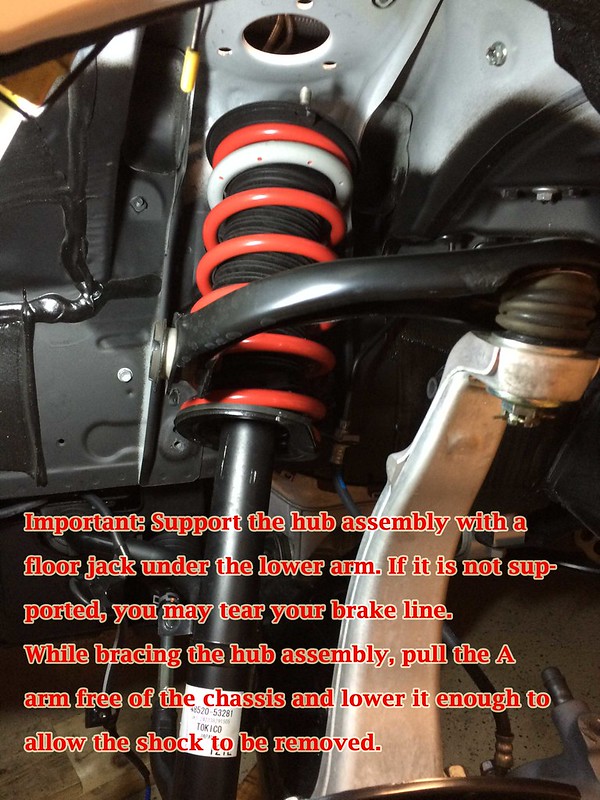
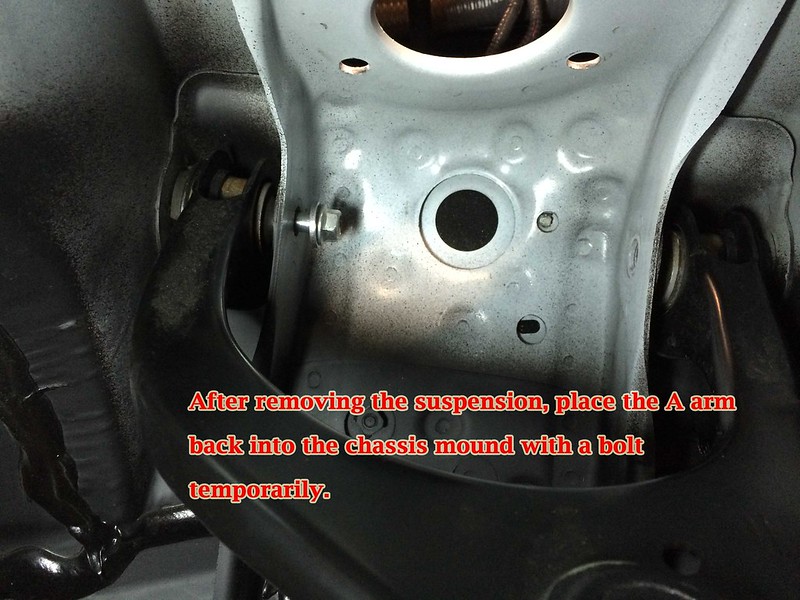
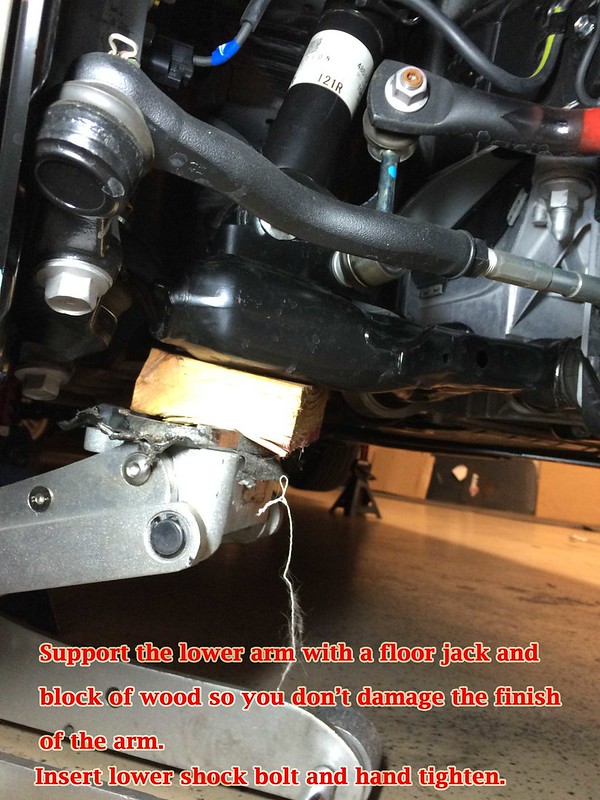
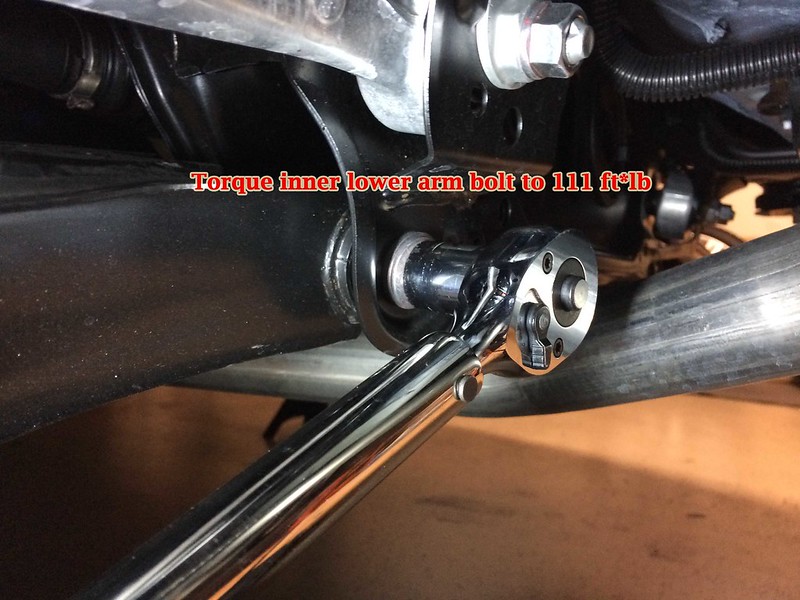
If you do NOT have a ball joint separator, use the A arm removal method here.


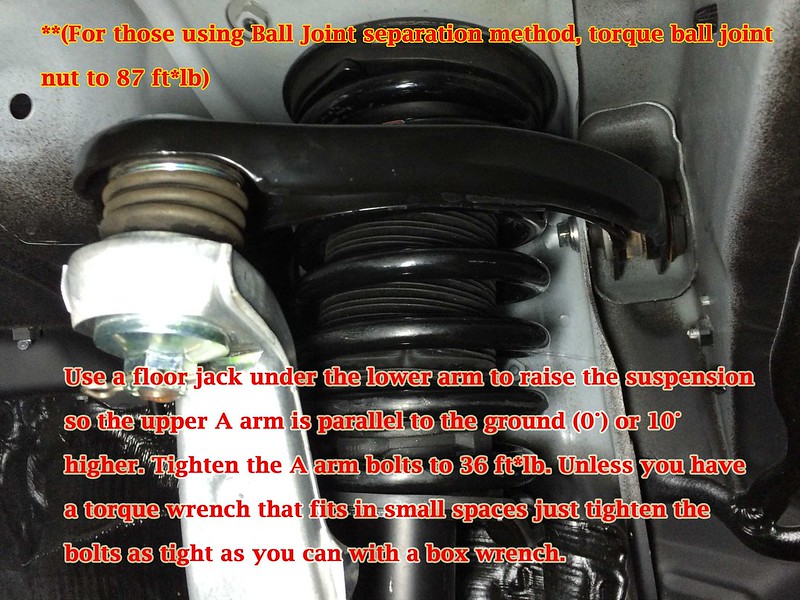
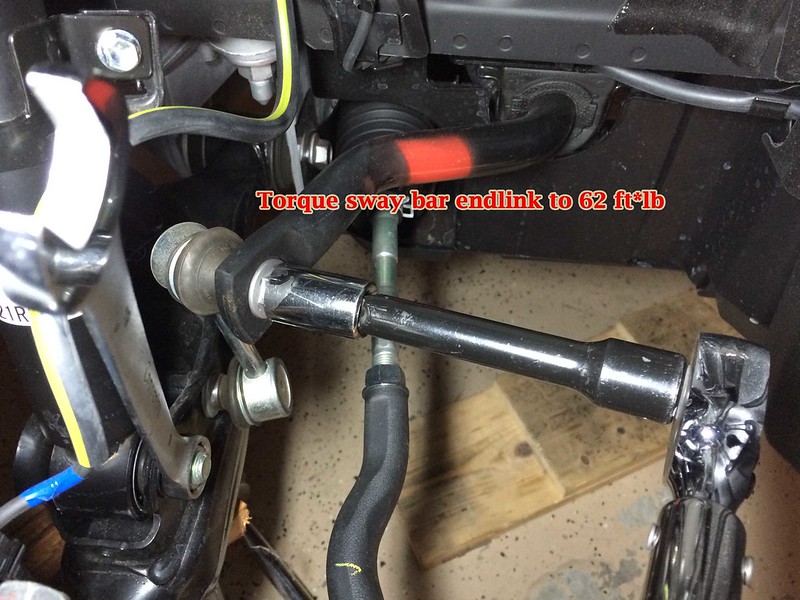

***If you used the Ball Joint method: Torque for ball joint nut is 87 ft*lbs***
Check all bolts and nuts that were loosened, are now torqued to spec.
Install wheels and torque lug nuts to 76 ft*lbs.
***If you used the Ball Joint method: Torque for ball joint nut is 87 ft*lbs***
Check all bolts and nuts that were loosened, are now torqued to spec.
Install wheels and torque lug nuts to 76 ft*lbs.
Last edited by CLUM; 02-26-16 at 10:20 PM.
The following 2 users liked this post by CLUM:
MagStock (08-17-21),
whoismiked (02-14-20)
01-31-15, 11:27 PM
#3
Pole Position
Thread Starter
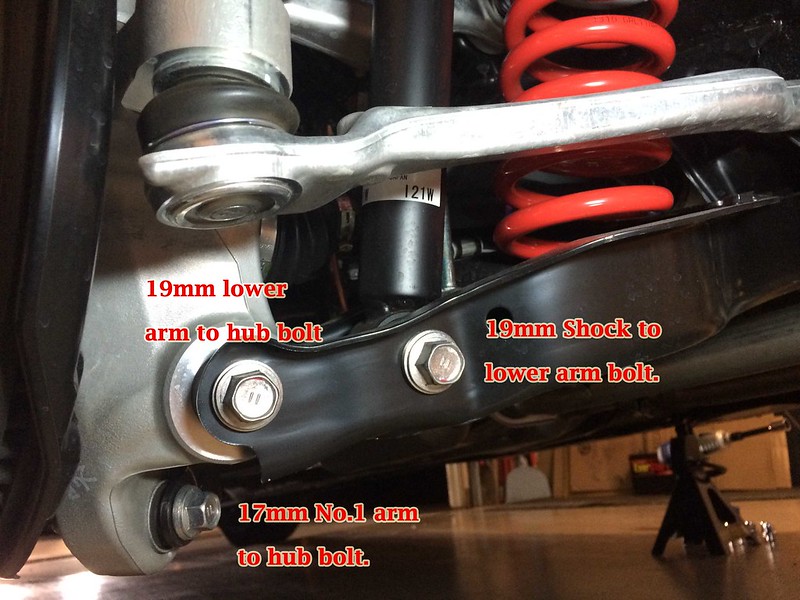
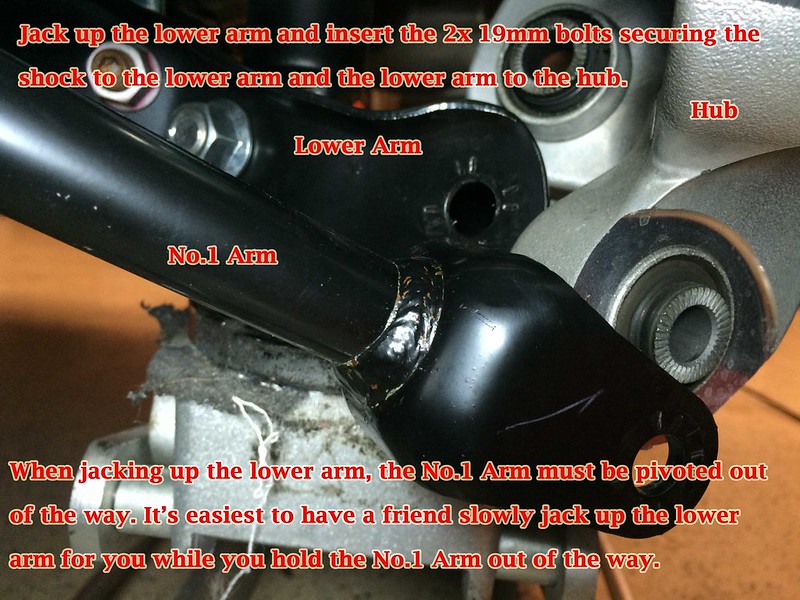
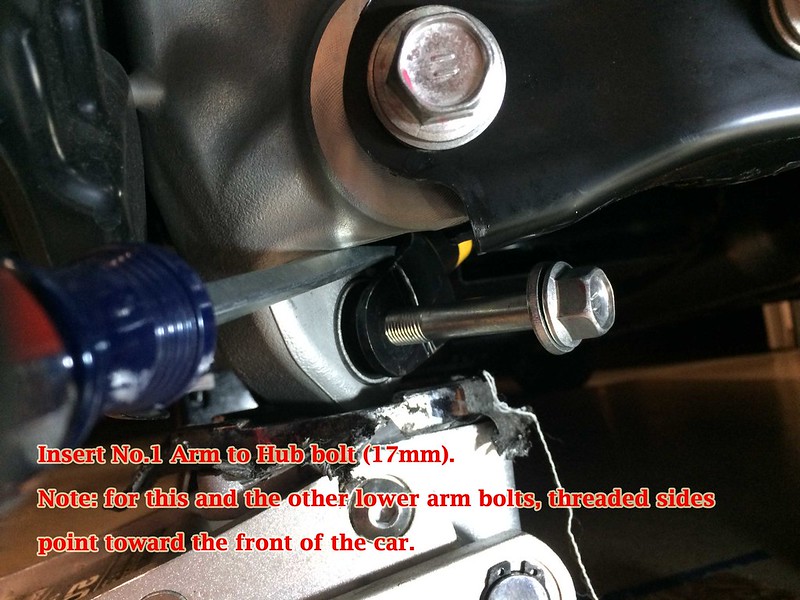
Rear suspension (should be the same for all model IS 14+ RWD and AWD):


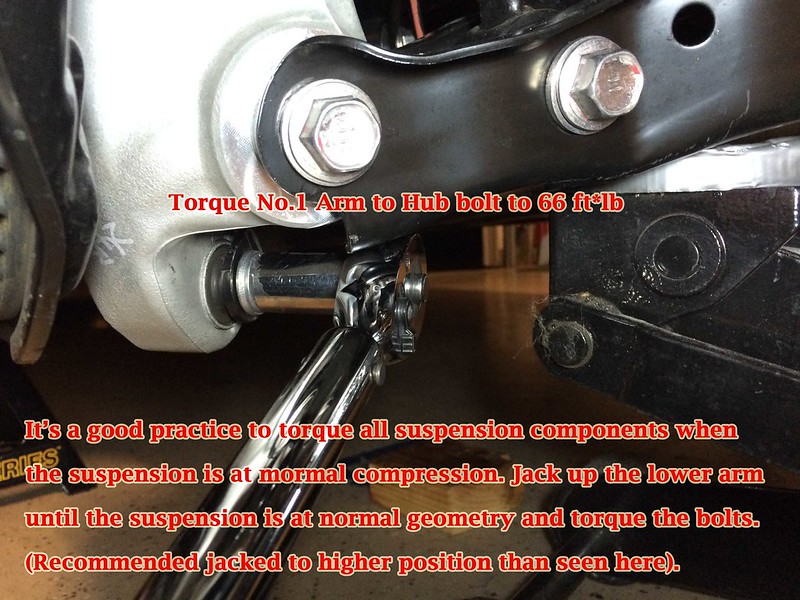

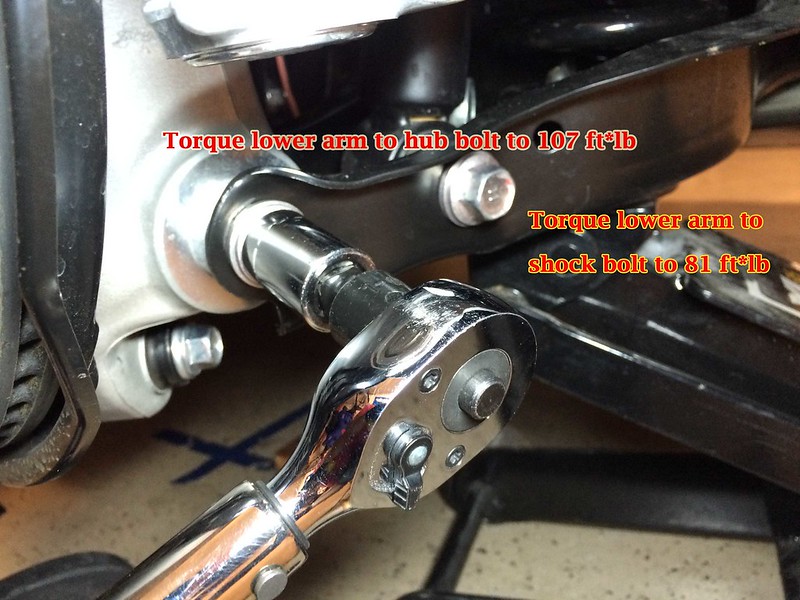
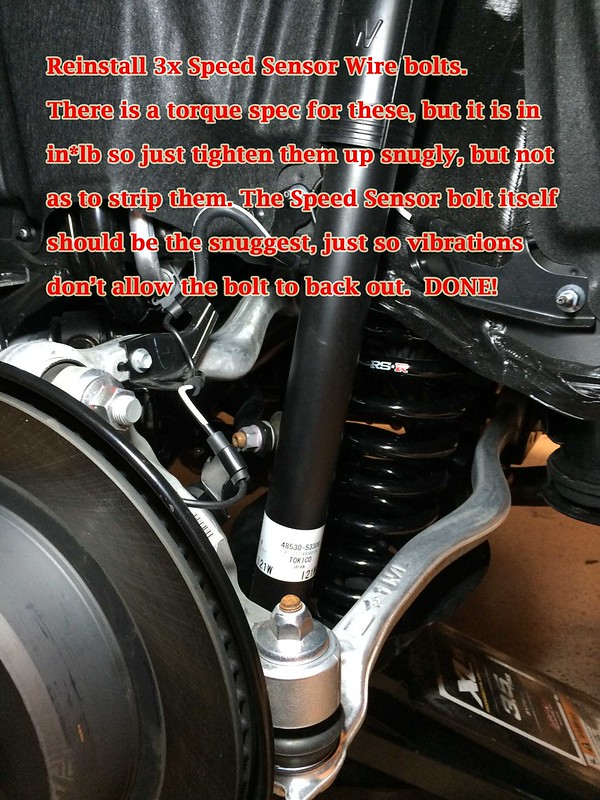
Check all bolts and nuts that were loosened, are now torqued to spec.
Install wheels and torque lug nuts to 76 ft*lbs.
Check all bolts and nuts that were loosened, are now torqued to spec.
Install wheels and torque lug nuts to 76 ft*lbs.
Last edited by CLUM; 02-26-16 at 10:22 PM.
The following 3 users liked this post by CLUM:

 02-01-15, 09:46 AM
#7
Pole Position
Thread Starter

Both of us weren't having that (although the car looked damn good low!) so decided to do a less aggressive drop. The Half Downs are perfect for her.
Trending Topics
02-01-15, 09:56 AM
#8
Rookie
Join Date: Jul 2014
Location: Ca
Posts: 80
Likes: 0
Received 0 Likes
on
0 Posts
Thanks! The IS is actually my wife's car and the Tanabe's dropped the car too low. She was scraping the tire air deflectors and when i took those off, she ended ups scraping the bumper on a driveway
Both of us weren't having that (although the car looked damn good low!) so decided to do a less aggressive drop. The Half Downs are perfect for her.
Both of us weren't having that (although the car looked damn good low!) so decided to do a less aggressive drop. The Half Downs are perfect for her.
02-01-15, 12:16 PM
#9
Pole Position
Thread Starter
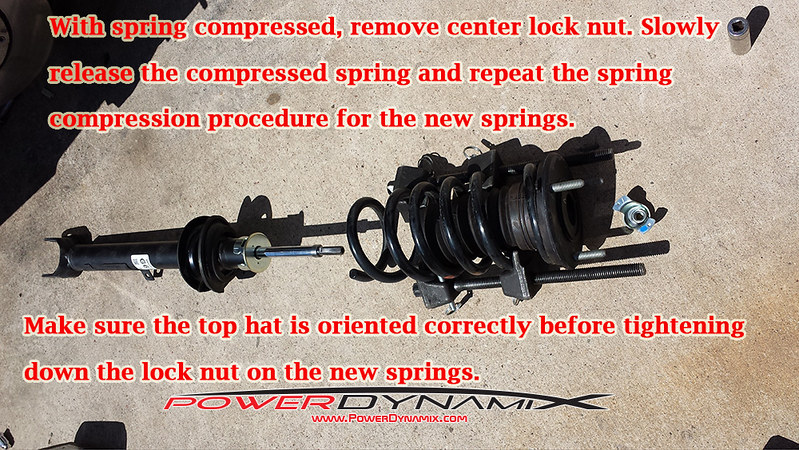
I loved how low the Tanabe's dropped the car, it was the perfect height, looks wise. I could have driven it just fine like that, but my wife, who is not used to angling driveways and such, would just destroy the car at that height. Plus, i'm not so sure the soft spring rates helped. On even the mildest rain gutters around my community, at a moderate speed, the deflectors would scrape due to all the compression movement. There was a 22-23mm difference between the 2 sets of springs.
Here's the Tanabe NF210:
 image.axd-2 by Chris Lum S2K, on Flickr
Here's the RSR Half Downs:
 Untitled by Chris Lum S2K, on Flickr
Here's the Tanabe NF210:
image.axd-2 by Chris Lum S2K, on FlickrHere's the RSR Half Downs:
Untitled by Chris Lum S2K, on Flickr
Last edited by CLUM; 02-01-15 at 12:54 PM.
02-01-15, 12:38 PM
#10
Rookie
Join Date: Jul 2014
Location: Ca
Posts: 80
Likes: 0
Received 0 Likes
on
0 Posts
I hear you on the wife part. I installed the Tanabe Strut Tower Brace yesterday and I haven't' driven the car yet so while I was rotating my wife's tires on her car she took the Lexus to go show some property and when she return I asked her how did it handle and she said "ahhh I just went straight there was no handling going on" lol
