DIY: 3IS Spring Installation! Picture intensive
 02-23-16, 07:36 AM
#31

Question: is it worth the investment to get a ball joint separator? If so, you mentioned threading a nut to prevent caving in, but I didn't see it in the picture. Is this a must? Do you just thread it at the lower part of the bolt?
Thanks in advance for the clarification. I'm gearing up for my drop and wanted to make sure I have a full understanding before doing it.
Thanks in advance for the clarification. I'm gearing up for my drop and wanted to make sure I have a full understanding before doing it.
 02-23-16, 11:52 AM
#33
Pole Position
Thread Starter
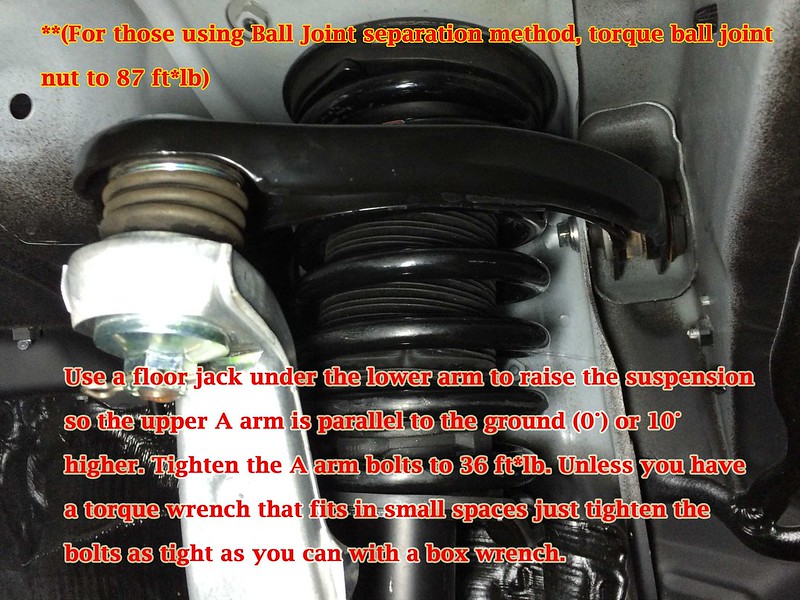
using the ball joint separator is really easy (you can look up youtube videos on how to use it). Most important thing is that you be careful not to tear the rubber boot with the tool because if you do, then you need to replace the boot. If you leave it torn, the grease will dry out and your ball joint will need replacing sooner than later.
02-23-16, 10:03 PM
#35
Rookie

Join Date: Feb 2016
Location: Texas
Posts: 77
Likes: 0
Received 0 Likes
on
0 Posts
So I took out the front springs, and I'm confused. Tanabes do not appear to be lower than my existing F Sport. I bought my used, could they have already lowered it? Should the spring height be the same?
Also, tanabes says to cut the rubber bump, anyone do this? What about the spiral bind? These were not mentioned before so it is throwing me off.
Also, tanabes says to cut the rubber bump, anyone do this? What about the spiral bind? These were not mentioned before so it is throwing me off.
02-24-16, 09:17 AM
#36
Pole Position
Thread Starter
So I took out the front springs, and I'm confused. Tanabes do not appear to be lower than my existing F Sport. I bought my used, could they have already lowered it? Should the spring height be the same?
Also, tanabes says to cut the rubber bump, anyone do this? What about the spiral bind? These were not mentioned before so it is throwing me off.
Also, tanabes says to cut the rubber bump, anyone do this? What about the spiral bind? These were not mentioned before so it is throwing me off.
If the instructions call for cutting the bump stop, then you should definitely consider it. It means the drop is so significant that you may hit your bump stops more frequently, so they want you to trim the bump stop to be shorter so you can have more shock travel before hitting the stop.
The spiral bind is just a spring silencer sheath so that when the springs make less noise when they hit each other (called binding). you should put that on if you have it, but it's not a life or death thing.
Last edited by CLUM; 02-24-16 at 09:37 AM.
02-24-16, 02:47 PM
#38
Pole Position
Thread Starter
Tanabe installed the springs because it was a test vehicle. They did not cut the bump stops. Are your springs the same model that I had though? The more aggressive drop, the more necessity to cut the stops.
anyway, I would just cut the stops if the instructions say to do so. It won't hurt the car nor will it hurt if you ever go back to stock springs.
anyway, I would just cut the stops if the instructions say to do so. It won't hurt the car nor will it hurt if you ever go back to stock springs.
02-26-16, 09:54 PM
#41
Pole Position
Thread Starter
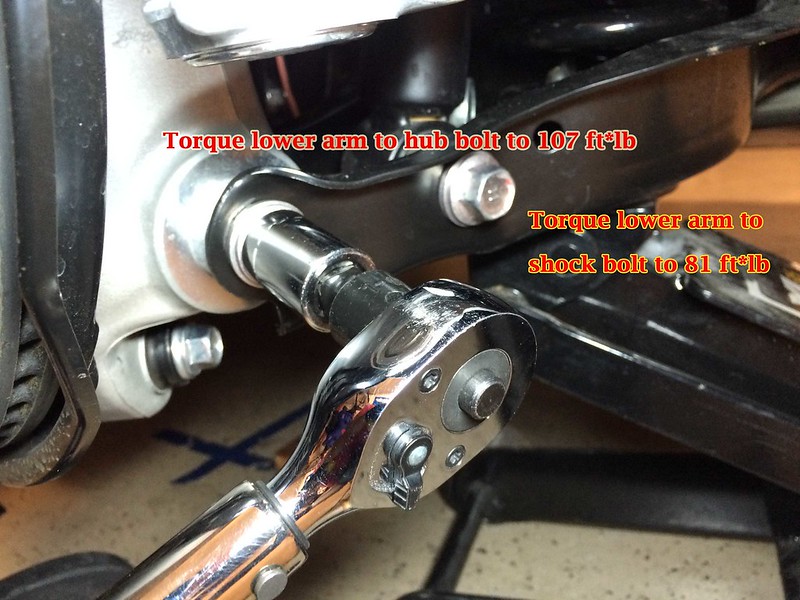
Sorry about that! it's 81 ft*lbs
Sorry i don't have the camber arm torque spec in the manuals i downloaded.
Sorry i don't have the camber arm torque spec in the manuals i downloaded.
Last edited by CLUM; 02-26-16 at 10:29 PM.
02-26-16, 10:26 PM
#43
Pole Position
Thread Starter
The hub to lower arm is 107 ft/lbs while the shock to lower arm is 87 ft/lbs.
Sorry i didn't realize i had left out the shock to lower arm torque spec.
20 ft/lb extra on the shock bolt probably won't do any damage to the bolt or any suspension component. I'd expect the bolt to shear at a much higher torque value. But for sure, go back and torque it to the correct, lower, spec for good measure.
02-26-16, 10:28 PM
#44
Pole Position
Thread Starter
i corrected these two images with the torque value for the Front Ball Joint in the Front Spring Install section and the rear shock to lower arm torque value for the Rear Spring Install.