95 SC400, front shocks replacement?
 03-24-14, 01:45 AM
#16
Rookie
Thread Starter
Hey uras300, hoping you could help since you followed that site for the work you did.
Others that have an answer, please join in.
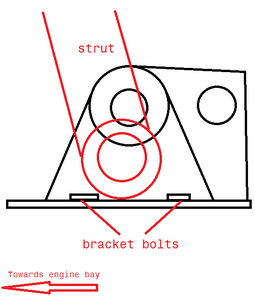
I tried to unbolt that lower mounting bracket from the lower control arm. The problem is similar to before... the strut is pushing down SO HARD against that bracket! My guess is 50-80lbs of force is pressing down and any pry bar I use to get at it is just enough it up and get it back, but it bottoms out at the further back bracket mounting bolt, it just won't lift over it. Below is a diagram I made, as you can see the (red) strut gets caught on that back bolt (closer towards the engine bay).
From what I've read and see it seems as if every one finds their strut assembly to be basically free-floating here. Mine is in a huge tension and even if I man-handle it to try to get a wiggle it might just a tiny bit. Anyway, here's the pic for those that may have a tip.
Others that have an answer, please join in.
I tried to unbolt that lower mounting bracket from the lower control arm. The problem is similar to before... the strut is pushing down SO HARD against that bracket! My guess is 50-80lbs of force is pressing down and any pry bar I use to get at it is just enough it up and get it back, but it bottoms out at the further back bracket mounting bolt, it just won't lift over it. Below is a diagram I made, as you can see the (red) strut gets caught on that back bolt (closer towards the engine bay).
From what I've read and see it seems as if every one finds their strut assembly to be basically free-floating here. Mine is in a huge tension and even if I man-handle it to try to get a wiggle it might just a tiny bit. Anyway, here's the pic for those that may have a tip.

 03-24-14, 03:06 AM
#17
I struggled while attempting the same.
Due to the nature of suspension components, the lower control arm will be applying force upwards. In order to create space for the strut to somewhat freely move around, I've used a pipe to create leverage. I placed the end of pipe against bottom of body panel (rather deep inside towards the engine) and pushed down on top of the brake rotor. Now, it is almost impossible to simultaneously apply pressure and wiggle the strut so it would be great to have a friend hold/apply pressure while you work on the strut.
And If I remember correctly, I was able to position an impact gun using universal joint (not recommended ) to removed mounting bolts that are attached to bracket you've illustrated. I've worked on the bolt closer to the engine first, and once it's removed, you should be able to swing the strut toward the cleared space and work on the other bolt. And it should be smooth sailing from there. (The order of bolt to work on is irrelevant. Pick one that's easier for you.)
It is doubting but it's possible. Good luck!
Due to the nature of suspension components, the lower control arm will be applying force upwards. In order to create space for the strut to somewhat freely move around, I've used a pipe to create leverage. I placed the end of pipe against bottom of body panel (rather deep inside towards the engine) and pushed down on top of the brake rotor. Now, it is almost impossible to simultaneously apply pressure and wiggle the strut so it would be great to have a friend hold/apply pressure while you work on the strut.
And If I remember correctly, I was able to position an impact gun using universal joint (not recommended
) to removed mounting bolts that are attached to bracket you've illustrated. I've worked on the bolt closer to the engine first, and once it's removed, you should be able to swing the strut toward the cleared space and work on the other bolt. And it should be smooth sailing from there. (The order of bolt to work on is irrelevant. Pick one that's easier for you.)It is doubting but it's possible. Good luck!
03-27-14, 02:03 AM
#18
Rookie
Thread Starter
I want to thank you again, uras300! That link you provided was excellent and saved me the pain and strain of removing the upper control arm!
It's amazing how that little bracket at the bottom being removed frees up all the slack on the strut. I found removing the rear bolt on that bracket first was easiest, then removing the front, as you could more easily slide the strut back.
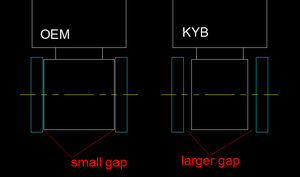
Now, before installing the struts, I noticed that the lower mount area on the KYBs is thinner than the OEM strut. I'm referring to the mounting point in my above diagram, that has the bolt run through it. The OEM one had thin circular foam pads on each side of the mount to cushion it in the mounting bracket that attaches to the lower control arm, but my KYB struts did not come with any, and they appear to require larger ones... but I'm not sure what they're called, and if they'd need to be special ordered...
Below is a diagram to illustrate what I'm talking about, if that aids any of you in helping me on this part. It's the blue rectangles (would be circles if you were looking at the strut from the side) parts that I need the name of, and where I can get some of the appropriate size for the thinner mount on the KYB struts. They are a rubber foam kind of washer... The OEM ones are all chewed up from wear, so even if they'd be ok to use normally, I still need to buy new ones.
It's amazing how that little bracket at the bottom being removed frees up all the slack on the strut. I found removing the rear bolt on that bracket first was easiest, then removing the front, as you could more easily slide the strut back.
Now, before installing the struts, I noticed that the lower mount area on the KYBs is thinner than the OEM strut. I'm referring to the mounting point in my above diagram, that has the bolt run through it. The OEM one had thin circular foam pads on each side of the mount to cushion it in the mounting bracket that attaches to the lower control arm, but my KYB struts did not come with any, and they appear to require larger ones... but I'm not sure what they're called, and if they'd need to be special ordered...
Below is a diagram to illustrate what I'm talking about, if that aids any of you in helping me on this part. It's the blue rectangles (would be circles if you were looking at the strut from the side) parts that I need the name of, and where I can get some of the appropriate size for the thinner mount on the KYB struts. They are a rubber foam kind of washer... The OEM ones are all chewed up from wear, so even if they'd be ok to use normally, I still need to buy new ones.

Last edited by picodroid; 03-27-14 at 02:06 AM.
 03-27-14, 04:16 PM
#20
Rookie
Thread Starter
Hmm, I'll check with KYB to see if they make/include/recommend those rubber bushings I don't have with the struts. I couldn't imagine the strut flexing laterally at the lower mount so I don't see why they'd be necessary, but I don't want to miss something that simple and have to tear it all down again.
04-04-14, 12:55 AM
#21
Rookie
Thread Starter
So I ordered two new boots, and two new front strut mounts from Rockauto. They listed Monroe replacements as compatible... and while they look to be the correct shape and have pretty much spot-on mounting bolt placement, the underside has no rubber fused to it for the spring seat! You can see here:
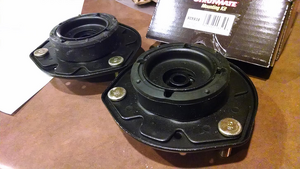
I don't get it... such a part is supposed to be permanently fused to the metal, is it not? There's no way a spring could properly be seated on an uneven, bare metal component like this and I see no such additional piece to purchase to place on it. Even then, it'd slip all over the place.
I've emailed Rockauto to see if they made a mistake in placing that item compatible with the SC. Was hoping someone here could shed some light on this if they don't have a good answer.
04-04-14, 08:13 AM
#22
the rubber spring seat that you are talking about is built into the OEM dust boot, it is the spring seat + the boot all in one piece.
The replacement dust boots are just the boot, no upper rubber spring seat. Only Lexus/Toyota carry the boot with the spring seat built in. If you have the old parts lying around, trim off whatever of the boot is dangling, and use the spring seat part in conjunction with whatever new boots you bought.
The replacement dust boots are just the boot, no upper rubber spring seat. Only Lexus/Toyota carry the boot with the spring seat built in. If you have the old parts lying around, trim off whatever of the boot is dangling, and use the spring seat part in conjunction with whatever new boots you bought.
04-04-14, 06:47 PM
#23
Rookie
Thread Starter
Thanks for the answer, Candela.
The old boot that covers the exposed strut arm/rod was already detached and degraded, leading me to think it was a separate piece. Didn't think it'd be a one piece item. The only reason I bought new mounts is because I thought the rubber seat was fused to it. Oh my!
The current rubber seat/boot is pretty dried and cracked in some areas... I guess I'll inspect the parts further to see if I need replacements or not.
Thanks again!
 08-09-14, 03:57 PM
#26
Driver School Candidate

I just got my '93 SC400 July 2014 and had the typical clunk. Part of it was a transmission mount - the old one was very trashed and replacing it was easy and made things a whole lot better. Still, the front end wasn't right and I had small clunks when hitting bumps. Rather than trying to upgrade too much, I went with a three part OEM repair (after I get everything back to 100% I will consider upgrades)
- steering rack bushing replacement (other posts indicated this was the most likely)
- control arm bushing replacement
- shock replacement (mine were pretty trashed)
When I got underneath and started working on the rack the bushings weren't that bad so I replaced the larger one and didn't go for the two other smaller ones. The lower control arm bushing were very shot so I replaced them (pressing out using a harbor freight 12 ton press and burning out the residue. And finally replaced the shocks with OEM replacement KYB Excel-G with boots and a mounting kit. Since the lower control arms were out I was able to angle the shock into place.
08-09-14, 04:06 PM
#27
Driver School Candidate
I just got my '93 SC400 July 2014 and had the typical clunk. Part of it was a transmission mount - the old one was very trashed and replacing it was easy and made things a whole lot better.
Still, the front end wasn't right and I had small clunks when hitting bumps. Rather than trying to upgrade, I went with a three part OEM repair:
- steering rack bushing replacement (other posts indicated this was the most likely a clunk problem)
- control arm bushing replacement
- shock replacement (mine were pretty trashed)
When I got underneath and started working on the rack I found my bushings were OK so I replaced the larger one and didn't go for the two other smaller ones. The lower control arm bushing were very shot so I replaced them (pressing out using a harbor freight 12 ton press and burning out the residue. The upper control arm bushings seemed OK. And then I replaced the shocks with OEM replacement KYB Excel-G with boots and a mounting kit. I got a local shop to do the spring compression for $50 and felt that was a fair price. Since the lower control arms were out I was able to angle the shock into place. I also found the sway bar links were pretty trashed so I replaced them too. And I got an alignment which got everything into spec and also proved my tie rod ends and ball joints were OK.
I'm not sure what fixed what, but by going OEM I'm very happy. I feel the road much better and have eliminated sway and clunks. I was considering coil overs but I'm very OK with the OEM feel.
08-11-14, 09:46 AM
#28
Wanted to know if you got the shocks installed, the shock usually comes out from inside if the control arm without taking it off.
It's a small space to work with, bu I'm sure you got it all figured it out!! Don't forget the alignment, because it's very important!!
Tell us how it rides
It's a small space to work with, bu I'm sure you got it all figured it out!! Don't forget the alignment, because it's very important!!
Tell us how it rides

Thread
Thread Starter
Forum
Replies
Last Post
SweetGS300
SC- 1st Gen (1992-2000)
4
03-08-02 06:15 PM
SweetGS300
Suspension and Brakes
3
03-08-02 08:58 AM