Tein S Tech Lowering Springs
 03-19-14, 07:14 PM
#91

So whats the RSR equivalent? From pics it looks like the super downs put the car waaaay down. I love the stance of the S tech, but really want the true performance gain of the spring. If not, its not worth it for " the look " IS350 Fsport is a luxury performance car. I dont want to half a$$ this, yet I clearly dont want coils since I like the dynamics aspects of the drive modes. Any assistance?
 03-20-14, 05:55 AM
#92
I thought the H-Tech were equivalent to the RS-R Down Springs.. and the S-Tech being more of a drop than the Downs.. Slightly higher than the RS-R Super Down Springs...
03-20-14, 08:57 AM
#93

This is correct. S-Tech are like Super Down. Damn, now I need to see spring rates. Im going to start a new thread, but Ive been bouncing emails back from Tanabe. They need an is350 Fsport AWD for testing. Im on the east coast or i'd do it. Thus far, they only have RWD springs and not AWD. So frustrated. I just want a solid drop and a tight ride. Im not half-assing this and would rather over engineer the thought process vs buy a part 2x. Oh well. Par for the course.
03-20-14, 09:56 AM
#95
This is correct. S-Tech are like Super Down. Damn, now I need to see spring rates. Im going to start a new thread, but Ive been bouncing emails back from Tanabe. They need an is350 Fsport AWD for testing. Im on the east coast or i'd do it. Thus far, they only have RWD springs and not AWD. So frustrated. I just want a solid drop and a tight ride. Im not half-assing this and would rather over engineer the thought process vs buy a part 2x. Oh well. Par for the course.
03-27-14, 12:29 PM
#96

they are SKQ74-AUB00 free shipping and $167.19 on
http://www.autoanything.com/coupons-...FahlOgodXA8Adw
http://www.autoanything.com/coupons-...FahlOgodXA8Adw
03-27-14, 12:35 PM
#99
tanabe rates
http://www.ebay.com/itm/PRE-ORDER-TANABE-NF210-LOWERING-SPRINGS-Lexus-IS250-IS350-RWD-F-SPORT-jdm-/221399004784?pt=Motors_Car_Truck_Parts_Accessories&fits=Year%3A2014%7CModel%3AIS250%7CMake%3ALexus&hash=item338c68b670&vxp=mtr
http://www.ebay.com/itm/PRE-ORDER-TANABE-NF210-LOWERING-SPRINGS-Lexus-IS250-IS350-RWD-F-SPORT-jdm-/221399004784?pt=Motors_Car_Truck_Parts_Accessories&fits=Year%3A2014%7CModel%3AIS250%7CMake%3ALexus&hash=item338c68b670&vxp=mtr
 03-27-14, 06:37 PM
#101
Driver School Candidate
Join Date: Dec 2013
Location: FL
Posts: 25
Likes: 0
Received 0 Likes
on
0 Posts
03-27-14, 09:22 PM
#102
Time to finish the rear install writeup. I will keep it short and simple since it was relatively easier than the fronts. Install took pretty much one day to do both fronts and rears. The first wheel on each end took the longest. The other side was much faster. I wrote this to help others as I have benefited from reading many how-tos from other posters in the past. Same disclaimer in my front install writeup. If you are not mechanically inclined, I suggest taking it to a shop. This was how I installed mine and have had no problems after the install. YMMV.
1. Loosen the rear lugs and jack up the rear. I used the differential for the jack point and placed jack stands along the inside jack points on the side. Always chock your wheels and use jack stands. Don't rely on just the jack to hold your car stable.
2. Remove rear wheel.
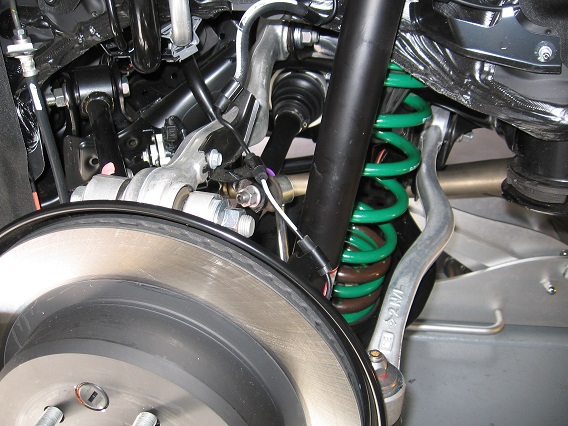
3. Remove the nut and separate the height control sensor sub-assembly from the rear upper control arm assembly. Just remember how it looked so can you reinstall it correctly. Only the driver side has this.

Sensor link removed.

4. Separate toe control link sub-assembly. You need to use the ball joint tool. Torque setting: 54 ftlb.

Rear ball joint after.

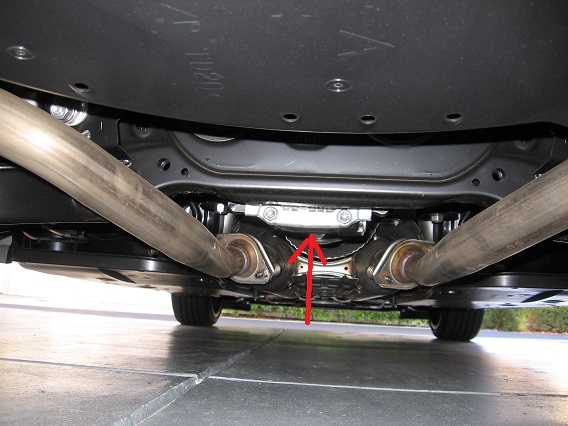
5. Separate rear suspension arm assembly. Unfortunately, I forgot to take a pic of this. In the pic below, look at the lower left of the pic to the left of the red arrow. You can see a hole where the bolt used to be above the jack holding the knuckle. Torque setting: 80ftlb for reinstall.
6. Remove swaybar link assembly. Torque: 62 ftlb

7. Separate the rear shock absorber assembly. Support suspension arm using jack and wooden block. NOTE: The spot I placed the wood wasn't too secure. Slipped a few times. You can probably find a better spot. Remove the bolt and nut. Torque: 110 ftlb
Bolt removed from shock.
8. Loosen (don't remove) the bolt holding the rear suspension arm assembly. You want to be able to swing the arm down after. Torque for this bolt is 103 ftlb for reinstallation.
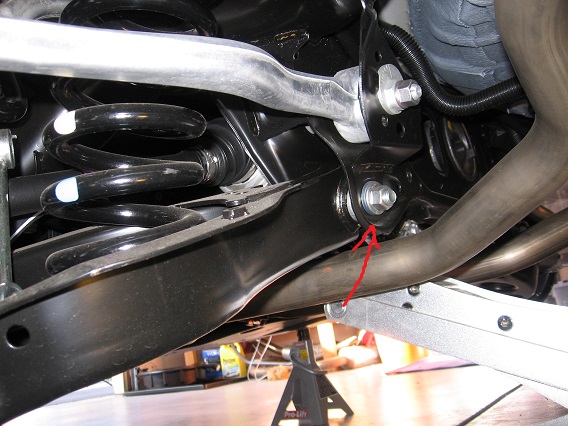
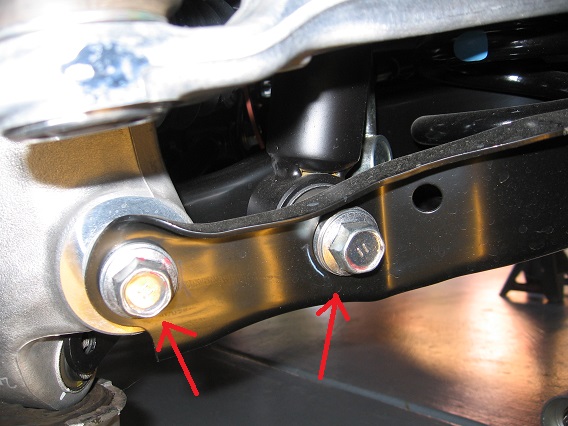
9. Remove the bolt and nut (left red arrow) and separate the suspension arm assembly from knuckle. Loosen the bolt, not the nut because the nut is self gripping. Torque; 119 ftlb
10. Lower the jack and suspension arm to remove the spring.

11. Install new spring. You will need to reuse the rubber upper and lower mounts.

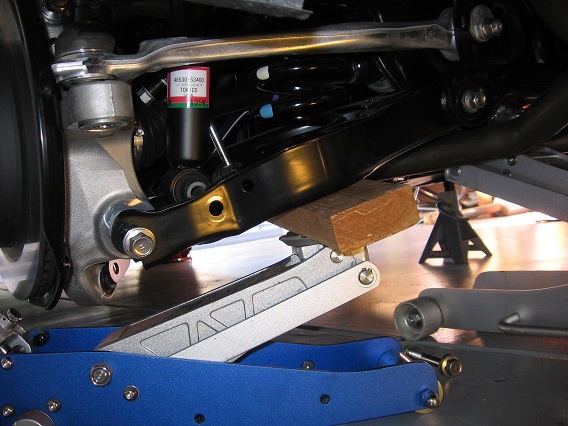
Spring installed. Getting the spring into place while jacking up the lower suspension arm was probably the hardest part. Just go slow and make sure the lower mount is in place. It may look like it will pop out but will hold as you jack the arm up.
Reinstall is pretty much the reverse. Torque the lower control arm bolts with the suspension under load. I used the jack and lifted the suspension.
1. Loosen the rear lugs and jack up the rear. I used the differential for the jack point and placed jack stands along the inside jack points on the side. Always chock your wheels and use jack stands. Don't rely on just the jack to hold your car stable.
2. Remove rear wheel.
3. Remove the nut and separate the height control sensor sub-assembly from the rear upper control arm assembly. Just remember how it looked so can you reinstall it correctly. Only the driver side has this.
Sensor link removed.
4. Separate toe control link sub-assembly. You need to use the ball joint tool. Torque setting: 54 ftlb.
Rear ball joint after.
5. Separate rear suspension arm assembly. Unfortunately, I forgot to take a pic of this. In the pic below, look at the lower left of the pic to the left of the red arrow. You can see a hole where the bolt used to be above the jack holding the knuckle. Torque setting: 80ftlb for reinstall.
6. Remove swaybar link assembly. Torque: 62 ftlb
7. Separate the rear shock absorber assembly. Support suspension arm using jack and wooden block. NOTE: The spot I placed the wood wasn't too secure. Slipped a few times. You can probably find a better spot. Remove the bolt and nut. Torque: 110 ftlb
Bolt removed from shock.
8. Loosen (don't remove) the bolt holding the rear suspension arm assembly. You want to be able to swing the arm down after. Torque for this bolt is 103 ftlb for reinstallation.
9. Remove the bolt and nut (left red arrow) and separate the suspension arm assembly from knuckle. Loosen the bolt, not the nut because the nut is self gripping. Torque; 119 ftlb
10. Lower the jack and suspension arm to remove the spring.
11. Install new spring. You will need to reuse the rubber upper and lower mounts.
Spring installed. Getting the spring into place while jacking up the lower suspension arm was probably the hardest part. Just go slow and make sure the lower mount is in place. It may look like it will pop out but will hold as you jack the arm up.
Reinstall is pretty much the reverse. Torque the lower control arm bolts with the suspension under load. I used the jack and lifted the suspension.
Last edited by IS350S2K; 03-27-14 at 09:32 PM.
04-22-14, 08:27 PM
#104
Driver School Candidate
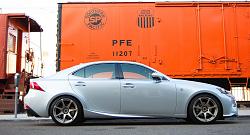
Here is a flat ground side view of the S-Tech drop on my IS250 on 18's with stock tires, I have about a one finger gap all around and assume she will sit very minimally lower after springs settle. Performed install the night before this picture was taken. The write up on this thread really helped me during my install btw, thanks!