Brakes 101 - Class is in session!
 09-04-13, 07:39 AM
#1
This thread is for those who either already do their own brakes and want to learn more or those that want to learn to do them properly. This isn't selling anything just good knowledge to have for the DIY'er. The embarrassing part? I took the word of the guy I bought my car from and believed that the brakes were done just a few months prior to my buying it. I knew in the back of my mind that the brakes weren't 100% but they functioned well enough to get me out of trouble. Well, this weekend I dove into my cars system and I'm appalled at what I found!
In a previous life I had my own brake shop and then worked as a field technical consultant for Bendix training technicians. Hopefully this thread will help to get more of you checking your brakes and learning from my negligence!
So, without further delay let's start with the basics...
First and most importantly - USE THE HIGHEST QUALITY PARTS YOU CAN AFFORD!!! These are your brakes, the #1 safety feature of your car! If the car doesn't run, you won't die. If your brakes don't work you can get killed or injured or end-up killing or injuring someone else! Don't skimp on your brakes, this is not a place to cut corners! Also, if you do not have 100% confidence in your ability please be honest with yourself and let a professional handle the repairs on your brakes.
Brake pads - Unless you really intend on doing a lot of racing stick with OEM brake pad materials and use pads and rotors from the same company. Ceramics are touted as the be-all, end-all brake pads. Not so much... While they run cooler and create less dust they are much harder than organics and semi-metallic pads, they will often increase your braking distances, and are very hard on standard rotors. Ceramics were developed by European manufacturers for their heat resistance in high-speed braking, but the cars equipped with them also have what are known as "soft-rotors" that are designed to be replaced along with the pads. If you stick with OEM materials for rotors and pads and have a properly functioning brake system you'll be amazed at how powerful they are!
Brake rotors - Again, unless you are spending a lot of time on a racetrack you do not need to crazy with drilled, slotted, and zinc-washed rotors. If you old rotors are in decent shape and .015-.020"+ over minimum spec go ahead and have them machined by a QUALIFIED machinist using a rotor-turning machine. I say qualified because so few really know what they are doing. Watch the machinists with your rotors, if he/she just bolts them up and starts cutting... RUN! If the tech doesn't spend a few minutes turning the mounting cups a quarter turn at a time, checking for true.. RUN! If you hear the machine humming while you rotor is on there have them replace it with a new one as they've screwed your rotor. There may be room for another cut but they have proven they can't do it right, and your rotor now has 20-30k miles shorter life. A well machined rotor will look like this...
If you see ANY kind of pattern on the rotor face, get it replaced by the shop. If it doesn't have a smooth, consistent finish, have them replace it. I have no patience for poorly trained techs so I hammer them!
If you are getting new rotors go with the better quality name brands and if possible match the manufacturer of your rotors and pads.
Brake fluid - You must replace it every 2years or 24K miles. Surprised? Most are and domestic car owners manual say not a word about it, but check your owners manuals and they will recommend every 1-2 years. Brake fluid is similar to motor oil in that it is designed to encapsulate the moisture and sediment in brake systems but it only has so much capacity to do so. As it ages the boiling point drops, deposits collect, and problems start becoming more expensive to correct. Flush and bleed the brakes after every other oil change and you'll avoid 70% of common brake issues. I recommend DOT 4 fluid or Castrol LMA fluid (low moisture absorbtion) as it has a higher temperature rating and is less suceptible to breakdown in high-performance use. The only down side to the LMA fluid is you need to change it more often as it won't encapsulate as much moisture.
Wheel cylinders - None of ourcars have these but If you have drum brakes on another car and over 15K miles on them I will bet the wheel cylinders are either leaking or sticking. I'll also bet alot of folks here think they are supposed to leak and operate just fine like that. THEY ARE NOT SUPPOSED TOO!! Wheel cylinders operate at far higher pressures than calipers just to open the return springs, much less stop the car. Peel back the dust boots on the ends and if you find any brake fluid at all (assembly grease is OK) go ahead and replace them. Often, wheel cylinders will blow their seal during a hard stop, squirt tiny amounts of fluid, then draw air into the lines when you release the pedal. This essentially renders rear drum brakes useless on a disc/drum car, overworking the fronts causing excessive heat, wear, and dramatically increased braking distances. It will also cause spongy brake pedals, more so on drum/drum cars. If you have the hardware off check to see if the cylinders move freely back and forth, about 1/4" of travel. If they stick, replace them, it's cheap insurance!
Hardware - Anytime you replace pads or shoes replace the caliper hardware and/or return springs as well. These items are cheap and allow the system components to slide and return properly. Worn caliper hardware will cause uneven pad wear from the leading-to-trailing ends. Worn return springs will cause heel-toe shoe wear (different wear in leading and trailing shoes). To lubricate the hardware do not use silicone-based lubes, use a proper brake grease.
Calipers - These are a stout pieces for around town driving and the dual piston units are fairly resistant to sediment binding when maintained properly. The most common problem afflicting calipers is sediment bind due to poor maintenance. The heat cycling calipers go through is staggering and the larger-bore calipers tend to "cook" the fluid under heavy use and flushing the fluid every 2 years max is essential to keep these working well. Binding is diagnosed through the pads, look for uneven wear, pitting (numerous small holes on the pad face), and scoring (the pads look like the surface of an old LP record). I would recommend rebuilding the ones on your car before getting remans, no matter how cheap they are. Why? Because your calipers have been in service recently, you know their history, and they haven't been sitting in a junkyard for who knows how long awaiting rebuild while exposed to the elements. It's also very inexpensive, about $8-12 per corner and all you'll need is some compressed air, a green scotch-brite pad, and some hydraulic assembly lube to rebuild them. You would probably be stunned if you opened a reman caliper for an older car. Many will have heavy corrosion pitting on the piston, scored bores, corrosion scarring, and heli-coiled line and bleeder threads. None of these conditions are acceptable your brakes shouldn't have these issues. I will post pictures of what I found on my car at the end of this, it will shock you!
So far we've covered what 95% of all brake repair entails and the items you'll typically look at and work with. Now, let's dig a little deeper!
In a previous life I had my own brake shop and then worked as a field technical consultant for Bendix training technicians. Hopefully this thread will help to get more of you checking your brakes and learning from my negligence!
So, without further delay let's start with the basics...
First and most importantly - USE THE HIGHEST QUALITY PARTS YOU CAN AFFORD!!! These are your brakes, the #1 safety feature of your car! If the car doesn't run, you won't die. If your brakes don't work you can get killed or injured or end-up killing or injuring someone else! Don't skimp on your brakes, this is not a place to cut corners! Also, if you do not have 100% confidence in your ability please be honest with yourself and let a professional handle the repairs on your brakes.
Brake pads - Unless you really intend on doing a lot of racing stick with OEM brake pad materials and use pads and rotors from the same company. Ceramics are touted as the be-all, end-all brake pads. Not so much... While they run cooler and create less dust they are much harder than organics and semi-metallic pads, they will often increase your braking distances, and are very hard on standard rotors. Ceramics were developed by European manufacturers for their heat resistance in high-speed braking, but the cars equipped with them also have what are known as "soft-rotors" that are designed to be replaced along with the pads. If you stick with OEM materials for rotors and pads and have a properly functioning brake system you'll be amazed at how powerful they are!
Brake rotors - Again, unless you are spending a lot of time on a racetrack you do not need to crazy with drilled, slotted, and zinc-washed rotors. If you old rotors are in decent shape and .015-.020"+ over minimum spec go ahead and have them machined by a QUALIFIED machinist using a rotor-turning machine. I say qualified because so few really know what they are doing. Watch the machinists with your rotors, if he/she just bolts them up and starts cutting... RUN! If the tech doesn't spend a few minutes turning the mounting cups a quarter turn at a time, checking for true.. RUN! If you hear the machine humming while you rotor is on there have them replace it with a new one as they've screwed your rotor. There may be room for another cut but they have proven they can't do it right, and your rotor now has 20-30k miles shorter life. A well machined rotor will look like this...

If you see ANY kind of pattern on the rotor face, get it replaced by the shop. If it doesn't have a smooth, consistent finish, have them replace it. I have no patience for poorly trained techs so I hammer them!
If you are getting new rotors go with the better quality name brands and if possible match the manufacturer of your rotors and pads.
Brake fluid - You must replace it every 2years or 24K miles. Surprised? Most are and domestic car owners manual say not a word about it, but check your owners manuals and they will recommend every 1-2 years. Brake fluid is similar to motor oil in that it is designed to encapsulate the moisture and sediment in brake systems but it only has so much capacity to do so. As it ages the boiling point drops, deposits collect, and problems start becoming more expensive to correct. Flush and bleed the brakes after every other oil change and you'll avoid 70% of common brake issues. I recommend DOT 4 fluid or Castrol LMA fluid (low moisture absorbtion) as it has a higher temperature rating and is less suceptible to breakdown in high-performance use. The only down side to the LMA fluid is you need to change it more often as it won't encapsulate as much moisture.
Wheel cylinders - None of ourcars have these but If you have drum brakes on another car and over 15K miles on them I will bet the wheel cylinders are either leaking or sticking. I'll also bet alot of folks here think they are supposed to leak and operate just fine like that. THEY ARE NOT SUPPOSED TOO!! Wheel cylinders operate at far higher pressures than calipers just to open the return springs, much less stop the car. Peel back the dust boots on the ends and if you find any brake fluid at all (assembly grease is OK) go ahead and replace them. Often, wheel cylinders will blow their seal during a hard stop, squirt tiny amounts of fluid, then draw air into the lines when you release the pedal. This essentially renders rear drum brakes useless on a disc/drum car, overworking the fronts causing excessive heat, wear, and dramatically increased braking distances. It will also cause spongy brake pedals, more so on drum/drum cars. If you have the hardware off check to see if the cylinders move freely back and forth, about 1/4" of travel. If they stick, replace them, it's cheap insurance!
Hardware - Anytime you replace pads or shoes replace the caliper hardware and/or return springs as well. These items are cheap and allow the system components to slide and return properly. Worn caliper hardware will cause uneven pad wear from the leading-to-trailing ends. Worn return springs will cause heel-toe shoe wear (different wear in leading and trailing shoes). To lubricate the hardware do not use silicone-based lubes, use a proper brake grease.
Calipers - These are a stout pieces for around town driving and the dual piston units are fairly resistant to sediment binding when maintained properly. The most common problem afflicting calipers is sediment bind due to poor maintenance. The heat cycling calipers go through is staggering and the larger-bore calipers tend to "cook" the fluid under heavy use and flushing the fluid every 2 years max is essential to keep these working well. Binding is diagnosed through the pads, look for uneven wear, pitting (numerous small holes on the pad face), and scoring (the pads look like the surface of an old LP record). I would recommend rebuilding the ones on your car before getting remans, no matter how cheap they are. Why? Because your calipers have been in service recently, you know their history, and they haven't been sitting in a junkyard for who knows how long awaiting rebuild while exposed to the elements. It's also very inexpensive, about $8-12 per corner and all you'll need is some compressed air, a green scotch-brite pad, and some hydraulic assembly lube to rebuild them. You would probably be stunned if you opened a reman caliper for an older car. Many will have heavy corrosion pitting on the piston, scored bores, corrosion scarring, and heli-coiled line and bleeder threads. None of these conditions are acceptable your brakes shouldn't have these issues. I will post pictures of what I found on my car at the end of this, it will shock you!
So far we've covered what 95% of all brake repair entails and the items you'll typically look at and work with. Now, let's dig a little deeper!
Last edited by Murco; 10-02-13 at 07:51 AM.
 09-04-13, 07:40 AM
#2
MASTER CYLINDER - The master cylinder is the most important part of your car!!! Think about it, it's true!
Look inside your master cylinder reservoir for a moment and look at the fluid. Does it look like apple cider, tea, or coffee? It should be a golden clear color. If it's slightly darker (like tea) it's time for a change. If it's really dark (like coffee) and there is sediment at the bottom (wet black film) you have extensive seal deterioration and need a new master cylinder, PERIOD!
How about green fluid? Never seen it? Ask a neighbor who owns a 3 year-old ford if you can see his master cylinder. If he's like 90% of people, it's the OEM fluid and I'm willing to bet it's green! Green fluid indicates the copper in the brake fluid has started turning acidic from excessive moisture and is eating the brake-line inner coating and corroding them from the inside out. Fords do it quickly but after a dozen years or so I'll bet some of our board member's cars have this too.
Getting back to the blackened fluid - That film is particulates from the seals coming apart. Our master cylinders are made up of;
2 pistons (primary & secondary)
2 chambers (primary & secondary)
2 primary seals (named for pressure sealing, not location)
2-3 secondary seals (used for separation and sealing)
2 springs (primary & secondary piston return)
and a housing and reservior
If one of the secondary seals goes bad you will still have a decent pedal but your brakes will wear one or the other end much faster than the other. You can usually identify this problem when opening a master cylinder cap and finding one chamber lower than normal and the other near overflowing. Replace the master cylinder.
If one of the primary seals is dead you will still have brakes but with a low pedal and little stopping power. Replace the master cylinder.
If one or both of the springs are losing tension the pedal will return slowly and drag the brakes after you release pressure. Replace the master cylinder.
Also, consider replacement if you have headers and more than 100K miles on your master cylinder. The extra heat will damage the springs (heat-stress) and seals (hardening) inside the master. Our one advantage to cars is the relatively large expanse under our hoods so the exhaust heat isn't directly under the master cylinder.
ABS Pump/Module - There has only been one ABS unit in our 1st generation cars and fortunately they have been pretty good as far as reliability and maintenance. However, you don't want to have too replace one as the sticker on one of these bad-boys will make you cry! When you bleed your brakes don't forget to cycle the ABS and Traction Control pumps to get all of the fluid flushed through it. Other than that it's nothing you need to do much about for maintenance.
Got nasty fluid in the master or the ABS system? Guess what else needs replacement?!
Remember, gravity does it's thing with particulates too so when you find it in the master cylinder/prop valve/ABS unit you'll certainly find it in the calipers/wheel cylinders.
Going back to "buying the best products you can" for a moment - when replacing rotors go with the "better-name" options (Brembo, Raybestos, Wagner) and avoid the low-dollar options. The better branded brakes will have more cooling fins, more chromium to inhibit corrosion, and better machining with truer surfaces.
I actually had a Camaro come into my shop a few years ago with the customer saying, "I put brand new rotors and pads on a month ago and ever since the front end is wandering." It was an '89 IROC and had the low-end rotors from one of the big-name retail auto parts joints. After getting it in the air and removing the wheels we discovered a consistent layer of surface rust, the hub of these cheap rotors weren't machined properly and his wheels had been sitting about 1/8" off the hub surface the whole time!
I'm not saying go buy the wiz-bang drilled and slotted stuff, they look pretty but do nothing on a street vehicle except crack and create extra dust. Just get high-quality rotors and pads from the same manufacturer and you'll be quite happy.
09-04-13, 07:44 AM
#3
Diagnosis order of operations -
If you currently have a brake issue here is the order of diagnosis, and this applies almost universally in brake repair...
The first thing to do is make sure the bottom-end is good. The calipers (and wheel cylinders) aren't leaking, frozen, or full of sediment. If they check out the next thing to verify is that the fluid hoses and lines are in good shape. No bulges or kinks in the hoses (if they have inner wall damage you'll usually have a significant pull under braking), no crimps or breaks in the hard-lines, and no leaks.
If all the lower components check-out flush the system and have someone (a dealer if necessary) cycle the fluid out of the ABS pump (if so equipped) to make certain you have no air in the system - which will give you the same indications you asked about.
If after these have all been checked, the fluid fully flushed, and you still have the same symptoms check your booster and the vacuum going to it. If you have access to a vacuum gauge check the booster vacuum, it should read no less than 14 inches at steady idle. If lower than that check the hose and fittings for cracks or leaks. You can use a can of starter fluid, just as you would a manifold or carb leak, running a spray along the length of the line listening for an RPM rise.
If you have good vacuum and feeder hose/fittings then have someone push the brakes with the engine idling, listen for the sound of a consistent air leak while they hold the pedal down - it's obvious when you hear it, a "whooshing" sound that continues while the pedal is held down.
As I said earlier, diagnostics starts at the bottom and you need to work your way up in the system. If you've followed these steps in order (which even if having the flushing done at a dealership should be well under $100 so far) and still have a weak pedal it is likely that the master cylinder is done. Now let's make certain!
Remove the master cylinder, using proper fitting wrenches for the lines, drain it, and clamp it securely in a bench vise. Put bleeding caps with tubes on the outlets (your local auto parts store should have some), refill the reservoir, and slowly push and release the plunger at the back using a screwdriver with the bleeder hoses in the fluid reservoir. Continue the push and release until the bubbles stop coming out of the hoses so you'll know the master is air-free, then remove and replace the bleeder cap with a block-off cap on the rear outlet and attempt to push the plunger again. If it's solid and won't move the primary side is good. Return the bleeder cap and hose to the rear and place the block-off cap on the front outlet and try to push the plunger again, You should be able to move it a little but maybe only a half stroke compared to when you were bleeding both outlets.
If you should go through these steps and haven't found an issue feel free to PM me and we'll start really digging.
09-04-13, 07:46 AM
#4
After reading all of this, even if you don't do the repairs yourself, at least you have the knowledge to ask questions and sift-through any BS thrown at you and that's the whole point if this thread. I'm a brake geek (a geek in many ways) and trying to diagnose something without being there and doing all the things I'd do instinctively is tough so I won't pretend to be able to fix all issues with a brake system through forum posts. However, I am happy to provide all the expertise I have so that when you get into it yourself, or have it done elsewhere, you'll have the information you need to spend your time and money wisely.
I'll post the source of my embarrassment soon!!!
I'll post the source of my embarrassment soon!!!
 09-04-13, 10:59 AM
#6
I mentioned that my brakes didn't feel quite right and it had progressively gotten worse. Well, in my defense I will mention that the brakes are spectacular when 100% and that built-in goodness can mask certain defects. Let that be a heads-up for you to check your brakes out thoroughly!
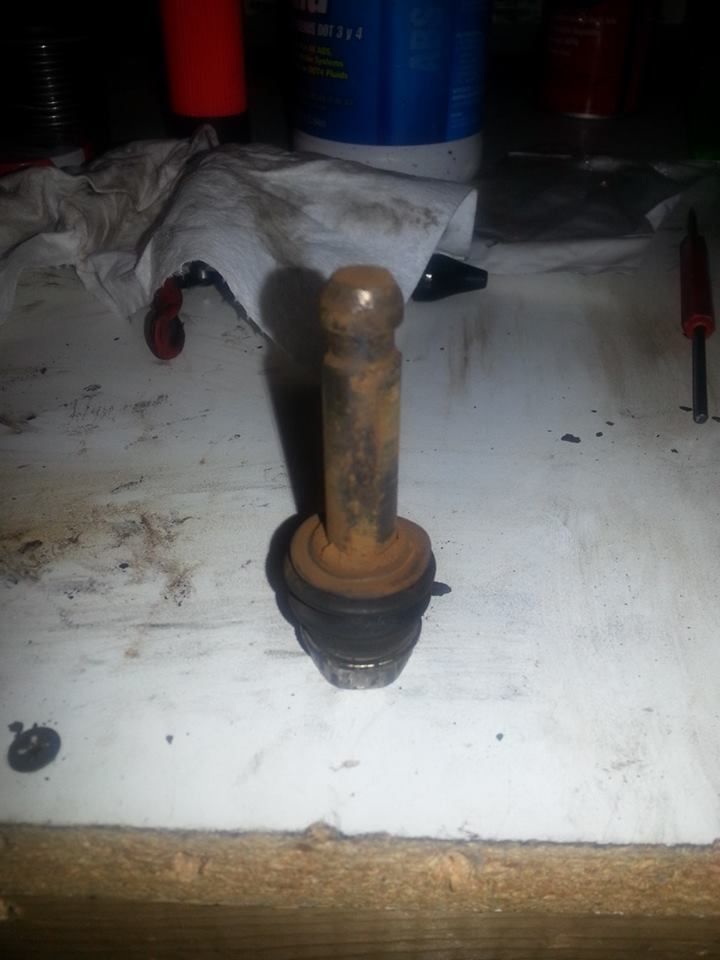
Upon disassembly the first issue I found was 3 rusted-frozen slider pins and the rest had lost all lubrication and bushings. This is what allows your calipers to compensate for rotor run-out and wear, but when the pins are frozen you'll end up with only the inner pad doing all the work.
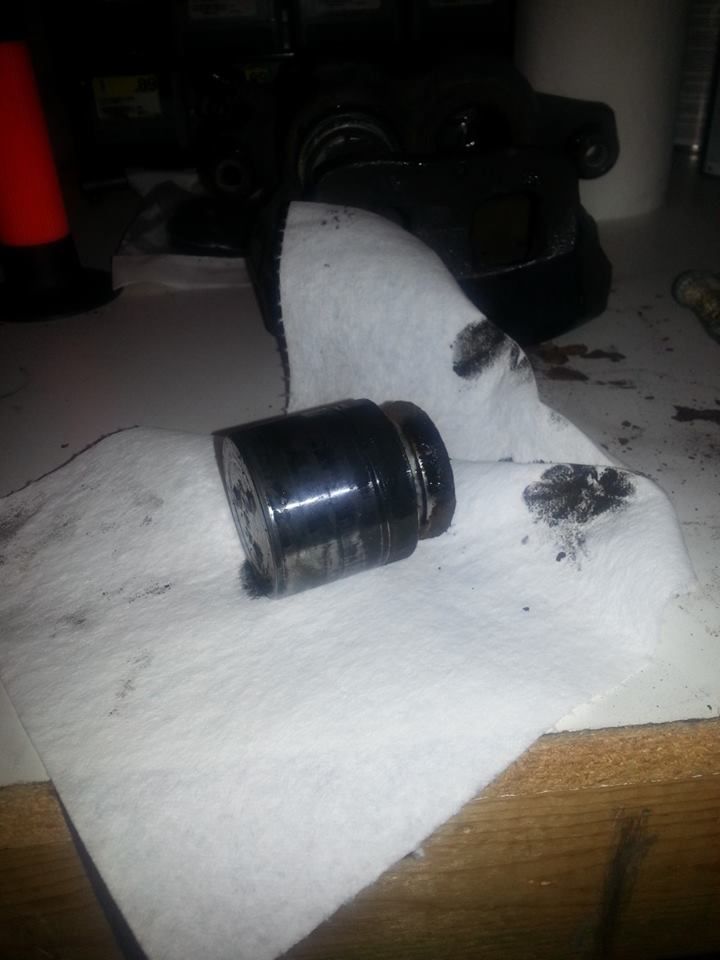
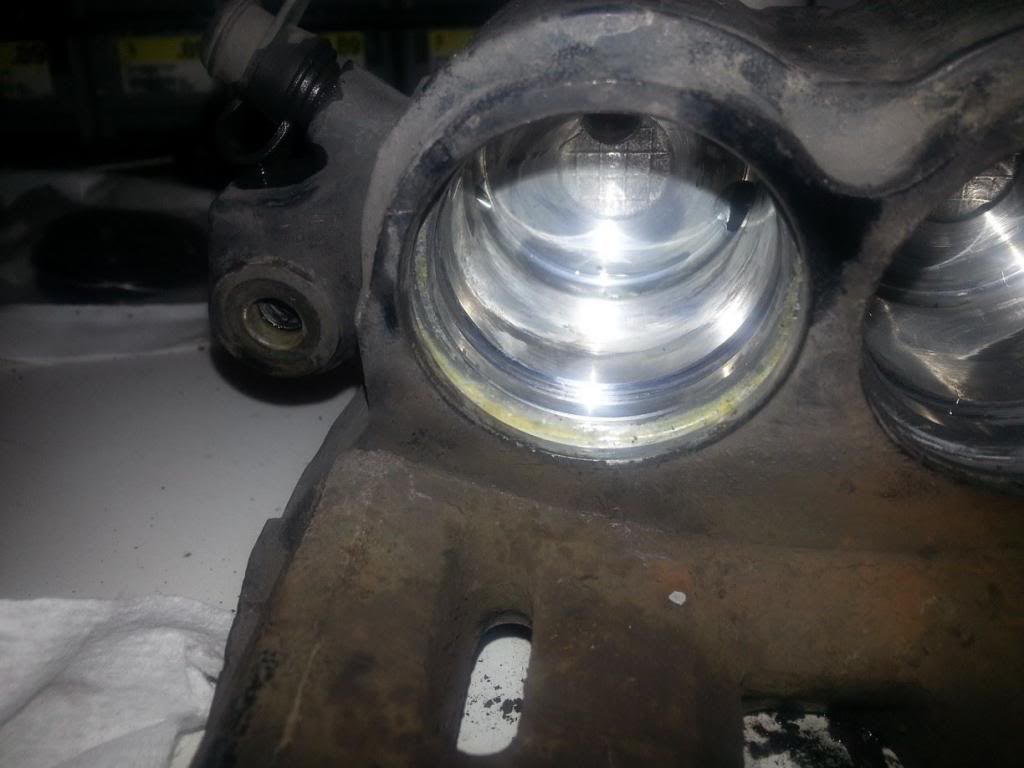
That overstresses the caliper, overheats the rotor face (causing cracks in my car's case), eats up the pad, overheats the caliper seals and in some cases can boil the brake fluid! Here is a piston that came out of my right-front caliper. Notice the sediment, corrosion line, and blackened fluid?
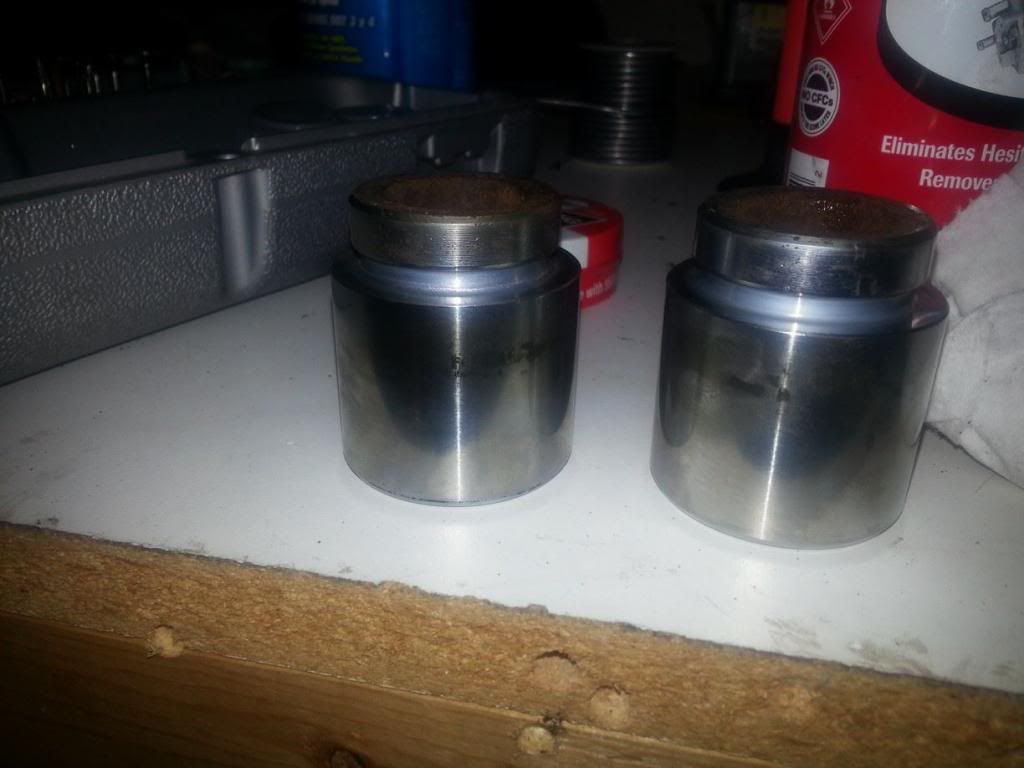
Here are both of the front pistons from the right front. They were remanufactured at some point and after clean-up you could see the pitting from when they were sitting in the junkyard awaiting a new life. This shiny surface had rust on it but that didn't stop the companies quality control department from reusing it! So this porous area has been acting like sand-paper, chewing up the seal with every pedal push and the seal material came out with the fluid as I drained the caliper. THIS IS WHY I TRY TO NEVER USE REBUILT CALIPERS!
Here is the caliper they came out of. Notice the white grease in the boot groove? A sure sign of a rebuilt unit. Now notice the bores! This calipers bores where corroded at one point and have been resurfaced, and you can see the difference surfaces! This caliper is no good so I will chuck it asap and I am looking for a fresh junkyard car to come in.
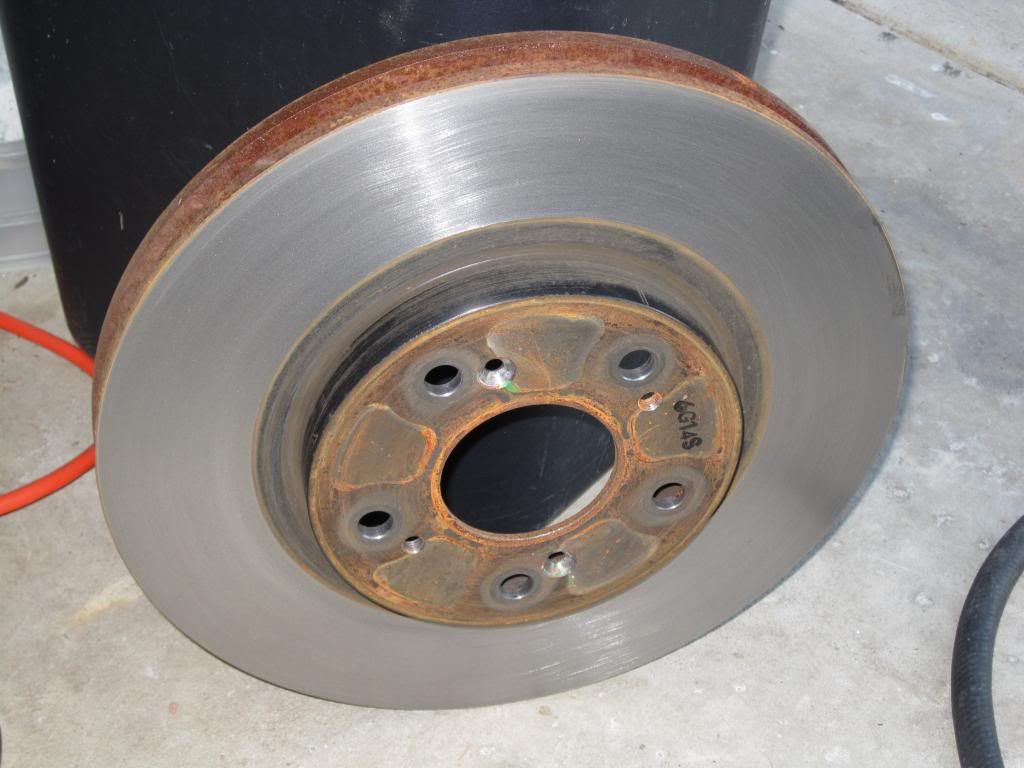
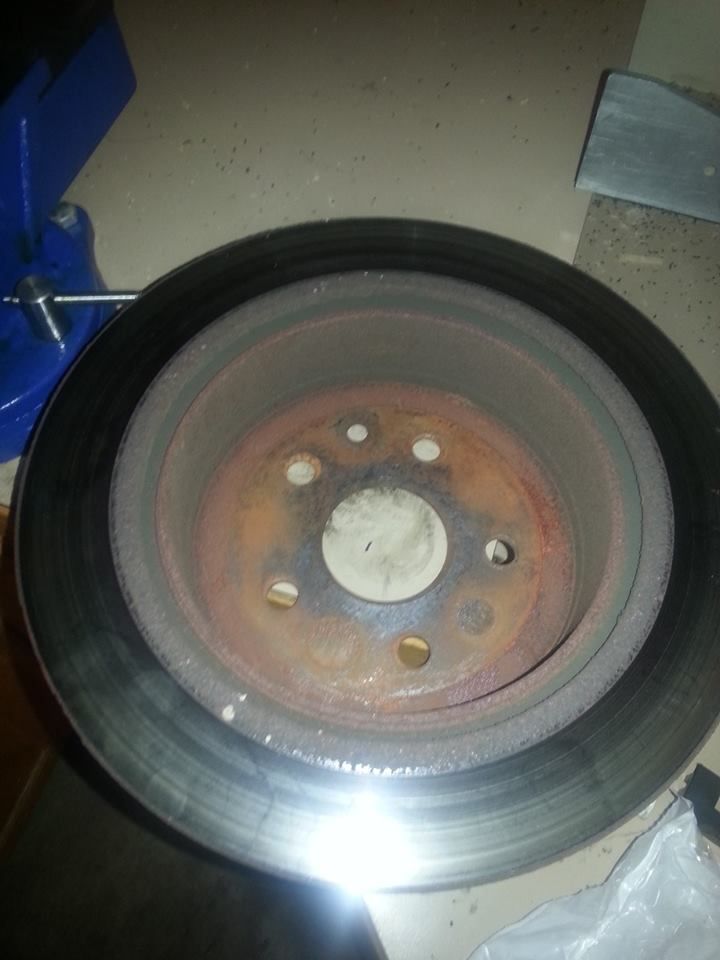
And here is the end result. From the outside, looking between the wheel spokes, the rotors looked fine! I promise! But take them off and it's a different story! Notice the radial heat-stress cracks!!!
In doing the brake work I didn't get a pic of the fluid (which was DARK GREEN, nearly BLACK) or several other issues I found, mostly because I didn't want to get brake fluid on my new Galaxy!
Let this be a warning, check out your brakes!
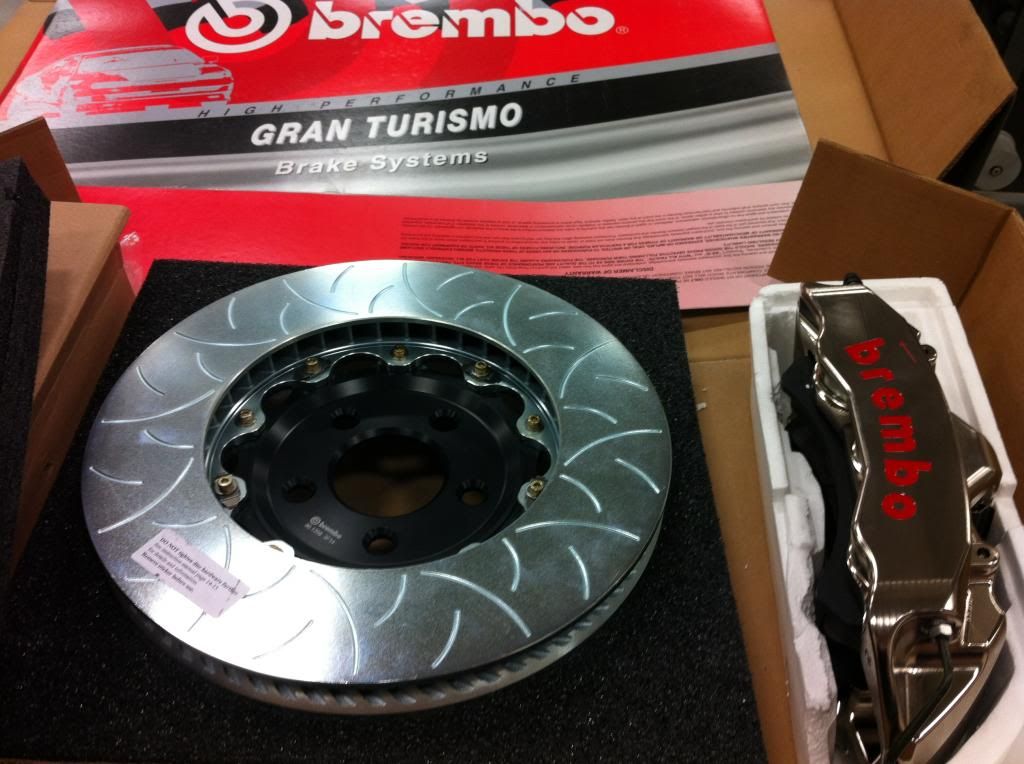
Now, for hanging with me through the dry, semi-boring OEM brake stuff I'll post an eye-candy pic of the baddest-assed brakes available!
Upon disassembly the first issue I found was 3 rusted-frozen slider pins and the rest had lost all lubrication and bushings. This is what allows your calipers to compensate for rotor run-out and wear, but when the pins are frozen you'll end up with only the inner pad doing all the work.

That overstresses the caliper, overheats the rotor face (causing cracks in my car's case), eats up the pad, overheats the caliper seals and in some cases can boil the brake fluid! Here is a piston that came out of my right-front caliper. Notice the sediment, corrosion line, and blackened fluid?

Here are both of the front pistons from the right front. They were remanufactured at some point and after clean-up you could see the pitting from when they were sitting in the junkyard awaiting a new life. This shiny surface had rust on it but that didn't stop the companies quality control department from reusing it! So this porous area has been acting like sand-paper, chewing up the seal with every pedal push and the seal material came out with the fluid as I drained the caliper. THIS IS WHY I TRY TO NEVER USE REBUILT CALIPERS!

Here is the caliper they came out of. Notice the white grease in the boot groove? A sure sign of a rebuilt unit. Now notice the bores! This calipers bores where corroded at one point and have been resurfaced, and you can see the difference surfaces! This caliper is no good so I will chuck it asap and I am looking for a fresh junkyard car to come in.

And here is the end result. From the outside, looking between the wheel spokes, the rotors looked fine! I promise! But take them off and it's a different story! Notice the radial heat-stress cracks!!!

In doing the brake work I didn't get a pic of the fluid (which was DARK GREEN, nearly BLACK) or several other issues I found, mostly because I didn't want to get brake fluid on my new Galaxy!
Let this be a warning, check out your brakes!
Now, for hanging with me through the dry, semi-boring OEM brake stuff I'll post an eye-candy pic of the baddest-assed brakes available!
 09-04-13, 11:11 AM
#7
I found this thread to answer all the in's and out's of the complex ABS and TRAC systems on my 1992 car. The fluid was really nasty in there which makes me amazed that they still work!
Trending Topics
09-07-13, 08:49 PM
#8
my brakes are sticking a little bit, and they are showing signs of uneven wear, this is after replacing all rotors and brake pads, what do u think is the cause of this?
perhaps they need to be rebuilt? if so do u know where I can buy the parts to rebuild them?
Thanks
perhaps they need to be rebuilt? if so do u know where I can buy the parts to rebuild them?
Thanks
09-17-13, 02:49 PM
#9
The corroded pin I had a picture of, that is likely the culprit. Get new ones AND the boots, bushings, Moly brake grease and an afternoon to install them all. Use a drill to get the crap out of the caliper brackets, where the pins slide in, and make sure to note which pins have the bushings.
Last edited by Murco; 09-24-13 at 12:52 PM.
09-20-13, 05:59 PM
#10
I am trying to make my 93 SC400 as light as possible and am considering removing the ABS and TRAC system and reconnecting the lines or having new lines made. Whats your opinion. I also would appreciate the loss of the parts under the master cyl.
09-24-13, 12:41 PM
#11
I haven't taken the time and traced the routing of the lines but I don't see why this wouldn't be a relatively easy proposition, if you are good at line bending, flaring, have the tools and know where to get the proper fittings. What I don't know is if our cars have a prop valve? If so, that would be a good point to route the new lines in and connect to the existing system. If not, well, a new adjustable prop-valve (I hate those for street cars, just sayin') can serve the same purpose. Other things to consider, you may need to use a different master cylinder (non ABS/TRAC car) and be careful to use proper precautions with the pressurized canister under the master cylinder. It's under enough pressure to really hurt you!
09-29-13, 08:46 AM
#12
Driver
Join Date: Sep 2013
Location: NY
Posts: 185
Likes: 0
Received 0 Likes
on
0 Posts
thanks for the info my left front is also sticking on my 93 300, a slight pull to the right under heavy braking. i had the mechanic bleed the brakes and all 3 had fluid come out right away but that front left didnt. had to pump brake to get it going, it went but still pulls right. he even said the fluid is dark. can i just open up the lines and let all the fluid run out and just put new fluid in, any recomendation of something i can do to get all the old fluid out. i know i need new pads in about 3k miles. just trying to do regular maintenance that wont break the bank so i can get good pads later.
09-29-13, 10:02 AM
#13
Thanks for all the info. My brakes have to much play in the pedal and are kind of weak. So far I have just flushed the fluid started with the wheel farthest from the master cyclinder to the closest. The car has 115k and the fluid was pretty dark like coffee : sad: I'm hoping the cylinder isn't toast.
09-29-13, 10:05 AM
#14
Also I was going to add a lot of people seem to be switching the ls400 calipers and rotors would you recommend this? What is a good set of pad and rotors that aren't the cheapest in the world but won't 'brake' the bank?
