Polyurethane diff bushing diy (mini version)
 06-25-13, 09:32 PM
#1
I finally got around to installing my polyurethane diff bushings in my gs300 today and I forgot how much of a difference this makes!
Big shout out to the boys at MAS performance for the use of the shop and btw they sell and install these and just happen to have a nasty 9 second sc300 on a stock long block!
Diff clunk is gone and the car feels way more connected to the road also spins the tires much more easy now.
Now on to the how to.....
1st raise the car in the air then unbolt the mufflers and the rear diff mounts (3 12 mm allen bolts) and the 2 ear mount bolts (17mm) then lower the diff down about 3-4 inches just enough to get an air chisel in there to chisel out the old soft rubber bushings which should take about 5-10 mns to do
Then you need to get them on the ground and burn out the center dowel to re use in the polyurethane bushings,
Next install the center dowel in the polyurethane bushings then coat them in wd40 and hand press them together in the diff ear then put the round donut looking piece on top of the ear along with the stainless washer on top of that and it will center with the bolt so just bolt everything up in the reverse of how you took it out
Also no need to pull the diff out of the car and takes about 2 hours from start to finish with the right tools in a shop and can be done on the ground but will take longer but doable none the less.
This how it looks installed ....
 Uploaded with ImageShack.com
 Uploaded with ImageShack.com
 Uploaded with ImageShack.com
 Uploaded with ImageShack.com
 Uploaded with ImageShack.com
 Uploaded with ImageShack.com
 Uploaded with ImageShack.com
Big shout out to the boys at MAS performance for the use of the shop and btw they sell and install these and just happen to have a nasty 9 second sc300 on a stock long block!
Diff clunk is gone and the car feels way more connected to the road also spins the tires much more easy now.
Now on to the how to.....
1st raise the car in the air then unbolt the mufflers and the rear diff mounts (3 12 mm allen bolts) and the 2 ear mount bolts (17mm) then lower the diff down about 3-4 inches just enough to get an air chisel in there to chisel out the old soft rubber bushings which should take about 5-10 mns to do
Then you need to get them on the ground and burn out the center dowel to re use in the polyurethane bushings,
Next install the center dowel in the polyurethane bushings then coat them in wd40 and hand press them together in the diff ear then put the round donut looking piece on top of the ear along with the stainless washer on top of that and it will center with the bolt so just bolt everything up in the reverse of how you took it out
Also no need to pull the diff out of the car and takes about 2 hours from start to finish with the right tools in a shop and can be done on the ground but will take longer but doable none the less.
This how it looks installed ....
Uploaded with ImageShack.comUploaded with ImageShack.comUploaded with ImageShack.comUploaded with ImageShack.comUploaded with ImageShack.comUploaded with ImageShack.comUploaded with ImageShack.com


 06-26-13, 08:21 PM
#4
Figured I'd chip in for others wondering about the sleeve/burning process...
This is the OEM diff ear mount when removed (air chiseled OR hammer & big dull flathead)
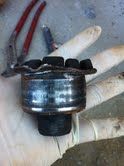
I used a torch to light them up *Do at your own risk* I assume you know it's fire & what it can do

Here is a quick vid below of it in action burning up. Just give it a few mins to get burnt down to the sleeve core. *WEAR PROTECTIVE GLOVES OBVIOUSLY* Very easy to scrape of the melted remaining rubber with a big flathead. *TIP* Use a big foil baking tray to not dirty your garage/driveway Water container handy might be a good idea or as I did, used the snow 
This is what it looks like burnt w/o the oem rubber

Here is the final product of what you want. After cooling of, I rubbed a semi coarse sandpaper over it Just slip in the sleeve and re-install 
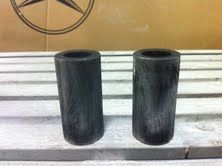
Kit has the poly bushings (4 pc) and new washers for the sandwich fit.
Now I have installed these on my SC (GTE swapped) and I have the solid Titan versions on one of my Supras. ALL these rear ends bolt up the SAME so install/remove are identical. They both make a drastic difference and reduces some of the wheel hop (especially manuals) associated not forgetting the clunk at times . Take a normal spin round the block before you nail it making sure things are cool. The poly's are very streetable with no NVH to report and you will still feel like you're in a sweet Lexus
-Rik
This is the OEM diff ear mount when removed (air chiseled OR hammer & big dull flathead)
I used a torch to light them up *Do at your own risk* I assume you know it's fire & what it can do
Here is a quick vid below of it in action burning up. Just give it a few mins to get burnt down to the sleeve core. *WEAR PROTECTIVE GLOVES OBVIOUSLY* Very easy to scrape of the melted remaining rubber with a big flathead. *TIP* Use a big foil baking tray to not dirty your garage/driveway
Water container handy might be a good idea or as I did, used the snow This is what it looks like burnt w/o the oem rubber
Here is the final product of what you want. After cooling of, I rubbed a semi coarse sandpaper over it
Just slip in the sleeve and re-install Kit has the poly bushings (4 pc) and new washers for the sandwich fit.
Now I have installed these on my SC (GTE swapped) and I have the solid Titan versions on one of my Supras. ALL these rear ends bolt up the SAME so install/remove are identical. They both make a drastic difference and reduces some of the wheel hop (especially manuals) associated not forgetting the clunk at times . Take a normal spin round the block before you nail it making sure things are cool. The poly's are very streetable with no NVH to report and you will still feel like you're in a sweet Lexus
-Rik
06-26-13, 09:27 PM
#5
I run them in my supra and had them in my sc400 and now my gs300 so even stock cars can gain a major improvement with them
Thanks RikTT for picking up the parts I forgot to take pics of so hopefully this can help people in the future who install these.


Thread
Thread Starter
Forum
Replies
Last Post
Eurofreak
IS F (2008-2014)
24
04-24-19 02:43 PM