DIY Rear Camber Bolt/Knuckle Bushing
 03-14-10, 08:44 PM
#1
Driver School Candidate
Thread Starter

Join Date: Jun 2009
Location: Ca
Posts: 31
Likes: 0
Received 0 Likes
on
0 Posts
Brief history: my 2003 GS300 has worn out bushings at both ends. We all know about the Daizens for the front and Adus(mybushings.com) for the rear.
But I found I had verticle movement of the whole rear knuckle/spindle that wasn't due to the failure of the rubber bushings. My problem was with the bushing that the camber bolt goes thru, where the outer end of the lower control arm connects to the knuckle. I looked everywhere for a replacement and couldn't find one, which seemed odd since they make all the others. Well, it turns out the reason why they don't is because it's not rubber, it's what's called a pillow bushing, all metal and moves somewhat like a ball joint. There are after market racing parts but they have ball bearings in them and are very expensive. Luckily I stumbled on a Ebay auction in England that was selling a nylon replacement. I talked to Martin at cheaptoyotaparts@live.co.ukHe said he's installed over 200 of these and never had a problem. His personal car has 40,000 miles on the bushing and has no movement or wear. These are a solid nylon bushings with an inner metal sleeve that looks like they were hand turned on a lathe. I was concerned that they wouldn't offer the movement of the originals and that they might affect the ride. Martin said not to worry. The reason the originals are made of metal and not rubber is because they're not suppose to move. All they due is provide a housing for the camber bolt and a hinge point between the knuckle and the lower arm. The ride quality is determined by the rubber bushing at the other end of the lower arm. In fact, he said for 2 wheel steering systems there's no need for a pillow bushing. He believes that Toyota put them in so they could use the same knuckle for 2 wheel and 4 wheel steering. And by the way, these will not work on 4 wheel steering systems because of that. He is developing a bushing for 4 wheel systems and should have it soon. It cost me $180 for 2 bushings shipped to the US and it took less than a week. The dealer price for 2 new knuckles was $500 and a lot of labor to replace them. This install took me an hour for the first side and 30 minutes for the second side after I became experienced. Here's how.
1.
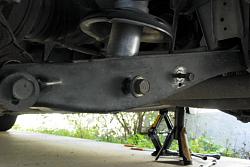
Put your car up on jacks and remove the wheels. Martin suggested removing the brake caliper for added room but I noticed I had plenty of room and didn't have to. Some parts diagrams show a rear suspension cover, which is only a plastic shield. Mine didn't have that but if yours does take it off. It's just a couple of bolts. Next, mark the postion of the camber setting with a little white paint on the bolt and the lower arm so you can reallign them later. Next, remove 3 bolts, they all go thru the lower control arm, the sway bar bolt, the lower shoock absorber bolt and the camber bolt.
2.
You'll need to pull the lower arm down a litttle to keep it out of the way. I used a piece of wood wedged between the arm and the sway bar.

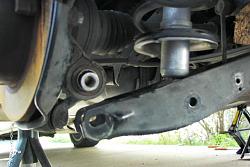
Next, pull the rubber dust caps off each end of the bushing we're replacing. Once they're off you can grab each end of the bushing between your thumb and forefinger and feel for verticle movement. If there is none, then stop. That's not your problem, could be wheel bearings or the hub. Mine had enough to clunk when I moved it up and down. Check out the 3rd pic. That's what it should look like.
Now Martin suggested taking a 1-1/4 in., 1/2 in. drive, socket and using that to tap out the old bushing. He also said it helps to take a 1/2 in. X 5 in. carriage bolt and run it thru the socket and the bushing and putting a washer and nut on the other end and tighten them up just enough to hold everything together. Check out pic. 4 and see how they go together with the new bushing.
This worked great and keeps everything from sliding around and prevents smashed fingers. Just make sure that the socket is riding on the bushing and not on the knuckle. At this point he just keeps hitting that socket until the bushing pops out. The first 1/4 in. is the hardest, you gotta whack it pretty good and then it gets easier as you see it coming out the other end of the knuckle. But, before I did this I added my own twist. First, I don't like whacking anything on my car, especially around wheel bearings. So, I cut a piece of wood the fit between the knuckle and the inner fender to act as a brace. The end against the knuckle was square and the other end was angled to fit inside the fender. Obviously you don't want to push it up against soft sheet metal. (oops, looks like I'm only allowed 5 pics(files) so I'll start a second thread and continue.........
But I found I had verticle movement of the whole rear knuckle/spindle that wasn't due to the failure of the rubber bushings. My problem was with the bushing that the camber bolt goes thru, where the outer end of the lower control arm connects to the knuckle. I looked everywhere for a replacement and couldn't find one, which seemed odd since they make all the others. Well, it turns out the reason why they don't is because it's not rubber, it's what's called a pillow bushing, all metal and moves somewhat like a ball joint. There are after market racing parts but they have ball bearings in them and are very expensive. Luckily I stumbled on a Ebay auction in England that was selling a nylon replacement. I talked to Martin at cheaptoyotaparts@live.co.ukHe said he's installed over 200 of these and never had a problem. His personal car has 40,000 miles on the bushing and has no movement or wear. These are a solid nylon bushings with an inner metal sleeve that looks like they were hand turned on a lathe. I was concerned that they wouldn't offer the movement of the originals and that they might affect the ride. Martin said not to worry. The reason the originals are made of metal and not rubber is because they're not suppose to move. All they due is provide a housing for the camber bolt and a hinge point between the knuckle and the lower arm. The ride quality is determined by the rubber bushing at the other end of the lower arm. In fact, he said for 2 wheel steering systems there's no need for a pillow bushing. He believes that Toyota put them in so they could use the same knuckle for 2 wheel and 4 wheel steering. And by the way, these will not work on 4 wheel steering systems because of that. He is developing a bushing for 4 wheel systems and should have it soon. It cost me $180 for 2 bushings shipped to the US and it took less than a week. The dealer price for 2 new knuckles was $500 and a lot of labor to replace them. This install took me an hour for the first side and 30 minutes for the second side after I became experienced. Here's how.
1.
Put your car up on jacks and remove the wheels. Martin suggested removing the brake caliper for added room but I noticed I had plenty of room and didn't have to. Some parts diagrams show a rear suspension cover, which is only a plastic shield. Mine didn't have that but if yours does take it off. It's just a couple of bolts. Next, mark the postion of the camber setting with a little white paint on the bolt and the lower arm so you can reallign them later. Next, remove 3 bolts, they all go thru the lower control arm, the sway bar bolt, the lower shoock absorber bolt and the camber bolt.

2.
You'll need to pull the lower arm down a litttle to keep it out of the way. I used a piece of wood wedged between the arm and the sway bar.

Next, pull the rubber dust caps off each end of the bushing we're replacing. Once they're off you can grab each end of the bushing between your thumb and forefinger and feel for verticle movement. If there is none, then stop. That's not your problem, could be wheel bearings or the hub. Mine had enough to clunk when I moved it up and down. Check out the 3rd pic. That's what it should look like.

Now Martin suggested taking a 1-1/4 in., 1/2 in. drive, socket and using that to tap out the old bushing. He also said it helps to take a 1/2 in. X 5 in. carriage bolt and run it thru the socket and the bushing and putting a washer and nut on the other end and tighten them up just enough to hold everything together. Check out pic. 4 and see how they go together with the new bushing.
This worked great and keeps everything from sliding around and prevents smashed fingers. Just make sure that the socket is riding on the bushing and not on the knuckle. At this point he just keeps hitting that socket until the bushing pops out. The first 1/4 in. is the hardest, you gotta whack it pretty good and then it gets easier as you see it coming out the other end of the knuckle. But, before I did this I added my own twist. First, I don't like whacking anything on my car, especially around wheel bearings. So, I cut a piece of wood the fit between the knuckle and the inner fender to act as a brace. The end against the knuckle was square and the other end was angled to fit inside the fender. Obviously you don't want to push it up against soft sheet metal. (oops, looks like I'm only allowed 5 pics(files) so I'll start a second thread and continue.........
 03-14-10, 09:28 PM
#2
Driver School Candidate
Thread Starter
Join Date: Jun 2009
Location: Ca
Posts: 31
Likes: 0
Received 0 Likes
on
0 Posts


The other thing I did is add a little heat on the knuckle, around the bushing with a small propane torch. Martin said it wasn't necessary but it was cold here this morning and I wanted it to pop out as easily as possible. Just be VERY careful that you don't get the flame near any rubber parts or anything flammable, especially the gas tank. And then I whacked it. Took about 20 hits with the hammer but it came out. I'm sure the wooden brace helped alot.

3.
Next, again I was told this wasn't necessary but I did put just a little chassis grease inside the knuckle where the new bushing will go to make things slide eaiser. Martin says he uses the same bolt and socket to tap the new one in, which I did. But I tapped too hard or too long and drove it too far inside. If you look at the new bushings it's wider than the opening in the knuckle. It should extend an equal amount on both sides. Eyeballing it is sufficient. So I disconnected the trailing arm (strut rod) and tried to tap it back from the other side. But that didn't work becuase there wasn't enough room to take a good whack with the hammer. So, I bought a cheap 2-1/8 in. hole saw and used that and the bolt and a 3/4 in. washer(to fit over the sleeve and shoulder of the new bushing) and cranked down on the nut touse it like a press and press the new bushing in. This worked great, no pounding and I could be very precise.

4.
Once it's in just reattach everything. I did the sway bar first, the shock second and the camber bolt last. Now, all the bolt holes may take some jiggling and pushing to line up properly but if they're way off I insert a phillips screwdriver from the opposite side to the side I want to start the bolt thru and you can use that to leverage the arm to line up the holes. And once they're started the rest is usually easy. Just don't get a bolt started and smack it with a hammer, you may strip the treads on it. Use a little more leverage and gentle taps usually get it done. When you're ready to slide the camber bolt in it helps to put a little jack under the control arm and raise it until the hole lines up. Make sure you turn the camber bolt until your markings line up and you're just about done. When you do reattach everything don't tighten the bolts to maximum torque settings, just enough to hold together. All the repair manuals say to "load" the suspension before you crank it down. The easiest way is to put a floor jack under the control arm where the shock sits and raise it 4 or 5 inches. This simulates the car resting on it's suspension. Then tighten everything as much as your suppose to and you're done.

After I replaced these I immediately noticed the clunking when I back out of my driveway was gone. Also, the rear end seems to follow a tighter radius when I take a turn. It doesn't seem to lag behind. Feels great. And as I was told, it didn't affect the ride. I hope this helps.
03-15-10, 01:10 AM
#3

u might wanna have a mod change your title...think u meant to type DIY not DIT. and why make 2 separate threads instead of combining them into one? u coulda just made your first post and then posted a response on it
creative way to remove the bushing, i will say though
creative way to remove the bushing, i will say though
 03-15-10, 09:33 AM
#6
Driver School Candidate
Thread Starter
Join Date: Jun 2009
Location: Ca
Posts: 31
Likes: 0
Received 0 Likes
on
0 Posts
Thanks for merging the threads. I was only allowed to post 5 pics per thread, so that's why I had 2 threads. If anyone needs the part email Martin at cheaptoyotaparts@live.co.uk Tell him you want the knuckle bushing for the camber bolt. Here's his Ebay auction http://cgi.ebay.co.uk/ws/eBayISAPI.d...m=190378974300
Last edited by moetheshmo; 03-15-10 at 09:36 AM. Reason: forgot link
03-17-10, 01:33 AM
#7
Driver School Candidate

Join Date: Sep 2008
Location: Kazakhstan
Posts: 39
Likes: 0
Received 0 Likes
on
0 Posts
Great DIY.
Let me put my two cents in.
I have replaced knuckle pillow bushing with regular one made from rubber year ago. It seems that ride control is worse on bad roads. Also I have noticed that rear wheels begin to stand angularly under load.
According to one of the forums, supra jza80's pillow bushings are acceptable with adaptor (http://tourerv.ru/forum/download/file.php?id=96196).
So, what do you think about it?
Trending Topics
03-18-10, 11:16 AM
#8
Driver School Candidate
Thread Starter
Join Date: Jun 2009
Location: Ca
Posts: 31
Likes: 0
Received 0 Likes
on
0 Posts
Interesting. As far as ride control I haven't noticed any changes, if anything it's better because I don't have the verticle play or "slop" I had with my old bushings. Looking at the wheels from the rear I don't see any change in the angle(I'm assuming you mean camber). Again, according to the guy I bought these from there is not suppose to be any play in that bushing, if there is then it wouldn't hold the camber settings, and that would affect the angle of the wheels. Now if you replaced a metal(pillow) bushing with rubber, then the rubber would squeeze or compress under load and that would change the camber settings. I'm going in for a 4 wheel alignment next week and I'm curious to see what the technician thinks. I'll let you know.
 02-13-11, 06:22 PM
#14
Driver

Join Date: Jan 2006
Location: MA
Posts: 129
Likes: 0
Received 0 Likes
on
0 Posts
Took a week and a day to receive. I spoke to my Lexus dealer and I'll have the bushings installed next Saturday (2/19/11). I'll let you know how things go. If it were warmer here in Boston, I'd probably do these myself.
Bushings look good....professional....well finished. The lead mechanic and I are interested to see how these fit. I'll have an alignment following the install and post my impressions.
best
dd
Bushings look good....professional....well finished. The lead mechanic and I are interested to see how these fit. I'll have an alignment following the install and post my impressions.
best
dd
02-19-11, 05:31 PM
#15
Driver
Join Date: Jan 2006
Location: MA
Posts: 129
Likes: 0
Received 0 Likes
on
0 Posts
...stock bolt, so the Lexus tech may have to bore the sleeve a little - not something I wanted the dealer to have to do. This is best done on a lathe or at a minimum, on a good drill press and I don't know what they'll be using. I sure hope they don't use a hand-held drill.
Also, the bushings slide into the hole too easily - one can move them in/out by hand, whereas the original bushings appeared to be press fit into the hole (although this could be because of age/time - there wasn't any sort of flange to hold the bushing in place.)
Lastly, once installed, since the bushing slides with ease, there is nothing to stop the suspension piece from moving in/out with the bushing. We're not sure that this is a legitimate concern and will figure this out when the alignment is performed and a road test completed.
I'm really getting terrific service from Dan at Northborough Lexus - I'm really impressed with his willingness to pursue this with me. I'll have some sort of final post tomorrow when this work is expected to be completed.
Fingers crossed :-)
dd