GS430 L-Tuned Suspension Install
 04-25-05, 09:55 AM
#1
Racer
Thread Starter
GS430 L-Tuned Suspension Install (my first cl post)
Car: 2001 GS430 with 60k miles at time of install.
Edit 20071109: The car now has 105k miles, 45k since the suspension upgrade. I've been very happy with the ride.
Edit 20081116: Up to 120k miles, 60k since upgrade, still a solid ride.
Edit 20091114: Up to 135k miles, 75k since upgrade, no complaints. Just did timing belt, water pump.
Edit 20110402: 148k miles, had to replace front springs with Eibachs; drivers side spring broke.
Edit 20130522: 165k miles. Car still awesome.
Edit 20140426: 175k miles. Replaced Radio lcd bulbs. CEL on, almost positive it's exhaust leak.
Edit 20150515: 180k miles. Wow it's been ten years since I did this. Exhaust patch welds and one O2 sensor fixed CEL. $300 total repair. LOVE this car. KBB value now $4200. Keeping forever.
Edit 20150515: I popped into this thread and found the images were broken a few weeks ago. They are working again, but here is the album on Imgur in case that happens again.
Edit 20170508: 191k miles. I sold it. What a ride...
People who've used this guide: Flossn, NoS, Stoner, Dukespeed, BlazenHazn (in part), joel5150, DaGunit, speedie, KANEDL25, denut-L, newgsman, [ant], MJImport, Emil. Responses and comments have been incorporated into this writeup.
Special thanks: I want to thank nsf0607 for featuring this DIY in his most awesome collection.
Things that have happened to me since I wrote this guide:
Met my wife
Moved to Philadelphia
Got a decent job
Proposed
Got a better job
Got married
Got promoted
Bought a house
Got a puppy
Had a daughter
Got another job
Got yet another job
Had a son
Bought a bigger house
Got yet another job
Sold this lovely car and bought a 2013 GS350 awd luxury w ml
Special tools
14mm deep socket (3/8" drive) for strut tower nuts ($4)
17mm impact socket (1/2" drive) for lower shock bolt ($8)
21mm impact socket (1/2" drive) for wheel nuts ($8)
Ampro T70570 Spring Compressor (Advanced Auto Parts, $30) -- can be driven with 21mm socket or directly with 1/2" drive
Pitman arm puller, adjustable (not necessary if not detaching upper suspension arm)
Safety goggles - for things that go pop
Best practices
Most of the nuts and bolts in the wheel well are exposed to a good deal of weather.
Use WD-40 on nuts/bolts before removing and a modicum of engine oil before reattaching.
Use big wrenches whenever possible and move things slowly.
Read the whole thread before beginning your project.
Don't be afraid to use the force or invoke antiquarian gods of workmanship.
Time
1 hour per side for fronts (first one took 1.25 hrs, second .75 hrs)
1.5 hours per side for the rear (first one took 2 hrs, second 1 hrs)
5 hours total.
Up in the Air and off with the Wheels
Secure the car with jack stands.
Bear in mind that the car will come down farther when finished.
FRONT
Torques
Lower shock bolt: 116 ftlbs (wow)
Upper suspension arm bolt: 64 ftlbs
Strut tower nuts: 41 ftlbs
Piston rod lock nut: 20 ftlbs
Stabilizer bar nut and bolt: 41 ftlbs
Remove ABS speed sensor wire bolts


NOTE: Speedie advises treating the ABS sensor wires as though they are tripwires for explosives. Breaking or damaging these lines can lead to expensive repairs.
There are two bolts, one on the wheel well, one on the shock, that guide the ABS speed sensor wire.
By removing both, the wire can be moved down and out of the way.
(The shop manual says to remove the ABS speed sensor and brake caliper. Neither is necessary.)
Detach upper suspension arm from steering knuckle
NOTE: Several people have said this is NOT necessary, that it is possible to slide the shock out with the steering knuckle still attached. Flossn did it by turning the wheel, avoiding stress on the brake line in the process. DoubleWhoosh suggested that if you do decide to detach this, leave the nut on the stud so that when the joint separates, it can't fall or otherwise detach violently, which is a really good idea; in addition, he suggests turning the wheels out when working on each side to reduce stress on the brake line.

Remove the pin. Remove the nut. Now it gets fun.
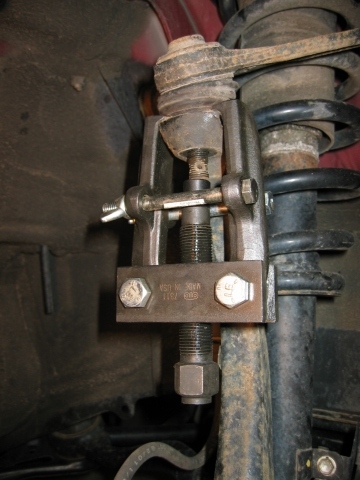

I used a pitman arm puller to press out the stud. You just turn it slowly...slowly...slowly...and then BANG! the stud releases.
The rotor and brake assembly now moves freely, supported only by the lower ball joint. Secure the assembly with string to avoid pressure on the ball joint and stress on the brake line. (Above picture was taken before using string; you can see the stress on the brake line.)
Detach stabilizer bar from stabilizer bar link
Remove the nut and the bolt (two separate attachments). Do this on both sides to allow the sway bar to fall and the bar link to be rotated down, allowing access to the lower shock bolt (see next picture).
Remove the front shock absorber
Hold the lower shock nut (19mm, facing rear) in place with a wrench and use a breaker bar to loosen the lower shock bolt (17mm, facing forward - use a 6-faced impact socket to avoid damage to the bolt). It's HARD; this is one of those great bolts that the car actually sits on. Remove the bolt, and the lower suspension arm will drop a little, leaving the strut free at the bottom.

Loosen the piston rod lock nut in the engine bay. DO NOT REMOVE IT; startling things will happen if you do.
Remove the three strut tower nuts (14mm deep socket) in the engine bay.
Remove the strut.
Disassemble the strut
Compress the springs until pressure on the top and bottom is relieved.
Remove the piston rod lock nut. It may still be under some pressure, which will prompt the assembly to pop apart, which can be fun (guard your *********).
Assemble the new strut
Compress the new L-Tuned spring. It's hard. You can only grab five rings, and you have to compress the whole spring from 13" to 10.25" total length, which will give you enough to build the new strut.
Assemble new strut and thread piston rod lock nut.

Aligning the assembly can be tricky. To ensure a perfect fit, loosen the spring compressors so the spring tightens but not so much you can no longer turn the tower bolt assembly against the spring. Put the shock absorber in the car; push the tower bolts up through their respective holes and secure it with one tower nut. Rotate the lower shock absorber AND spring together to align the shock with the shock absorber bracket. Once aligned, remove from the car and remove the spring compressors.
Install the shock absorber
Repeat for the other side
Stay tuned for Episode II: The Rear!
Car: 2001 GS430 with 60k miles at time of install.
Edit 20071109: The car now has 105k miles, 45k since the suspension upgrade. I've been very happy with the ride.
Edit 20081116: Up to 120k miles, 60k since upgrade, still a solid ride.
Edit 20091114: Up to 135k miles, 75k since upgrade, no complaints. Just did timing belt, water pump.
Edit 20110402: 148k miles, had to replace front springs with Eibachs; drivers side spring broke.
Edit 20130522: 165k miles. Car still awesome.
Edit 20140426: 175k miles. Replaced Radio lcd bulbs. CEL on, almost positive it's exhaust leak.
Edit 20150515: 180k miles. Wow it's been ten years since I did this. Exhaust patch welds and one O2 sensor fixed CEL. $300 total repair. LOVE this car. KBB value now $4200. Keeping forever.
Edit 20150515: I popped into this thread and found the images were broken a few weeks ago. They are working again, but here is the album on Imgur in case that happens again.
Edit 20170508: 191k miles. I sold it. What a ride...
People who've used this guide: Flossn, NoS, Stoner, Dukespeed, BlazenHazn (in part), joel5150, DaGunit, speedie, KANEDL25, denut-L, newgsman, [ant], MJImport, Emil. Responses and comments have been incorporated into this writeup.
Special thanks: I want to thank nsf0607 for featuring this DIY in his most awesome collection.
Things that have happened to me since I wrote this guide:
Met my wife
Moved to Philadelphia
Got a decent job
Proposed
Got a better job
Got married
Got promoted
Bought a house
Got a puppy
Had a daughter
Got another job
Got yet another job
Had a son
Bought a bigger house
Got yet another job
Sold this lovely car and bought a 2013 GS350 awd luxury w ml
Special tools
14mm deep socket (3/8" drive) for strut tower nuts ($4)
17mm impact socket (1/2" drive) for lower shock bolt ($8)
21mm impact socket (1/2" drive) for wheel nuts ($8)
Ampro T70570 Spring Compressor (Advanced Auto Parts, $30) -- can be driven with 21mm socket or directly with 1/2" drive
Pitman arm puller, adjustable (not necessary if not detaching upper suspension arm)
Safety goggles - for things that go pop
Best practices
Most of the nuts and bolts in the wheel well are exposed to a good deal of weather.
Use WD-40 on nuts/bolts before removing and a modicum of engine oil before reattaching.
Use big wrenches whenever possible and move things slowly.
Read the whole thread before beginning your project.
Don't be afraid to use the force or invoke antiquarian gods of workmanship.
Time
1 hour per side for fronts (first one took 1.25 hrs, second .75 hrs)
1.5 hours per side for the rear (first one took 2 hrs, second 1 hrs)
5 hours total.
Up in the Air and off with the Wheels
Secure the car with jack stands.
Bear in mind that the car will come down farther when finished.
FRONT
Torques
Lower shock bolt: 116 ftlbs (wow)
Upper suspension arm bolt: 64 ftlbs
Strut tower nuts: 41 ftlbs
Piston rod lock nut: 20 ftlbs
Stabilizer bar nut and bolt: 41 ftlbs
Remove ABS speed sensor wire bolts
NOTE: Speedie advises treating the ABS sensor wires as though they are tripwires for explosives. Breaking or damaging these lines can lead to expensive repairs.
There are two bolts, one on the wheel well, one on the shock, that guide the ABS speed sensor wire.
By removing both, the wire can be moved down and out of the way.
(The shop manual says to remove the ABS speed sensor and brake caliper. Neither is necessary.)
Detach upper suspension arm from steering knuckle
NOTE: Several people have said this is NOT necessary, that it is possible to slide the shock out with the steering knuckle still attached. Flossn did it by turning the wheel, avoiding stress on the brake line in the process. DoubleWhoosh suggested that if you do decide to detach this, leave the nut on the stud so that when the joint separates, it can't fall or otherwise detach violently, which is a really good idea; in addition, he suggests turning the wheels out when working on each side to reduce stress on the brake line.
Remove the pin. Remove the nut. Now it gets fun.
I used a pitman arm puller to press out the stud. You just turn it slowly...slowly...slowly...and then BANG! the stud releases.
The rotor and brake assembly now moves freely, supported only by the lower ball joint. Secure the assembly with string to avoid pressure on the ball joint and stress on the brake line. (Above picture was taken before using string; you can see the stress on the brake line.)
Detach stabilizer bar from stabilizer bar link
Remove the nut and the bolt (two separate attachments). Do this on both sides to allow the sway bar to fall and the bar link to be rotated down, allowing access to the lower shock bolt (see next picture).
Remove the front shock absorber
Hold the lower shock nut (19mm, facing rear) in place with a wrench and use a breaker bar to loosen the lower shock bolt (17mm, facing forward - use a 6-faced impact socket to avoid damage to the bolt). It's HARD; this is one of those great bolts that the car actually sits on. Remove the bolt, and the lower suspension arm will drop a little, leaving the strut free at the bottom.
Loosen the piston rod lock nut in the engine bay. DO NOT REMOVE IT; startling things will happen if you do.
Remove the three strut tower nuts (14mm deep socket) in the engine bay.
Remove the strut.
Disassemble the strut
Compress the springs until pressure on the top and bottom is relieved.
Remove the piston rod lock nut. It may still be under some pressure, which will prompt the assembly to pop apart, which can be fun (guard your *********).
Assemble the new strut
Compress the new L-Tuned spring. It's hard. You can only grab five rings, and you have to compress the whole spring from 13" to 10.25" total length, which will give you enough to build the new strut.
Assemble new strut and thread piston rod lock nut.
Aligning the assembly can be tricky. To ensure a perfect fit, loosen the spring compressors so the spring tightens but not so much you can no longer turn the tower bolt assembly against the spring. Put the shock absorber in the car; push the tower bolts up through their respective holes and secure it with one tower nut. Rotate the lower shock absorber AND spring together to align the shock with the shock absorber bracket. Once aligned, remove from the car and remove the spring compressors.
Install the shock absorber
Repeat for the other side
Stay tuned for Episode II: The Rear!
Last edited by jonathancl; 02-19-20 at 06:45 AM. Reason: update

 04-25-05, 11:32 AM
#3
Hey, I'm about to get my L-tuned shocks & springs installed. In order to do the rear, do all of the trunk panels have to come out or what? I know you have to take them out to get to the rear strut towers, but do the panels have to come out? Thanks!
04-25-05, 03:20 PM
#4
Lead Lap
Join Date: Sep 2002
Location: CA
Posts: 422
Likes: 0
Received 0 Likes
on
0 Posts
Nice write up. 
I was talking to my mechanic buddy about me doing this and he said since i've never done this before I should just pay to have it done (and i've pulled motors before, etc). Reason being if you don't press the ball joints back in correctly, it can mess a lot of things up. That with not being able to track down the proper tools (all I could find was the pitman fork and i've heard it's garbage for this job).
I've also read there is a better type of spring compressor for this but all i've been able to find is the one pictured. Other than that i have air tools, and everything i need. choices choices.
One part you didn't talk about was pressing the ball joint back in. Do you use the pitman press for that? i.e. install reverse of the removal?
Thanks for using pics, can't wait to see episode 2
04-25-05, 03:46 PM
#5
Lead Lap

Join Date: Feb 2001
Location: California
Posts: 681
Likes: 0
Received 0 Likes
on
0 Posts
sort of off topic but it seems like there are lots of rust on the suspension parts for a 01-up gs430 from the pics...has it been thru alot of snow or something or is that just how it looks like?
04-25-05, 05:37 PM
#6
Racer
Thread Starter
Originally Posted by davezaristo
sort of off topic but it seems like there are lots of rust on the suspension parts for a 01-up gs430 from the pics...has it been thru alot of snow or something or is that just how it looks like?

Trending Topics
04-25-05, 06:09 PM
#8
I just got a quote from my local dealer for the install. They're asking $484.00 with alignment. I think I'm gonna take that route. I think they've got less of a chance of messing it all up than I do. I think $484.00 is worth it. What do you guys think?
04-25-05, 06:16 PM
#9
Lexus Test Driver
Originally Posted by AUGuy21
I just got a quote from my local dealer for the install. They're asking $484.00 with alignment. I think I'm gonna take that route. I think they've got less of a chance of messing it all up than I do. I think $484.00 is worth it. What do you guys think?
04-26-05, 12:31 PM
#10
Racer
Thread Starter
REAR
Torques
Stabilizer bar link nut: 22 ftlbs
Lower shock absorber bolt: 81 ftlbs
Lower suspension arm nut: 81 ftlbs
Mid shock absorber bolts: 13 ftlbs
Strut tower nuts: 47 ftlbs
Piston rod lock nut: 20 ftlbs

Refer to this image for the stabilizer bar bolt, lower suspension arm bolt, and lower shock absorber bolt.
Remove stabilizer bar link bolt
Loosen nut and remove bolt.
Remove lower suspension arm bolt

Make match marks to allow easy realignment (even though you will need to have the car aligned anyway).
Remove the nut. Remove the bolt. There is pressure involved in this assembly. It may take a bit of pushing up and down on the rotor to relieve the pressure.
NOTE: when reinstalling, use a jack to raise the lower suspension arm and allow easy insertion of the suspension arm bolt.
Remove the lower shock absorber bolt
Loosen the nut. Remove the bolt. Again, this assembly is under pressure. Apply downward force on the lower suspension bar to relieve the pressure.
Loosen piston rod lock nut

Hold the rod in place and loosen the bolt. DO NOT REMOVE IT; startling things will happen if you do.
Remove strut tower nuts
Remove mid shock absorber nuts

Remove shock absorber
Disassemble the strut
This is substantially easier than the front. The springs to not need to be compressed as far, and the nut has much more travel.
Assemble the new strut

NOTE: Since the L-Tuned bumper floats, some have reported noise issues and recommend using the stock bumper since it snaps into place. Edit 20080425: After more than 50k miles, I have not noticed any noise issues with replacement bumpers.
Replace the bump rubber with the one supplied with the L-Tuned shocks. Tighten the springs .5-1". Thread the piston rod lock nut. Align the mid shock absorber bolt holes parallel to the lower shock absorber bolt hole.
Reinstall the shock absorber
Repeat for the other side
Torques
Stabilizer bar link nut: 22 ftlbs
Lower shock absorber bolt: 81 ftlbs
Lower suspension arm nut: 81 ftlbs
Mid shock absorber bolts: 13 ftlbs
Strut tower nuts: 47 ftlbs
Piston rod lock nut: 20 ftlbs
Refer to this image for the stabilizer bar bolt, lower suspension arm bolt, and lower shock absorber bolt.
Remove stabilizer bar link bolt
Loosen nut and remove bolt.
Remove lower suspension arm bolt
Make match marks to allow easy realignment (even though you will need to have the car aligned anyway).
Remove the nut. Remove the bolt. There is pressure involved in this assembly. It may take a bit of pushing up and down on the rotor to relieve the pressure.
NOTE: when reinstalling, use a jack to raise the lower suspension arm and allow easy insertion of the suspension arm bolt.
Remove the lower shock absorber bolt
Loosen the nut. Remove the bolt. Again, this assembly is under pressure. Apply downward force on the lower suspension bar to relieve the pressure.
Loosen piston rod lock nut
Hold the rod in place and loosen the bolt. DO NOT REMOVE IT; startling things will happen if you do.
Remove strut tower nuts
Remove mid shock absorber nuts
Remove shock absorber
Disassemble the strut
This is substantially easier than the front. The springs to not need to be compressed as far, and the nut has much more travel.
Assemble the new strut
NOTE: Since the L-Tuned bumper floats, some have reported noise issues and recommend using the stock bumper since it snaps into place. Edit 20080425: After more than 50k miles, I have not noticed any noise issues with replacement bumpers.
Replace the bump rubber with the one supplied with the L-Tuned shocks. Tighten the springs .5-1". Thread the piston rod lock nut. Align the mid shock absorber bolt holes parallel to the lower shock absorber bolt hole.
Reinstall the shock absorber
Repeat for the other side
Last edited by jonathancl; 04-25-08 at 07:11 PM.
04-26-05, 12:52 PM
#11
Hey,
I noticed that you replaced the stock bump stop rubber with the L-Tuned supplied ones. On previous install threads some guys recommended putting the stock bump stops back on with the new shocks and springs. Apparently some guys stated there were some noise issues with the L-tuned supplied bump stops. Was your stock bump stop worn out or what?
I noticed that you replaced the stock bump stop rubber with the L-Tuned supplied ones. On previous install threads some guys recommended putting the stock bump stops back on with the new shocks and springs. Apparently some guys stated there were some noise issues with the L-tuned supplied bump stops. Was your stock bump stop worn out or what?

 i like the pictures, i think they are very illustrative to the steps, big props!
04-26-05, 02:04 PM
i like the pictures, i think they are very illustrative to the steps, big props!
04-26-05, 02:04 PM
#13
Racer
Thread Starter
Originally Posted by AUGuy21
I noticed that you replaced the stock bump stop rubber with the L-Tuned supplied ones. On previous install threads some guys recommended putting the stock bump stops back on with the new shocks and springs. Apparently some guys stated there were some noise issues with the L-tuned supplied bump stops. Was your stock bump stop worn out or what?
Thanks for mentioning it; I'm keeping my factory bumpers just in case...not that I really want to take the back end apart again...
Last edited by jonathancl; 04-26-05 at 02:17 PM.
 04-26-05, 05:35 PM
#15
Driver School Candidate

Join Date: Apr 2005
Location: Wyoming
Posts: 2
Likes: 0
Received 0 Likes
on
0 Posts
Just curious why did you even remove the ball joints? I installed the eibach pro kit last week on my 2002 GS430 and was able to remove the front struts without taking apart the ball joints. The struts will slide out right under the ABS line on the left; it takes a little maneuvering, but its just one more bolt you don�t have to take off. Let me know if there was a reason for this. And when you align the strut you don�t have to recompress the spring, with a little lubrication it will turn without it coming out of its seat.

