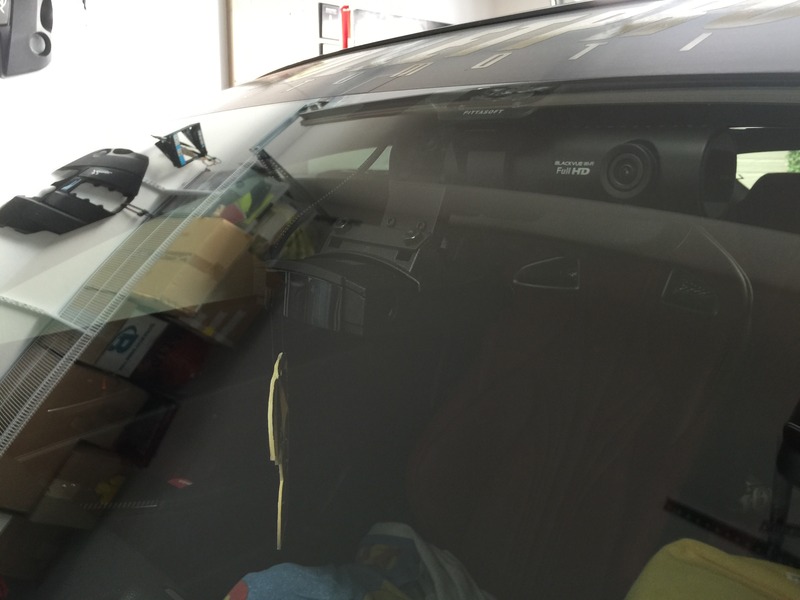
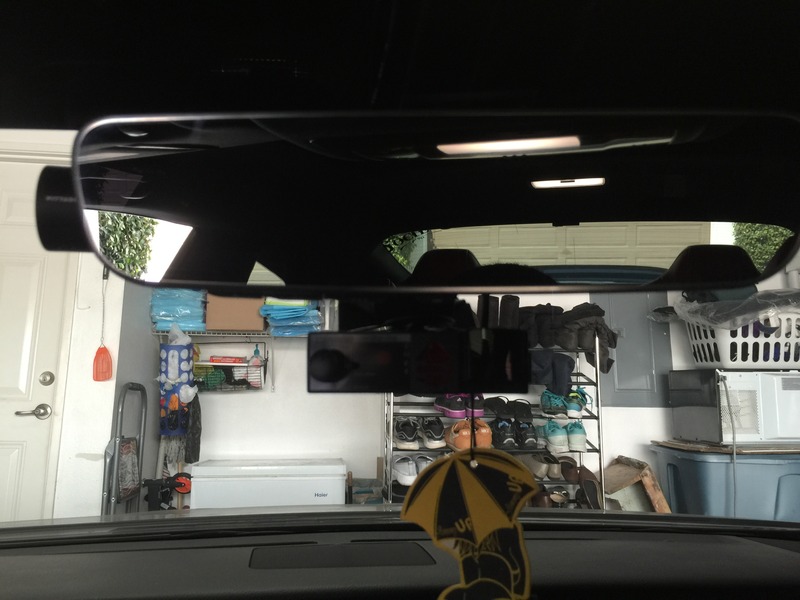
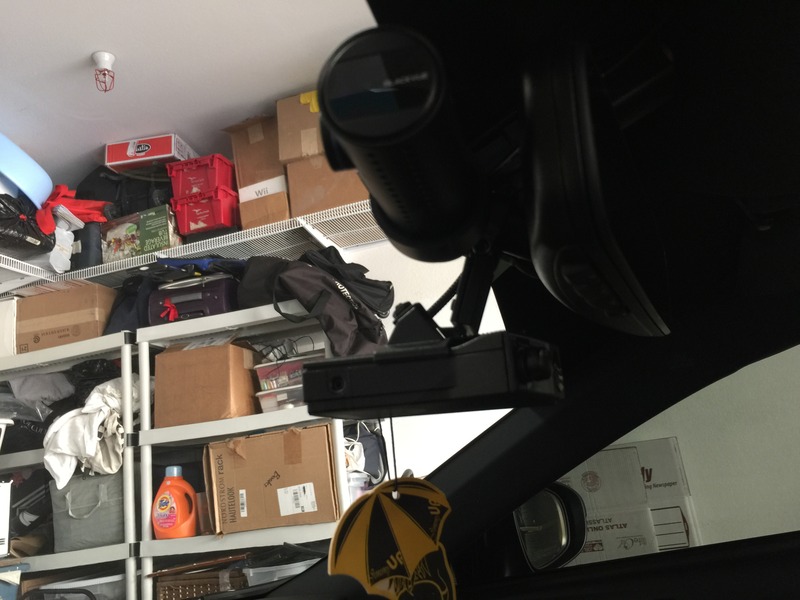
Has anybody done a BlendMount/MirrorTap radar-detector mirror mount install?
#1
Racer
Thread Starter
Hey gang, hopefully I can get some pointers on this, but if not, I'll order the mount and mirror cable (hardwire with no modifications at all) anyway. Always do that when available, since they mount the radar detector right under the mirror, with no suction cups and no wires hanging. And they're BOTH available for the RC-F. For those not familiar with those aluminum mounts, go to their website as spelled above (don't want to possibly get a warning for posting a link if they're not vendors).
My specific question is how to remove the plastic parts and mirror connector to be able to remove the mirror (much easier install of the mount). They have very fragile tabs, and prefer to know what I'm dealing with, especially with the mirror hanging and having to support it; not much dexterity there. On the wiring side, want to use a 9" MirrorTap cord (rather than the 12" suggested) for a tidier look, but need to make sure it fits. That will depend on how far up the stem is the mirror connector. Oh, and would be nice to know which color wires to tap for switched power . Thank you.
My specific question is how to remove the plastic parts and mirror connector to be able to remove the mirror (much easier install of the mount). They have very fragile tabs, and prefer to know what I'm dealing with, especially with the mirror hanging and having to support it; not much dexterity there. On the wiring side, want to use a 9" MirrorTap cord (rather than the 12" suggested) for a tidier look, but need to make sure it fits. That will depend on how far up the stem is the mirror connector. Oh, and would be nice to know which color wires to tap for switched power
 . Thank you.
Last edited by JCtx; 09-04-15 at 11:57 AM.
#2
If the mirror is similar to the 2015 IS350, my guide for doing a dash cam should help you:
https://www.clublexus.com/forums/is-...diy-guide.html
https://www.clublexus.com/forums/is-...diy-guide.html
#3
I installed the blendmount without taking the mirror off. It wasn't too difficult but I agree it would probably be easier that way. I have a V-1 so I had an existing power line that I used and then I had a auto accessories guy wire it for me since i was having some tinting and other work done there. In my opinion you are better off using the longer wire because you can push extra length back under the cover that extends from headliner to the mirror mount point and too long is better than too short.
#4
Racer
Thread Starter
Hey guys, had time, so decided to tackle the job blindly before anybody replied. But thanks for the help anyway . Install went perfect, and nothing broken. Tapping the right wires took the longest, as the car harness had totally different colors than the mirror one. Nothing made sense, so decided to do what I should have done initially, which was to test every wire against ground, to see which ones had juice, and avoid blowing my multimeter's fuse. Here are the results and observations of my install:
1. I could use the GTR's mount, which is p/n BV1-2000. The RC-F's is BV1-2012. The only difference is a notch for the wires, but I actually liked mine better. Not only for the looks, but could get the ring much higher (all the way to touching the plastic cover), to minimize the gap between detector and mirror. It was larger than I wanted, but remembered the garage buttons are under the mirror, so couldn't have done it any closer, or would have lost use of the 3rd button and to turn off the anti-glare feature. I don't use either button, but they're reachable, like they should be. Therfore, the gap was the absolute minimum possible, and it was barely large enough to operate the buttons, so perfect compromise .
.
2. I used the 9" MirrorTap MT-2009, and it was even longer than needed. But 'wrapped' it under the cable harness, and ended up looking great. The 12" would have been way too long. I did it the best way, but the harder way. If you want to tap the car's connector, then for sure you'd need the 12" one (MT-2012), but would be a mess to install with the mirror in place (plus if you need to remove the mirror, what a PITA). Anyway, had a new MT-3009 spare cable, which would have been perfect for the mirror's small connector... but when installing the second lead, pushed the first one a little, and it broke. Geez. So simply opened up the gap a little with a pic, and inserted the MT-2009 leads, which are very strong, yet slim enough even for that connector (you can see the red lead in one of the photos below).
3. WIRES TO TAP (for SWITCHED power). As I mentioned, wire colors are different on both connectors, but if you want to do the job right, tap the mirror, instead of the car. MUCH easier to remove and install the mirror as one unit, than having to tap/untap wires every time you install/remove the mirror... but to each his own. Besides, I always prefer to mess with a replaceable component as well .
.
POSITIVE= tap the WHITE wire
GROUND= tap the BLACK wire. Couldn't get easier than that folks. But yes, you need to remove the plastic cover over the connector, and also the connector from the mirror. You'll need a strong metal sharp pic to make a gap for the MirrorTap wire leads to go in. But they go in super secure. The job looks almost OEM, and super clean; just the way I like it . The beauty of this method is zero alteration to the vehicle, and it can be reversed by just pulling the leads.
4. Level radar detector in both directions with your mirror mounted and adjusted perfectly. I personally always install the detector on its first detent, and then insert a piece of rubber between detector and tab, so it's as close to the mirror as possible without any vibration. And also away from the sun heating it up. And as I mentioned, put the ring basically touching the plastic tab so detector would be as close to the mirror as possible. It looks awful with a huge gap IMO, but again, to each his own. You'll have to do several trial and error runs installing the mirror and leveling things perfectly. When I was done, took the pictures below. Just need to take one installed, which I'll do shortly. Hope this guide helps folks. It's an awesome mod, especially on this car, with no 12V power closer than the freaking center console. If you have any questions, fire away .
.
 . Install went perfect, and nothing broken. Tapping the right wires took the longest, as the car harness had totally different colors than the mirror one. Nothing made sense, so decided to do what I should have done initially, which was to test every wire against ground, to see which ones had juice, and avoid blowing my multimeter's fuse. Here are the results and observations of my install:
1. I could use the GTR's mount, which is p/n BV1-2000. The RC-F's is BV1-2012. The only difference is a notch for the wires, but I actually liked mine better. Not only for the looks, but could get the ring much higher (all the way to touching the plastic cover), to minimize the gap between detector and mirror. It was larger than I wanted, but remembered the garage buttons are under the mirror, so couldn't have done it any closer, or would have lost use of the 3rd button and to turn off the anti-glare feature. I don't use either button, but they're reachable, like they should be. Therfore, the gap was the absolute minimum possible, and it was barely large enough to operate the buttons, so perfect compromise
 .
.2. I used the 9" MirrorTap MT-2009, and it was even longer than needed. But 'wrapped' it under the cable harness, and ended up looking great. The 12" would have been way too long. I did it the best way, but the harder way. If you want to tap the car's connector, then for sure you'd need the 12" one (MT-2012), but would be a mess to install with the mirror in place (plus if you need to remove the mirror, what a PITA). Anyway, had a new MT-3009 spare cable, which would have been perfect for the mirror's small connector... but when installing the second lead, pushed the first one a little, and it broke. Geez. So simply opened up the gap a little with a pic, and inserted the MT-2009 leads, which are very strong, yet slim enough even for that connector (you can see the red lead in one of the photos below).
3. WIRES TO TAP (for SWITCHED power). As I mentioned, wire colors are different on both connectors, but if you want to do the job right, tap the mirror, instead of the car. MUCH easier to remove and install the mirror as one unit, than having to tap/untap wires every time you install/remove the mirror... but to each his own. Besides, I always prefer to mess with a replaceable component as well
 .
. POSITIVE= tap the WHITE wire
GROUND= tap the BLACK wire. Couldn't get easier than that folks. But yes, you need to remove the plastic cover over the connector, and also the connector from the mirror. You'll need a strong metal sharp pic to make a gap for the MirrorTap wire leads to go in. But they go in super secure. The job looks almost OEM, and super clean; just the way I like it
 . The beauty of this method is zero alteration to the vehicle, and it can be reversed by just pulling the leads.
4. Level radar detector in both directions with your mirror mounted and adjusted perfectly. I personally always install the detector on its first detent, and then insert a piece of rubber between detector and tab, so it's as close to the mirror as possible without any vibration. And also away from the sun heating it up. And as I mentioned, put the ring basically touching the plastic tab so detector would be as close to the mirror as possible. It looks awful with a huge gap IMO, but again, to each his own. You'll have to do several trial and error runs installing the mirror and leveling things perfectly. When I was done, took the pictures below. Just need to take one installed, which I'll do shortly. Hope this guide helps folks. It's an awesome mod, especially on this car, with no 12V power closer than the freaking center console. If you have any questions, fire away
 .
.
Last edited by JCtx; 09-04-15 at 08:58 PM.
The following 3 users liked this post by JCtx:
#5
Racer
Thread Starter
Can only upload 5 pics per post, so below are a few already installed. Detector is perfectly level in all directions, so any indication to the contrary, is just the camera angle . Hope this helps folks.
Forgot to mention the other Friday afternoon project: Remove the darn 'rear bumper applique'. Had to pay like $75 for it, but after only 3 days of ownership, dirt couldn't be removed from the edges, so away it went. Was going to do it soon anyway, since that 'Lexus' gold logo is just hideous. I'm the only one who will ever put luggage in that car, so no worries. And much easier to clean. That's the main reason I debadge. And just as expected, this white car is just awful with black soot too. Have a good one folks.
 . Hope this helps folks.
 Forgot to mention the other Friday afternoon project: Remove the darn 'rear bumper applique'. Had to pay like $75 for it, but after only 3 days of ownership, dirt couldn't be removed from the edges, so away it went. Was going to do it soon anyway, since that 'Lexus' gold logo is just hideous. I'm the only one who will ever put luggage in that car, so no worries. And much easier to clean. That's the main reason I debadge. And just as expected, this white car is just awful with black soot too. Have a good one folks.
The following 2 users liked this post by JCtx:
finny76 (03-07-17),
raerae1616 (03-05-17)
#6
Lead Lap
How do you like the Valentine V-1?
I did a lot of research last year and talked myself out of buying a radar detector for two reasons.
1. Too many false alarms
2. Illegal in Virginia (stupid f'ing state)
I did a lot of research last year and talked myself out of buying a radar detector for two reasons.
1. Too many false alarms
2. Illegal in Virginia (stupid f'ing state)
#7
Racer
Thread Starter
THAT was the reason I was hardly using it. And it's the same with almost all of them, according to people who own other brands. But that was before I learned you can deactivate any band you want . Deactivated both the 'X' and 'K' bands, and ZERO false alarms anymore. For what I've read, no police is using K band anymore, at least around here (just Ka and laser on motorbikes in the city). I'm only interested in the highway patrol, and it seems to work perfectly. And also worth mentioning, I don't rely on the radar alone, because I know how it works. When no traffic ahead to alert me, I slow down when an oncoming car has no DLRs (could be a cop), and looks like the car could be a cop car/SUV. Common sense like that. I only speed when it's safe (for my licence, myself, and others), and my perfect driving record attests to that
 .
.
Hey, for those who want instructions on how to remove the mirror, here you go:
1. Loosen torx T-20 bolt at the base of the mirror. No need to remove it, since you risk losing it. When you can see the threads, that's enough.
2. Remove the plastic cover on the mirror stem by pulling it DOWNWARD. You're not going to reuse this part after bracket is installed.
3. Retract the telescopic plastic bracket touching the headliner. This is the plastic part covering the wires. Just push it towards the mirror until it bottoms out.
4. Now you're ready to remove the mirror. Wiggle it or tap it while you push the mirror UPWARD.
5. Once in your hand, press down on the white male connector FROM THE CAR, and pull out. If you have fat fingers, you'll need something else to push down while pulling. Maybe your pinkie? But it comes out relatively easy.
6. With the mirror fully removed, go to your bench and remove the black cover over the female connector. Then with a thin flat-blade screwdriver, pull on the tab and slide the connector out of the mirror. Now you're ready to start the installation. You'll need a pick to open a small gap at the end of the WHITE and BLACK wires. Then patiently repeat the process of inserting the pick and try to insert the terminals (red to white, black to black) until you're successful. Don't go too wild on the pick at first, since you want the terminals tight in there.
7. Once the cable is installed, reattach the connector AND the black cover and you're ready to start the installation of the mount. I lined the inside of the bracket that attaches to the stem with black electrical tape, to prevent marring the surface. You don't have to do that, but I always do it (the **** in me. Ha ha). Reason is you might decide to move it later, and done like that, the surface won't be marred. You have my pictures to go by, but any question, just shoot .
.
8. Finally, before tightening everything for good, go back to your car, slide the mirror down its base (leave connector off) until it has no movement, adjust your mirror perfectly (mine didn't seem to affect radar position, but just in case yours moves from the other end), use a rubber wedge to prevent detector movement and noise (I did), and test if you like the position. I also leveled it in both directions at this time, but up to you. Remember there're buttons under the mirror, but installing mine as high as possible (I wouldn't do it any other way), wasn't an issue even with the detector flush with the mirror: still space to insert my finger and operate button #3 and the on/off one if needed (don't use them myself). And you could always just slide the detector closer to the windshield and leave that space wide open, but I like it flush for easier operation, better looks, and less heat from the sun. Go back to the bench and readjust until you're happy with your job, then tighten things good (check alignment again if you decided to do that; mirror moves when tightening). When satisfied, hook up connector, install mirror, install sliding plastic part and slide it up to the headliner, and finally tighten the T-20 bolt and you're done . Oh, this last part will be tricky if you decided to install bracket all the way up: I had to use visegrip pliers on the T-20 socket due to lack of space. If you have an 'L' such wrench (I only have allens like that), that'd be easier. Good luck, and hope this helps folks.
 . Deactivated both the 'X' and 'K' bands, and ZERO false alarms anymore. For what I've read, no police is using K band anymore, at least around here (just Ka and laser on motorbikes in the city). I'm only interested in the highway patrol, and it seems to work perfectly. And also worth mentioning, I don't rely on the radar alone, because I know how it works. When no traffic ahead to alert me, I slow down when an oncoming car has no DLRs (could be a cop), and looks like the car could be a cop car/SUV. Common sense like that. I only speed when it's safe (for my licence, myself, and others), and my perfect driving record attests to that
 .
.Hey, for those who want instructions on how to remove the mirror, here you go:
1. Loosen torx T-20 bolt at the base of the mirror. No need to remove it, since you risk losing it. When you can see the threads, that's enough.
2. Remove the plastic cover on the mirror stem by pulling it DOWNWARD. You're not going to reuse this part after bracket is installed.
3. Retract the telescopic plastic bracket touching the headliner. This is the plastic part covering the wires. Just push it towards the mirror until it bottoms out.
4. Now you're ready to remove the mirror. Wiggle it or tap it while you push the mirror UPWARD.
5. Once in your hand, press down on the white male connector FROM THE CAR, and pull out. If you have fat fingers, you'll need something else to push down while pulling. Maybe your pinkie? But it comes out relatively easy.
6. With the mirror fully removed, go to your bench and remove the black cover over the female connector. Then with a thin flat-blade screwdriver, pull on the tab and slide the connector out of the mirror. Now you're ready to start the installation. You'll need a pick to open a small gap at the end of the WHITE and BLACK wires. Then patiently repeat the process of inserting the pick and try to insert the terminals (red to white, black to black) until you're successful. Don't go too wild on the pick at first, since you want the terminals tight in there.
7. Once the cable is installed, reattach the connector AND the black cover and you're ready to start the installation of the mount. I lined the inside of the bracket that attaches to the stem with black electrical tape, to prevent marring the surface. You don't have to do that, but I always do it (the **** in me. Ha ha). Reason is you might decide to move it later, and done like that, the surface won't be marred. You have my pictures to go by, but any question, just shoot
 .
. 8. Finally, before tightening everything for good, go back to your car, slide the mirror down its base (leave connector off) until it has no movement, adjust your mirror perfectly (mine didn't seem to affect radar position, but just in case yours moves from the other end), use a rubber wedge to prevent detector movement and noise (I did), and test if you like the position. I also leveled it in both directions at this time, but up to you. Remember there're buttons under the mirror, but installing mine as high as possible (I wouldn't do it any other way), wasn't an issue even with the detector flush with the mirror: still space to insert my finger and operate button #3 and the on/off one if needed (don't use them myself). And you could always just slide the detector closer to the windshield and leave that space wide open, but I like it flush for easier operation, better looks, and less heat from the sun. Go back to the bench and readjust until you're happy with your job, then tighten things good (check alignment again if you decided to do that; mirror moves when tightening). When satisfied, hook up connector, install mirror, install sliding plastic part and slide it up to the headliner, and finally tighten the T-20 bolt and you're done
 . Oh, this last part will be tricky if you decided to install bracket all the way up: I had to use visegrip pliers on the T-20 socket due to lack of space. If you have an 'L' such wrench (I only have allens like that), that'd be easier. Good luck, and hope this helps folks.
Last edited by JCtx; 09-08-15 at 11:12 AM.
Trending Topics
#9
Intermediate
iTrader: (4)
Thanks for this. Should have done a search before I purchased and attempted install. I had a blendmount and mirrortap on my IS-F and it worked flawlessly. Luckily I ordered the BV1-2000 and MT-2009. Although I spoke with the folks at blendmount, I didn't go exactly with what they recommended as they indicated 2 or 3 that would/should work.
Anyway, got the blendmount installed exactly how I wanted it without removing the mirror. Have always been hesitant to remove mirrors as in the past I haven't been able to get them back on without experiencing a lot of vibration after re-installing. I tried to use my multimeter to read the wires on the connector but, my prongs were too big for the holes on the connector (story of my life ) In your testing did you happen to determine which wires/holes on the connector were power and ground. As I think was indicated, the wire colors are different from the ones in the mirror. There are five wires in the connector, white, green, blue, pink and lavender(?). Any and all help would be greatly appreciated.
Anyway, got the blendmount installed exactly how I wanted it without removing the mirror. Have always been hesitant to remove mirrors as in the past I haven't been able to get them back on without experiencing a lot of vibration after re-installing. I tried to use my multimeter to read the wires on the connector but, my prongs were too big for the holes on the connector (story of my life
 ) In your testing did you happen to determine which wires/holes on the connector were power and ground. As I think was indicated, the wire colors are different from the ones in the mirror. There are five wires in the connector, white, green, blue, pink and lavender(?). Any and all help would be greatly appreciated.
Last edited by weswork; 01-21-16 at 08:43 PM.
#10
Pole Position
I tried to use my multimeter to read the wires on the connector but, my prongs were too big for the holes on the connector (story of my life  ) In your testing did you happen to determine which wires/holes on the connector were power and ground. As I think was indicated, the wire colors are different from the ones in the mirror. There are five wires in the connector, white, green, blue, pink and lavender(?). Any and all help would be greatly appreciated.
 ) In your testing did you happen to determine which wires/holes on the connector were power and ground. As I think was indicated, the wire colors are different from the ones in the mirror. There are five wires in the connector, white, green, blue, pink and lavender(?). Any and all help would be greatly appreciated.
I installed my tap today and this verifies the connections shown in the attached PDF. I removed
the mirror so I could have it out on the bench and in a bright light. Since I also got the larger pins on the mirror tap I ordered I felt this would be helpful. Like ELC_JP said, you dont have much room and light to work on the headliner side and you are inside the car. I verified this while testing the voltage and ground. I found Blue is 12v switched and Violet next to it is then ground (on the headliner side). Once the mirror is off it helps to slide the white connector off its mount to create easy access to the connector pin holes. Yes the colors change to white for 12v and black for ground. I used the awl shown in the pdf to create a little more space for the tap as ELC_JP suggested. The tap wire then runs inside the 2 plastic pieces that cover the mirror mount and cable. My goal was to avoid any window or mirror mount since many states have laws on window mount and more important I wanted the detector as hidden as possible.
"Currently, windshield mounts are illegal in more than half of the US–no matter where you mount it on your windshield, you can get a ticket passing through these states."
http://gpstracklog.com/2014/07/gps-w...-half-u-s.html
Due to my crappy mid distance vision without my computer glasses, the visor mount is also a perfect place for me to quickly read the display on the Max 360. Only neg is when I want to use the visor on the right side window I have to unplug the power or use something else for a side sun block. The mount is a Escort Visor Clip 57-000027. I ground down each side about 1.8mm with a grinding stone and my electric drill to match the sticky Escort window mount that comes with the Max 360.
Last edited by lobuxracer; 01-22-19 at 07:42 PM.
#11
Racer
Thread Starter
Great job Rick. And with your instructions on where to tap the larger connector, all radar-detector mounting and powering options are covered now . Glad to be of help. Happy new year folks.
 . Glad to be of help. Happy new year folks.
#13
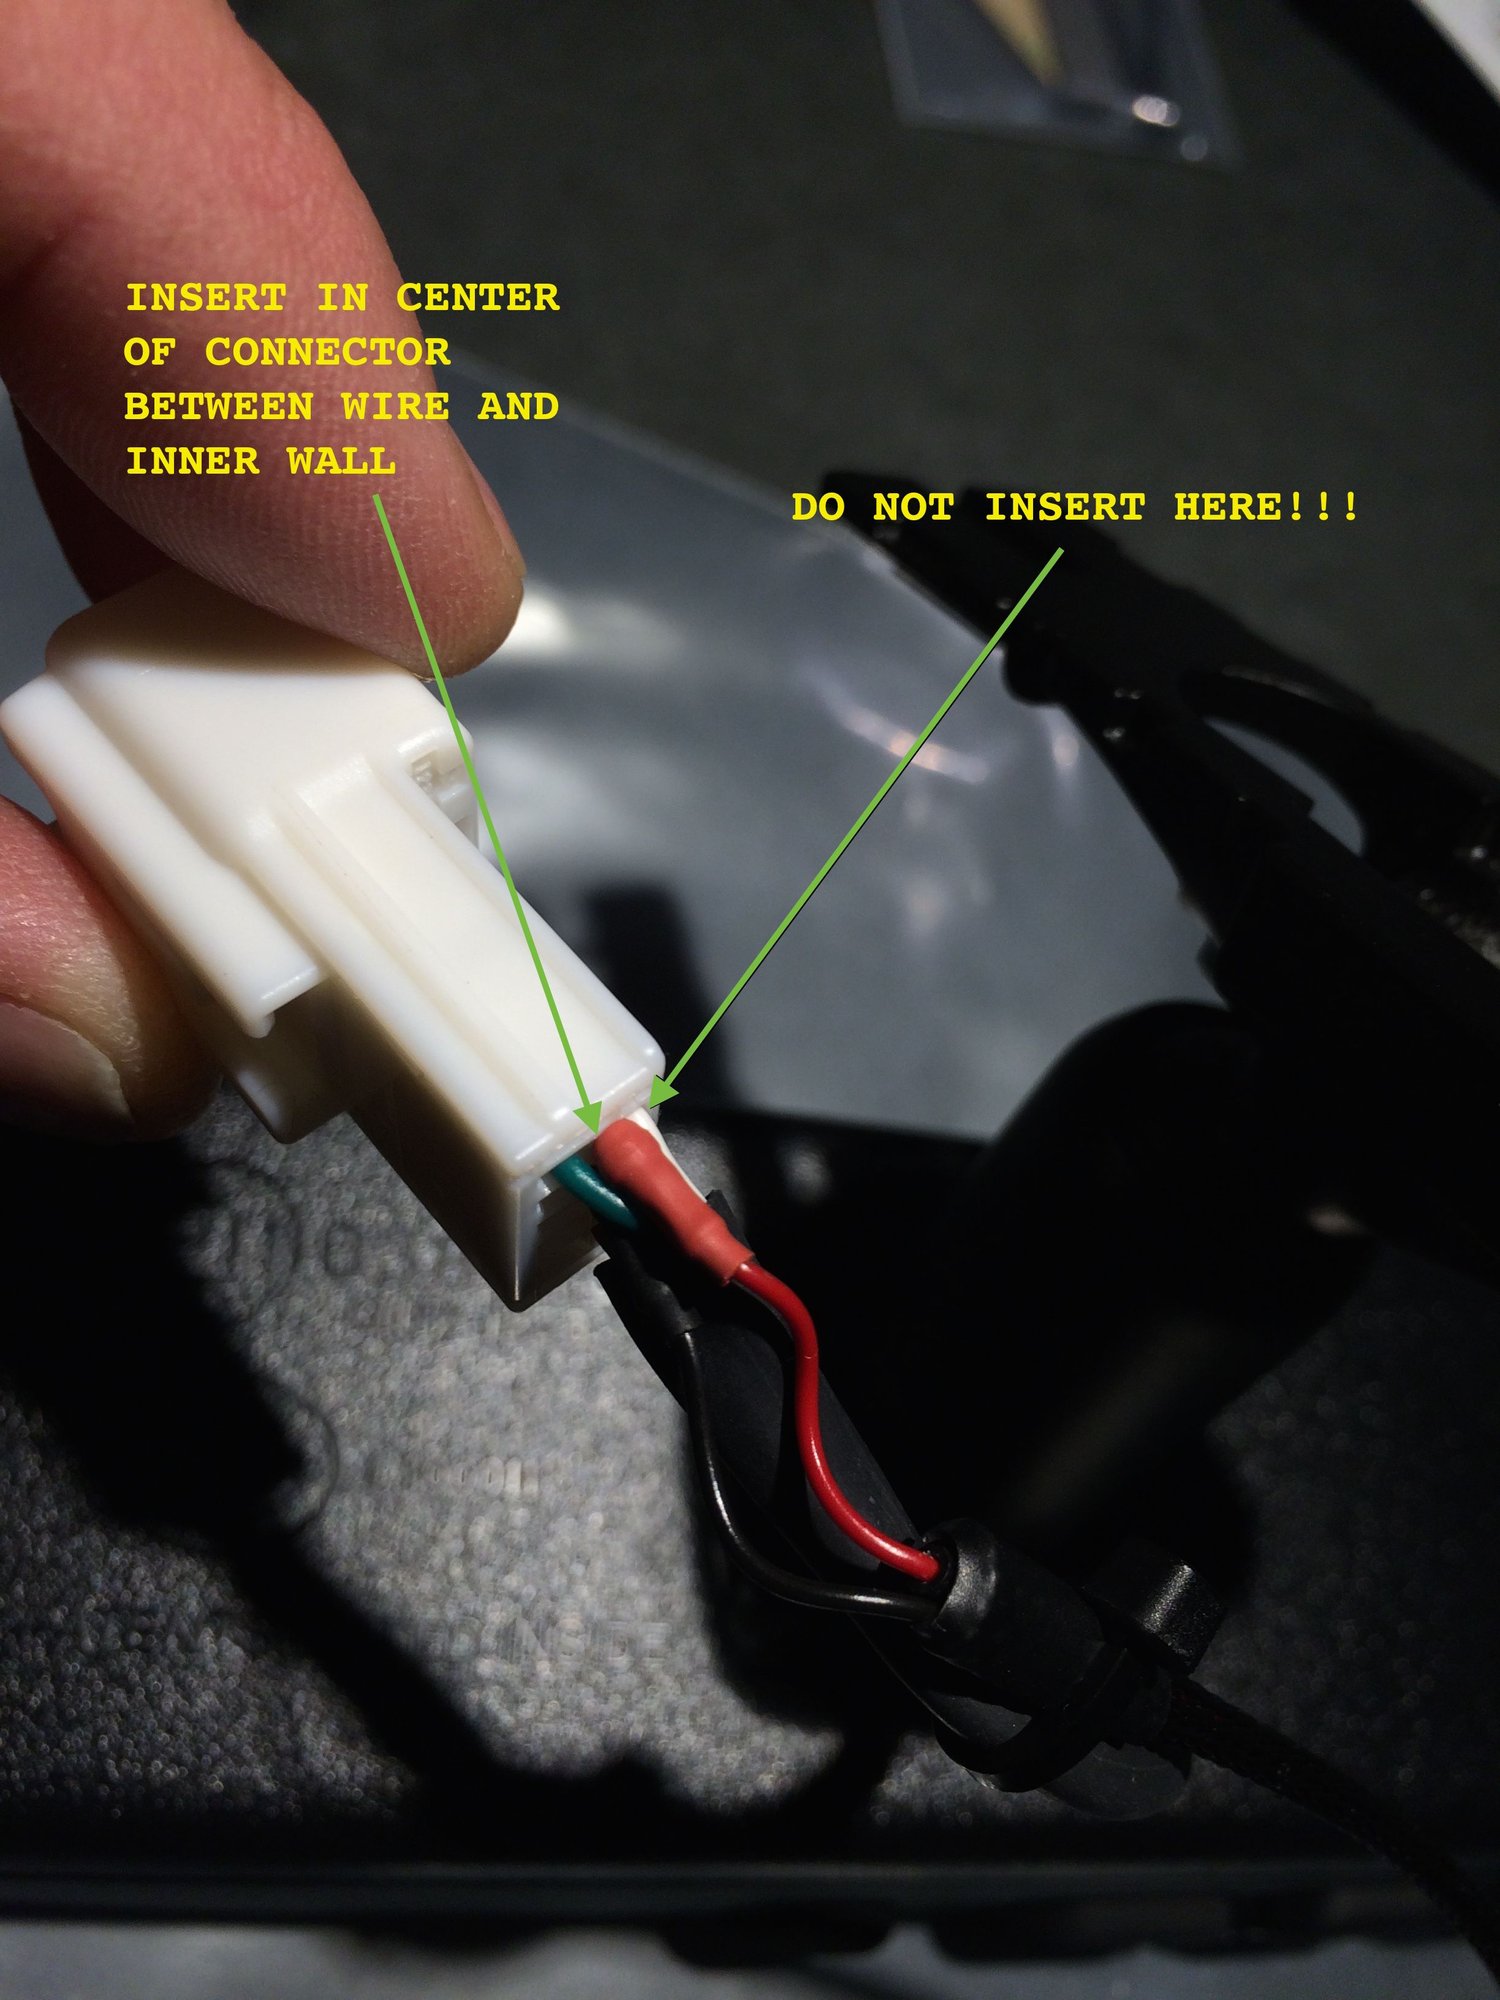
I have a few comments as well. I found if you insert the mirror tap cables in the middle of the connector, they insert easily with minimum force. This is somewhat awkward to handle, but avoids the need to use a pick or sewing needle to insert the tap. I have attached some pictures that illustrates this.
Regarding the TORX T20 driver needed to remove the mirror from the car, I used a $4 mini ratchet I picked up at Auto Zone last summer when I was in there buying SAE30 motor oil for my mower. (Pure impulse buy, knew I would use it someday!) This little ratchet works perfectly with a TORX bit to remove the mirror. As others mentioned, a normal screwdriver style TORX driver may be difficult to use. Pictures attached of this little guy also.
Overall the mirror removal was easy, you can easily do this job in 30 minutes.
I purchased my blendmount and mirror tap cable on amazon. This saves $10 on the backet. Someone from blend mount will email you after you purchase to get the make and model of your car. They let you know the part numbers they will be sending you.
Detail views of blend mount tap insertion.


This mini ratchet ($4 from AutoZone) with a T20 bit is ideal for mirror removal
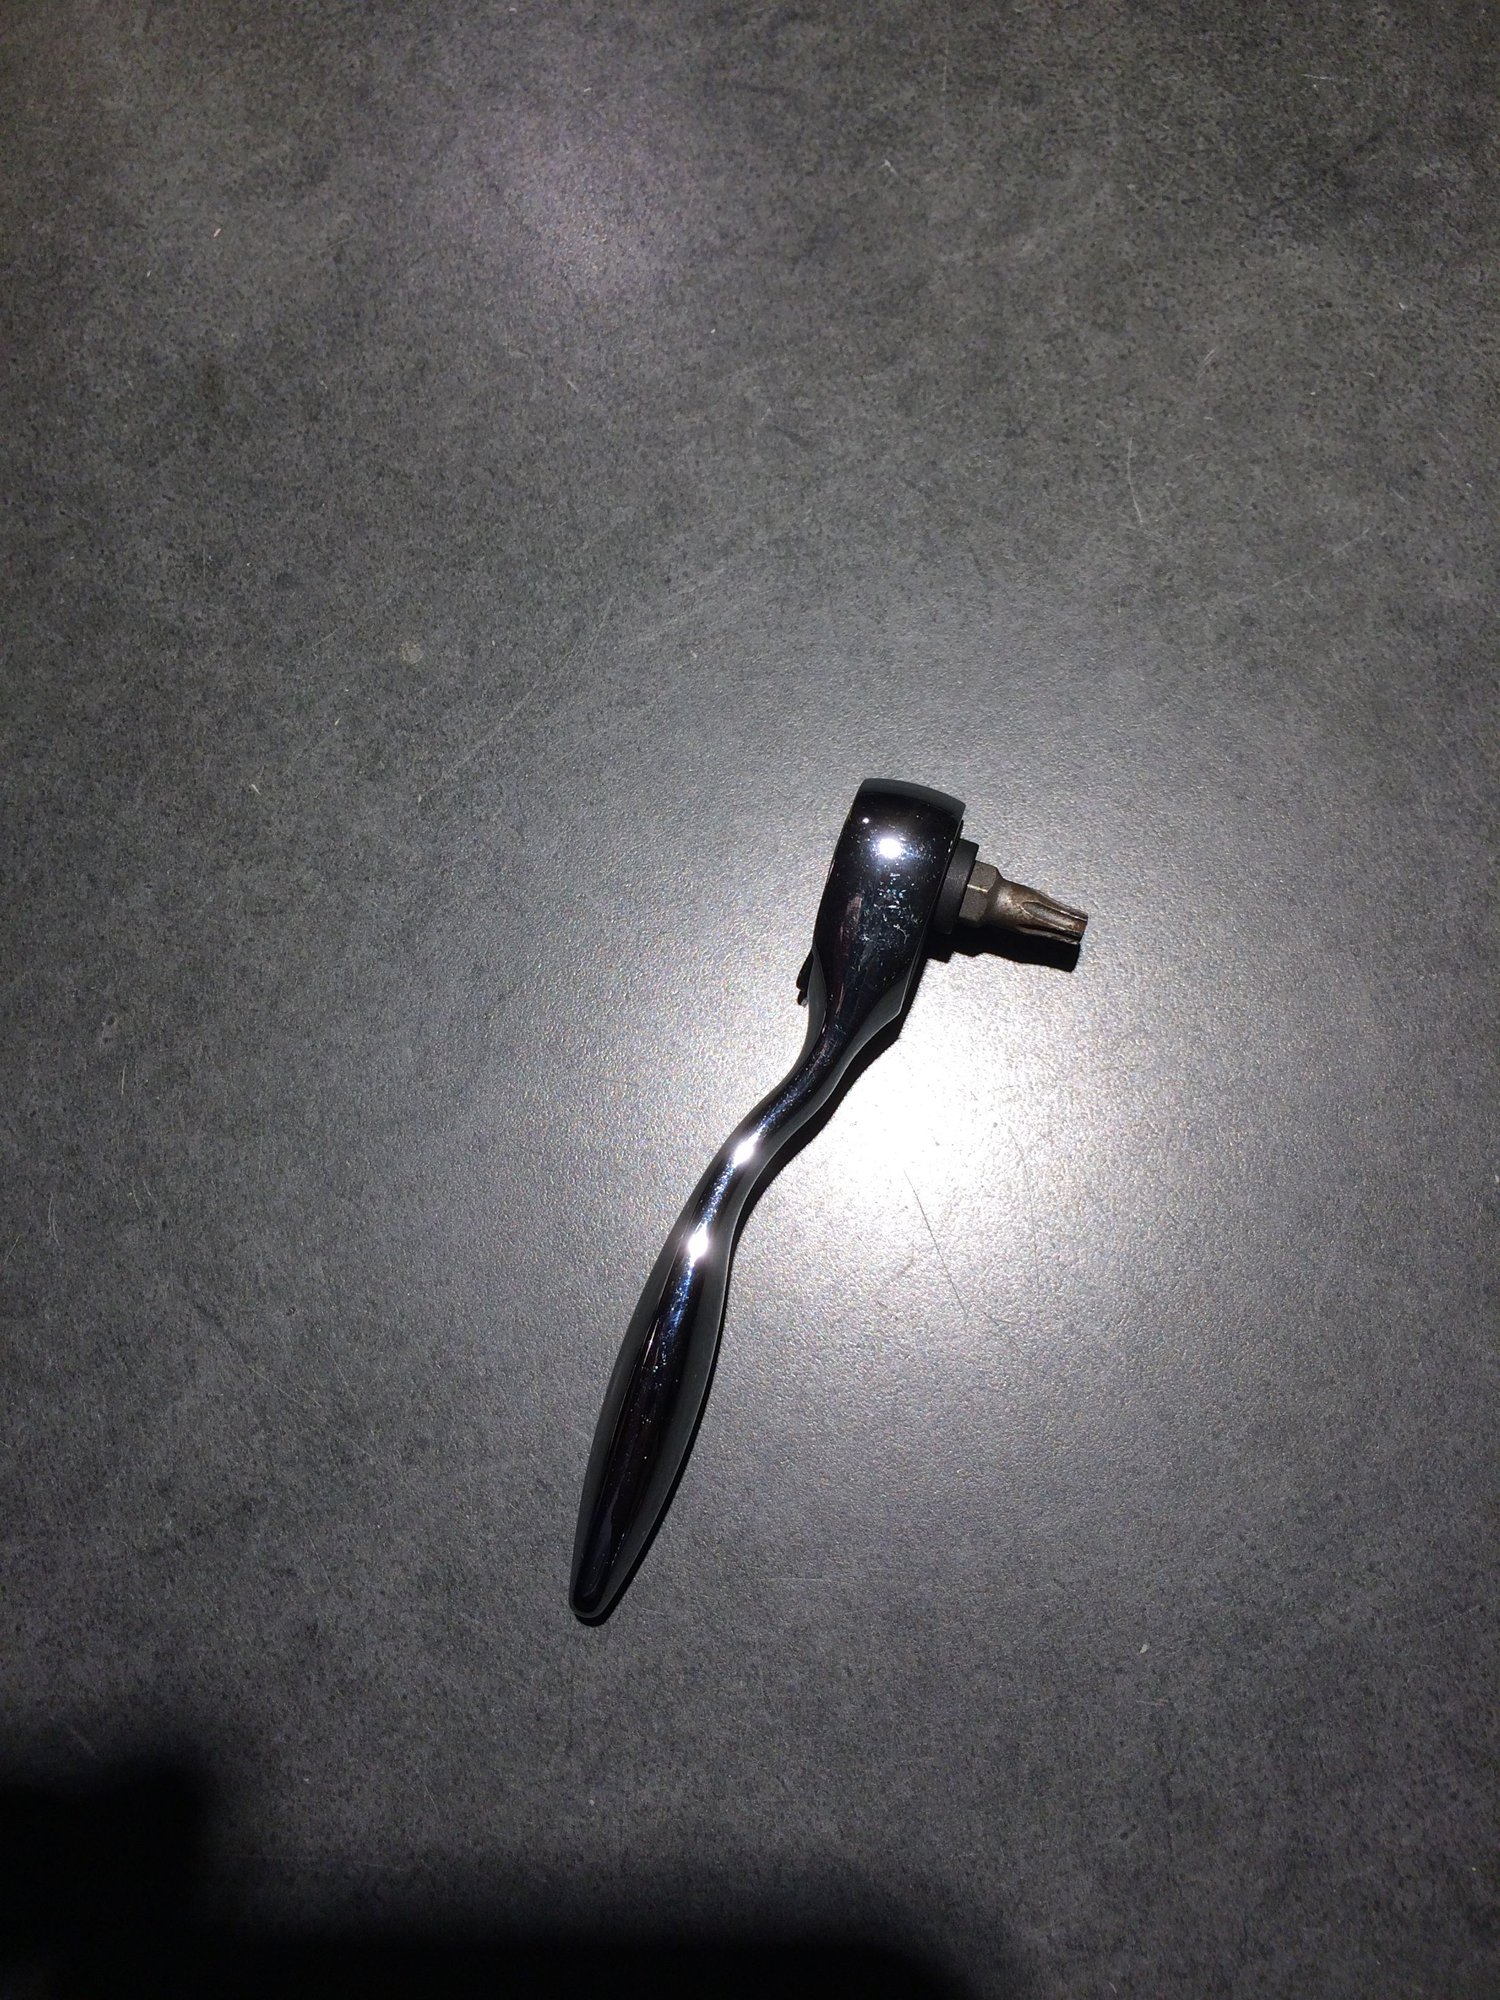
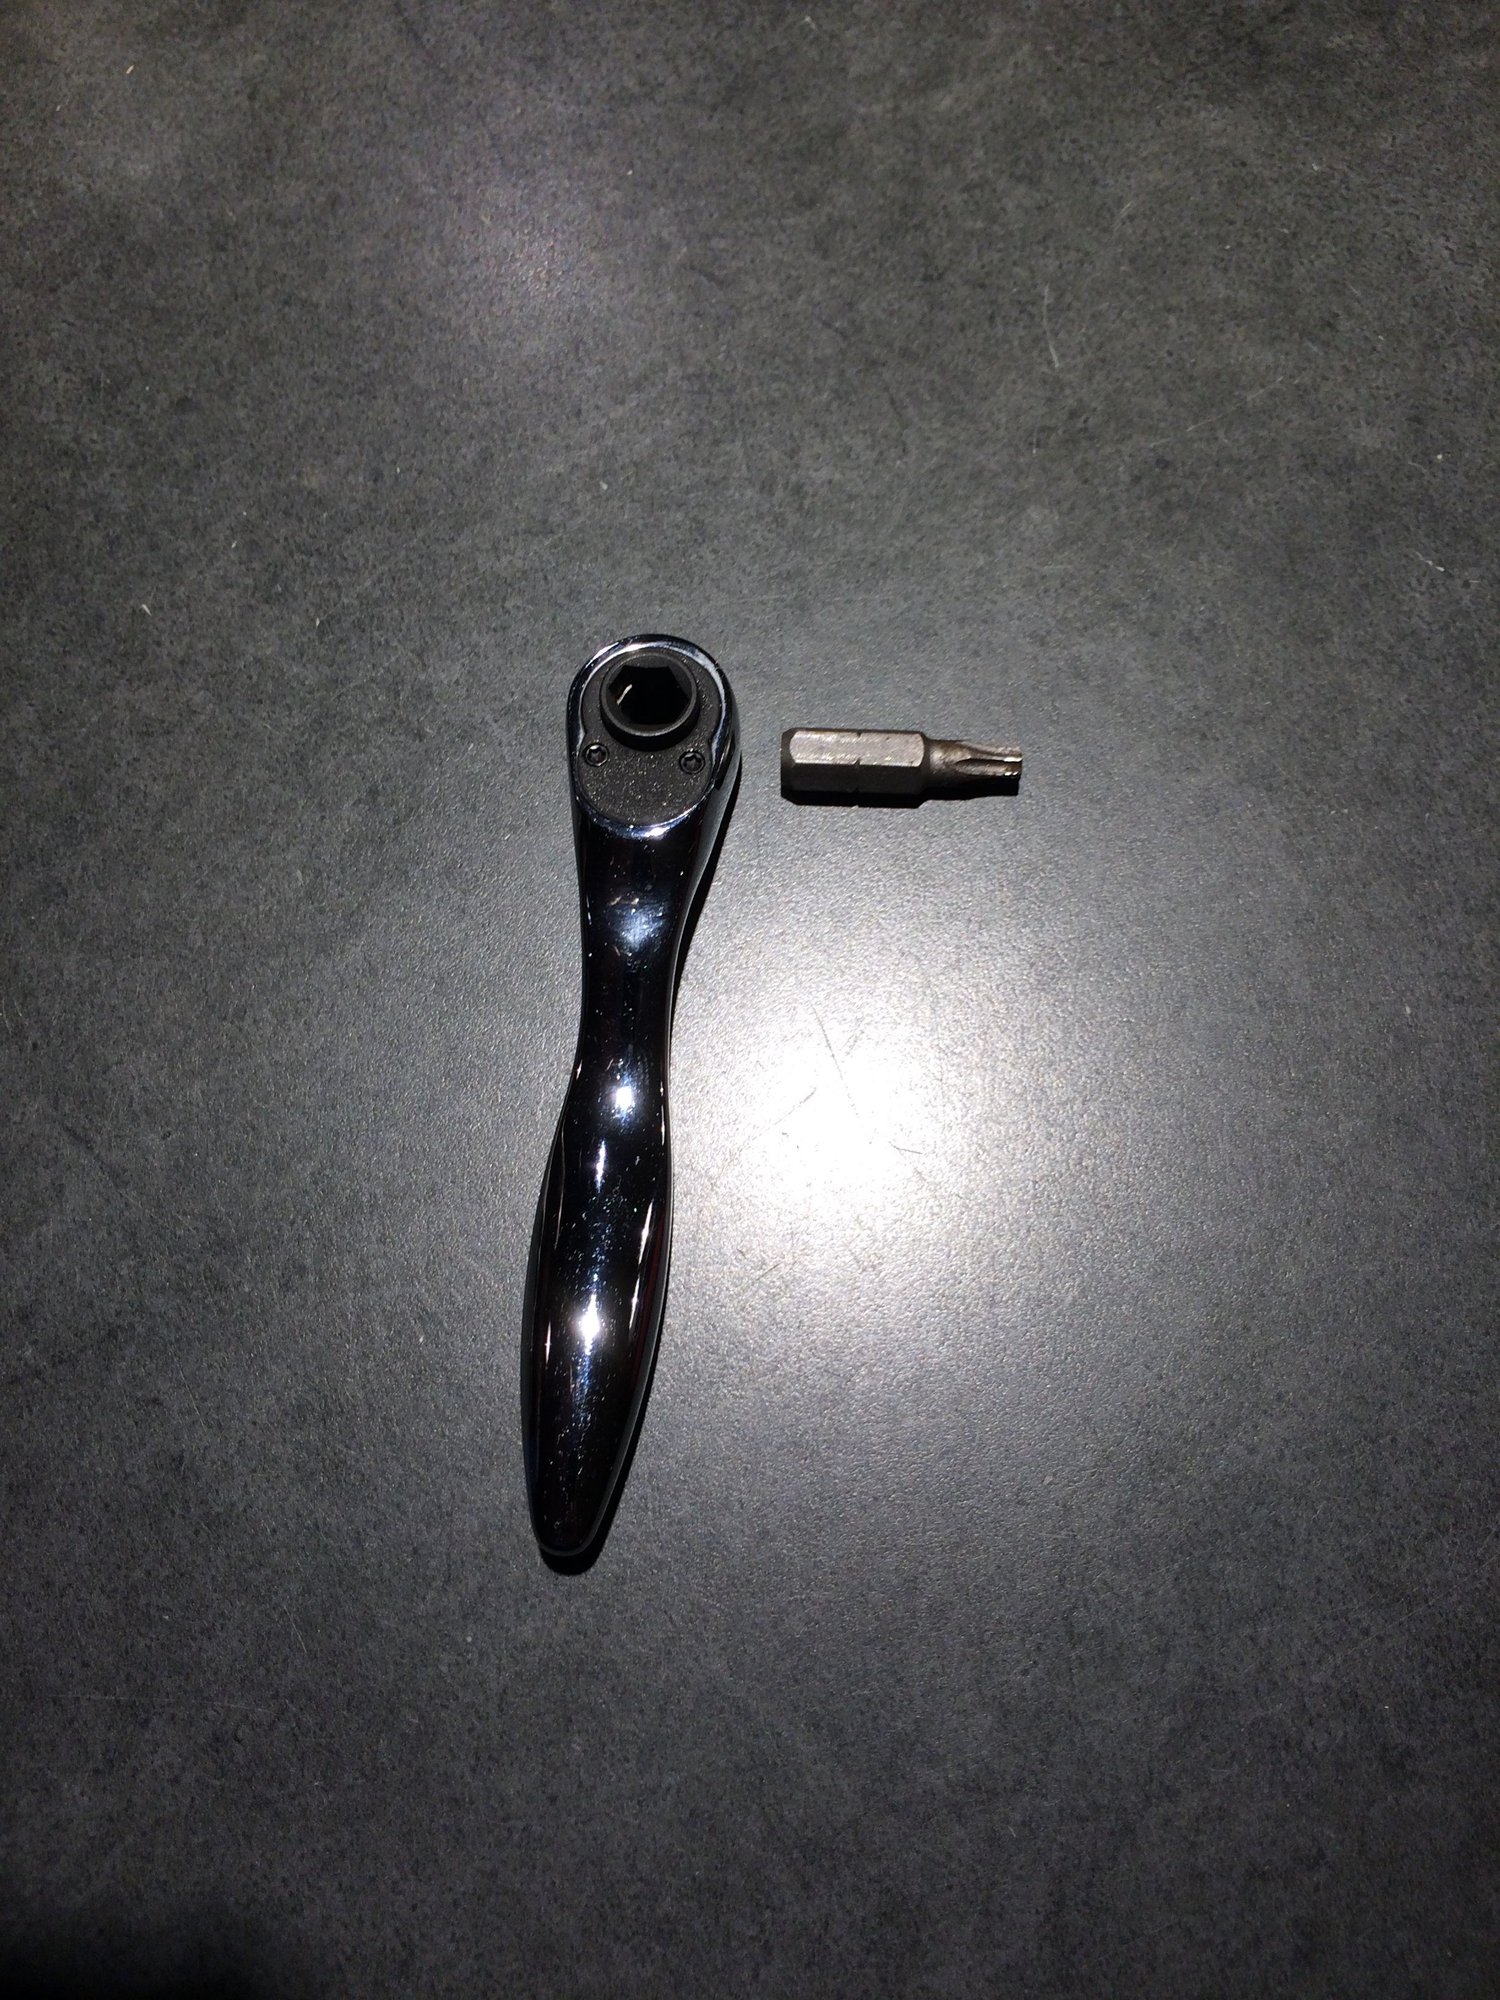
#14
Racer
Thread Starter
Remember there're TWO connectors where to tap. If installing the BlendMount bracket, I suggest using the connector INSIDE the mirror. That way you don't have to do anything inside the car, other than just removing the mirror. I'd also use the connector inside the mirror for any other mounting application due to the ease of working outside the car. And if you happen to screw anything, it's part of the mirror (cheap), and not of the car's harness. Not a big deal in this case, but just wanted to mention it  . The smaller connector inside the mirror is definitely tighter, and you need the help of a pick. But once in there, it'd never come off. At the end of the day, either one would be fine, and just a matter of personal preference
 .
.
 . The smaller connector inside the mirror is definitely tighter, and you need the help of a pick. But once in there, it'd never come off. At the end of the day, either one would be fine, and just a matter of personal preference
 .
.
#15
Driver School Candidate
Join Date: Feb 2016
Location: CA
Posts: 30
Likes: 0
Received 0 Likes
on
0 Posts
Hey peeps, just wanted to say thanks so much for posting these instructions, as I would have had no clue how to install my radar detector without the power cord hanging through the center of my RC F. Here are some pics of the final result.


