
 01-07-15, 12:33 PM
Last edit by: IB Advertising
See related guides and technical advice from our community experts:
Browse all: Steering and Suspension
- How to Change Ball Joints
Step by step instructions for do-it-yourself repairs
Browse all: Steering and Suspension

DIY Lower Ball Joints for the 2nd Gen GS. - Step by Step Instructions and Pictures
06-30-07, 07:42 AM
#1
Pole Position
Thread Starter

Join Date: Nov 2006
Location: Florida
Posts: 334
Likes: 0
Received 0 Likes
on
0 Posts
Whats up all, I have finally been able to upload my pics from my ball joint & tie rod replacement. I have a '99 GS4, but I am sure its practically identical for all 2nd Gen GS's. I am not a professional mechanic and do not claim to be. These are the instructions on how I replaced these parts on my vehicle. With that being said, lets get started...
You will need: -A jack, jackstands, wheel chokes, a ratchet with 14, 17,18, & 19MM attachments, a breaker bar, a pitman arm puller SST, a set of crescent wrenches, and this DIY.
Step 1.
Loosen the lugs on one or both front wheels. (I doubt a picture is necessary)
Step 2. Jack the front end of the car up and support both sides with jack stands and choke the rear wheels. (Again, no picture, its pretty self-explanatory.
Step 3. Once you have safely secured the vehicle, loosen the lugs the rest of the way and remove the front wheels. (Next step will have a pic, I promise)
Step 4. Remove the two bolts that secure the caliper to the disc brace. These two bolts are 14MM. This pic is one taken from directly behind the caliper inside the wheel well.
Step 5. Remove the caliper and brake pads. Make sure not to lose the two brake pad clips that secure the brake pads together Also make sure that you rest the caliper on something other than the tie rod, since that will be removed later. DO NOT let it hand by the brake line. As you can see in my pics I have mine resting on a cinder block and some wood blocks.
Step 6. Remove the two bolts that secure the brake rotor/caliper brace. These two bolts are 17 MM. This pic is a one from directly behind the brace.
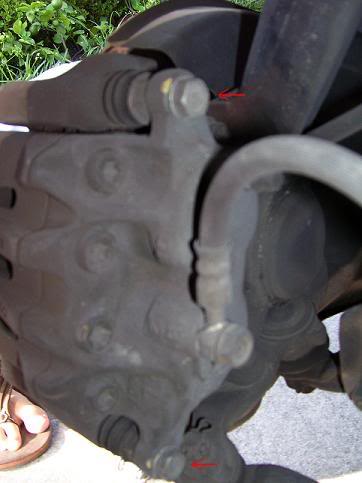
Step 7. Remove the brake rotor/caliper brace and brake rotor.
Step 8. Remove the cotter pin from the tie rod crown nut and remove the crown nut itself. The crown nut is 17MM.

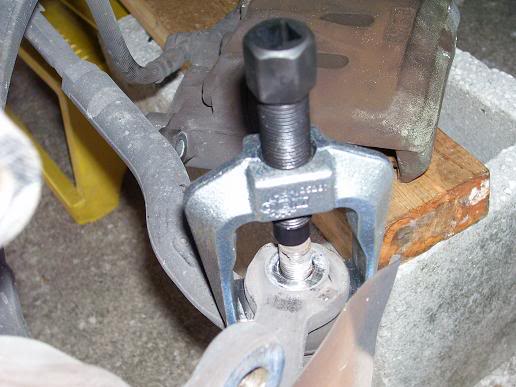
- SST required for next step - You will need your pitman arm puller. This costs 10 bucks at autozone or discount auto or you can borrow it from them for free. Personally, I forked over the 10 bucks, since its nothing compared to the $220 I spent for the tie rods and ball joints. Here is a pic of it.

Step 9. Secure your puller to the top of the tie rod where the crown nut was, and start ratcheting that thing. This particular puller needed an 18MM attachment. DO NOT bang on the tie rod to separate it from the ball joint. If you aren't going to replace that, you will screw up the tread. If you are going to replace it, good luck getting it out of the ball joint's whole once you have disfigured the top of the screw part. Do not skimp out on the arm puller. Here is a pic of this before I separated the two. They will separate with some force, so don't be concerned.
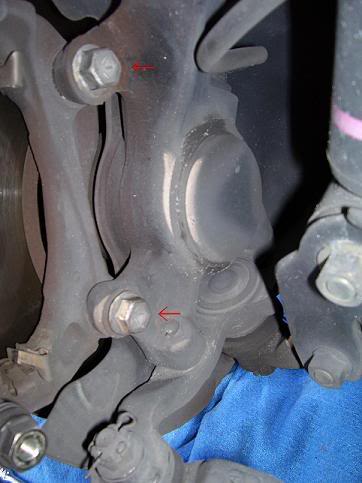
Step 10. Once you have separated these two, You will need to remove the cotter pin from the crown nut that secures the ball joint to the control arm. Once you do this, then remove the crown nut and the two bolts on either side of this crown nut. The crown nut is a 19MM and the other two bolts are 17MM. This pic was taken directly underneath the ball joint where these three bolts are. I apologize for the clarity, but it gets the job done.
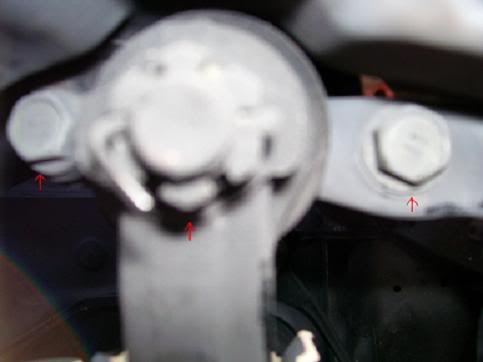
Step 11. With these out of the way, the move the control arm aside. You will need the arm puller again, but this time you will need to pry the boot of the ball joint up so that you can get the puller into position. This may take some force and you may rip the boot of the old ball joint. This should not matter, since you are replacing it, so be rough with it. Here is a pic of the pitman arm puller in place after I pried the boot and separated the ball joint.
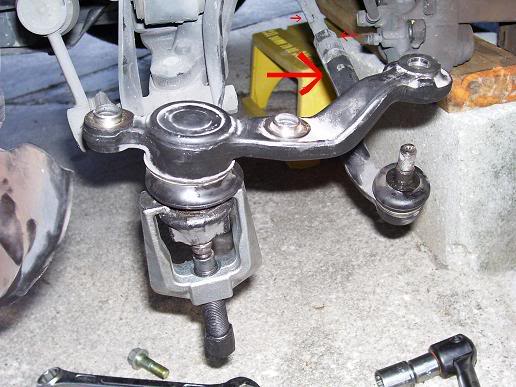
Step 12. (If you are going to replace the outer tie rods) Using cresecent wrenches and referring to the above picture, secure the rod towards the center of the car, (where the small red arrow is) and twist on the tie rod (where the big red arrow is). There is a section on the tie rod itself that will allow the use of a crescent wrench, so I suggest twisting it off from there instead of messing with the adjuster nut. (middle red arrow) You want to make sure you do not move that nut. If you think that you will end up moving that nut, mark its position with tape, nail polish, paint, or whatever you want so that you can get it back into place. Once you twist off the old tie rods, just twist on the new ones back to the correct position.
Install everything in the reverse of the removal. Use the new crown nuts that are provided with the ball joints and tie rods. I highly (HIGHLY) recommend getting your alignment done after this. My steering wheel was cocked after I did this, so I drove immediately to get that done. Some people say its not necessary, but think of it this way - why do all that work and then subject your tires to uneaven wear because your alignment was a little off. In the immortal words of Ben Stiller in Starsky & Hutch - DO IT!
Make sure you torque everything to the correct specifications. Here is a pdf files that give information on torque specs.
https://www.clublexus.com/forums/att...1&d=1183230750
My old ball joints had a large amount of play in them and definitely needed changing. My tie rods were relatively ok, but the passenger side one had a rip in the boot, so that one would have worn out quick.
RESULTS: You should have tighter steering and less shiftiness at high speeds. If you heard clunking noises before you changed these, that may disappear, but there are also worn bushings that could be contributing to that noise. Above all, you should get the peace of mind that your ball joint will not just separate on you and cause thousands of dollars of damage, or worse....
I do hope this motivates everyone that was thinking about making this a DIY project but hasn't yet. It is pretty easy. Next I will be doing a complete bushing upgrade with the Daizen sets for the steering rack, the control arm, and the sway bars. That may be in a month or so, but once I do it I will post the DIY.
You will need: -A jack, jackstands, wheel chokes, a ratchet with 14, 17,18, & 19MM attachments, a breaker bar, a pitman arm puller SST, a set of crescent wrenches, and this DIY.
Step 1.
Loosen the lugs on one or both front wheels. (I doubt a picture is necessary)
Step 2. Jack the front end of the car up and support both sides with jack stands and choke the rear wheels. (Again, no picture, its pretty self-explanatory.
Step 3. Once you have safely secured the vehicle, loosen the lugs the rest of the way and remove the front wheels. (Next step will have a pic, I promise)
Step 4. Remove the two bolts that secure the caliper to the disc brace. These two bolts are 14MM. This pic is one taken from directly behind the caliper inside the wheel well.
Step 5. Remove the caliper and brake pads. Make sure not to lose the two brake pad clips that secure the brake pads together Also make sure that you rest the caliper on something other than the tie rod, since that will be removed later. DO NOT let it hand by the brake line. As you can see in my pics I have mine resting on a cinder block and some wood blocks.
Step 6. Remove the two bolts that secure the brake rotor/caliper brace. These two bolts are 17 MM. This pic is a one from directly behind the brace.
Step 7. Remove the brake rotor/caliper brace and brake rotor.
Step 8. Remove the cotter pin from the tie rod crown nut and remove the crown nut itself. The crown nut is 17MM.
- SST required for next step - You will need your pitman arm puller. This costs 10 bucks at autozone or discount auto or you can borrow it from them for free.
Personally, I forked over the 10 bucks, since its nothing compared to the $220 I spent for the tie rods and ball joints. Here is a pic of it.Step 9. Secure your puller to the top of the tie rod where the crown nut was, and start ratcheting that thing. This particular puller needed an 18MM attachment. DO NOT bang on the tie rod to separate it from the ball joint. If you aren't going to replace that, you will screw up the tread. If you are going to replace it, good luck getting it out of the ball joint's whole once you have disfigured the top of the screw part. Do not skimp out on the arm puller. Here is a pic of this before I separated the two. They will separate with some force, so don't be concerned.
Step 10. Once you have separated these two, You will need to remove the cotter pin from the crown nut that secures the ball joint to the control arm. Once you do this, then remove the crown nut and the two bolts on either side of this crown nut. The crown nut is a 19MM and the other two bolts are 17MM. This pic was taken directly underneath the ball joint where these three bolts are. I apologize for the clarity, but it gets the job done.
Step 11. With these out of the way, the move the control arm aside. You will need the arm puller again, but this time you will need to pry the boot of the ball joint up so that you can get the puller into position. This may take some force and you may rip the boot of the old ball joint. This should not matter, since you are replacing it, so be rough with it.
Here is a pic of the pitman arm puller in place after I pried the boot and separated the ball joint.Step 12. (If you are going to replace the outer tie rods) Using cresecent wrenches and referring to the above picture, secure the rod towards the center of the car, (where the small red arrow is) and twist on the tie rod (where the big red arrow is). There is a section on the tie rod itself that will allow the use of a crescent wrench, so I suggest twisting it off from there instead of messing with the adjuster nut. (middle red arrow) You want to make sure you do not move that nut. If you think that you will end up moving that nut, mark its position with tape, nail polish, paint, or whatever you want so that you can get it back into place. Once you twist off the old tie rods, just twist on the new ones back to the correct position.
Install everything in the reverse of the removal. Use the new crown nuts that are provided with the ball joints and tie rods. I highly (HIGHLY) recommend getting your alignment done after this. My steering wheel was cocked after I did this, so I drove immediately to get that done. Some people say its not necessary, but think of it this way - why do all that work and then subject your tires to uneaven wear because your alignment was a little off. In the immortal words of Ben Stiller in Starsky & Hutch - DO IT!
Make sure you torque everything to the correct specifications. Here is a pdf files that give information on torque specs.
https://www.clublexus.com/forums/att...1&d=1183230750
My old ball joints had a large amount of play in them and definitely needed changing. My tie rods were relatively ok, but the passenger side one had a rip in the boot, so that one would have worn out quick.
RESULTS: You should have tighter steering and less shiftiness at high speeds. If you heard clunking noises before you changed these, that may disappear, but there are also worn bushings that could be contributing to that noise. Above all, you should get the peace of mind that your ball joint will not just separate on you and cause thousands of dollars of damage, or worse....
I do hope this motivates everyone that was thinking about making this a DIY project but hasn't yet. It is pretty easy. Next I will be doing a complete bushing upgrade with the Daizen sets for the steering rack, the control arm, and the sway bars. That may be in a month or so, but once I do it I will post the DIY.
Last edited by Chenzo26; 06-30-07 at 12:11 PM.


 06-30-07, 12:12 PM
#7
Pole Position
Thread Starter
Join Date: Nov 2006
Location: Florida
Posts: 334
Likes: 0
Received 0 Likes
on
0 Posts
Thanks man, I just updated the pdf files, since they didn't work. I have one working now, the other isn't necessary, so I took it off.
Trending Topics
06-30-07, 09:20 PM
#8
just did the lower ball joint and tie-rods with my friends...
HOLY (insert vulgar word here), MY CAR ACTUALLY STEERS!
Took me like 8 hours to do it b/c for some reason the threads on the bolt for the caliper became flat after i took them off (dont know why, and still pissed), but besides that it went pretty smooth. The tie-rods took FOREVER to take off though.
I have a quick question also...
would I need to re-align the car? I changed the outer tie rods but the bolt was so encrusted on there, we couldnt even move it. so it should be in theory, back to its original alignment...
 07-01-07, 10:33 AM
#11
just did the lower ball joint and tie-rods with my friends...
HOLY (insert vulgar word here), MY CAR ACTUALLY STEERS!
Took me like 8 hours to do it b/c for some reason the threads on the bolt for the caliper became flat after i took them off (dont know why, and still pissed), but besides that it went pretty smooth. The tie-rods took FOREVER to take off though.
I have a quick question also...
would I need to re-align the car? I changed the outer tie rods but the bolt was so encrusted on there, we couldnt even move it. so it should be in theory, back to its original alignment...
HOLY (insert vulgar word here), MY CAR ACTUALLY STEERS!
Took me like 8 hours to do it b/c for some reason the threads on the bolt for the caliper became flat after i took them off (dont know why, and still pissed), but besides that it went pretty smooth. The tie-rods took FOREVER to take off though.
I have a quick question also...
would I need to re-align the car? I changed the outer tie rods but the bolt was so encrusted on there, we couldnt even move it. so it should be in theory, back to its original alignment...
Any time you change something or replace suspension you should get a alignment. After i did mine I had terrible vibrations until i was able to get the alignment shop.. It makes a huge difference and better for tire wear..
 GL..
07-01-07, 10:47 AM
GL..
07-01-07, 10:47 AM
#12
Pole Position
Thread Starter
Join Date: Nov 2006
Location: Florida
Posts: 334
Likes: 0
Received 0 Likes
on
0 Posts
just did the lower ball joint and tie-rods with my friends...
HOLY (insert vulgar word here), MY CAR ACTUALLY STEERS!
Took me like 8 hours to do it b/c for some reason the threads on the bolt for the caliper became flat after i took them off (dont know why, and still pissed), but besides that it went pretty smooth. The tie-rods took FOREVER to take off though.
I have a quick question also...
would I need to re-align the car? I changed the outer tie rods but the bolt was so encrusted on there, we couldnt even move it. so it should be in theory, back to its original alignment...
HOLY (insert vulgar word here), MY CAR ACTUALLY STEERS!
Took me like 8 hours to do it b/c for some reason the threads on the bolt for the caliper became flat after i took them off (dont know why, and still pissed), but besides that it went pretty smooth. The tie-rods took FOREVER to take off though.
I have a quick question also...
would I need to re-align the car? I changed the outer tie rods but the bolt was so encrusted on there, we couldnt even move it. so it should be in theory, back to its original alignment...

