Project Scarlett -> Slow NA-T Build"


 02-26-15, 09:40 AM
#77

covered the holes that are on the side in the trunk. I welded them shut with some 20 guage sheet metal. I put black enamel there but I still plan on dynamatting the whole trunk including these spots. I would have a bunch of road noise whenever I drove with the radio off. sadly I melted my bumper since it cought fire and I couldn't put it out till I poked a hole through the bumper.
 oh well, easily fixable with a new bumper and 97+ side skirts. this is the drivers side by the way next to my battery location.

this is the passengers side. this one came out pretty good too and it didn't burn the bumper. haha.

want to cut this all out and weld in new metal. I have 1/8 inch steel plate that i'm welding in place of it. completely flat and gonna dynamat after everything is done. i'm hoping to keep all outside noise outside and help out my sound system.
 02-26-15, 09:46 AM
#78

also welded the factory sub hole shut, even though I found out I want as big as a hole on the deck lid so all the bass can be heard inside the cabin. oh well though. I still have two smaller holes that i'll keep open. want to dynamat this too eventually.

right side hole with factory speaker in place.

left side hole with speaker missing since it popped and didn't work. want to replace this as well with good speakers.

heres my amp and how its installed.


 03-04-15, 08:46 AM
#80
finally got my rear seats and deck put back together. I was waiting on that so I could buy the speakers and install them. I went with some pioneer 6.5" speakers but after measuring them, i'm kinda thinking some 7" speakers would've fit flawlessly. I did buy 2 sets though so I can install 2 in the rear and 2 in the front. just need to come up with the money to install these in the front since I need a couple of stuff like mdx medium density wood and liquid nail with some screws or something to bolt it onto the factory speaker box.
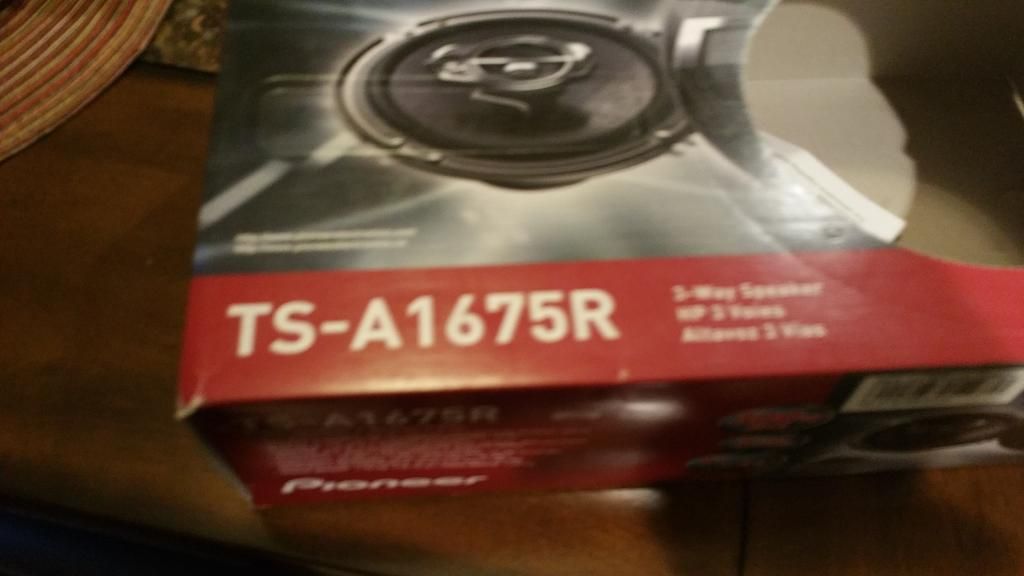
this is the brand of speakers that I went with.
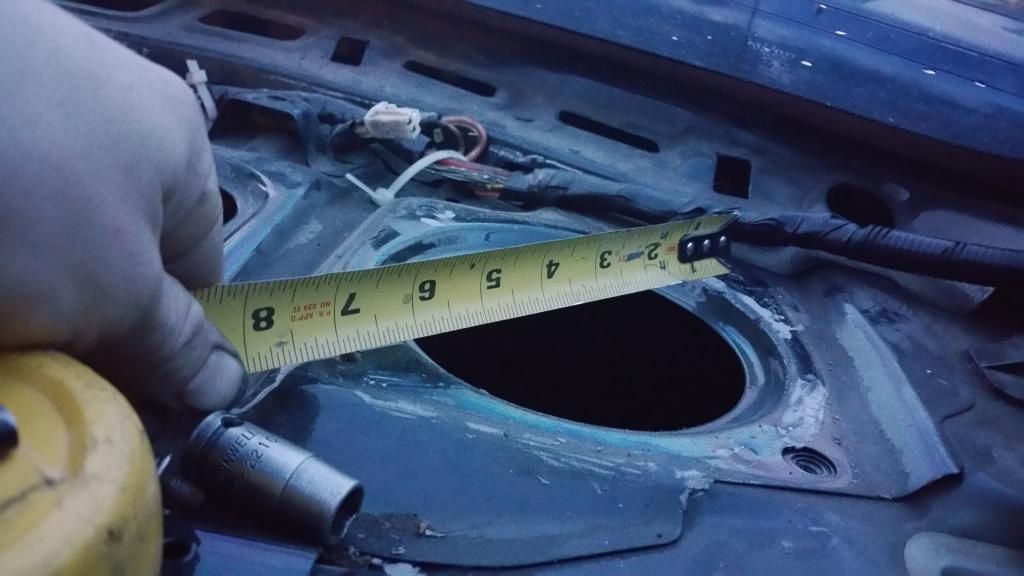
after measuring the mounting holes on the factory hole, I saw that the bolts measured a distance of 7" exactly. that tells that a 7" speaker wouldve fit perfectly.
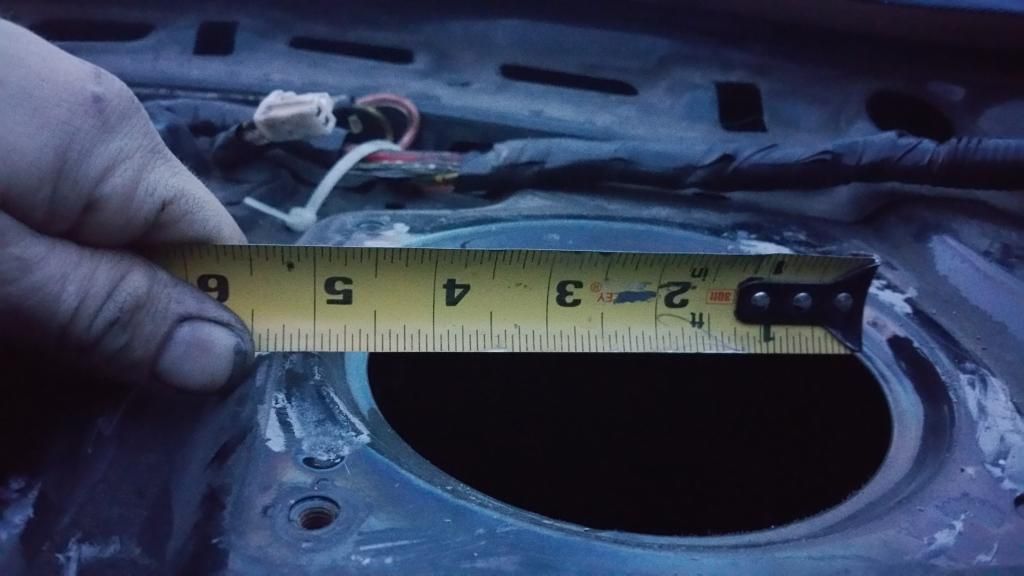
just to know, the opening of the hole is only 4.5".
I marked on the paper these mounting holes so I can measure the distance.
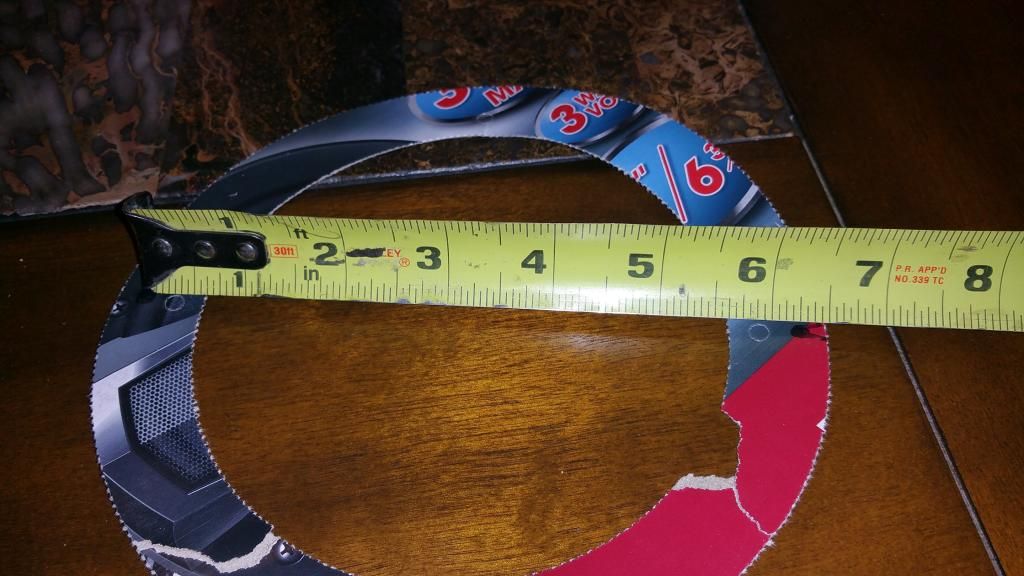
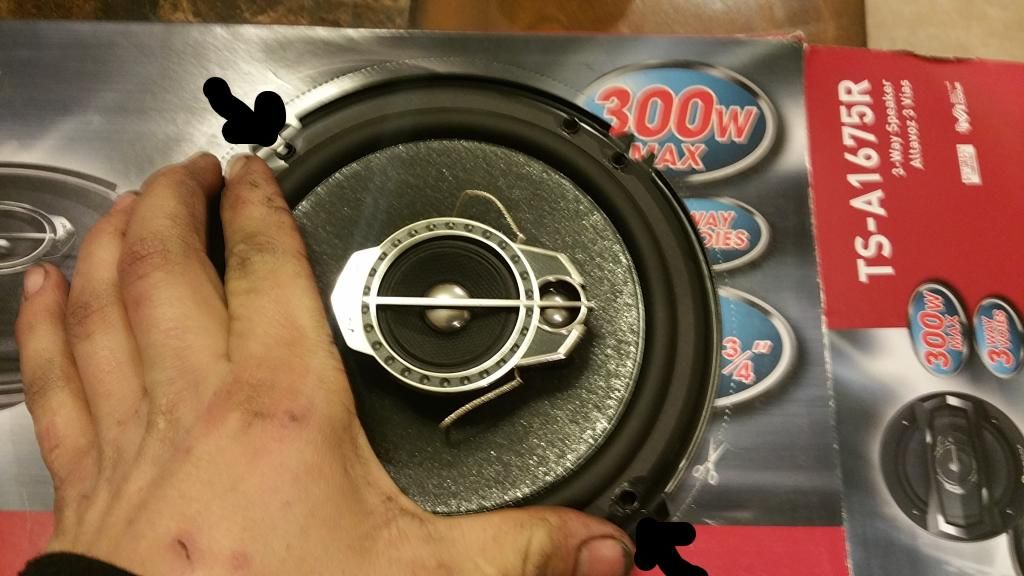
this is the weird part. looking at this measurement. it shows that the speaker is only 6.25". but when I went to install it, it was actually very close to the factory mounting holes so I do believe it was 6.75" like advertised. (speaker says its 6.5" but has the option of 6.75" mounting holes as well.)
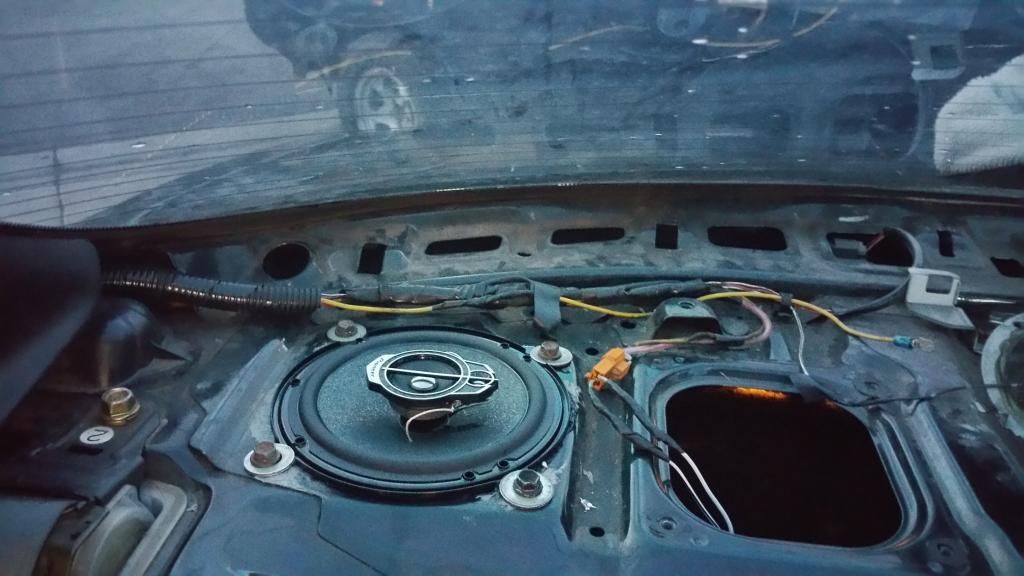
heres what it looks like installed. fit a little to small so I just found some spare washers to grab the speaker.
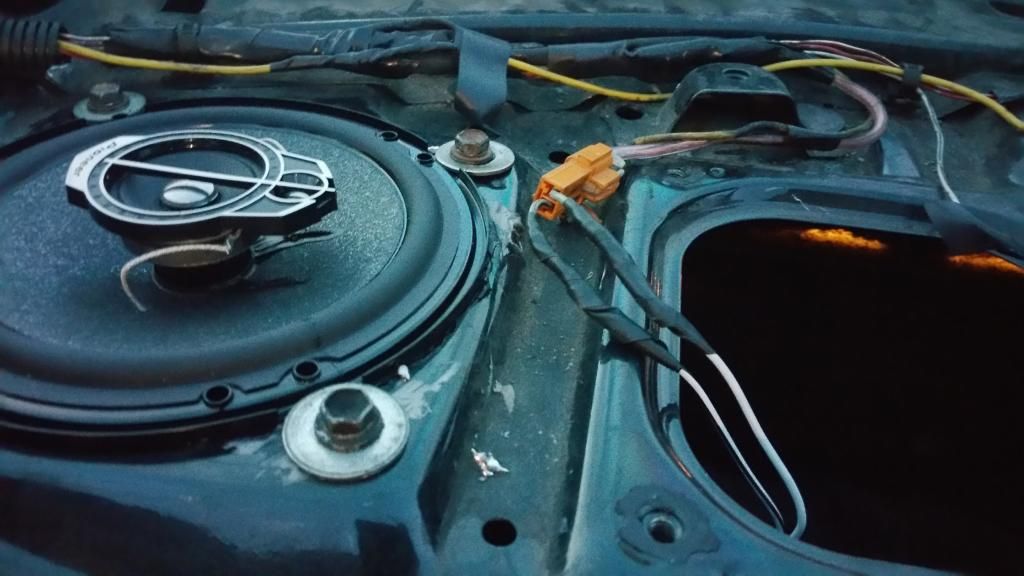
heres a close up pic. for the record though I did solder the connections, shrink wrap, then tape shut.
that's all for now. I do like the way they sounds and they are fantastic speakers, they are way clearer than the factory speakers. but I think the factory rear speaker puts out a little more bass. I am ok with this though because I have 2 ten inch subs in the back for the bass I want. next time I buy speakers though i'm thinking I might buy 7 inch.
this is all for now.

this is the brand of speakers that I went with.

after measuring the mounting holes on the factory hole, I saw that the bolts measured a distance of 7" exactly. that tells that a 7" speaker wouldve fit perfectly.

just to know, the opening of the hole is only 4.5".

I marked on the paper these mounting holes so I can measure the distance.

this is the weird part. looking at this measurement. it shows that the speaker is only 6.25". but when I went to install it, it was actually very close to the factory mounting holes so I do believe it was 6.75" like advertised. (speaker says its 6.5" but has the option of 6.75" mounting holes as well.)

heres what it looks like installed.
fit a little to small so I just found some spare washers to grab the speaker.
heres a close up pic. for the record though I did solder the connections, shrink wrap, then tape shut.
that's all for now. I do like the way they sounds and they are fantastic speakers, they are way clearer than the factory speakers. but I think the factory rear speaker puts out a little more bass. I am ok with this though because I have 2 ten inch subs in the back for the bass I want. next time I buy speakers though i'm thinking I might buy 7 inch.
this is all for now.
Last edited by grumpi300; 03-04-15 at 08:49 AM.
03-04-15, 09:08 AM
#81
I just looked up the specs to my head unit, (ptid-7250nr), which is a horrible head unit by the way, is only rated to 20watts rms and 50watts peak. these speakers are 50watts rms and 300watts peak. I have a little tiny Rockford fosgate amp sitting in my room that I had installed for my single 12 sub that I had prior to my 2 tens. its a 2 channel 4 ohm amp but I can figure out how to hook it all up so it works for my speakers.
what sucks is that the proper way to do it is to get a 4 channel amp with the option of 2 inputs for the rca's. but I don't have that money right now so I cant do it the right way but at least the speakers will sound a bit better.
what sucks is that the proper way to do it is to get a 4 channel amp with the option of 2 inputs for the rca's. but I don't have that money right now so I cant do it the right way but at least the speakers will sound a bit better.
 03-15-15, 07:24 PM
#83
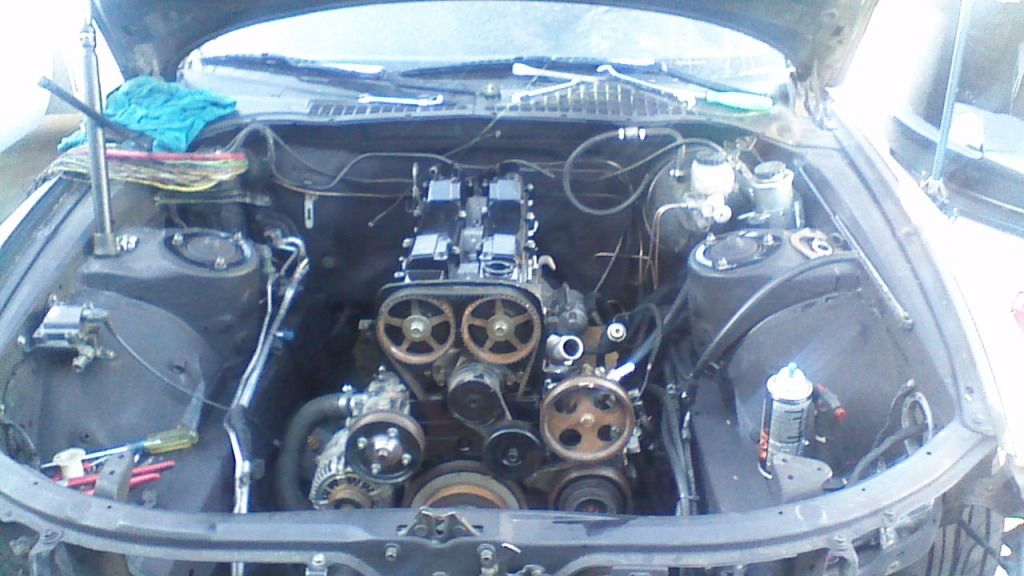
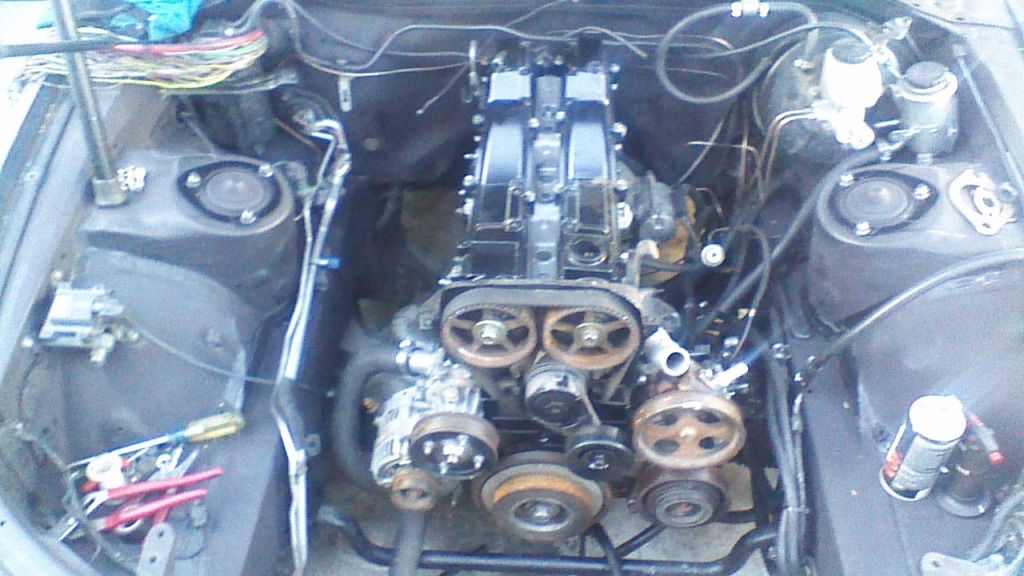
11 days since last post and still haven't finished my engine bay. I got way to much school and work and going out because of family coming over or going out of town with the girlfriend. but i'm about 3/4 done with the engine bay. so happy. 
so I decided against the amp: i'm in a rush to get it done now because of several reasons: 1, i'm broke, 100 is too much for me. I know it sounds pathetic but for the next few months I have no money left to spare. I gotta save up for several things coming up. 2: my dad has a spare truck that I've been using as a daily since my car is down. sadly my dad is selling it so I have no way to drive around town. on any given day of the week I drive 65 miles minimum. 3: my smog is coming up. I found out recently that since my car is a salvage, I have to go to a mechanic shop and have it dmv certified, then go to the dmv to get a permit, take it to the dmv, have the dmv inspect it, then smog it. only thing is idk if it will pass the primary or secondary inspection because I removed the air bags. I also removed the egr system but that's easy for me to make it look like its back on. haha.
well heres a picture of my engine bay for now.
so I decided against the amp: i'm in a rush to get it done now because of several reasons: 1, i'm broke, 100 is too much for me. I know it sounds pathetic but for the next few months I have no money left to spare. I gotta save up for several things coming up. 2: my dad has a spare truck that I've been using as a daily since my car is down. sadly my dad is selling it so I have no way to drive around town. on any given day of the week I drive 65 miles minimum. 3: my smog is coming up. I found out recently that since my car is a salvage, I have to go to a mechanic shop and have it dmv certified, then go to the dmv to get a permit, take it to the dmv, have the dmv inspect it, then smog it. only thing is idk if it will pass the primary or secondary inspection because I removed the air bags.
I also removed the egr system but that's easy for me to make it look like its back on. haha.well heres a picture of my engine bay for now.
03-23-15, 10:28 AM
#85
well i havent done much since last update. i finally got around to installing my new clutch master cylinder. (its a pain to do when the fuse box on the kick panel is missing the top bolt so the pedal is hitting the fuse box.) so i put the nut on the fuse box and the pedal and clutch master just fell right where they were supposed to. haha.
also, when i initially made the hole for the clutch pedal and slave cylinder, i made the hole a little too big. so i made a little plate to cover some of the hole. i made it to try and reduce whatever road noise i could. i wanted to weld it to the firewall but it was so much of a pain being bent over like that for so long fighting with the fuse box so i just left it bolted on. i'll take pics next time around.
reason i changed the clutch master cylinder is cause it was leaking on the inside of my car. every morning i would go to put it in reverse, i would have to push the pedal down at least three times so it would actually engage. hopefully its fixed now.
also, i wired in the clutch pedal switch so the car doesnt turn on unless my foot is on the pedal. like a true clutch!!!
decided also on trying to fool the dmv inspection by just putting on a lexus air bag and steering wheel for just a week, or atleast until i pass the inspection. shouldnt be too bad hopefully. all vacuum lines will have to be reinstalled and routed properly also. once i pass the inspection i want to put it back to the way i want.
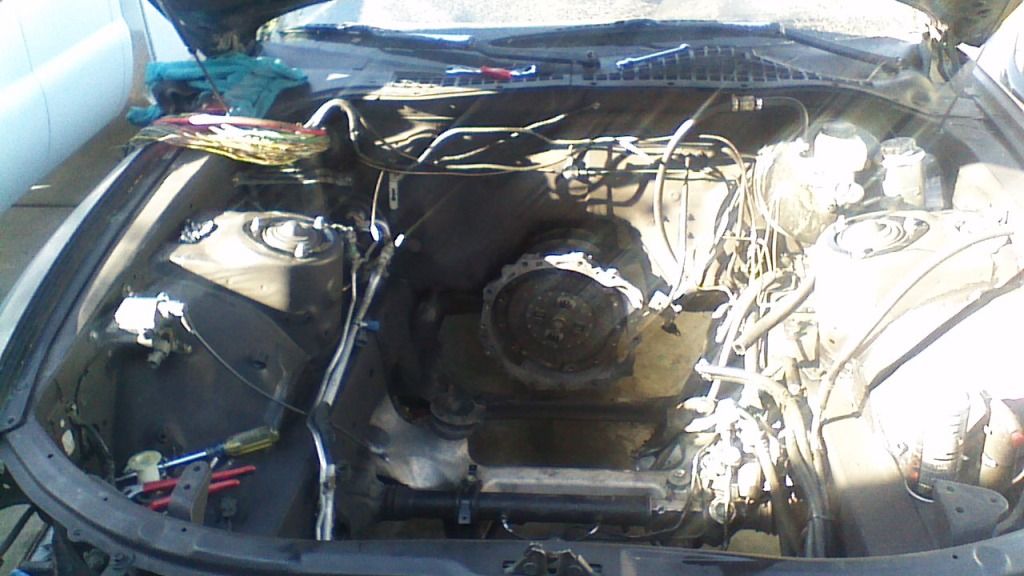
i havent done anything to the engine this past week since i was getting everything all buttoned up on the engine bay. all i got left to do is put on the brake master cylinder and lines, install the oil pressure switch and run the wires accordingly, and run the wire for the vsv for the intake valve. i accidentally disconnected it all the way to the computer, now i have to run it again. luckily i have tomorrow and wednesday off so i can get everything else done.
also, when i initially made the hole for the clutch pedal and slave cylinder, i made the hole a little too big. so i made a little plate to cover some of the hole. i made it to try and reduce whatever road noise i could. i wanted to weld it to the firewall but it was so much of a pain being bent over like that for so long fighting with the fuse box so i just left it bolted on. i'll take pics next time around.
reason i changed the clutch master cylinder is cause it was leaking on the inside of my car. every morning i would go to put it in reverse, i would have to push the pedal down at least three times so it would actually engage. hopefully its fixed now.
also, i wired in the clutch pedal switch so the car doesnt turn on unless my foot is on the pedal. like a true clutch!!!
decided also on trying to fool the dmv inspection by just putting on a lexus air bag and steering wheel for just a week, or atleast until i pass the inspection. shouldnt be too bad hopefully. all vacuum lines will have to be reinstalled and routed properly also. once i pass the inspection i want to put it back to the way i want.
i havent done anything to the engine this past week since i was getting everything all buttoned up on the engine bay. all i got left to do is put on the brake master cylinder and lines, install the oil pressure switch and run the wires accordingly, and run the wire for the vsv for the intake valve. i accidentally disconnected it all the way to the computer, now i have to run it again. luckily i have tomorrow and wednesday off so i can get everything else done.
03-24-15, 10:48 PM
#86
got everything done from my previous post except run the vsv wire for the vacuum canister. I figure I can do it when my engine is in.
I got the broken knock sensors removed finally and installed the new ones. installed the oil pressure switch and oil level sensor, (I took off the internals of the level sensor so it only looks like its there. just to cover the hole. I figured it would be hard to do while in the car.)
all I got left to do in exhaust cam and valve cover and then i'm going to put my engine in my car. i'll finish timing belt and cover and all the rest of the accessories when the engine is in. at least this way i'm not so stressed out about getting it in and having space.
I got the broken knock sensors removed finally and installed the new ones. installed the oil pressure switch and oil level sensor, (I took off the internals of the level sensor so it only looks like its there. just to cover the hole. I figured it would be hard to do while in the car.)
all I got left to do in exhaust cam and valve cover and then i'm going to put my engine in my car.
i'll finish timing belt and cover and all the rest of the accessories when the engine is in. at least this way i'm not so stressed out about getting it in and having space.
03-26-15, 09:38 AM
#87
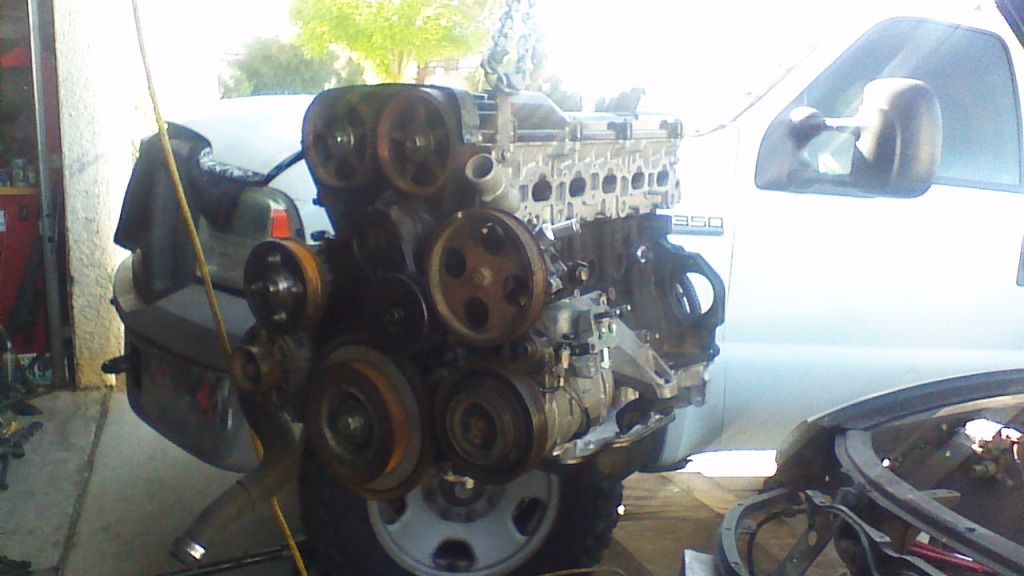
finally got my engine in. and did a little modification to my trans tunnel for the r154 and shorth throw.
heres the pics. also had to re-relocate my oil filter relocation kit since i took off my power steering cooler. i will be using my prior trans cooler as a power steering cooler.
heres my guage. didnt have the right tools for the job so i kinda messed up. dug a little too far bottom.
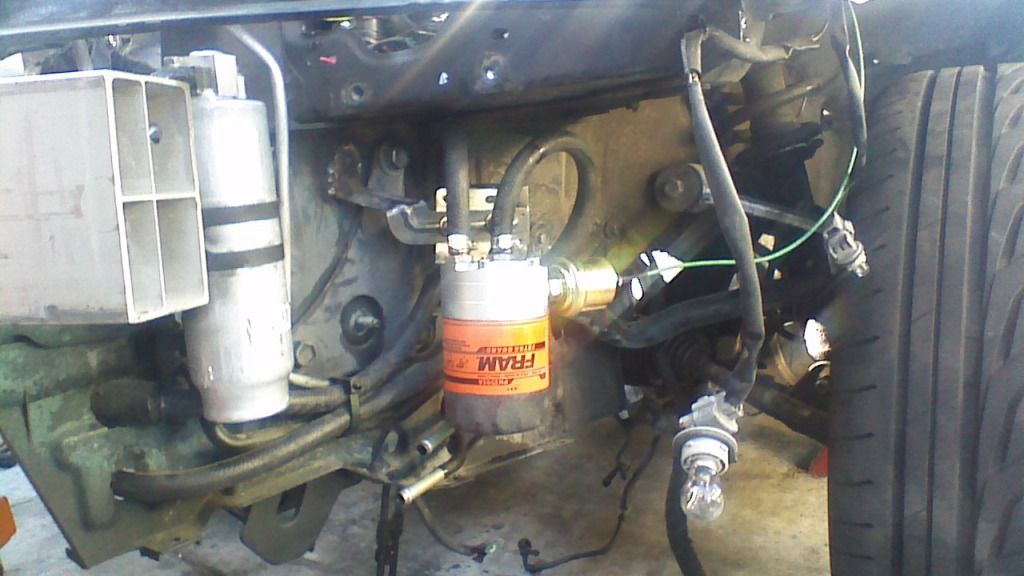
welded the bracket to the frame. i'm sure i'm gonna have to re-re-relocate my oil filter again when i go turbo and add intercooler piping. had to do this because the oil pressure switch wouldnt fit where i had it previously.
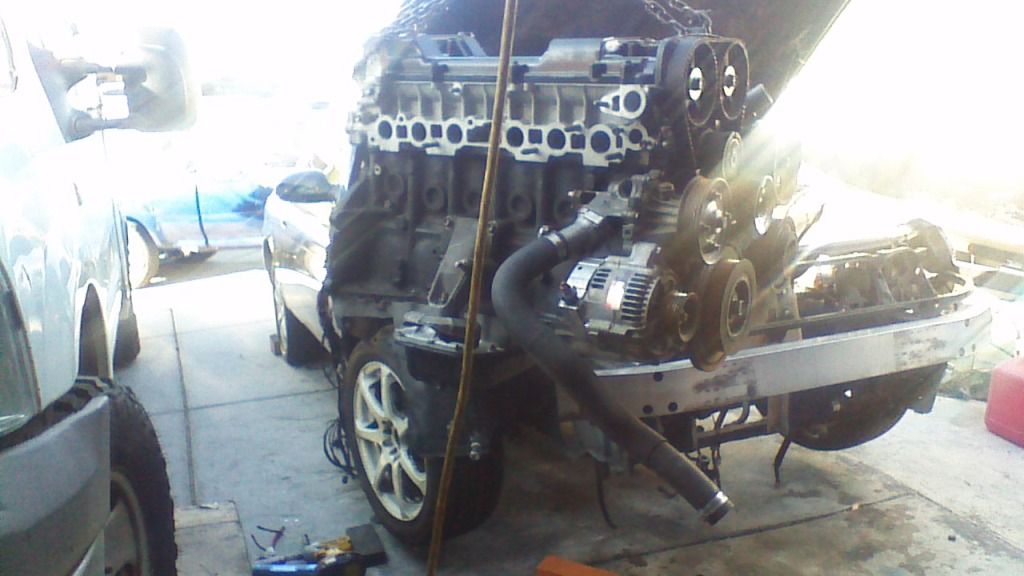
if you'll notice, i have half of the motor mounts on the engine. and the lower halfs in on the car. my motor mounts are completely destroyed but i dont have the money at the time for new ones. so i'll install them later.

all cleaned up engine bay and painted and ready for its new heart.
its in!!!
thats all for now. i didnt get any pics of the trans tunnel cause it was to dark and didnt have a good camera.
and did a little modification to my trans tunnel for the r154 and shorth throw.heres the pics. also had to re-relocate my oil filter relocation kit since i took off my power steering cooler. i will be using my prior trans cooler as a power steering cooler.

heres my guage. didnt have the right tools for the job so i kinda messed up. dug a little too far bottom.

welded the bracket to the frame. i'm sure i'm gonna have to re-re-relocate my oil filter again when i go turbo and add intercooler piping. had to do this because the oil pressure switch wouldnt fit where i had it previously.


if you'll notice, i have half of the motor mounts on the engine. and the lower halfs in on the car. my motor mounts are completely destroyed but i dont have the money at the time for new ones. so i'll install them later.


all cleaned up engine bay and painted and ready for its new heart.

its in!!!

thats all for now. i didnt get any pics of the trans tunnel cause it was to dark and didnt have a good camera.
03-29-15, 11:24 PM
#88
finally got my car running and driving.
1st, when I was putting my engine back together, I noticed that my fuel line had broken, so I took the opportunity to make a new stainless steel braided hose and delete the fuel pulsation damper. so fuel pulsation damper mod is now done.
2nd, beech short throw shifter version 2. SUPER happy the throws are short, but its hard putting it in any gear. especially since its pointed so far forward that when I go into 1st, 3rd, and 5th my hand hits the bezel. I think i'm going to just cut the shifter and weld it back on so it points straight up.
3rd, my trd shift **** that my girlfriend got me from amazon had the "trd" emblem fall off. so now my hands get full of glue. easily fixable with some brake cleaner and hopefully doesn't destroy the fabric. if it does then i'll buy another one.
4th, engine runs perfect. ran new vacuum lines for the charcoal canister, and intake valve. unfortunately I'm getting a code 52, knock sensor code. I replaced them both but I heard one crack while installing it. it didn't break fully, but I guess its enough to throw a code. i'll replace it next.
5th, my oil pressure switch works. only thing that scares me is that when I let off the gas on cruise, my oil pressure drops to about 16psi. when idle its around 25-30 give or take. cant remember right now. I have a feeling that its because my oil filter relocation kit is so far away that it lowers the pressure drastically. i'm thinking a high pressure pump can fix this.
i'll post pics tomorrow hopefully.
1st, when I was putting my engine back together, I noticed that my fuel line had broken, so I took the opportunity to make a new stainless steel braided hose and delete the fuel pulsation damper. so fuel pulsation damper mod is now done.
2nd, beech short throw shifter version 2. SUPER happy the throws are short, but its hard putting it in any gear. especially since its pointed so far forward that when I go into 1st, 3rd, and 5th my hand hits the bezel. I think i'm going to just cut the shifter and weld it back on so it points straight up.
3rd, my trd shift **** that my girlfriend got me from amazon had the "trd" emblem fall off. so now my hands get full of glue. easily fixable with some brake cleaner and hopefully doesn't destroy the fabric. if it does then i'll buy another one.
4th, engine runs perfect.
ran new vacuum lines for the charcoal canister, and intake valve. unfortunately I'm getting a code 52, knock sensor code. I replaced them both but I heard one crack while installing it. it didn't break fully, but I guess its enough to throw a code. i'll replace it next.5th, my oil pressure switch works. only thing that scares me is that when I let off the gas on cruise, my oil pressure drops to about 16psi. when idle its around 25-30 give or take. cant remember right now. I have a feeling that its because my oil filter relocation kit is so far away that it lowers the pressure drastically. i'm thinking a high pressure pump can fix this.
i'll post pics tomorrow hopefully.
03-30-15, 02:50 PM
#89
everything all buttoned up. only thing left is drain the water and add coolant. put on the factory adjustment screw on the clutch master cylinder, and adjust the timing a little. my hydrocarbons are a little high on idle and co2's are a little high on idle. put ngk 4644 plugs gapped to .032 since i'm factory with no major mods.
3rd picture is my shifter in 3rd gear.
4th picture is neutral.
5th picture is 5th gear. gotta cut the shifter and weld it back on so my hand doesn't hit the bezel.
other than that i'm all done and good with my car.
once I pass inspection, i'll put on the obx headers and b pipe again so it can breath better. right now it feels sluggish compared to my last engine that had a blown head gasket. it actually took off when I stepped on the gas compared to now.
04-02-15, 10:51 AM
#90
got a couple other things fixed. cut out my spare tire well and welded one plate of metal so far. still have the other plate but didn't have time.
also got my knock sensor code fixed. I changed the one that cracked first to the old one but that didn't fix the problem. so I changed the other one and the check engine light finally went away. I guess both the ones I bought were bad. but at least its running better now.
the oil pressure problem was fixed by adding more oil. 5 quarts isn't enough with the cooler and the relocation kit. now it runs a steady 25-33 psi on idle and 56-61psi on cruise.
only things left to do now is
remove the "o/d" bulb on the cluster so it can stop flashing at me while driving.
still fix the shifter. all I have to do is bend it about 35-45 degrees up.
and finish the trunk. once that's all fixed I can be done with my car for a while.
that is also not including the air bag and egr reinstall so I can pass inspection. I went to a junkyard and they quoted me 100 for a steering wheel and air bag. not bad. I have everything for the egr in my possession so i'm not worried about that.
also got my knock sensor code fixed. I changed the one that cracked first to the old one but that didn't fix the problem. so I changed the other one and the check engine light finally went away.
I guess both the ones I bought were bad. but at least its running better now. the oil pressure problem was fixed by adding more oil. 5 quarts isn't enough with the cooler and the relocation kit. now it runs a steady 25-33 psi on idle and 56-61psi on cruise.
only things left to do now is
remove the "o/d" bulb on the cluster so it can stop flashing at me while driving.
still fix the shifter. all I have to do is bend it about 35-45 degrees up.
and finish the trunk. once that's all fixed I can be done with my car for a while.
that is also not including the air bag and egr reinstall so I can pass inspection. I went to a junkyard and they quoted me 100 for a steering wheel and air bag. not bad.
I have everything for the egr in my possession so i'm not worried about that.