
Roof Problem
 08-09-16, 11:07 AM
#76
Lead Lap

bimmer, I find it interesting that you are now getting different readings. In posts 64 & 67, the left side was 6Ω and the right side was 1Ω. Now you are reading just the opposite, just different values (left side 1Ω & right side 3Ω).
 08-09-16, 02:07 PM
#77
Hi Harold,`
first time i think i think was doing something wrong as it took me a while to figure out pins .. my right side has the issue but first time i was testing i was getting 001 on right side and 006 on left which wasnt right..
so my good initial 2000ohm test showed 001 right side (sometimes 002) and left side 001
for 200ohm test i got 1.1 left and 1.4 ish on right
the current through all wires is 000 from one end to other
and the positive and negative at the motor end show: 003 right and 001 left
08-19-16, 10:24 AM
#78
I had bad luck just as yours Tarheel, my motor came in with assembly half broken
From what I heard, it's the brushes in these motors that go bad which could be my intermittent or weak connection issue. I'll open this motor once I get another.
Good news is this motor/gear assembly is very easy to change. I must find another new motor
From what I heard, it's the brushes in these motors that go bad which could be my intermittent or weak connection issue. I'll open this motor once I get another.
Good news is this motor/gear assembly is very easy to change. I must find another new motor
08-19-16, 10:46 AM
#79
I had bad luck just as yours Tarheel, my motor came in with assembly half broken
From what I heard, it's the brushes in these motors that go bad which could be my intermittent or weak connection issue. I'll open this motor once I get another.
Good news is this motor/gear assembly is very easy to change. I must find another new motor
From what I heard, it's the brushes in these motors that go bad which could be my intermittent or weak connection issue. I'll open this motor once I get another.
Good news is this motor/gear assembly is very easy to change. I must find another new motor
08-19-16, 11:02 AM
#80
Pole Position
 08-19-16, 02:07 PM
#81
These kind of places can fix them for way less than a new one . You basically have a new motor after they get done with it unlike a used motor.http://www.mikeselectricmotors.com/
08-20-16, 09:29 AM
#82

I had bad luck just as yours Tarheel, my motor came in with assembly half broken
From what I heard, it's the brushes in these motors that go bad which could be my intermittent or weak connection issue. I'll open this motor once I get another.
Good news is this motor/gear assembly is very easy to change. I must find another new motor
From what I heard, it's the brushes in these motors that go bad which could be my intermittent or weak connection issue. I'll open this motor once I get another.
Good news is this motor/gear assembly is very easy to change. I must find another new motor
08-20-16, 09:49 AM
#83
...also, for what it's worth: the motor is attached to the gear assembly with a few bolts,... so you may be able to take your new motor, and attach it to your old gear assembly on the existing bracket.
08-20-16, 11:46 PM
#84
1) is your roof functional at all? if Yes use the switch to move the roof, let trunk lift, let roof move to trunk and let package tray stay up (this is must) and then stop and disconnect battery ....... If No then disconnect battery from the start and manually move roof
2) remove seats, head rests, wind deflector,
3) remove door sills and disconnect the wire from the clip so it doesnt get pulled.
4) Remove rear side panels i believe its 4 screws on the inside of car and 1 screw and clip behind package tray (now because this is large and is held by seat belts and gets in the way.. i removed the 3 bolts to split the bigger section of this panel from the top, makes it easier)
5) disconnect motor connectors
6) there are 3 hex screws which need to be opened and the motor should come right off with the gear assembly (now i dont know if a wrench can fit in there as i have not tried, but there is room)
i will post some pics for when i do it, otherwise just post here if you need any help.
These kind of places can fix them for way less than a new one . You basically have a new motor after they get done with it unlike a used motor.http://www.mikeselectricmotors.com/
Sorry to hear that. If they send you a replacement: Ask them to remove the motor/gear assembly (three bolts) before they package & ship it. That assembly sticks out like a sore thumb from the brackets---so it's no wonder why the gear-box gets broken in transit,--no matter how much bubble-wrap they use...
second complication i noticed was there is a little metal ball that goes into the cover end of the armature... that ball is impossible to slide in with the armature as it comes out and sticks to the strong magnets
did you get a chance to open the one you received?
Last edited by 416tt; 08-20-16 at 11:50 PM.
08-18-17, 01:12 PM
#86
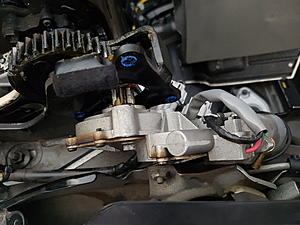
sorry guys I didn't get back on this but thanks to the individuals who helped me on this thread I was able to identify that my passenger roof motor is dying and the first motor i recieved was broken but I got another in mail.
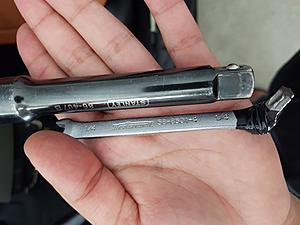
It was the right side motor behind passenger quarter panel. I couldn't get any wrench or tool with torx bit to fit behind motor in the little gap (in red) so I used a tiny 1/4 wrench that held bit making a mini wrench and then used an extension socket as leverage to push since these bolts are really tight.
tool:
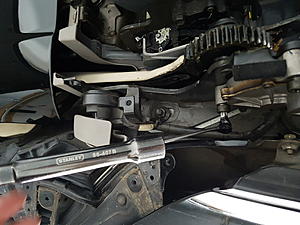
got this tool in small gap:

used wrench extension for leverage:
3 torx screws, got them open. When your putting new motor in you might have to turn the gear for it to fit back in the spot correctly otherwise the screw holes wont match
It was the right side motor behind passenger quarter panel. I couldn't get any wrench or tool with torx bit to fit behind motor in the little gap (in red) so I used a tiny 1/4 wrench that held bit making a mini wrench
and then used an extension socket as leverage to push since these bolts are really tight. tool:

got this tool in small gap:

used wrench extension for leverage:

3 torx screws, got them open. When your putting new motor in you might have to turn the gear for it to fit back in the spot correctly otherwise the screw holes wont match


Thread
Thread Starter
Forum
Replies
Last Post
lexusscturbo
CL of Southern California
1
12-19-09 03:26 PM