When you click on links to various merchants on this site and make a purchase, this can result in this site earning a commission. Affiliate programs and affiliations include, but are not limited to, the eBay Partner Network.
Thanks Mark!! I'm more excited about this than my GS.. lol
Originally Posted by Nat
Thank you kuWupt...I just picked up an SC and like you, start working from the inside out. The work on a 13 years old car.
tell me about it.. I just cleaned up the seats cause it looked horrible.. but I want to address all my maintenance items including all the gaskets I can change and then suspension components.. its gonna be a long road.. good luck on your SC man...
On my 2nd Gen GS after lowering the car and putting wheels I spent a lot of time chasing down the source of an annoying vibration I had between 65 and 70mph. I changed each suspension component at a time to see what would help it and with each component I changed it got better and better till it was no more. Huge thanks to the members of ClubLexus back in the day that reported similar issues and helped narrow my issues down. The SC430 shares a lot of the GS suspension components and so everything I did on the GS I wanted to do on the SC, but not in increments. Wanted it all said and done at the same time, and since a lot of them are interlinked it made more sense to do it at the same time.
These are the components I've changed:
Moog inner tie rods EV800543 x 2
Moog Outer tie rod Left ES80585
Moog Outer tie rod Right ES80584
Moog Ball joint Left K500102
Moog Ball joint Right K500101
Figs steering rack bushing
Figs #2 caster arm bushing.
Along with the above components the engine mounts and the transmission mounts need to be changed as well which I will do the next time I get a chance. I want to upgrade the sway bars in the near future so will do the sway bar end links then too.
I don't think these components have been changed since the day it left the factory 13 years ago!! Wow was it a bi**h. The tie rod ends were definitely shot, the boot was torn and grease all over the place, the ball joints were shot, boots torn, grease all over the place, the inner tie rod would flop with gravity, the steering rack bushings didn't look bad they were starting to separate at the edge a little from the metal collar and the caster arm bushings didn't look that bad either, slight tears in the bushings but not torn through like on my old GS. Although the bushings looked fine my tires showed inner camber wear just on the inner 1 inch which is usually caused by the caster bushing. I'm really glad I did end up doing everything that I planned on, it definitely needed it.
I don't get to work on my car on a daily basis so to move things along quicker I got a used set of arms to press out the old bushings and press in the new bushings. Fold in the lip on one side press out the old bushing and press in the Fig's bushing. The pic shows only the press in bushing installed, the metal sleeve has to be greased and put in along with the end caps. I waited till the day of install to grease it and assemble it all together. The metal sleeve can be hand pressed in so no big deal but the grease is really sticky so didn't want it being exposed to other elements.
When I got the chance to install the rest of my components it was all remove and replace. Still took like 4 hours to do all of it, everything seemed like it was seized on there. the locking nut between the inner and outer tie rod did not want to budge, I took both out attached, took it to a bench vise and was able to remove the outer tie rod end but not the nut in between. I ended up cutting the nut on either sides just to get it off to get the rubber boots off for the new tie rods. The ball joints took an exuberant amount of force to pop. The only thing that went smoothly was the steering rack bushing and the already pre-assembled caster arm.
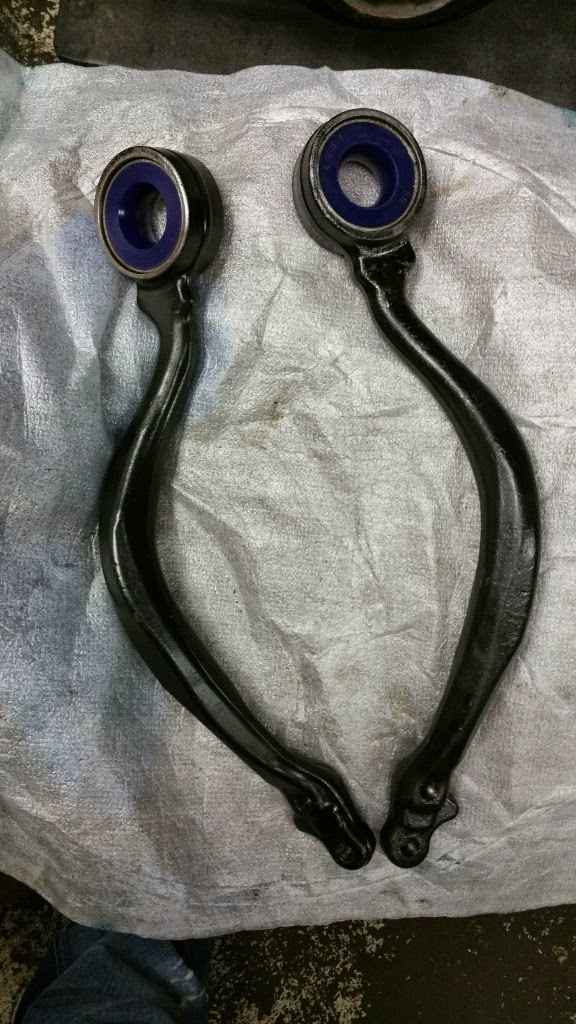
Comparison of the old and new tie rods:
The ball joints were in the same condition, forgot to take a pick of it before I cussed at it a few times and threw it!
Out with the old:
\
In with the new:
I took measurements of the length of the tie rods and matched it up to the new ones hoping to get by till I got an alignment on Monday but that definitely didn't work out. Driving the car, it was all over the place so I'm not driving it till I get it aligned and can update then.
Also in hindsight I should have washed the underside and engine bay to get rid of the old oil buildup mainly from the valve cover gasket that I can see, hopefully it's just that. I think I might also have a slight leak from my power steering line where it meets the power steering. I'll probably clean the engine bay and underside before I continue with any other changes, it should better help me pinpoint leaks.
Wow" Fantastic job. i need to inspect all those parts myself. I have new Moog ball joint but ny shop said I didn't need them. I'll have the car up on jack stands soon so I'll check everything. I did have the control arm and steering bushings changed for Daizan poly bushings.
I guess that you won't know for sure until after you get it aligned as to whether changing the tie rods, ball joints, steering rack bushing and caster arm bushing got rid of your vibrations. Let us know how it turns out.
I can't identify what these bushings are in you last picture. Where is that?
If you could circle that in a drawing ex. From Sewell Parts, or name the part it would help me get oriented until I can get back under.
Note - take a look at the differential bushings as well. I am replacing the diff with one off a Supra TT and am replacing all the bushings with some from Figs.
Wow" Fantastic job. i need to inspect all those parts myself. I have new Moog ball joint but ny shop said I didn't need them. I'll have the car up on jack stands soon so I'll check everything. I did have the control arm and steering bushings changed for Daizan poly bushings.
You photos and descriptions are excellent. Thanks
Thanks Slv.. the ball joints might be fine but you would be surprised at the amount of difference the inner tie rods make. On my 2nd gen GS the inner's made the biggest difference in eliminating the vibration.
Originally Posted by Harold57
Nice job kuWuPt!
I guess that you won't know for sure until after you get it aligned as to whether changing the tie rods, ball joints, steering rack bushing and caster arm bushing got rid of your vibrations. Let us know how it turns out.
Couldn't get an alignment today hopefully tomorrow after work. The vibration isn't as annoying on stock size tires, it is magnified exuberantly when u have a low profile tire. This has been an issue and is documented heavily for the 2nd gen.. and since the sc and the gs suspensions being identical I am almost 100% that I'll have this problem later on. As of now yes there is a mild vibration that I can feel.. but not to the point where you can see your passenger seat back support vibrate.... will fill you in once I get an alignment.
Originally Posted by SlvBullet
A bit of help ...
I can't identify what these bushings are in you last picture. Where is that?
If you could circle that in a drawing ex. From Sewell Parts, or name the part it would help me get oriented until I can get back under.
Note - take a look at the differential bushings as well. I am replacing the diff with one off a Supra TT and am replacing all the bushings with some from Figs.
Thanks much
Those are steering rack bushings on the drivers side. The image below is from an SC300 steering rack but same idea. The two red circles on the steering rack on the right are what you see in my pics.. the one of the left is the bushing on the passenger side.
Here is a write up on steering rack bushing replacement in which Step 4 to 6 is the bushings in question. Good write up, although it is easier to smack the bushing out from the front to the back. i just used a punch and hammered it out. Came out without any issues.
I was thinking about the diff but with all these parts I've been buying I need to pace myself. Also want to get the rear knuckle done, the front lca, well I'm sure there are more but off the top of my head that's all I would love to have soon.
Wow !! So I started typing this early morning but clearly passed out. It's been a long tiring weekend guys!
Oh right. I upgraded those a few years ago but had the shop do the work. I'll take a look at the tie rods and other components. The Silver Bullet has just about 70K miles so is still rather young.
Thanks for all the posts. I have a short project to put some insulation on the garage door so I can keep it warmer so I can work on the car.
Couldn't get an alignment done on Sunday so since the car was at the shop anyway I thought it would be best to clean out the engine bay.
The engine bay and under carriage never looked like it was ever cleaned. I know there is a slight oil leak which I believe is coming from the valve cover gaskets. Cleaning the engine bay would help me locate the leak better. It looks like the leak has been existing for awhile now, there was oil buildup everywhere it seemed.
On inspection I found a leak coming from the oil feed line from the power steering reservoir and the power steering pump. So swapped that out before I started on the cleanup.
I used the following tools:
- Purple Power 1 Gallon
- Long bristle brush
- Red scuff pad
- Grey Scuff pad
- Pressure Washer
I had the car on a lift when doing this because I wanted to tackle the bottom of the car too, there was oil build up there as well, possibly trickling down from the valve cover gaskets over time. Make sure the car is not cool to the touch, when purple power is sprayed on to a warm engine it dries up almost instantly leaving a residue behind. You don't want that, you want it to penetrate the grease etc by letting it sit there and agitating it a little to help it through. A warm engine is not going to allow you to do that.
With the engine cooled down and on the lift, I took all the covers off. Engine cover, air box and intake piping. Before I forgot to, I went ahead and removed the MAF off the piping and there is a vacuum solenoid on the piping that I took off too. All the loose connectors and vacuum lines I took off I wrapped in plastic and taped it up. Also taped up the throttle body to prevent water from getting in. On the underside of the car I took all the covers off as well.
With everything prepped I sprayed the engine down with purple power, I did the underside first, sprayed on, let it sit for about 10 minutes and agitated it with the brush to help loosen the grease up. With the pressure washer I sprayed everything off, I could see a huge difference already. All the oil build up was washed away. I did the same to the engine bay from up top. The pressure washer definitely helps to knock away the loosened build up from all the nicks and crannies.
I let it drip dry for a bit while I addressed all the covers too. I didn't let the purple stuff sit on for a long time on the plastics. Sprayed it on, agitated it with the brush and immediately rinsed it off. There wasn't that much build up on the plastics except for the bottom tray. Looked like new once finished. Some areas in the bay needed a little more attention so sprayed those areas down again and worked the brush and pressure washed it a little bit more.
When I looked under the car again, all the build up is gone but then I saw a thin layer of dust that was baked on for some reason on the parts. The pic below shows the dust on the inside of the dust shield, lower control arm etc and it gives off a greyish appearance. The caster arm and the tie rods look fresh because they were just replaced yesterday.
Sprayed a little more purple power on there and scrubbed it with a red pad and grey pad. Red pad where metal was not smooth, like the lower control arm and grey pad where it was like the dust shield. Did the scrub down to most of the underside really, sub frame, oil pan, transmission pan, steering rack, sway bars, inner fender well liners etc. I did the underside rinsed it off with the pressure washer, did the left fender liners front and back, rinsed off and proceeded to do the same on the right fender liners. Scrubbing it down made a big difference, the baked on layers of dust etc broke down and the suspension pieces are all black again. Even the fender liner is black and not grayish anymore.
I used compressed air to blow out all the water from the engine bay, especially from all the connectors. With the MAF out I used some MAF cleaner to clean that out as well before assembly.
I sprayed on some conditioner for the hoses onto a rag and wiped the hoses and fender well down but I'll end up putting on a water based protectant on the engine covers etc once I finish all the maintenance and a final rinse in the engine bay.
I picked up the car today. The alignment was done yesterday but got done with work late so didn't get a chance to pick it up till today.
Wow what a difference!! The front end feels soo much more planted, steering response is much much better. While driving down a straight road I could move my steering wheel almost 2 inches to either side and it would not be responsive. Now though, steering is very responsive and front end feels solid. No shuddering when I go over pot holes and the vibration is not there anymore. Definitely need to do the rear sway bars though. Rear end feels a little loose, upgrade the rear sway bars, bushings and end links along with the front sway bars, bushings and end links and I think I would be happy.
While I was at the shop I tried to draw and cut a sticker for the brake calipers. Trying to get the width and the curve right for the LS400 calipers. This is want I came up with, need to do a little more work on the curvature but it's going in the right direction.
Congrats on the suspension work! The rear sway bar will make a huge difference, too! Do the LS400 Calipers fit the OEM SC430 rotors? Front or rear?
Thanks Shawn, sway bars are on my list. The LS400 calipers are for the front, they will not fit the rear. Also the calipers will not fit the OEM SC430 rotors, you'll have to get LS400 rotors as well.
 01-07-15, 07:48 PM


 This thread has been helpful.