
SC430 Timing Belt Installation Notes
 01-01-14, 08:34 AM
#76

Thanks OBP. The Aisin kit comes with Mitsuboshi which is the OEM. I replaced my serpentine with GATES back in 2010. It still looks good.
Yes I want to see the OEM belt, but yours is young, they will look almost new.
See you later in the month.
Yes I want to see the OEM belt, but yours is young, they will look almost new.
See you later in the month.
Mandy good luck with the timing belt/water pump change. I feel good about mine - engine sounds better - less squeaky and there is a healthy hum to it. BTW I also got the serpentine belt changed to a Gatorback per many people's recommendations. Lemme now how yours goes. Can show you my old belts the next time we meet.
Last edited by mandyfig; 01-06-14 at 01:39 PM.
 01-06-14, 01:52 PM
#77
My AISIN Timing Belt kit came in recently. They include the Water pump and its gasket. 2 Idlers. 1 Tensioner. 2 O rings and 1 square gasket.
Now the review and research will be the key.
Now the review and research will be the key.
01-06-14, 06:05 PM
#78
 01-06-14, 06:40 PM
#79
Trust me, I need all the help I can get. So when I get down to it, I will be sending pics...instant support, hopefully.
01-06-14, 06:41 PM
#80
I have a manual as well, which I really need to get familiar with. Thanks.
01-24-14, 04:29 AM
#81
Pole Position

First off,thank you very much for the .PDFs at the beginning of this thread!
I lost my digital workshop manual set late last year when my last laptop's HDD crashed and as I'm doing the belt,tensioners,idlers & pump on my LS430 this weekend,the info is invaluable!
One quick question for you all: Have any of you changed the oil seals?
No-one's mentioned it so far and I have generally always done these as well when doing a job like this,so you know you never need to open it up again...
The cam seals are several hours work to do as thw whole cam has to come out and be pulled apart to get them out,but the crank is straight forward.
Mine look okay so far,so they're staying this time around,but what sort of mileage have people seen them fail at?
My car has 146k km on it,and was running an original belt until a few hours ago...
I plan to pull the top covers every second service and inspect the oil seals from here on out until they start to leak.
Regards,
Justin...
01-24-14, 07:54 AM
#82
This is an interesting topic. I went back-and-forth on whether to change seals when I did my timing belt. They looked good and weren't leaking (of course). I read a few comments from Lexus/Toyota techs who claimed crank/cam seal failure was rare in Toyota/Lexus. Also, I've owned a lot of cars in the past 40 years, and take many of them to high mileage - gas, diesel, turbo charged, 4's, 6's, 8's - and I've never had a crank or cam seal failure. Maybe I'm lucky, or fussy, or both.
So I passed on changing the seals. So far, so good (that was almost 60K miles ago on my '02)
Kelly
So I passed on changing the seals. So far, so good (that was almost 60K miles ago on my '02)
Kelly
01-28-14, 03:43 AM
#83
I changed all the front end seals on my SC430 engine last year, and included the power steering pump too. Seems like the opportune time to do it,, and yes I have had them fail on other Lexi I've owned the crankshaft seal failure being the most annoying and costly one.
07-05-14, 05:18 PM
#84
Driver School Candidate
Join Date: Jul 2014
Location: CA
Posts: 7
Likes: 0
Received 0 Likes
on
0 Posts
Great write up I am in the middle of my replacement (115k miles) of my timing belt.
Question for you.
Did you replace the fan idler pulley?
I have it as a Aisin part number: FBT-011.
No fan but it is still referred to as the Fan Pulley Bracket.
I have it all apart and I really don't want to have to come back later and replace this part.
Question for you.
Did you replace the fan idler pulley?
I have it as a Aisin part number: FBT-011.
No fan but it is still referred to as the Fan Pulley Bracket.
I have it all apart and I really don't want to have to come back later and replace this part.
02-20-21, 12:30 AM
#85
Driver School Candidate

Join Date: Feb 2021
Location: California
Posts: 1
Likes: 0
Received 0 Likes
on
0 Posts
Got around to replacing the timing belt in the SC. A pretty straightforward job and I added some notes and pics to assist those that would either like to do things themselves and/or save the $700+ dollars. This is more of a reference thread in order for others in the future to refer to as I doubt many will read it and then want to run out and do this.
WARNING! An improper timing belt installation will result in severe engine damage. Do not attempt if you are not comfortable and skilled to tackle such a task.
This is not a 100% detailed installation post but will guide those that already have some level of automotive repair background.
A few notes:
1) The radiator DOES NOT have to be removed though the fan shroud assembly should be (10 minutes max)
2) Align the timing marks BEFORE removing the old belt.
3) A powerful impact wrench is highly recommended. No more than 7 3/4" long.
4) Time, 4 hours for those with the right tools and experience, 8-9 hours for the novice.
5) Since your in there ,might as well change the water pump.
6) Recommend replacing the tensioner rollers as well. Two of them (not pictured below).
Recommended tools:
1) 14mm,12mm ,22m, 10mm sockets.
2) 17mm, 14mm open end wrenches
3) Vice
4) Powerful impact wrench
5) Gear puller
6) Small allen wrench
The number one question I get to this day from my GS days is ,"How do I remove the crankshaft bolt?" My answer: Use a compact and powerful impact wrench-see below. Keep in mind that the bolt should be torqued back on so one should be familiar with the torque settings on the impact wrench.
The belt I am using is a Goodyear GatorBack timing belt: part number #40298. Cost me around $22.00 with shipping ( I get discounts, don't ask).
Anyhow, here are some pictures with a few notes. Feel free to ask any questions.
Line up the crank pulley first.
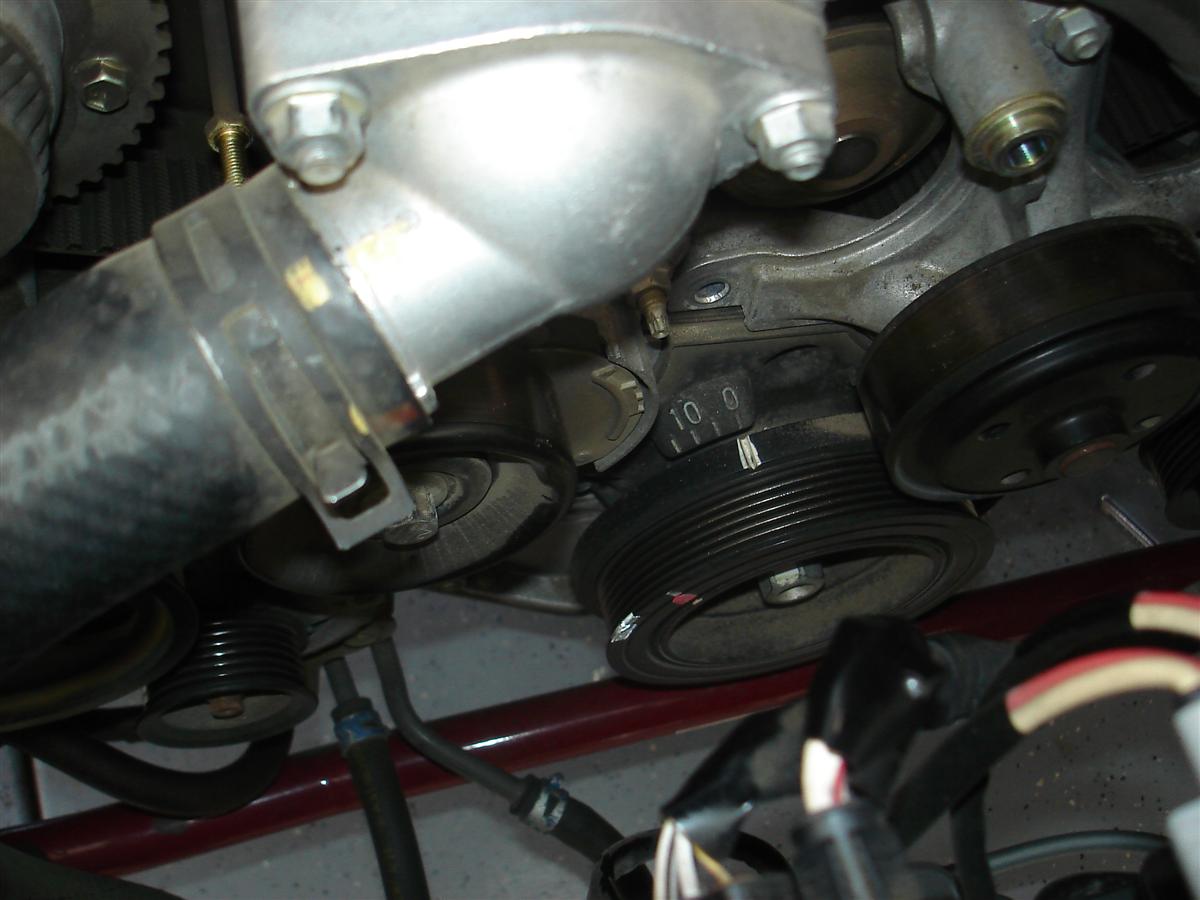
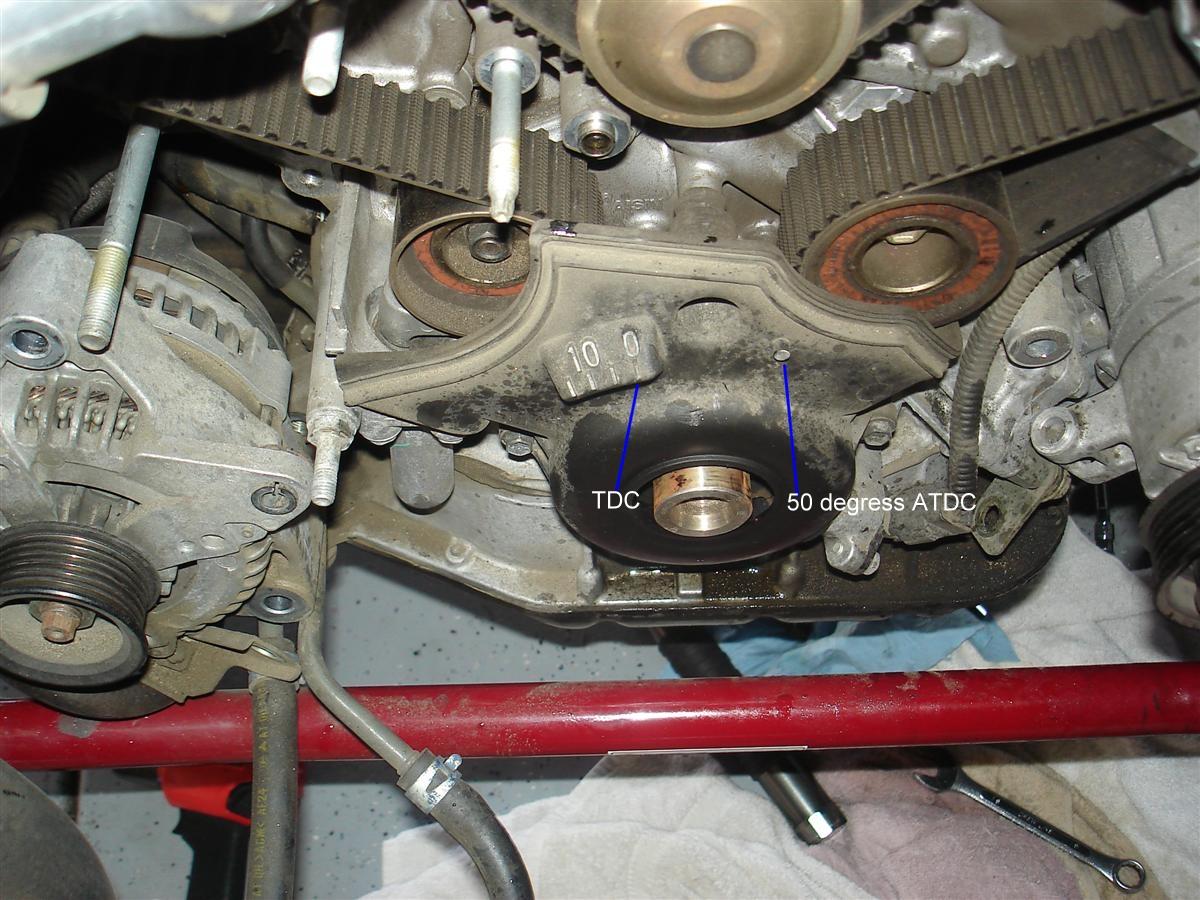
Timing marks:
Two ways to do this. This is where it gets confusing:
Lexus method: as the motor sits at TDC the left camshaft (as you sit in the car) is spring loaded and can (will) spring counter clockwise with the timing belt removed with very little effort.
TDC means the marks on the camshaft line up with the I on the housing of the camshafts (as seen in pics) and the dots on the crank pulley match the dot on the oil pump (see below) and the harmonic balancer notch is on 0. To prevent this spring loaded camshaft from moving, Lexus calls out to place the notches on the camshaft on the T and the crank pulley 50 degrees ATDC. This is marked on the plastic cover with a dot (see pic). This is to remove the belt and also keeps the camshafts in place where they are not prone to moving with the slightest pressure. Once the belt is removed then move the gears manually and individually over to TDC which is I on the camshafts and notch to notch for the crank pulley. The reason for this is that there is no mark on the oil pump for 50 degrees, only for TDC.
Some prefer to line up everything on the I from the start and finish that way and not move the gears individually. The choice is yours.

Same for the right side.
Engine pic
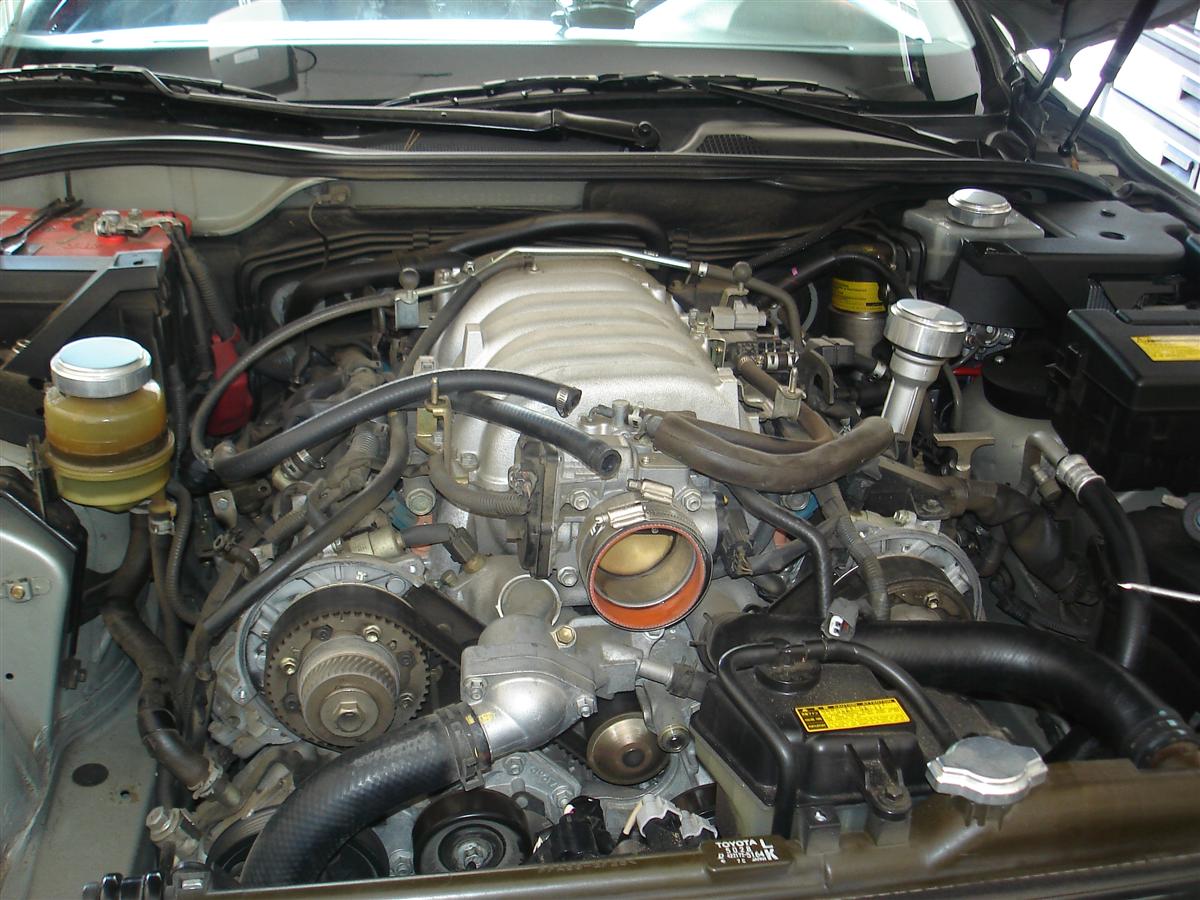
A/C compressor does not need to be removed, just moved out of the way. 3 bolts hold in in place.

Removing the idler pulley bracket
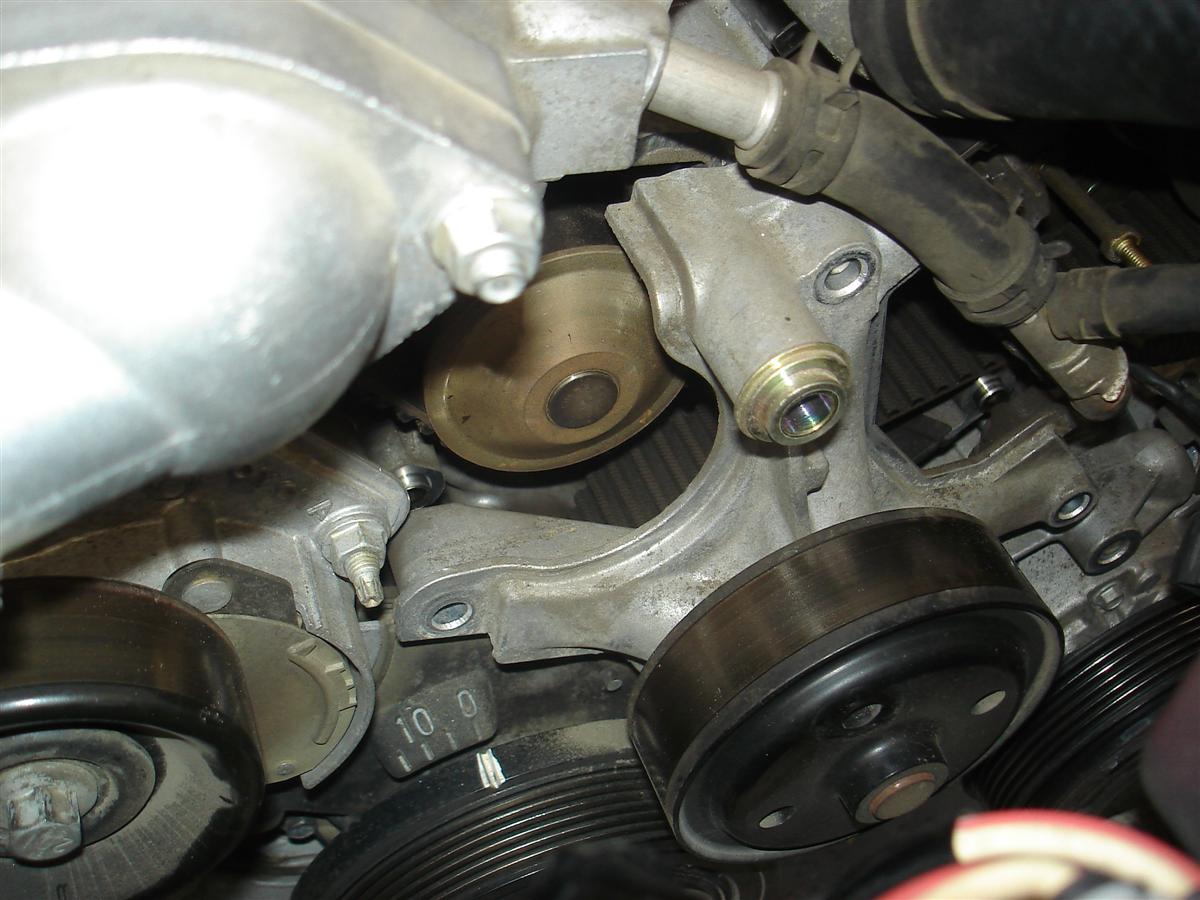
Remove the power steering pulley to allow the alternator to be moved out of the way. This is needed to remove the bracket behind.

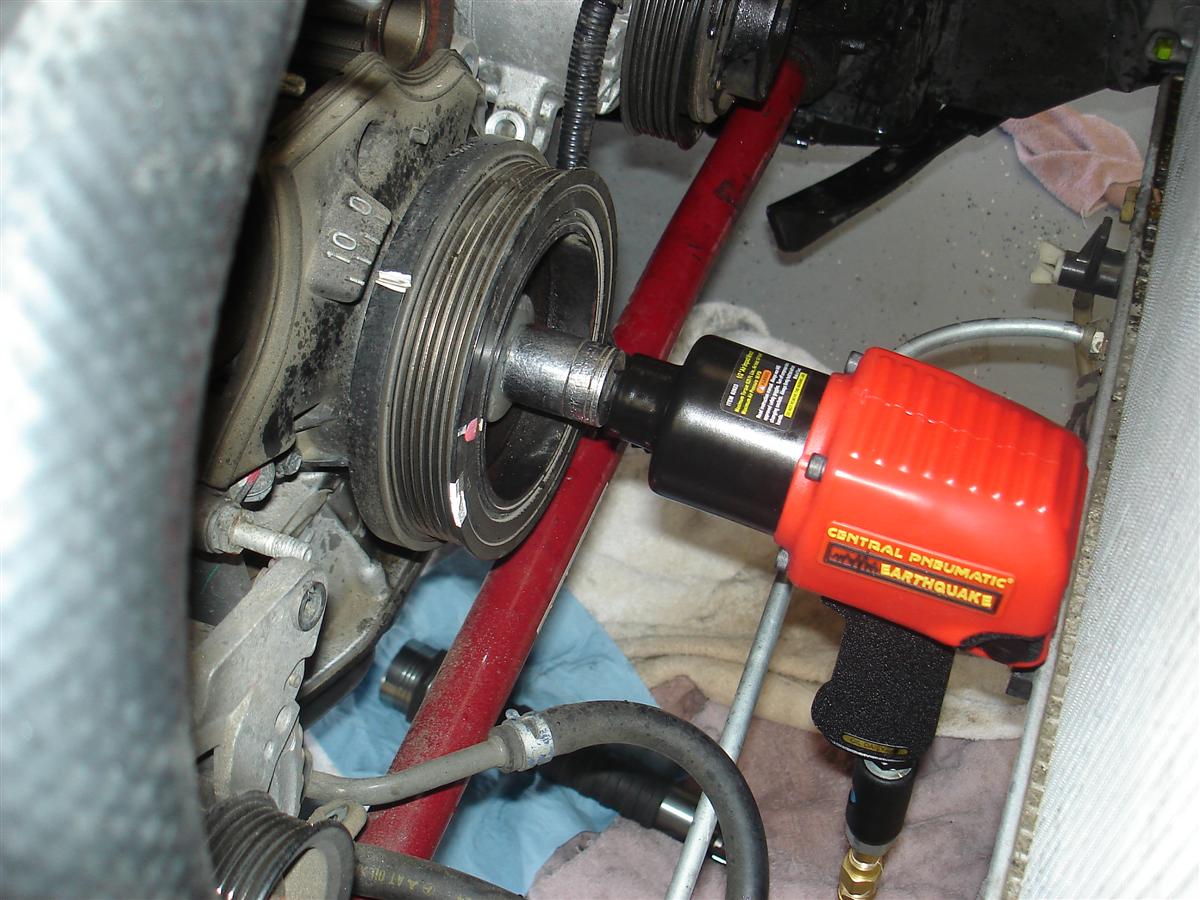
OK, this is the big one. Note: Take no shortcuts here. Some try to wedge something into the flexplate gear located in the bellhousing. There is potential to cause damage and that is one thing you do not want to have to repair as the labor involved is more than the timing belt.
The Lexus repair manual calls for a special tool (read: expensive) that attaches to the pulley. Again- not my cup of tea as one would still have to use a breaker bar and much force to loosen the bolt.
My method: One big bad impact wrench.
In this case I used a very nice Central Pneumatic Earthquake 1/2" with 625lbs of max torque at 90psi( I recommend this). I ran it at 130psi. Shhhh, don't tell them as anything over 90psi is not covered by warranty so says the little card in the box.
I am normally a Ingersoll Rand fanboy but this thing is awesome. Available on sale from Harbor Freight for $80.00! The crank bolt came loose within 1 second. Note: There is very little clearance between the back of the impact and the radiator-look at the pic. Do not try to remove the crank pulley all of the way or the impact will wedge into the radiator. Just loosen it. The benefit of using this method is that it works, it is much safer vs the other methods, does not move the pulleys, and requires very little effort on my part. In other words, I'm tired, lazy, and just want the tools to do the work for me.
Look at the photo and notice the timing marks are not lined up. This is for a pose shot showing the impact wrench in place as well as showing the available room between it and the radiator. Obviously I am not going to hold a camera in one hand and remove the bolt with the other. This was just a pose shot taken before the bolt was actually removed. Once lined up the pulley will not move with a high torque gun.
 +-
+-
WARNING! An improper timing belt installation will result in severe engine damage. Do not attempt if you are not comfortable and skilled to tackle such a task.
This is not a 100% detailed installation post but will guide those that already have some level of automotive repair background.
A few notes:
1) The radiator DOES NOT have to be removed though the fan shroud assembly should be (10 minutes max)
2) Align the timing marks BEFORE removing the old belt.
3) A powerful impact wrench is highly recommended. No more than 7 3/4" long.
4) Time, 4 hours for those with the right tools and experience, 8-9 hours for the novice.
5) Since your in there ,might as well change the water pump.
6) Recommend replacing the tensioner rollers as well. Two of them (not pictured below).
Recommended tools:
1) 14mm,12mm ,22m, 10mm sockets.
2) 17mm, 14mm open end wrenches
3) Vice
4) Powerful impact wrench
5) Gear puller
6) Small allen wrench
The number one question I get to this day from my GS days is ,"How do I remove the crankshaft bolt?" My answer: Use a compact and powerful impact wrench-see below. Keep in mind that the bolt should be torqued back on so one should be familiar with the torque settings on the impact wrench.
The belt I am using is a Goodyear GatorBack timing belt: part number #40298. Cost me around $22.00 with shipping ( I get discounts, don't ask).
Anyhow, here are some pictures with a few notes. Feel free to ask any questions.
Line up the crank pulley first.
Timing marks:
Two ways to do this. This is where it gets confusing:
Lexus method: as the motor sits at TDC the left camshaft (as you sit in the car) is spring loaded and can (will) spring counter clockwise with the timing belt removed with very little effort.
TDC means the marks on the camshaft line up with the I on the housing of the camshafts (as seen in pics) and the dots on the crank pulley match the dot on the oil pump (see below) and the harmonic balancer notch is on 0. To prevent this spring loaded camshaft from moving, Lexus calls out to place the notches on the camshaft on the T and the crank pulley 50 degrees ATDC. This is marked on the plastic cover with a dot (see pic). This is to remove the belt and also keeps the camshafts in place where they are not prone to moving with the slightest pressure. Once the belt is removed then move the gears manually and individually over to TDC which is I on the camshafts and notch to notch for the crank pulley. The reason for this is that there is no mark on the oil pump for 50 degrees, only for TDC.
Some prefer to line up everything on the I from the start and finish that way and not move the gears individually. The choice is yours.
Same for the right side.
Engine pic
A/C compressor does not need to be removed, just moved out of the way. 3 bolts hold in in place.
Removing the idler pulley bracket
Remove the power steering pulley to allow the alternator to be moved out of the way. This is needed to remove the bracket behind.
OK, this is the big one. Note: Take no shortcuts here. Some try to wedge something into the flexplate gear located in the bellhousing. There is potential to cause damage and that is one thing you do not want to have to repair as the labor involved is more than the timing belt.
The Lexus repair manual calls for a special tool (read: expensive) that attaches to the pulley. Again- not my cup of tea as one would still have to use a breaker bar and much force to loosen the bolt.
My method: One big bad impact wrench.
In this case I used a very nice Central Pneumatic Earthquake 1/2" with 625lbs of max torque at 90psi( I recommend this). I ran it at 130psi. Shhhh, don't tell them as anything over 90psi is not covered by warranty so says the little card in the box.
I am normally a Ingersoll Rand fanboy but this thing is awesome. Available on sale from Harbor Freight for $80.00! The crank bolt came loose within 1 second. Note: There is very little clearance between the back of the impact and the radiator-look at the pic. Do not try to remove the crank pulley all of the way or the impact will wedge into the radiator. Just loosen it. The benefit of using this method is that it works, it is much safer vs the other methods, does not move the pulleys, and requires very little effort on my part. In other words, I'm tired, lazy, and just want the tools to do the work for me.
Look at the photo and notice the timing marks are not lined up. This is for a pose shot showing the impact wrench in place as well as showing the available room between it and the radiator. Obviously I am not going to hold a camera in one hand and remove the bolt with the other. This was just a pose shot taken before the bolt was actually removed. Once lined up the pulley will not move with a high torque gun.
+-
Hey guys does anyone know what is the name of the part the it�s leaking from and how much to fix it
04-14-22, 10:58 PM
#86
This is such great information. I have done a lot of work on cars but this will be my first timing belt. I want to learn and will be hiring an expert to come buy and teach me what I do not understand.
My question... I have a SC430 with 309K miles. Just bought it and do not know history. Runs fine but has Code P1346 VVT Sensor /Camshaft Position Sensor Circuit Range/Performance Problem (Bank 1) AND Code P1349 VVT System Malfunction Bank 1 - Is it possible the car has skipped a tooth on timing somehow and if so how do I tell? Then if it did when I install new one will everything be off or will simply making sure the lines on belt and engine line up fix things? FYI - I do not notice it running odd but when it was cold it seemed to shake the other day a bit.
Hope I am asking or explaining that correct.
Thanks again.
04-15-22, 06:28 AM
#87
Lexus Test Driver
This is such great information. I have done a lot of work on cars but this will be my first timing belt. I want to learn and will be hiring an expert to come buy and teach me what I do not understand.
My question... I have a SC430 with 309K miles. Just bought it and do not know history. Runs fine but has Code P1346 VVT Sensor /Camshaft Position Sensor Circuit Range/Performance Problem (Bank 1) AND Code P1349 VVT System Malfunction Bank 1 - Is it possible the car has skipped a tooth on timing somehow and if so how do I tell? Then if it did when I install new one will everything be off or will simply making sure the lines on belt and engine line up fix things? FYI - I do not notice it running odd but when it was cold it seemed to shake the other day a bit.
Hope I am asking or explaining that correct.
Thanks again.
My question... I have a SC430 with 309K miles. Just bought it and do not know history. Runs fine but has Code P1346 VVT Sensor /Camshaft Position Sensor Circuit Range/Performance Problem (Bank 1) AND Code P1349 VVT System Malfunction Bank 1 - Is it possible the car has skipped a tooth on timing somehow and if so how do I tell? Then if it did when I install new one will everything be off or will simply making sure the lines on belt and engine line up fix things? FYI - I do not notice it running odd but when it was cold it seemed to shake the other day a bit.
Hope I am asking or explaining that correct.
Thanks again.
to answer your question, the steps will tell you to place the engine at TDC and if the marks don’t line up, you will know it skipped a tooth.
i did the job on my 2002 SC430 and must say, this was the most involved TB job I ever did…I have done about six total.
before you begin, please make sure you understand all the steps and have the correct tools and parts to get the job done.
as for parts, are you going to replace every part you remove? I hope so, since you plan to keep the car.
when it came time for a TB job on my 2007, I let a shop do it…I provided the parts.
here is my 2002 experience…again, please make sure you understand the job before you start this big adventure :-)
https://www.clublexus.com/forums/sc4...bws-sc430.html
Last edited by Bgw70; 04-15-22 at 06:43 AM.

The following users liked this post:
AceWright (04-15-22)
04-15-22, 07:49 AM
#88
it �looks� like it skipped a tooth.
to answer your question, the steps will tell you to place the engine at TDC and if the marks don�t line up, you will know it skipped a tooth.
i did the job on my 2002 SC430 and must say, this was the most involved TB job I ever did�I have done about six total.
before you begin, please make sure you understand all the steps and have the correct tools and parts to get the job done.
as for parts, are you going to replace every part you remove? I hope so, since you plan to keep the car.
when it came time for a TB job on my 2007, I let a shop do it�I provided the parts.
here is my 2002 experience�again, please make sure you understand the job before you start this big adventure :-)
https://www.clublexus.com/forums/sc4...bws-sc430.html
The following users liked this post:
Bgw70 (04-15-22)
04-15-22, 02:20 PM
#89
Pole Position

Any job can be a good one to learn on, assuming one has the proper parts, tools, reference material, gumption, patience and time. Most people don't.
"Code P1346 VVT Sensor /Camshaft Position Sensor Circuit Range/Performance Problem (Bank 1) AND Code P1349 VVT System Malfunction Bank," could simply be due to a bad sensor. I don't see how a TB could skip a tooth, but it can be installed one tooth off.
"Code P1346 VVT Sensor /Camshaft Position Sensor Circuit Range/Performance Problem (Bank 1) AND Code P1349 VVT System Malfunction Bank," could simply be due to a bad sensor. I don't see how a TB could skip a tooth, but it can be installed one tooth off.
04-15-22, 04:12 PM
#90
Any job can be a good one to learn on, assuming one has the proper parts, tools, reference material, gumption, patience and time. Most people don't.
"Code P1346 VVT Sensor /Camshaft Position Sensor Circuit Range/Performance Problem (Bank 1) AND Code P1349 VVT System Malfunction Bank," could simply be due to a bad sensor. I don't see how a TB could skip a tooth, but it can be installed one tooth off.
"Code P1346 VVT Sensor /Camshaft Position Sensor Circuit Range/Performance Problem (Bank 1) AND Code P1349 VVT System Malfunction Bank," could simply be due to a bad sensor. I don't see how a TB could skip a tooth, but it can be installed one tooth off.
The following 2 users liked this post by AceWright:
Bgw70 (04-15-22),
Wilson2000 (04-15-22)