SC430 New owner, intro and build thread.
 04-13-15, 07:31 PM
#121

Over the week I was experiencing a vibration between 40 and 50mph and I could hear my brakes squealing occasionally. So on Sunday finally had time to deal with it. I already had LS400 brakes and rotors ready to be put on, this just forced me to do it.
I'm not going to go in depth on the installation since it's been well documented but I'll post a few pics during the process and a pic with where I cut the heat shield for reference.
These are the calipers that are going on. I did rebuild them, I think I posted about this in my build thread earlier.

This is the RCA spacer I used, one piece aluminium. A shop here made these for me, comes with class 12.9 bolts and washers. Fit was perfect.
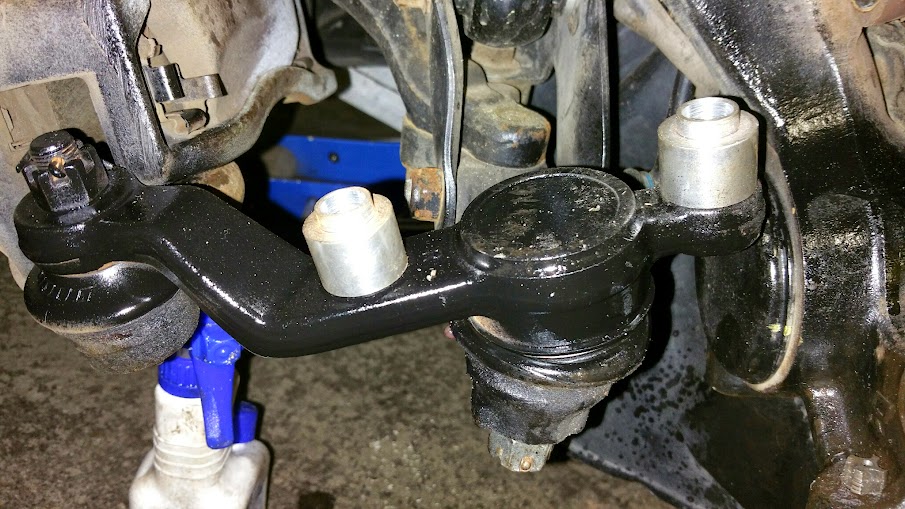
Used a m12x1.25 tapping tool and wd40 to clean out the bolt holes on the knuckle where the ball joint bolt goes through. Cleaning it is crucial because any debris or dirt can falsify torque specs.

Pic of the threads all cleaned up.

This pic is for reference, might help somebody else wanting to do this upgrade. The pink line denotes where I cut the heat shield, I was trying to take as little of it off to keep as much of the functionality of the heat shield.

This is the heat shield cut and the hub after the surface rust was removed and coated with high temp paint.

I was getting late at this point so didn't stop to take pics. Torque spec on the bolts with the RCA is 85ft-lbs, stock torque spec is 83 ft-lbs but the class 12.9 bolt will have no problems at that spec. Everything else is like stock, install rotors and screw on the loaded calipers. I did replace my lines with some stoptech stainless steel brake lines, front and back. Also did a full brake fluid flush with Amsoil Dot 3 brake fluid.
I'll post pics of the completed job later on.
I'm not going to go in depth on the installation since it's been well documented but I'll post a few pics during the process and a pic with where I cut the heat shield for reference.
These are the calipers that are going on. I did rebuild them, I think I posted about this in my build thread earlier.
This is the RCA spacer I used, one piece aluminium. A shop here made these for me, comes with class 12.9 bolts and washers. Fit was perfect.
Used a m12x1.25 tapping tool and wd40 to clean out the bolt holes on the knuckle where the ball joint bolt goes through. Cleaning it is crucial because any debris or dirt can falsify torque specs.
Pic of the threads all cleaned up.
This pic is for reference, might help somebody else wanting to do this upgrade. The pink line denotes where I cut the heat shield, I was trying to take as little of it off to keep as much of the functionality of the heat shield.
This is the heat shield cut and the hub after the surface rust was removed and coated with high temp paint.
I was getting late at this point so didn't stop to take pics. Torque spec on the bolts with the RCA is 85ft-lbs, stock torque spec is 83 ft-lbs but the class 12.9 bolt will have no problems at that spec. Everything else is like stock, install rotors and screw on the loaded calipers. I did replace my lines with some stoptech stainless steel brake lines, front and back. Also did a full brake fluid flush with Amsoil Dot 3 brake fluid.
I'll post pics of the completed job later on.
Last edited by kuWuPt; 04-13-15 at 07:54 PM.

 06-03-15, 05:02 PM
#126

Finally did the sway bar upgrade as well this is all the parts I used.
ISF sway bar - 48812‐30400
Figs rear polyurethane sway bar bushings - IS300_BSH_SW_RR‐SP2817K
Moog rear sway bar end links - K750288 x 2
Also did the front endlinks:
Moog front right strut bar end link - K90679
Moog front left strut bar end link - K90675
The rear sway bar bushings are held in by the SC430 stock bushings holder. The figs bushings fit in there without any issues. I haven't had a chance to really take it out for a spin and really test it out but just driving it normally I can tell a big difference. Felt sturdier, more in control!! I can't wait for the snow to melt and can actually take it out for a drive!
06-05-15, 12:02 AM
#127
My car is lowered now so replaced the moog end link with the same which is not the same size as the factory end link. The factory end links are not big enough for the holes in the isf sway bar. For stock ride height TXFM has pointed out some options..
"There are a couple of other solutions:
To use the stock SC430 end-link, you can get a steel sleeve from a hardware store that has an Inner Diameter close to the 10mm stock SC430 end-link size bolt and having an Outer Diameter that will fit through the 13mm hole in the ISF Rear Sway Bar. The sleeve doesn't actually have to be metric, just so that it allows a 10mm bolt to be inserted into it and then that combination can fit into the 13mm hole without slop. This will require the sleeve to be cut to the length of the Sway bar thickness at the flat section that has the 13mm attachment hole. Then use threadlocker in the assembly. Or, if you have a lathe, you could machine this out of steel rod stock.
The other solution requires quite a bit more fabrication/modification. I couldn't find any after-market End-Links that use Heim joints. But, you can order parts and put together your own ones. I just finished doing this (sorry no pics - already on the car). This does require quite a bit of fitting, metal cutting, rethreading, retapping, though. I measured the hole-to-hole length of the stock SC430 end-links at about 5" (127mm), and duplicated that length. I thread locked the assembly together and, so far, all seems to be ok."
12-24-15, 08:45 PM
#128
Cranking up the car one morning, well it didn't, jumped the car with my handy jump starter battery pack and got on my merry way. Didn't really think twice on why, jut figured it was cause I hadn't driven it in weeks and and didn't have my trickle charger hooked up to it. Anyway, drove around and stopped for coffee and noticed when I was cranking the car there was a hesitation and when my compressor for my air ride came on there was a huge drop in voltage almost stalled the car. So I have an optima yellow top and is a deep cycle battery, from past experience I know that once a cell goes bad on it (jump starting an optima does that I feel) you just warranty it out. I had the alternator checked too, just to be on the safe side, no sense putting a new battery and then finding out the alternator is gone which can pretty much ruin the battery as well. The alternator failed the testing process and I wasn't really shocked, the SC is an 02 and it was the original alternator on it. It had a good run but time for a new one. I chose to go back with a Denso alternator before I replaced the battery and while I was doing that I wanted to do the Big 4 upgrade.
The Big 4 upgrade I wanted to do in preparation for my sound system. For those that don't know the Big 4 is adding wires to allowing more current to flow easier to all components. The Big 4 consists of 4 wires:
1 - Battery positive to Alternator Positive
2 - Ground alternator to chassis
3 - Ground negative battery to chassis
4 - Ground engine to negative battery or chassis

The alternator is fairly easy, I'm not doing a DIY on this because it is well documented, I didn't remove the bottom splash guard just the 4 bolts in front that hold it up and managed to get the alternator out that way.

The alternator off the mount and chilling on the splash guard.

Move the alternator more towards the right of the engine bay and it'll plop out from the bottom like the pic above. I did not have to put the car on jack stands etc, as I said this alternator was fairly easy.

My big 4 wires, I chose to do 4GA the longest one was from the alternator positive to battery positive. The shortest one was from alternator ground to chassis. The other two, one was the battery negative to chassis ground, and the other was from engine to chassis.
Changed the battery out the next day and it is as good as new, no voltage drops, no dimming, no hesitations starting. Awesome!
The Big 4 upgrade I wanted to do in preparation for my sound system. For those that don't know the Big 4 is adding wires to allowing more current to flow easier to all components. The Big 4 consists of 4 wires:
1 - Battery positive to Alternator Positive
2 - Ground alternator to chassis
3 - Ground negative battery to chassis
4 - Ground engine to negative battery or chassis
The alternator is fairly easy, I'm not doing a DIY on this because it is well documented, I didn't remove the bottom splash guard just the 4 bolts in front that hold it up and managed to get the alternator out that way.
The alternator off the mount and chilling on the splash guard.
Move the alternator more towards the right of the engine bay and it'll plop out from the bottom like the pic above. I did not have to put the car on jack stands etc, as I said this alternator was fairly easy.
My big 4 wires, I chose to do 4GA the longest one was from the alternator positive to battery positive. The shortest one was from alternator ground to chassis. The other two, one was the battery negative to chassis ground, and the other was from engine to chassis.
Changed the battery out the next day and it is as good as new, no voltage drops, no dimming, no hesitations starting. Awesome!
Last edited by kuWuPt; 05-04-17 at 09:53 PM.
 05-02-17, 12:10 AM
#130
I've been meaning to do this write up for awhile but haven't had the time to till recently. I could not have done this without the guidance of 919 Motoring here in Raleigh North Carolina. So hearing a couple of speakers etc I fell in love with the Arc Audio black series. I am by no means an audiophile but these speakers sounded very clean and crisp to me. These are the components I used:
Head unit - Kenwood 9903s
Speakers - Arc Audio Black 6.2
Subwoofer - Black 12V2
Amplifier - XDI 1100.5
Sound deadening - Focal Bam
Wires - Focal RCA's, speaker wires etc
Trim kit - Beat-Sonic MVA-11FB
Additional wiring harness - Beat-Sonic MVA-13L
I started off by running all the lines and doing the sound dampening with the factory unit still in place. This is because I did this in stages and worked on the car when I had a chance to so I still had some sort of sound till it was all done.
Inner and outer door skins dampened
8080

Rear seat were removed and I'm not planning on putting it back in. Wanted to create a more factory looking sub install which I'm hoping it will turn out as I planned once my interior is done. Rear seat area, quarter panel and sides were all dampened as well.

Falls floors setup and then planned out the how the sub should sit. The amp and the crossovers sits under this falls floor. I wanted to keep the rear storage cubby which is why it is open in the pic below to make sure there was enough room for it to articulate open and close. </div>

Fleeced, resined and fiber added on the inside.


Pretty happy with how it turned out.


On to the head unit. Removed the factory unit and setup the Kenwood 9903S. The unit and brackets were mocked and modified to make sure the door would still close without any hindrances.</div>

Made the speaker pods out of 3/4" poly carbonate and the factory tweeter pods were modified to fit the new arc tweeters.

Shaun at 919 Motoring pretty much built my box for me and I want to thank him for all his help, guidance and for tuning my system. It sounds awesome and I am very happy with it!!
A couple more things I want to button up and then hopefully get the interior done soon.
Head unit - Kenwood 9903s
Speakers - Arc Audio Black 6.2
Subwoofer - Black 12V2
Amplifier - XDI 1100.5
Sound deadening - Focal Bam
Wires - Focal RCA's, speaker wires etc
Trim kit - Beat-Sonic MVA-11FB
Additional wiring harness - Beat-Sonic MVA-13L
I started off by running all the lines and doing the sound dampening with the factory unit still in place. This is because I did this in stages and worked on the car when I had a chance to so I still had some sort of sound till it was all done.
Inner and outer door skins dampened
8080
Rear seat were removed and I'm not planning on putting it back in. Wanted to create a more factory looking sub install which I'm hoping it will turn out as I planned once my interior is done. Rear seat area, quarter panel and sides were all dampened as well.
Falls floors setup and then planned out the how the sub should sit. The amp and the crossovers sits under this falls floor. I wanted to keep the rear storage cubby which is why it is open in the pic below to make sure there was enough room for it to articulate open and close. </div>
Fleeced, resined and fiber added on the inside.
Pretty happy with how it turned out.
On to the head unit. Removed the factory unit and setup the Kenwood 9903S. The unit and brackets were mocked and modified to make sure the door would still close without any hindrances.</div>
Made the speaker pods out of 3/4" poly carbonate and the factory tweeter pods were modified to fit the new arc tweeters.
Shaun at 919 Motoring pretty much built my box for me and I want to thank him for all his help, guidance and for tuning my system. It sounds awesome and I am very happy with it!!
A couple more things I want to button up and then hopefully get the interior done soon.
The following users liked this post:
SeaStories (03-25-20)
05-02-17, 09:15 AM
#131

Wow! What can I say. Awesome. The workmanship looks A1. I envy your set up. Enjoy.
05-05-17, 05:31 AM
#133
Lexus Test Driver
I always enjoy your work!
awesome job once again!
BTW, how is she running?
awesome job once again!
BTW, how is she running?
05-10-17, 10:34 AM
#135
Lead Lap

Looking good there KuWuPt. I'm looking forward to seeing the pictures of the finished product.

