Confused About Window Trim Removal
#1
Driver
Thread Starter
Join Date: Apr 2009
Location: District of Columbia
Posts: 116
Likes: 0
Received 0 Likes
on
0 Posts
Okay I dutifully did my search and homework before posting and that is what left me confused.
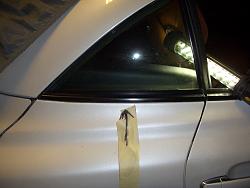
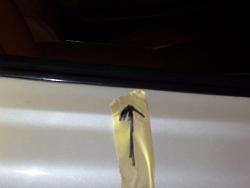
I am getting ready to have my car painted and since I have a 2002 my window trim has small white spots on it showing wear. I tried cleaning it but the spots will not go away. I want to remove the trim that is on the door and that trims the window, both the front window and the back window.
One forum member in past threads said that the trim is held by two screws in the door panel. ANother forum member said that the door panel will have to be removed. So, I don't have a clear answer here.
The bottom line is that I would like to remove the rubber trim that surrounds the window and that is a part of the door trim. It rums past the rearview mirrors. There also is the same trim for the back windows. Can some one tell me how to remove these as I want to replace them.
Also, and I know I am stretching this, if one one has the part number for purchasing these trims at Sewel please share it with me

#2
Pole Position
iTrader: (1)
Can you possibly supply a few photos. I believe i know the trim (window seal) you're referring to... but photos would clarify. I know on the interior one, you must remove the door panel and there are a few bent in "tabs" that hold the inner one in place so that the felt runs along the glass. Not too sure about the exterior, though.
#3
Driver
Thread Starter
Join Date: Apr 2009
Location: District of Columbia
Posts: 116
Likes: 0
Received 0 Likes
on
0 Posts
Can you possibly supply a few photos. I believe i know the trim (window seal) you're referring to... but photos would clarify. I know on the interior one, you must remove the door panel and there are a few bent in "tabs" that hold the inner one in place so that the felt runs along the glass. Not too sure about the exterior, though.
#4
I am speaking about the exterior rubber trim that is on the outside of the glass. It separates the glass from the door metal. It is between the door handle and the glass and runs the neigh of the glass even past the mirror on both sides. The same trim is on the back quarter window as well
Give ShawnOk a bit of time on this... He has had his Lexus SC430 torn into quite a bit as of late doing mirror mods etc. I'm sure he will come up with a helpful answer for you on this matter.


#5
Driver
Thread Starter
Join Date: Apr 2009
Location: District of Columbia
Posts: 116
Likes: 0
Received 0 Likes
on
0 Posts
#6
Pole Position
iTrader: (1)
Hahaha, I'm here and doing my research on the question at hand. I searched the Sewell Lexus parts diagrams and there are quite a few pieces that trim the windows. Could you post a pic, as there's a triangle piece around the mirror and a triangle piece around the quarter window also? Unless you mean the longer "horizontal" piece? A picture is worth a thousand words. :-)
#7
Pole Position
iTrader: (1)
Here's what i found, but I can't seem to locate the part by part number for the front of 2002... strange. Upper right exploded diagram. Looks like 75711/75712 and 75671/75672
http://lexus.sewellparts.com/oem-cat...C430-2002.html
http://lexus.sewellparts.com/oem-cat...C430-2002.html
Last edited by ShawnOk; 07-01-14 at 01:07 PM.
Trending Topics
#9
Driver
Thread Starter
Join Date: Apr 2009
Location: District of Columbia
Posts: 116
Likes: 0
Received 0 Likes
on
0 Posts
Here's what i found, but I can't seem to locate the part by part number for the front of 2002... strange. Upper right exploded diagram. Looks like 75711/75712 and 75671/75672
http://lexus.sewellparts.com/oem-cat...C430-2002.html
http://lexus.sewellparts.com/oem-cat...C430-2002.html
Can someone please explain how these trim pieces come off as I do want to replace them after my car is painted. Or do you guys recommend me painting them black. Alright-don't everyone laugh at the notion. But if that is possible it will save me a dollar.
But, if you guys can tell me how to remove them I will scrape up the money and replace them as mine are a little weather beaten. The pictures show the trim for the door as well as the trim on the back quarter panel below the glass. I need to remove the entire horizontal trim on the door and on the rear quarter


#10
There are screws ( one each per side) that hold the outer trim, or door belt molding in place. If you look closely at the Sewell parts picture you will see the same may not hold true for the rear quarter window outer molding. To remove the door belt molding, the screw is located at the rear edge of the door on the inside behind the rubber molding held in place by two plastic plugs. If you peel back the rubber molding just a bit, you will see a metal vertical strip attached to the belt molding. The screw is about 2-3 inches below the top edge of the rear of the belt molding. It appears it may not be necessary to remove the door paneling, but if it was my car, I would go that extra mile and remove the paneling. I've removed the paneling on my coupe a number of times, so it's easy for me and provides a better view of the mechanics as to how the pieces are held in place.
Refer to part number 75711B(RH) & 75712B(LH) on the Sewell parts list.
Refer to part number 75711B(RH) & 75712B(LH) on the Sewell parts list.
#11
Driver
Thread Starter
Join Date: Apr 2009
Location: District of Columbia
Posts: 116
Likes: 0
Received 0 Likes
on
0 Posts
There are screws ( one each per side) that hold the outer trim, or door belt molding in place. If you look closely at the Sewell parts picture you will see the same may not hold true for the rear quarter window outer molding. To remove the door belt molding, the screw is located at the rear edge of the door on the inside behind the rubber molding held in place by two plastic plugs. If you peel back the rubber molding just a bit, you will see a metal vertical strip attached to the belt molding. The screw is about 2-3 inches below the top edge of the rear of the belt molding. It appears it may not be necessary to remove the door paneling, but if it was my car, I would go that extra mile and remove the paneling. I've removed the paneling on my coupe a number of times, so it's easy for me and provides a better view of the mechanics as to how the pieces are held in place.
Refer to part number 75711B(RH) & 75712B(LH) on the Sewell parts list.
Refer to part number 75711B(RH) & 75712B(LH) on the Sewell parts list.
Darthside:
Thanks so much for the instructions. I will begin to dismantle my foot panels tomorrow as you suggest. I would imagine that there are some threads on here on how to take apart the door panels?
#12
SrWilliams, yes there is one good thread that covers the removal of the door panels.
Try this website.
It's under www.CarAudioTips.com
When the website opens, in the search window you can enter SC430.
http://caraudiotips.blogspot.com/201...l-removal.html
Try this website.
It's under www.CarAudioTips.com
When the website opens, in the search window you can enter SC430.
http://caraudiotips.blogspot.com/201...l-removal.html
#13
Driver
Thread Starter
Join Date: Apr 2009
Location: District of Columbia
Posts: 116
Likes: 0
Received 0 Likes
on
0 Posts
SrWilliams, yes there is one good thread that covers the removal of the door panels.
Try this website.
It's under www.CarAudioTips.com
When the website opens, in the search window you can enter SC430.
http://caraudiotips.blogspot.com/201...l-removal.html
Try this website.
It's under www.CarAudioTips.com
When the website opens, in the search window you can enter SC430.
http://caraudiotips.blogspot.com/201...l-removal.html
#14
Instructor
iTrader: (1)
Join Date: Mar 2009
Location: Formerly Easton, Pa. Bradenton FL, now Osprey Fl.
Posts: 877
Likes: 0
Received 5 Likes
on
5 Posts
Just a quick word on the door panel removal. If this work is going to take some time to complete you will have to reinstall the interior light striker on the door panel. (It's the black oblong thingy with a screw in the middle that is on the door ) If you don't reinstall, the interior lights will stay on. I tried putting something on the button to make it make contact but it was just as easy to reinstall the striker. I had mine off to work on the door speakers.
#15
Driver
Thread Starter
Join Date: Apr 2009
Location: District of Columbia
Posts: 116
Likes: 0
Received 0 Likes
on
0 Posts
Just a quick word on the door panel removal. If this work is going to take some time to complete you will have to reinstall the interior light striker on the door panel. (It's the black oblong thingy with a screw in the middle that is on the door ) If you don't reinstall, the interior lights will stay on. I tried putting something on the button to make it make contact but it was just as easy to reinstall the striker. I had mine off to work on the door speakers.
Eddy thanks for the heads up as this project with the door panels off will take some time for the car to be painted and all and then the new trim placed on. So, i truly needed your point

