New SC430 member from Denmark

 04-18-13, 01:20 PM
#107
Haha thanks guys 
 The other builds here on CL makes me wanna do more things and i love to work on a car like this.
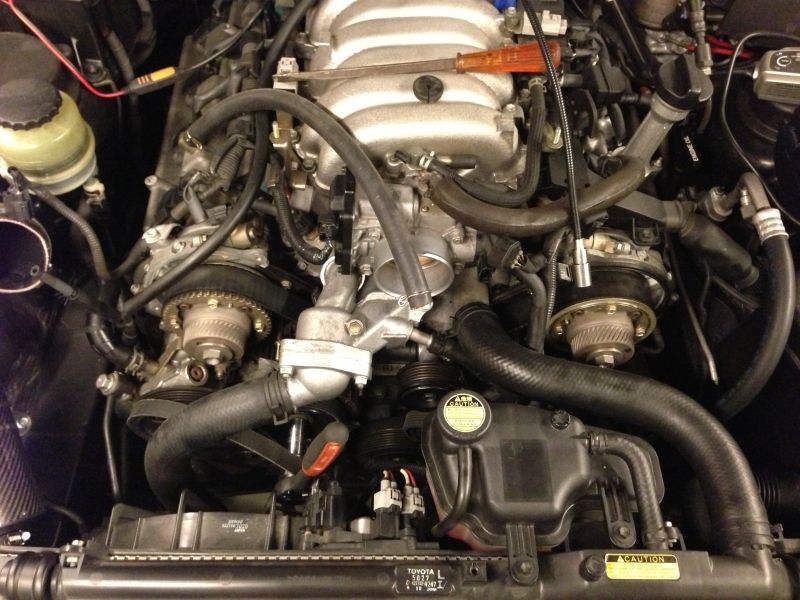
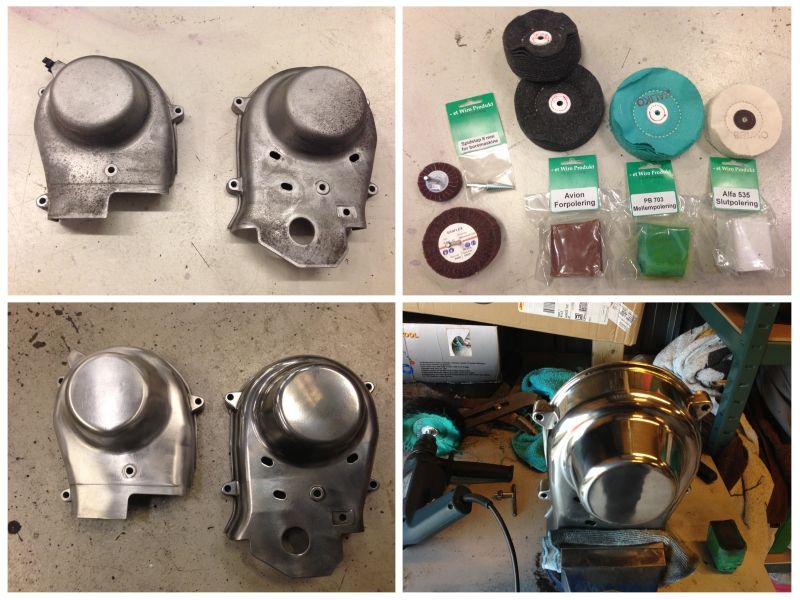
Heres a little update. The cam covers didnt look so good so i was wondering if i should paint them, but since i have some other polished parts i thought i would polish them to a mirror finish as well.
Woow what a huge job. Took me two days to do the grind and polish. Don't know the exact hours spend but its really time consuming.
Heres some pics:
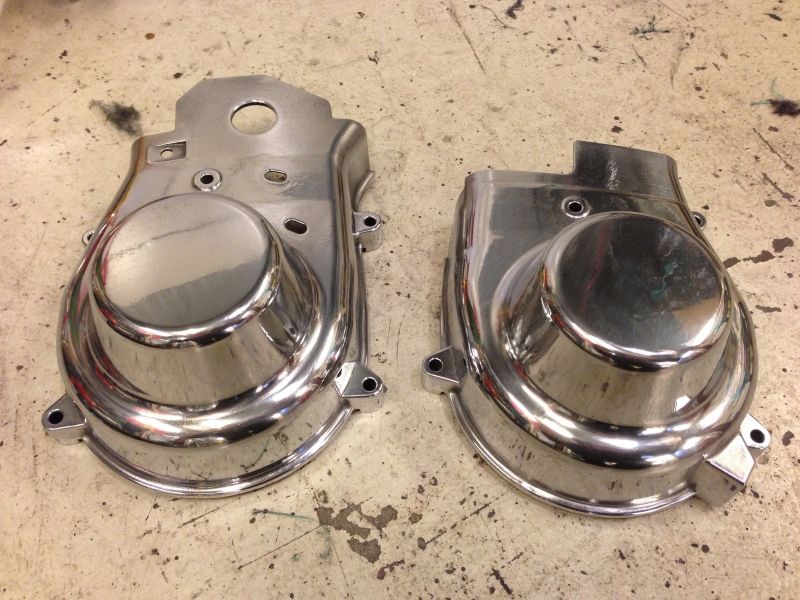
The right cover was really hard to get free. Not much space and there is a wire with a socket on that need to get through the hole in the cover so that took some extra time.
Bought grinders and a 3 stage polish kit.
Finally done
Hey, is that a twin turbo engine??
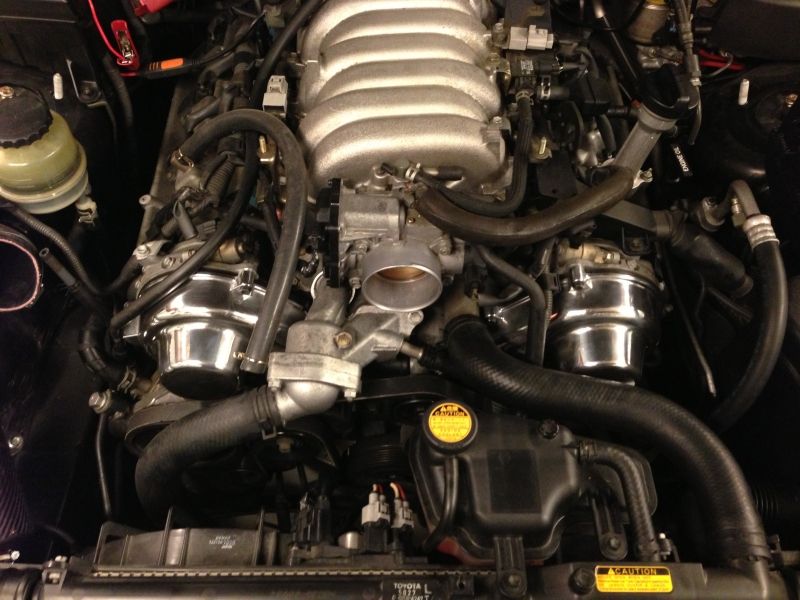
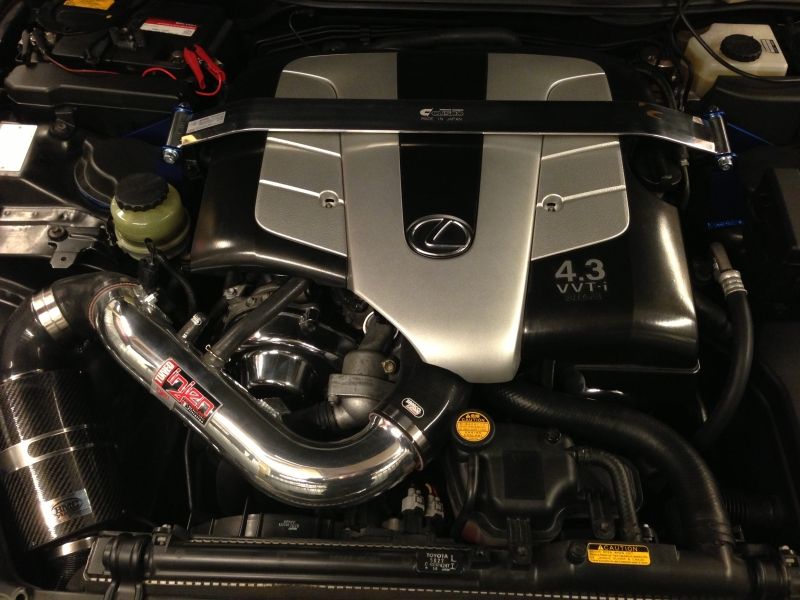
Finally As you can see i also finally recieved my Cusco tower bar (part number CUS-188540A). It fits perfectly and have about 10mm clearance to the engine cover. I think i will cut some of the engine cover in the lower right side so it shows more of the cam cover 
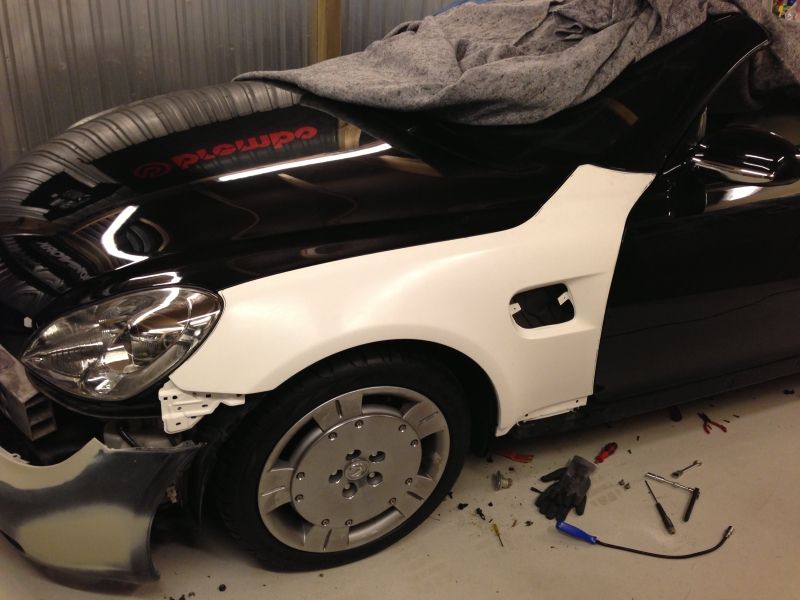
Here i test mounted one of my Behrman fenders. Pretty nice fit. Needed to make all the mounting holes a little bigger, but other than that i think it fits ok. Needs a final touch to get ready for paint.
The other builds here on CL makes me wanna do more things and i love to work on a car like this.Heres a little update. The cam covers didnt look so good so i was wondering if i should paint them, but since i have some other polished parts i thought i would polish them to a mirror finish as well.
Woow what a huge job. Took me two days to do the grind and polish. Don't know the exact hours spend but its really time consuming.
Heres some pics:
The right cover was really hard to get free. Not much space and there is a wire with a socket on that need to get through the hole in the cover so that took some extra time.
Bought grinders and a 3 stage polish kit.
Finally done
Hey, is that a twin turbo engine??
Finally
As you can see i also finally recieved my Cusco tower bar (part number CUS-188540A). It fits perfectly and have about 10mm clearance to the engine cover. I think i will cut some of the engine cover in the lower right side so it shows more of the cam cover Here i test mounted one of my Behrman fenders. Pretty nice fit. Needed to make all the mounting holes a little bigger, but other than that i think it fits ok. Needs a final touch to get ready for paint.
04-18-13, 10:02 PM
#108
Haha thanks guys The other builds here on CL makes me wanna do more things and i love to work on a car like this.
Heres a little update. The cam covers didnt look so good so i was wondering if i should paint them, but since i have some other polished parts i thought i would polish them to a mirror finish as well.
Woow what a huge job. Took me two days to do the grind and polish. Don't know the exact hours spend but its really time consuming.
Heres some pics:
The right cover was really hard to get free. Not much space and there is a wire with a socket on that need to get through the hole in the cover so that took some extra time.
Bought grinders and a 3 stage polish kit.
Finally done
Hey, is that a twin turbo engine??
Finally As you can see i also finally recieved my Cusco tower bar (part number CUS-188540A). It fits perfectly and have about 10mm clearance to the engine cover. I think i will cut some of the engine cover in the lower right side so it shows more of the cam cover
Here i test mounted one of my Behrman fenders. Pretty nice fit. Needed to make all the mounting holes a little bigger, but other than that i think it fits ok. Needs a final touch to get ready for paint.
The other builds here on CL makes me wanna do more things and i love to work on a car like this.Heres a little update. The cam covers didnt look so good so i was wondering if i should paint them, but since i have some other polished parts i thought i would polish them to a mirror finish as well.
Woow what a huge job. Took me two days to do the grind and polish. Don't know the exact hours spend but its really time consuming.
Heres some pics:
The right cover was really hard to get free. Not much space and there is a wire with a socket on that need to get through the hole in the cover so that took some extra time.
Bought grinders and a 3 stage polish kit.
Finally done
Hey, is that a twin turbo engine??
Finally
As you can see i also finally recieved my Cusco tower bar (part number CUS-188540A). It fits perfectly and have about 10mm clearance to the engine cover. I think i will cut some of the engine cover in the lower right side so it shows more of the cam cover Here i test mounted one of my Behrman fenders. Pretty nice fit. Needed to make all the mounting holes a little bigger, but other than that i think it fits ok. Needs a final touch to get ready for paint.
....excellent work !!!
04-18-13, 10:59 PM
#109

WOW is right.
I just powdercoated mine under the assumption that aluminum "pot" metal would never shine up. Guess that is why we should not assume. Great work. The "while you are at it" list is growing!!
I just powdercoated mine under the assumption that aluminum "pot" metal would never shine up. Guess that is why we should not assume. Great work. The "while you are at it" list is growing!!
04-20-13, 10:37 AM
#111
Instructor
Fantastic work again, you are making us all very jealous.
Keep it up.
Keep it up.
04-20-13, 03:43 PM
#112
Lead Lap

Looks great Rollaboy!
 04-25-13, 03:07 PM
#118
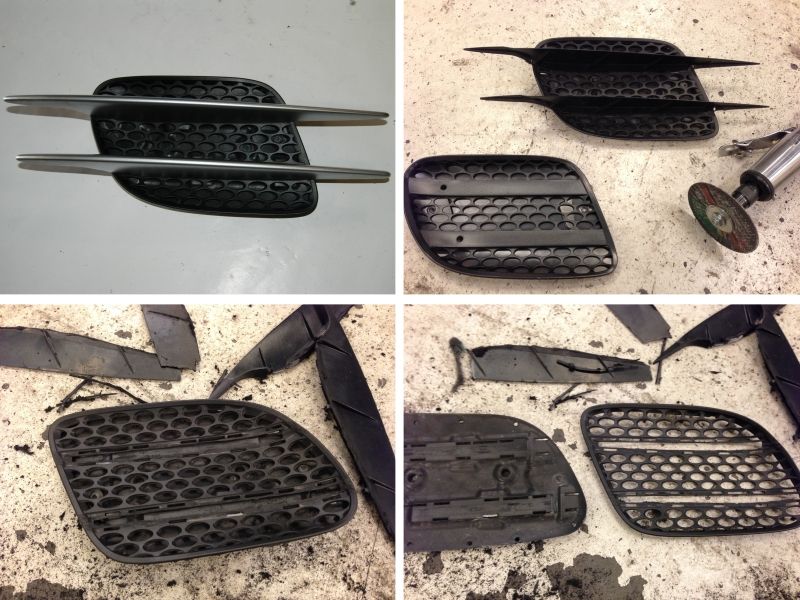
Thanks guys. The crazy dane is back Well.. Found out that the Behrman fenders i got from Japan has fake air vents with no holes in the mesh. I dont like that. So what to do... Found some used original Mercedes SL air vents on ebay for $100 a set. Took everythin apart just to get the mesh. It fits perfectly.
Like always, before mounting the new fenders i want to protect the chassis. First up is the thin anti rust layer.
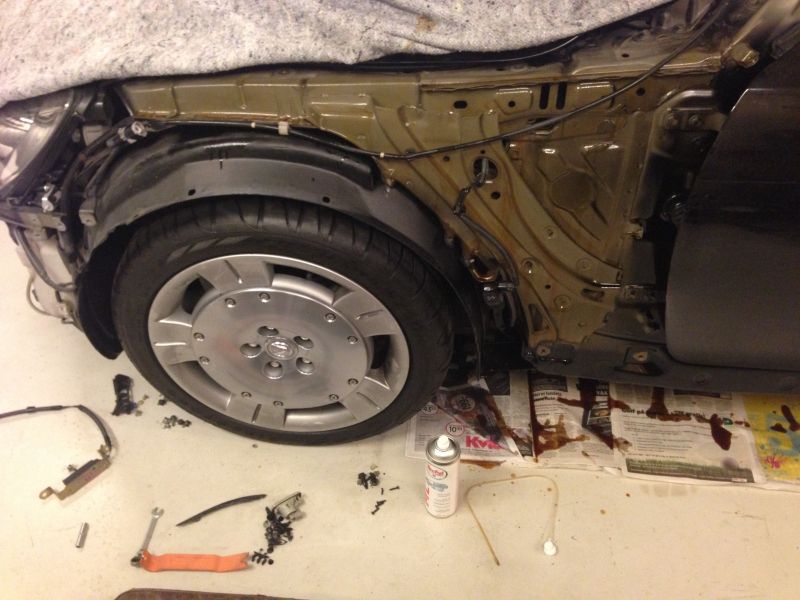
Then the thick anti rust spray which is mat black.
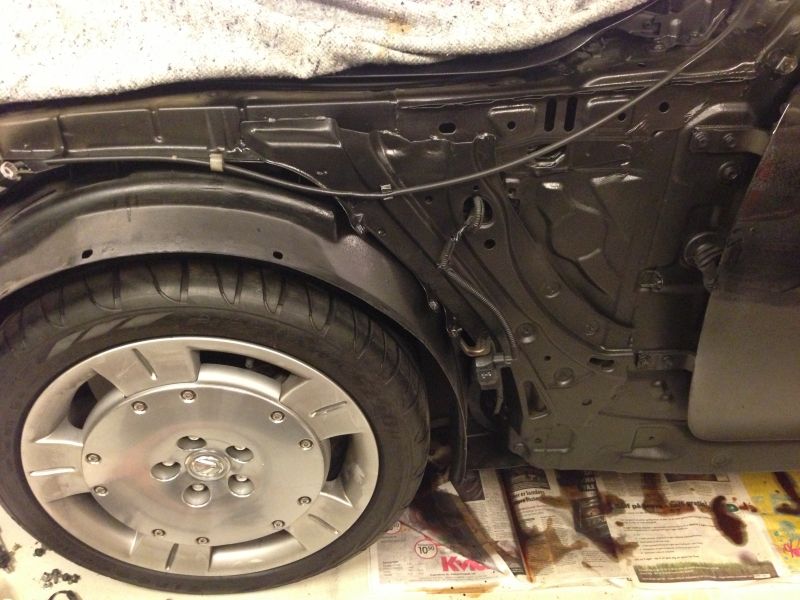
Heres the vents installed. Actually there is connection from the engine bay to the vents, so hot air from the V8 will get out of the vents. I know its not gonna give me any extra horsepower or anything, but hey at least its not fake vents
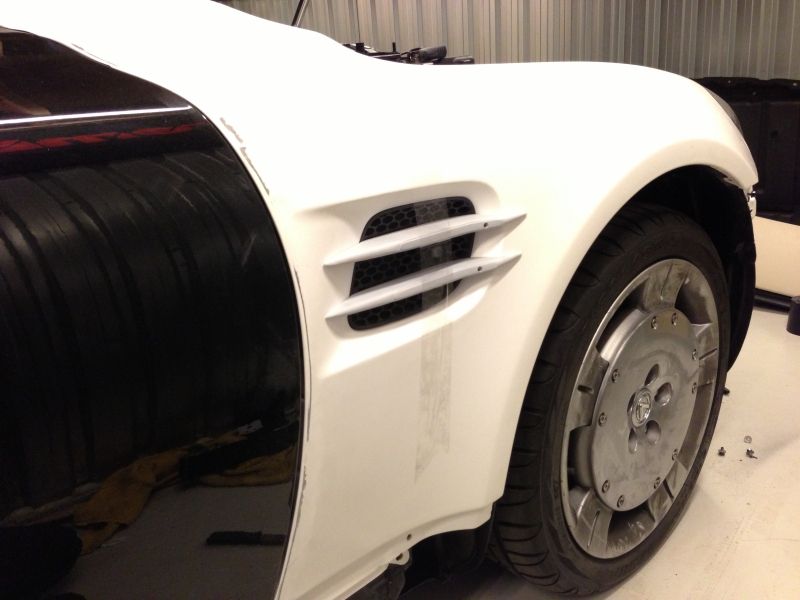
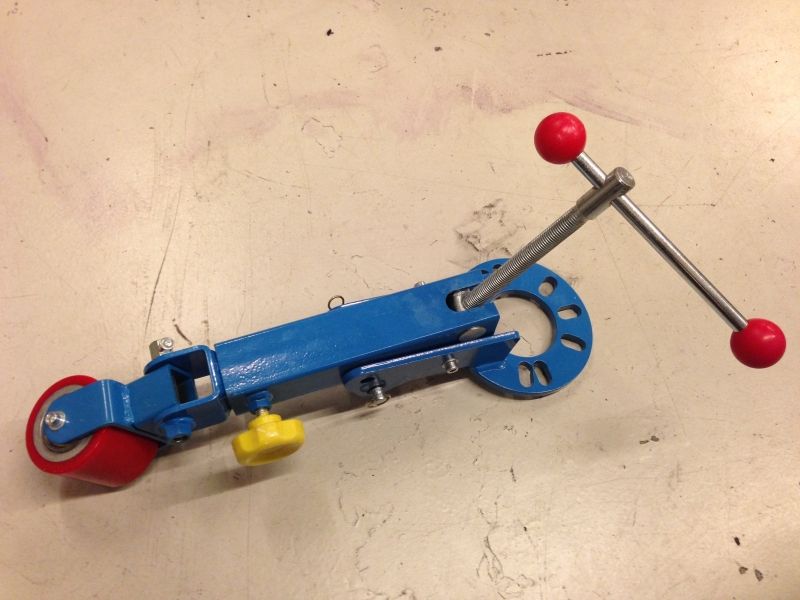
Oohh and i found a Fender roller from UK for only $150 including shipping. Those rear fenders need some serious rolling for the wide wheels to fit The fronts are perfect. I might add a 5 og 10mm spacer but we will see what the future brings.
Now i will take off the fenders again and get them and the front bumper ready for the painter
And yeah SlvBullet, i thought the same thing about the thermostat housing. But i will wait until i need to change the timming belt before polishing that.
See you soon for a new update
Well.. Found out that the Behrman fenders i got from Japan has fake air vents with no holes in the mesh. I dont like that. So what to do... Found some used original Mercedes SL air vents on ebay for $100 a set. Took everythin apart just to get the mesh. It fits perfectly.Like always, before mounting the new fenders i want to protect the chassis. First up is the thin anti rust layer.
Then the thick anti rust spray which is mat black.
Heres the vents installed. Actually there is connection from the engine bay to the vents, so hot air from the V8 will get out of the vents. I know its not gonna give me any extra horsepower or anything, but hey at least its not fake vents
Oohh and i found a Fender roller from UK for only $150 including shipping. Those rear fenders need some serious rolling for the wide wheels to fit
The fronts are perfect. I might add a 5 og 10mm spacer but we will see what the future brings.Now i will take off the fenders again and get them and the front bumper ready for the painter
And yeah SlvBullet, i thought the same thing about the thermostat housing. But i will wait until i need to change the timming belt before polishing that.
See you soon for a new update
04-25-13, 06:56 PM
#119

You are a tease Rollaboy, but that's just fine. We love your work. The SC will outlive you and your kids, LOL!
04-25-13, 09:21 PM
#120

You did a nice job polishing them. They look great but I have question;
Did you perhaps clear coat them? My experience with polished aluminum is that it will corrode after a while unless protected with a clear coat or routine re-polishing. I've seen this many times with aircraft. People will strip and polish a prop and after a few months they begin to corrode.
JR
Did you perhaps clear coat them? My experience with polished aluminum is that it will corrode after a while unless protected with a clear coat or routine re-polishing. I've seen this many times with aircraft. People will strip and polish a prop and after a few months they begin to corrode.
JR