Megan install in pictures
 03-22-11, 04:53 PM
#1
Instructor
Thread Starter
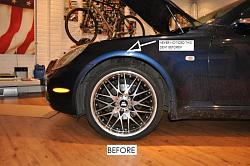
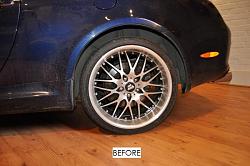
This install has been posted before, but thought I would do it a little different.
Couple of things to note.
1. Jacked front from side chassis rail and put stands at jack points. Front crossmember is to far back behind sump to operate jack from front (unless you say different). When taking off stands, lower onto block of wood so that you can remove stand and the jack again from jacking point.
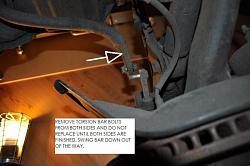
2. Remove bolts both side of torsion bars and lower out of the way until both side are finished and put them back last.
3. Finished drop for me was 1.5 inches all round.


Couple of things to note.
1. Jacked front from side chassis rail and put stands at jack points. Front crossmember is to far back behind sump to operate jack from front (unless you say different). When taking off stands, lower onto block of wood so that you can remove stand and the jack again from jacking point.
2. Remove bolts both side of torsion bars and lower out of the way until both side are finished and put them back last.
3. Finished drop for me was 1.5 inches all round.


 03-22-11, 04:54 PM
#2
Instructor
Thread Starter


 03-22-11, 04:56 PM
#3
Instructor
Thread Starter


 03-22-11, 04:58 PM
#4
Instructor
Thread Starter


The following users liked this post:
AnniesRide (01-27-21)
03-22-11, 04:59 PM
#5
Instructor
Thread Starter


The following users liked this post:
AnniesRide (09-25-20)
03-22-11, 05:00 PM
#6
Instructor
Thread Starter


 03-22-11, 05:04 PM
#7
Instructor
Thread Starter


Didn't bother to show trunk liner removal as VIPNiSS did that so well.
Hope you find it useful, have loads more picture if you require anything else.
Best regards
Steve
Trending Topics

 03-22-11, 05:40 PM
#11
Lead Lap

Nice writeup Steve. It's cool you found ways to optimize the replacement procedure. I should have waited until you did your's before doing mine The stance looks so much better now. Good Job!
The stance looks so much better now. Good Job!


 03-23-11, 04:07 AM
#15
Instructor
iTrader: (1)

Join Date: Mar 2009
Location: Formerly Easton, Pa. Bradenton FL, now Osprey Fl.
Posts: 877
Likes: 0
Received 5 Likes
on
5 Posts
Steve, I'm with m3nv, on the flooring in your garage. You don't see that on this side of the pond, at least not very often. Fantastic job, both on the coilovers and the writeup. Pictures were great. Now go hire Sherlock and find out when and who put that dent in the fender and make them pay! lol The last picture, you can't even notice the "giant" dent in the fender. lol Still love your wheels.
BTW why did it take all weekend to do? lol I know you had to let the paint dry. Now all you need are some decals on the calipers. Then wait for the next project to arrive.
BTW why did it take all weekend to do? lol I know you had to let the paint dry. Now all you need are some decals on the calipers. Then wait for the next project to arrive.