SC digital dash How-to
 09-13-12, 02:36 PM
#1
Rookie
Thread Starter
iTrader: (1)
Join Date: Aug 2012
Location: Alabama
Posts: 93
Likes: 0
Received 0 Likes
on
0 Posts
Well -I have got to the point that I have decided which display to use and so I am going to start making my plug-and-play cluster. I like to keep everything plug-n-play so that if at some point -I so choose -it would be extremely easy to restore the car back to un-modified original. I like to do this with all of my cars because you never can tell when a car might start going crazy for classic value.
So -I have decided on the Olds UB3 type cluster from late 80's to early 90's (not completely sure of the year of coverage). I picked this one because it has all of the minor gauges instead of the ususal temp and fuel with idiot lights for the others. I have begun the alterations on the SC cluster to put the digital one in.
Here is the UB3 Olds cluster:


I experimented with a lot of colored filters and in different combinations to see which one I like best.
Here is the stock color display with the SC smoke colored anti-glare piece only:

And yes -I know it looks a bit ghoulish. I don't like the stock color much myself either.
Here is the red (with stock SC smoke filter) that I like much better:

And now on to the two that I like most. Here is the blue witth stock smoke filter:

And finally here is how it comes out when you use a rose pink filter with the stock smoke fiter:

I picked up a spare SC fuel level sender and float assembly to modify with a Olds sender unit so that the fuel calibration is good. I will post details on these modifications later when I have time.
Olds float/sender assembly: FG09A -and can be had on egay for under $50 delivered
I also picked up the Olds oil pressure and water temp senders from the Olds Cutlass that I got this particular cluster from.
Pinout for the UB3 Olds Cluster:
Pink w/ Blk (C1-Fuse#11) = IGN
Orange(D16) = Memory/Battery Constant
Grey(C11) & Yellow(C10) & Brn w/ Wht(D10) = Dimmer/Light Switch
All Black & Black w/ White = Ground
LT Blu = lft signal
DK Blu = right signal
Tan w/ wht = Brake Warning
Grey w/ wht = NC(No Connection)
Tan w/ Blk (C6)= ECM/Shift
Lt. Green = Headlights/High beam indicator
Orange (C13) = ECM/Data IO/Tachometer
Pink w/ Blk (C16-Fuse#9) = IGN
Yellow(D2) = Chime Module
Yellow w/ Blk(D3) = ECM/Low Coolant Warning
Brown(D4) = Alternator/Generator/Voltmeter
Brown w/ White(D5) = ECM/Service Engine Soon/Check Engine
Tan(D11) = Oil Pressure
Dk Green w/ White(D12) = Temp
Purple(D13) = Fuel
Dark Green(D15) = ECM/Speedometer
So -I have decided on the Olds UB3 type cluster from late 80's to early 90's (not completely sure of the year of coverage). I picked this one because it has all of the minor gauges instead of the ususal temp and fuel with idiot lights for the others. I have begun the alterations on the SC cluster to put the digital one in.
Here is the UB3 Olds cluster:
I experimented with a lot of colored filters and in different combinations to see which one I like best.
Here is the stock color display with the SC smoke colored anti-glare piece only:
And yes -I know it looks a bit ghoulish. I don't like the stock color much myself either.
Here is the red (with stock SC smoke filter) that I like much better:
And now on to the two that I like most. Here is the blue witth stock smoke filter:
And finally here is how it comes out when you use a rose pink filter with the stock smoke fiter:
I picked up a spare SC fuel level sender and float assembly to modify with a Olds sender unit so that the fuel calibration is good. I will post details on these modifications later when I have time.
Olds float/sender assembly: FG09A -and can be had on egay for under $50 delivered
I also picked up the Olds oil pressure and water temp senders from the Olds Cutlass that I got this particular cluster from.
Pinout for the UB3 Olds Cluster:
Pink w/ Blk (C1-Fuse#11) = IGN
Orange(D16) = Memory/Battery Constant
Grey(C11) & Yellow(C10) & Brn w/ Wht(D10) = Dimmer/Light Switch
All Black & Black w/ White = Ground
LT Blu = lft signal
DK Blu = right signal
Tan w/ wht = Brake Warning
Grey w/ wht = NC(No Connection)
Tan w/ Blk (C6)= ECM/Shift
Lt. Green = Headlights/High beam indicator
Orange (C13) = ECM/Data IO/Tachometer
Pink w/ Blk (C16-Fuse#9) = IGN
Yellow(D2) = Chime Module
Yellow w/ Blk(D3) = ECM/Low Coolant Warning
Brown(D4) = Alternator/Generator/Voltmeter
Brown w/ White(D5) = ECM/Service Engine Soon/Check Engine
Tan(D11) = Oil Pressure
Dk Green w/ White(D12) = Temp
Purple(D13) = Fuel
Dark Green(D15) = ECM/Speedometer
Last edited by UZinator; 11-12-12 at 11:07 AM.


 09-13-12, 03:19 PM
#4
Rookie
Thread Starter
iTrader: (1)
Join Date: Aug 2012
Location: Alabama
Posts: 93
Likes: 0
Received 0 Likes
on
0 Posts
Here is how I traced the layout for the plexiglass filter so that it fits perfectly between the white plastic housing and the black part with the factory smoked filter:

And here is how the Plexiglass needs to be cut to avoid cracking:

I use a Roto-Zip type cutting bit because most any reciprocating saw-type action will cause the 1/8 inch thick Plexiglass to crack
Done cutting and ready for edge finishing:

I use one of those very small jewelers files to clean up the edges because they are not too excessively rough. Just take your time and do not rush it at all or you will have wasted several hours of work when you crack it.
The next step is to hack both cluster backshells so they can be welded together. Only the smaller recessed area on the Olds needs to be preserved for this operation:

I do hang onto the excess trimmings because they can be used for welding material when you fuse the two cluster shells together.ue!
And here is how the Plexiglass needs to be cut to avoid cracking:
I use a Roto-Zip type cutting bit because most any reciprocating saw-type action will cause the 1/8 inch thick Plexiglass to crack
Done cutting and ready for edge finishing:
I use one of those very small jewelers files to clean up the edges because they are not too excessively rough. Just take your time and do not rush it at all or you will have wasted several hours of work when you crack it.
The next step is to hack both cluster backshells so they can be welded together. Only the smaller recessed area on the Olds needs to be preserved for this operation:
I do hang onto the excess trimmings because they can be used for welding material when you fuse the two cluster shells together.ue!
Last edited by UZinator; 11-12-12 at 11:10 AM.
09-13-12, 03:21 PM
#5
Rookie
Thread Starter
iTrader: (1)
Join Date: Aug 2012
Location: Alabama
Posts: 93
Likes: 0
Received 0 Likes
on
0 Posts
I guess if your SC is slow -then you wouldn't see that result! hahah -couldn't help myself!
Actually -I believe the bar indication will max out -but the numbers keep rising. There are three digits and so I am assuming that it goes higher than the bar scale. I won't know until I have had the chance to try it out.
Actually -I believe the bar indication will max out -but the numbers keep rising. There are three digits and so I am assuming that it goes higher than the bar scale. I won't know until I have had the chance to try it out.

Trending Topics
09-13-12, 05:24 PM
#8
Rookie
Thread Starter
iTrader: (1)
Join Date: Aug 2012
Location: Alabama
Posts: 93
Likes: 0
Received 0 Likes
on
0 Posts
And if I want -I can also mix-n-match tubes to have a little more choice. Although -that is where you begin to get really deep into it. But this one will swap easier than the one did in my Probe GT. I don't have to do near the amount of housing modification or near the trouble I had to with that flex ribbon tracing. With the SC cluster I can just remove the connectors from the PC board and solder them directly onto the digital cluster wiring. Those ribbon traces are an extreme pain to work with.
09-13-12, 05:43 PM
#9

Interesting concept, and I think it'll look cool with the other gauges being digital also. I know this will be involved, so pardon the obvious and stupid question, but just how insane are we talking about?
Just want to know if I'll be needing to stock up on Red Bull or something.
Just want to know if I'll be needing to stock up on Red Bull or something.
 09-13-12, 05:59 PM
#11
As a fellow digital dash lover, subscribed.
I think the fixed 80mph top speed may be a hindrance though.
Also why not just go with the JDM Soarer dash?
Not sure what the area in the middle displays though.
I think the fixed 80mph top speed may be a hindrance though.
Also why not just go with the JDM Soarer dash?

Not sure what the area in the middle displays though.


 09-13-12, 07:08 PM
#14
Driver School Candidate

Join Date: Jul 2010
Location: Vic
Posts: 7
Likes: 0
Received 0 Likes
on
0 Posts
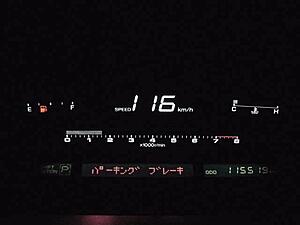
The middle is usually the clock, however it is replace with various system warnings and statuses such as litres of fuel remaining etc...
The warning above is handbrake/parkbrake on whilst driving, which is interesting as the left screen suggests the car is in park...
The warning above is handbrake/parkbrake on whilst driving, which is interesting as the left screen suggests the car is in park...