HOW TO: Remove Seat Motor
 05-18-14, 02:06 PM
#16
I actually don't think access through the bottom of the seat will accomplish anything. It looks like it has to be done by removing the entire seat back. Even if you were to remove the lower plastic trim, the three screws holding the motor in place are still hidden by the seat back's side structure.
I did find that I can get the most forward of the three screws out with the seat upright -- it's visible just above the release lever -- but I just don't see any way to get to the other two presently. And then I'm still facing the problem of how to get the motor out of the seat... It's all welded metal springs in the way, which brings me back to thinking the entire seat back needs to be lifted off. I don't see any plastic tie knots holding the backrest cushion in place, like you mentioned a few posts up.
I did find that I can get the most forward of the three screws out with the seat upright -- it's visible just above the release lever -- but I just don't see any way to get to the other two presently. And then I'm still facing the problem of how to get the motor out of the seat... It's all welded metal springs in the way, which brings me back to thinking the entire seat back needs to be lifted off. I don't see any plastic tie knots holding the backrest cushion in place, like you mentioned a few posts up.
 05-18-14, 02:07 PM
#17

I don't mind replacing those steering wheel motors with that of the 96 with white connectors. Just take care of shipping costs. Those with blue connectors you got as pictured where from a 97.
Here is a picture of the ring lock you got to remove before you can slide out that handle
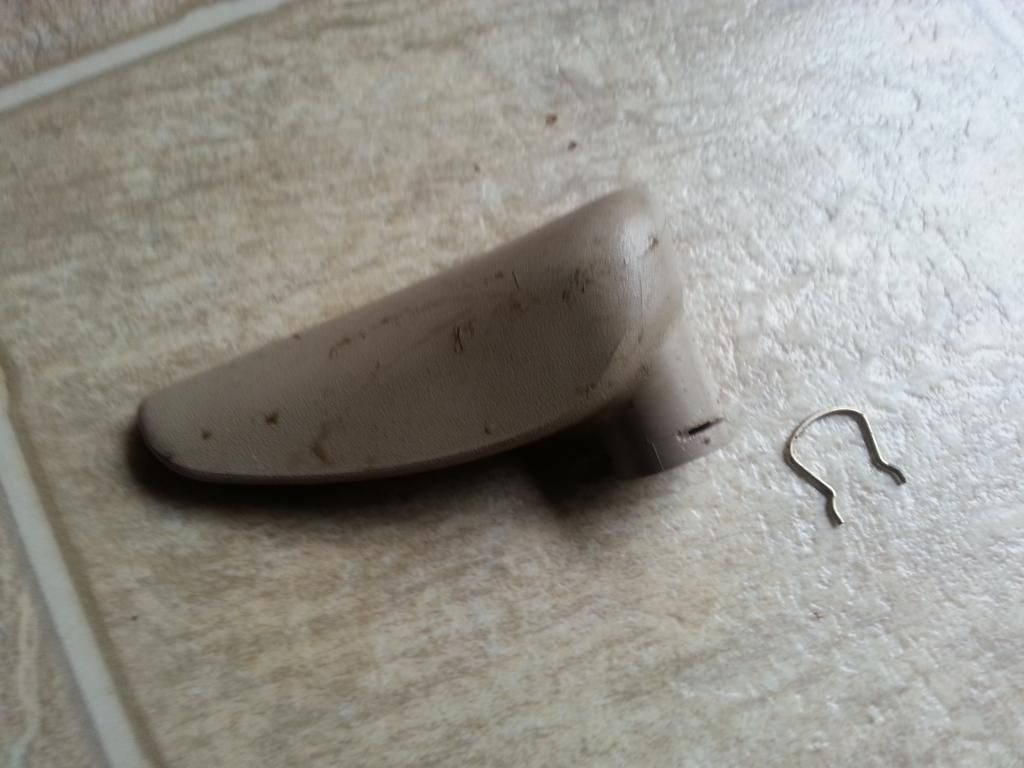
Here is a picture of the ring lock you got to remove before you can slide out that handle
 05-18-14, 02:19 PM
#18
For the sake of argument, if I were to get that lock ring off (which I can't reach even with a long bladed screwdriver, it's that tiny of an access point), how in the world would I ever get it back on? The only thing I can figure is there's some way to reassemble it with the seat bottom raised up off the rail. Otherwise, it's an irreversible disassembly.
05-18-14, 02:46 PM
#20
Thanks for trying to help, but I'm calling it. What I'm seeing doesn't match what you're describing (you may have missed my post #16 just before your reply), so barring a series of pictures walking me through the necessary disassembly steps, I've lost hope that it's doable [by me].
05-18-14, 03:01 PM
#21
You don't have to go through all that to take out that ring lock, On my previous post I just answered your question whether you can separate the seat from the rail...
Just from top, you will be able to pry out that ring lock...and putting it back takes some practice since ring lock has to be partly in and when you press that handle back , ring lock snaps into place.
Just from top, you will be able to pry out that ring lock...and putting it back takes some practice since ring lock has to be partly in and when you press that handle back , ring lock snaps into place.
05-18-14, 03:15 PM
#22
I just took out the one in one of my red SC and didnt take me 2 minutes..
Pry that ring lock out , here you see the two ends . Have a curved long nose to pull it from the other side. You don't have to do a lot of disassembly to take that handle out !
Pry that ring lock out , here you see the two ends . Have a curved long nose to pull it from the other side. You don't have to do a lot of disassembly to take that handle out !
 05-18-14, 05:13 PM
#23
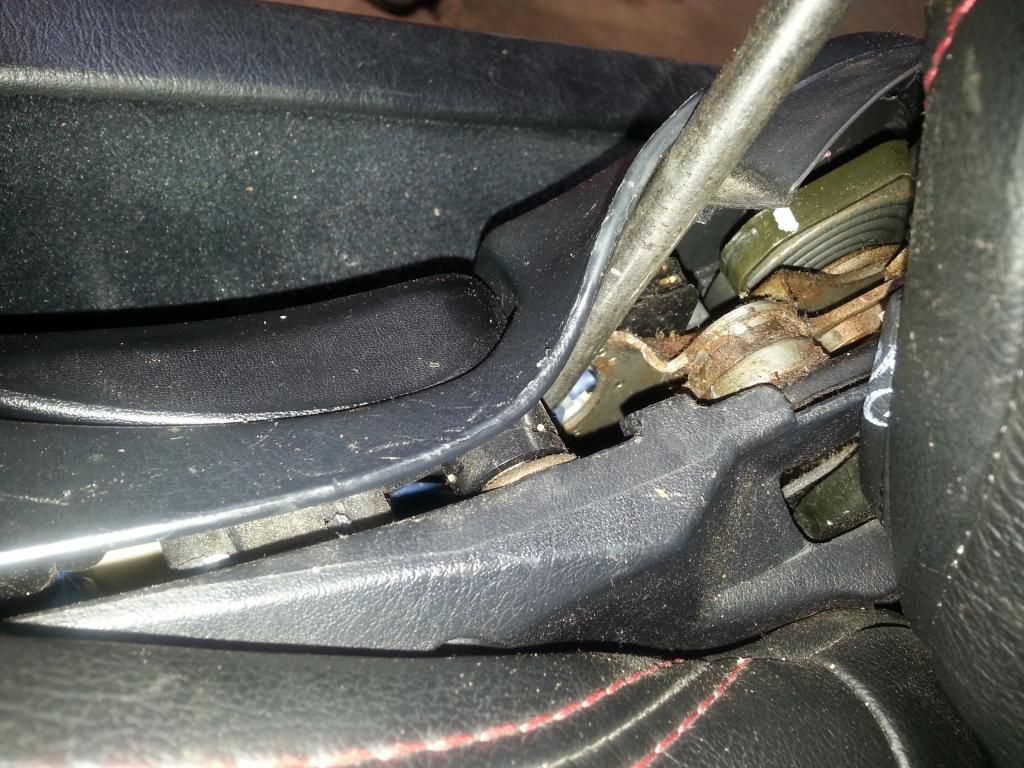
I don't understand how you're able to separate the trim piece enough to get to the lock ring above in that pic. Mine has maybe 1mm of movement and isn't enough to create a gap, let alone see anything behind it or get a tool down there.
I thought maybe removing the trim piece to the inside of it (above the seat cushion and below the trim ring, in your pic) would create the needed gap. I was able to get the screw out (its indentation is just visible in the bottom center of your pic), but it's still held in elsewhere...
I thought maybe removing the trim piece to the inside of it (above the seat cushion and below the trim ring, in your pic) would create the needed gap. I was able to get the screw out (its indentation is just visible in the bottom center of your pic), but it's still held in elsewhere...
Last edited by t2d2; 05-18-14 at 10:03 PM. Reason: typo
05-19-14, 04:58 AM
#24
I don't understand how you're able to separate the trim piece enough to get to the lock ring above in that pic. Mine has maybe 1mm of movement and isn't enough to create a gap, let alone see anything behind it or get a tool down there.
I thought maybe removing the trim piece to the inside of it (above the seat cushion and below the trim ring, in your pic) would create the needed gap. I was able to get the screw out (its indentation is just visible in the bottom center of your pic), but it's still held in elsewhere...
I thought maybe removing the trim piece to the inside of it (above the seat cushion and below the trim ring, in your pic) would create the needed gap. I was able to get the screw out (its indentation is just visible in the bottom center of your pic), but it's still held in elsewhere...
Last edited by gerrb; 05-19-14 at 05:11 AM.
05-19-14, 10:16 AM
#25
I took that screw out again and tried wiggling the small plastic trim piece around, but there's virtually no movement to it. And my outer trim piece already has a crack right near the base of the release lever, so I can hardly put any force there. Everything is too rigid and fixed in place. Your's doesn't seem like the same materials... Your's looks like a rubbery plastic, while mine is vinyl covering a very stiff plastic.
How do you remove the seat back? I'm all but convinced that's the only way this is doable on my seat. Removing the lower trim stuff won't help me with getting the motor out once the screws are out. Here's what the back of my seat looks like. It isn't obvious to me which of those springs can be released or how, or whether I can get to the two bolts on each lower side section without destroying the fabric.
How do you remove the seat back? I'm all but convinced that's the only way this is doable on my seat. Removing the lower trim stuff won't help me with getting the motor out once the screws are out. Here's what the back of my seat looks like. It isn't obvious to me which of those springs can be released or how, or whether I can get to the two bolts on each lower side section without destroying the fabric.
08-17-14, 03:15 PM
#27
I finally revisited this, having taken my driver's seat apart and figuring out how to get at the retainer clip on the lever ... with only mild damage to the already cracked lower trim piece. Ironically, that ended up being a non-issue on the passenger side, as I couldn't see any reason why the lever and trim should even be removed.
I still don't understand gerrb's last reply above about removing those coiled wires. Everything seems welded in place, or fastened with way too much tension to be able to maneuver by hand. I removed all the hog rings holding the sides and bottom of the seat back leather to the frame, which allowed enough wiggle room to pull the foam forward some and get to one of the three screws holding the motor in place. The other two were only accessible from the back with a tiny 8mm wrench in between the gear and brackets, with so little room that the wrench had to be flipped over with each turn of a barely measurable amount.
Finally, I had to unbolt the seat back from the side rails and lift it out, as there's no way to get the motor out from its little welded cage otherwise. I tried angling it every way imaginable...
With all that done, I swapped in the replacement motor and put everything back together. Some three hours later and I was ready to test! $@#!, nothing. The motor made a brief noise and then went quiet in either direction. However, I tested the signal to the motor (at the connector) and it's 12.5 V on the forward-tilt switch and zero on the backward tilt. That makes me think the gear is at the end of its range or something. Any ideas how to test that theory and reposition? Are there visual marks to where the gear needs to be? I thought I had it lined up the same as when I took the other motor out, but with how much I had to keep repositioning the seat back to remove and reinstall it, maybe something rotated without the other piece matching.
I'm definitely not looking forward to re-removing the three screws that hold the motor in place, but that's presumably the only way to back it off the gear enough to reposition. Is there any way to get at the gear from the outside with the lower plastic trim removed?
Edit: Although, the switch wouldn't know that the gear is at the end of its range, so the zero volt reading would be more indicative of a faulty switch, right? Maybe the gear is rotated all the way forward (the seat is very upright) and the +12.5 V forward has no effect, and it simply isn't providing power for tiling back.
I still don't understand gerrb's last reply above about removing those coiled wires. Everything seems welded in place, or fastened with way too much tension to be able to maneuver by hand. I removed all the hog rings holding the sides and bottom of the seat back leather to the frame, which allowed enough wiggle room to pull the foam forward some and get to one of the three screws holding the motor in place. The other two were only accessible from the back with a tiny 8mm wrench in between the gear and brackets, with so little room that the wrench had to be flipped over with each turn of a barely measurable amount.
Finally, I had to unbolt the seat back from the side rails and lift it out, as there's no way to get the motor out from its little welded cage otherwise. I tried angling it every way imaginable...
With all that done, I swapped in the replacement motor and put everything back together. Some three hours later and I was ready to test! $@#!, nothing.
The motor made a brief noise and then went quiet in either direction. However, I tested the signal to the motor (at the connector) and it's 12.5 V on the forward-tilt switch and zero on the backward tilt. That makes me think the gear is at the end of its range or something. Any ideas how to test that theory and reposition? Are there visual marks to where the gear needs to be? I thought I had it lined up the same as when I took the other motor out, but with how much I had to keep repositioning the seat back to remove and reinstall it, maybe something rotated without the other piece matching.I'm definitely not looking forward to re-removing the three screws that hold the motor in place, but that's presumably the only way to back it off the gear enough to reposition. Is there any way to get at the gear from the outside with the lower plastic trim removed?
Edit: Although, the switch wouldn't know that the gear is at the end of its range, so the zero volt reading would be more indicative of a faulty switch, right? Maybe the gear is rotated all the way forward (the seat is very upright) and the +12.5 V forward has no effect, and it simply isn't providing power for tiling back.
Last edited by t2d2; 08-17-14 at 03:30 PM.
08-18-14, 09:25 AM
#28
I went ahead and removed the lower plastic trim ("garnish") to pull off the seat control switches. I'm convinced it isn't possible to remove the lock ring on the seat back lever without busting up the plastic and vinyl that covers it... I sure as hell won't be reinstalling that pointless lock ring on either seat. Who cares if the lever slips off occasionally and has to be put back on?
Anyway, the switch actually is putting out 12.5 V in both directions. It seems the rubber cover between the switch control box and garnish was keeping it from moving all the way to the left. But, that still doesn't get me anywhere... I checked the tilt motor with 9 V power and nothing is happening, so either it died during installation or there's something about the gears that is keeping it from turning. I really, really don't want to go through that process of undoing those three impossible to get to screws just to see if it'll turn when disconnected from the gear...
Has anyone ever worked on the seat back gear and might know if there's something that could lock out the motor?
08-18-14, 12:39 PM
#29
I have a knack for finding the topics that no one has any interest in chiming in on, so rather than wait a week, I figured I might as well tear back into it and hope for the best. I discovered this time that the three screws holding the tilt motor in place aren't all that difficult to get at if you first remove pretty much everything around the motor. That includes removing the seat back from its side rails, and taking apart the bracket that the motor mounts to.
With the motor removed from the gear, to eliminate the possibility of the gear being what's locking things up, I reapplied battery power and it still doesn't work. Just a faint electric static noise. Maybe the motor was on its last legs already and died on the operating table.
With the motor removed from the gear, to eliminate the possibility of the gear being what's locking things up, I reapplied battery power and it still doesn't work. Just a faint electric static noise. Maybe the motor was on its last legs already and died on the operating table.
08-19-14, 09:33 AM
#30
I fixed it! It turned out to be the seat controls switch. It was hard to get a read initially on what the problem was, because I could get sporadic voltage readings on the backward-tilt, but never managed to get a signal with it connected to the motor.
Before ordering a replacement switch, I wanted to make sure there was nothing else in the system that could be somehow coming into play, although the switch was the only thing that made sense. I pried the thing apart, doing a fair bit of damage to the plastic tabs in the process, but figuring it was getting replaced, anyway. There was nothing to see of interest in the back compartment (clear cover), but when I pried the top cover (under the rubber gasket thing) off, this is what I found...
The lower of the two tips was melted! When the switch rocked back, it wasn't making hardly any contact on that one, which explains why it was so sporadic in testing. It probably only worked when I had it angled just right for gravity to press it down against the contact. I reversed the orientation of the piece (situated as pictured below now) and put it back together, and now the motor is working in both directions. I went ahead and ordered a replacement, anyway, as there's no telling how long that fix will hold up.
Has anyone seen something like this previously? I wonder how you would even go about doing such damage... Maybe a kid sat in the passenger seat and held the tilt button down continuously and created enough heat in the switch to melt the plastic?
Last edited by t2d2; 08-19-14 at 09:36 AM.