
Artsy/Spooky Pic's of SC's
 01-03-11, 10:02 PM
#16
Pole Position
Join Date: Aug 2009
Location: Florida
Posts: 251
Likes: 0
Received 0 Likes
on
0 Posts
Why do they never tear down or renovate mental hospitals? It's like they only abandon them for the sake of being scary or something lol

 01-04-11, 11:06 PM
#17
Lead Lap
iTrader: (1)
Join Date: Feb 2008
Location: I.E Southern California to SA,Texas
Posts: 4,447
Likes: 0
Received 5 Likes
on
5 Posts
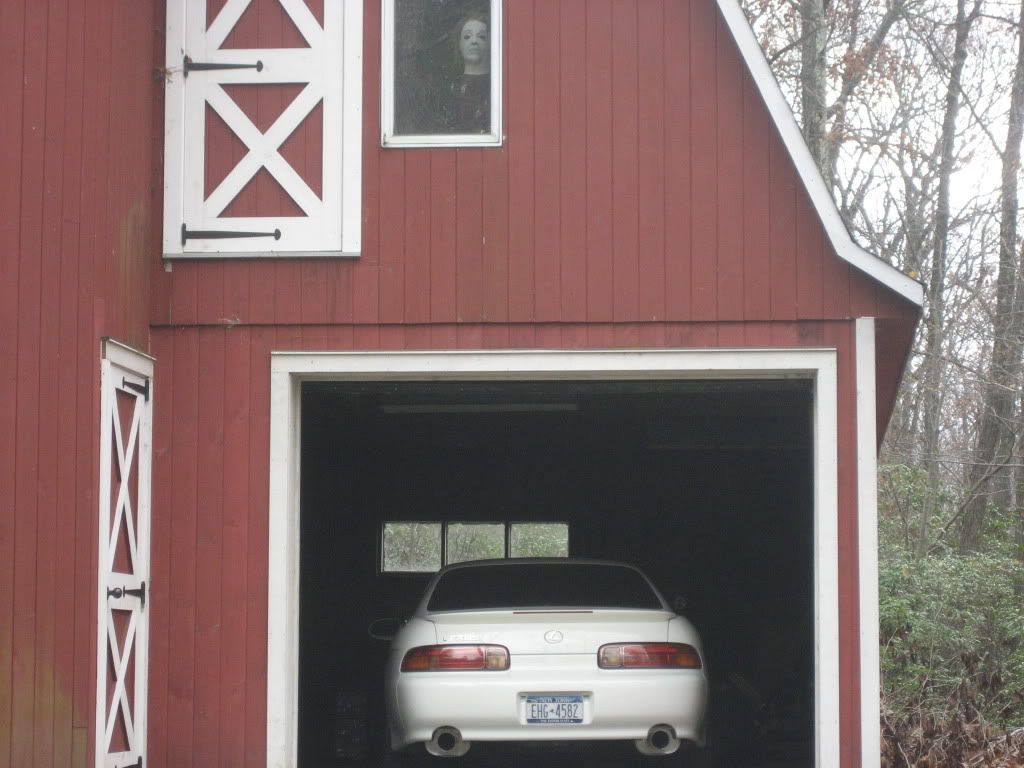
I�m actually a Ex patient there Drs said I was obsessed with SCs go inside look under room 400 it has SCs drawn all over the room.
I used to sing this song all night and drove everyone crazy....
TOYOTA SOARER 1992 commercial Japan

I used to sing this song all night and drove everyone crazy....
TOYOTA SOARER 1992 commercial Japan
Last edited by Joey-E; 01-04-11 at 11:12 PM.
01-05-11, 01:50 AM
#18
 01-05-11, 11:35 AM
#22
Lead Lap
Join Date: Sep 2007
Location: 501
Posts: 481
Likes: 0
Received 0 Likes
on
0 Posts
10-01-14, 10:48 PM
#24

Since its October again I thought I would revive this thread with a picture I've been meaning to take for a while.
Its also at an abandoned mental asylum local to me. The hospital grounds are massive, about the size of a small town, and there are a few buildings still being used to house a few patients - which makes it even spookier..
Sorry for the poor quality pics, I just purchased a D7100. Kick *** camera (from what I hear) but I have no idea how to use it. I just played with the ISO settings in Program mode to get these shots, but I know the camera is capable of much better low-light photos. If anyone has any suggestions for settings to shoot my car in low-light night settings like this it would be much appreciated!!
10-02-14, 04:25 AM
#26
scENFORCER, that's a great location! I love the second one especially.
I am not familiar with Nikon's sensors but generally I'd suggest this:
Until very recently the sweet spot for ISO settings for many DSLRs still emulated most 35mm professional film stocks (for BEST performance-- they can take pictures with considerably higher ISOs than film). The Canon 5D Mark III and Nikon's D700 changed that.
You'll have to forgive my comparisons to celluloid film methodology. That's how I trained and it's a point of starting reference for the thought process to manual exposures.
Switch to full manual, try ISO 1600-2000 to start (that's where most film left off although there were black and white 3200 and grainy as all hell 6400 speed films), and try an aperture of f/4.0, f/2.8 or f/2.0 or lower if your lens is that fast. Remember the wider the aperture the less depth of field you will have. Try lower shutter speeds as well. If you have a tripod or can safely set the camera on the ground try setting a shutter timer to use a setting below (or well below) 1/60th of a second. Sometimes you can go handheld at 1/45th but any lower than that and you need to set a timer. Just check your meter for the median exposure mark as you play with these settings.
The newest cameras have some very impressive maximum ISOs up to 12,500. They might be up to 15,000 ISO by now. Keep in mind, as your ISO goes even higher you'll have even more noise (like film grains being exposed for too long-- in color film photography this used to cause what was known as "reciprocity failure" where one or more color layers would burn out from extremely long exposures. It made for some cool experiments but with digital it's a thing of the past).
I usually stay around ISO 1600-2000 maximum for the most stable image with little to no noise. If you can do low shutter speeds on a timer you may be able to back it down considerably. Personally I love embracing the light in the location I'm in at night so my preference is to shoot near or full wide open aperture on the lens but this isn't always going to give you the affect you want.
That, and there is a big, big difference at night between a lens that will only give you f/4.5 maximum at night and a 50mm that will give you f/1.4 maximum.
Just play with your camera and remember that capturing light in your camera settings is additive and subtractive: aperture/f-stop (lens opening), shutter speed and ISO (sensor speed or camera film speed) are your three ways of doing this. And today the in-camera light sensors are pretty accurate at giving you a median exposure indication.
There is also the technique of making HDR images (High Dynamic Range) which is similar to bracketing but involves combining three or more varied exposures in Photoshop to create brilliantly colored images.
Hope this helps. Just have fun with it!
Last edited by KahnBB6; 10-02-14 at 04:34 AM.
10-02-14, 08:59 AM
#27
Lexus Champion

scENFORCER, that's a great location! I love the second one especially.
I am not familiar with Nikon's sensors but generally I'd suggest this:
Until very recently the sweet spot for ISO settings for many DSLRs still emulated most 35mm professional film stocks (for BEST performance-- they can take pictures with considerably higher ISOs than film). The Canon 5D Mark III and Nikon's D700 changed that.
You'll have to forgive my comparisons to celluloid film methodology. That's how I trained and it's a point of starting reference for the thought process to manual exposures.
Switch to full manual, try ISO 1600-2000 to start (that's where most film left off although there were black and white 3200 and grainy as all hell 6400 speed films), and try an aperture of f/4.0, f/2.8 or f/2.0 or lower if your lens is that fast. Remember the wider the aperture the less depth of field you will have. Try lower shutter speeds as well. If you have a tripod or can safely set the camera on the ground try setting a shutter timer to use a setting below (or well below) 1/60th of a second. Sometimes you can go handheld at 1/45th but any lower than that and you need to set a timer. Just check your meter for the median exposure mark as you play with these settings.
The newest cameras have some very impressive maximum ISOs up to 12,500. They might be up to 15,000 ISO by now. Keep in mind, as your ISO goes even higher you'll have even more noise (like film grains being exposed for too long-- in color film photography this used to cause what was known as "reciprocity failure" where one or more color layers would burn out from extremely long exposures. It made for some cool experiments but with digital it's a thing of the past).
I usually stay around ISO 1600-2000 maximum for the most stable image with little to no noise. If you can do low shutter speeds on a timer you may be able to back it down considerably. Personally I love embracing the light in the location I'm in at night so my preference is to shoot near or full wide open aperture on the lens but this isn't always going to give you the affect you want.
That, and there is a big, big difference at night between a lens that will only give you f/4.5 maximum at night and a 50mm that will give you f/1.4 maximum.
Just play with your camera and remember that capturing light in your camera settings is additive and subtractive: aperture/f-stop (lens opening), shutter speed and ISO (sensor speed or camera film speed) are your three ways of doing this. And today the in-camera light sensors are pretty accurate at giving you a median exposure indication.
There is also the technique of making HDR images (High Dynamic Range) which is similar to bracketing but involves combining three or more varied exposures in Photoshop to create brilliantly colored images.
Hope this helps. Just have fun with it!
I am not familiar with Nikon's sensors but generally I'd suggest this:
Until very recently the sweet spot for ISO settings for many DSLRs still emulated most 35mm professional film stocks (for BEST performance-- they can take pictures with considerably higher ISOs than film). The Canon 5D Mark III and Nikon's D700 changed that.
You'll have to forgive my comparisons to celluloid film methodology. That's how I trained and it's a point of starting reference for the thought process to manual exposures.
Switch to full manual, try ISO 1600-2000 to start (that's where most film left off although there were black and white 3200 and grainy as all hell 6400 speed films), and try an aperture of f/4.0, f/2.8 or f/2.0 or lower if your lens is that fast. Remember the wider the aperture the less depth of field you will have. Try lower shutter speeds as well. If you have a tripod or can safely set the camera on the ground try setting a shutter timer to use a setting below (or well below) 1/60th of a second. Sometimes you can go handheld at 1/45th but any lower than that and you need to set a timer. Just check your meter for the median exposure mark as you play with these settings.
The newest cameras have some very impressive maximum ISOs up to 12,500. They might be up to 15,000 ISO by now. Keep in mind, as your ISO goes even higher you'll have even more noise (like film grains being exposed for too long-- in color film photography this used to cause what was known as "reciprocity failure" where one or more color layers would burn out from extremely long exposures. It made for some cool experiments but with digital it's a thing of the past).
I usually stay around ISO 1600-2000 maximum for the most stable image with little to no noise. If you can do low shutter speeds on a timer you may be able to back it down considerably. Personally I love embracing the light in the location I'm in at night so my preference is to shoot near or full wide open aperture on the lens but this isn't always going to give you the affect you want.
That, and there is a big, big difference at night between a lens that will only give you f/4.5 maximum at night and a 50mm that will give you f/1.4 maximum.
Just play with your camera and remember that capturing light in your camera settings is additive and subtractive: aperture/f-stop (lens opening), shutter speed and ISO (sensor speed or camera film speed) are your three ways of doing this. And today the in-camera light sensors are pretty accurate at giving you a median exposure indication.
There is also the technique of making HDR images (High Dynamic Range) which is similar to bracketing but involves combining three or more varied exposures in Photoshop to create brilliantly colored images.
Hope this helps. Just have fun with it!
pretty sure DSLRs go even higher than 15k ISO since the Xperia Z3 phone can do 18k ISO lol. i think sony's mirrorless full size sensor cameras are in the hundreds of thousands, but who knows how grainy that will be lol. this isn't even a DSLR
http://store.sony.com/a7s-full-frame...pfm%3Dcategory
