DIY Tire Well Harness Relocation
 03-16-10, 02:10 PM
#1

Hi everybody, I finally got around to relocating the harness in my driver side tire well. I have seen a DIY on here before, showing you how to relocate the harness by extending all of the wires. I accomplished the same thing by disconnecting the harness on the inside of the foot well and moving it inside the engine bay.
Anyone who is slamming your SC should do this. I waited a few weeks after dropping mine to do it and luckily only one wire showed any damage.
This wasn't that hard, just a little time consuming. a few things were difficult, but just take your time and keep at it.
I took lot of pics, so hopefully will make it easier for anyone wanting to do this.
1. Ok to start of with here are the things you will need to do this. these are not required and can be substituted but this is what I used.
I used the Lugnut wrench from the trunk and my lug nut key to remove the wheel.
Jack
Jack Stand
3/8" Ratchet
3/8" Extension
10mm Socket
Phillips Screwdriver
Flathead Screwdriver
Needle Nose Plires
Hobby knife or razor blade
Electrical tape
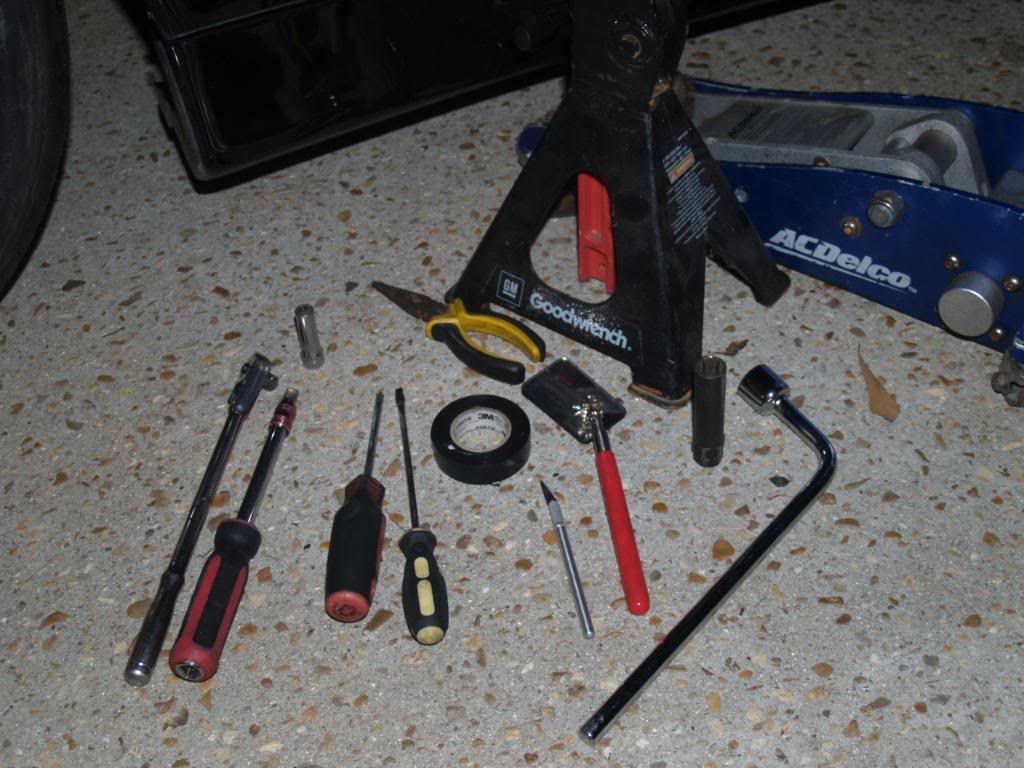
I also used a flashlight and teloscopic mirror to see the Plugs in the footwell better. Unplugging the harness is probably the hardest part.
2. I would start off by unplugging the harness first. you have to lay down in the floor board and its a pain in the butt, but its doable.
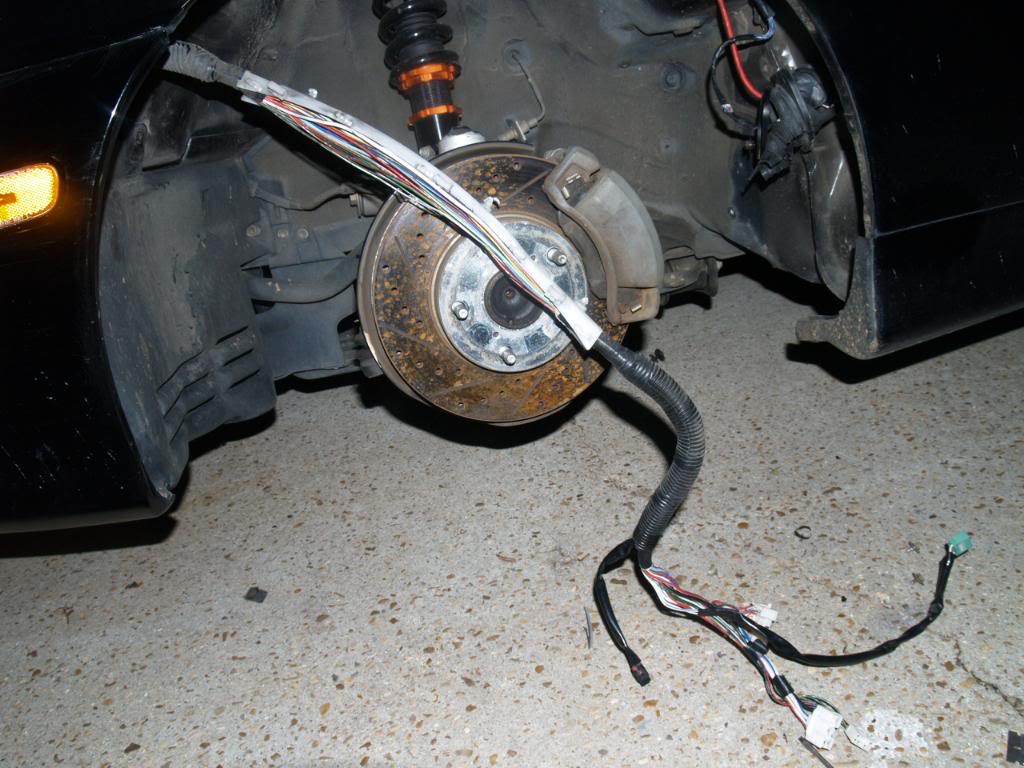
3. Jack up the car as far as you can, and put the jack stand in place. The higher the car the easier it is to work inside the tire well. then remove the wheel, and remove all of the 10mm/phillips head screws to take off the plastic liner
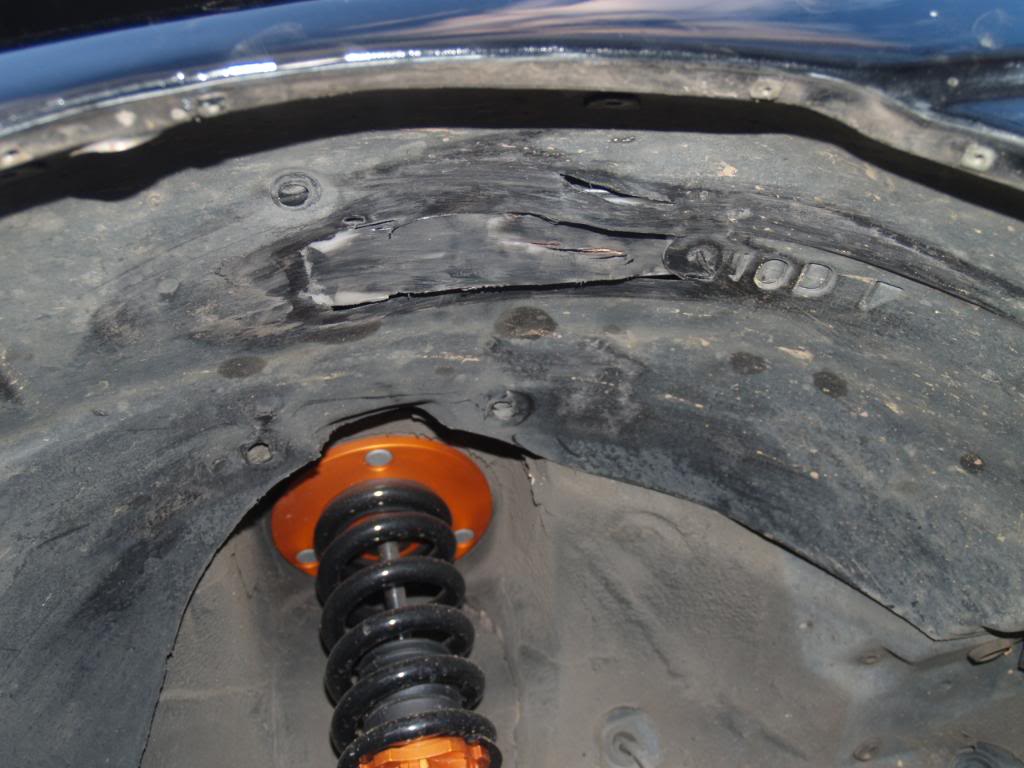
4. Remove the white plastic case the harness is in with a flat head screwdriver, then remove the two 10mm bolts holding the harness to the car.
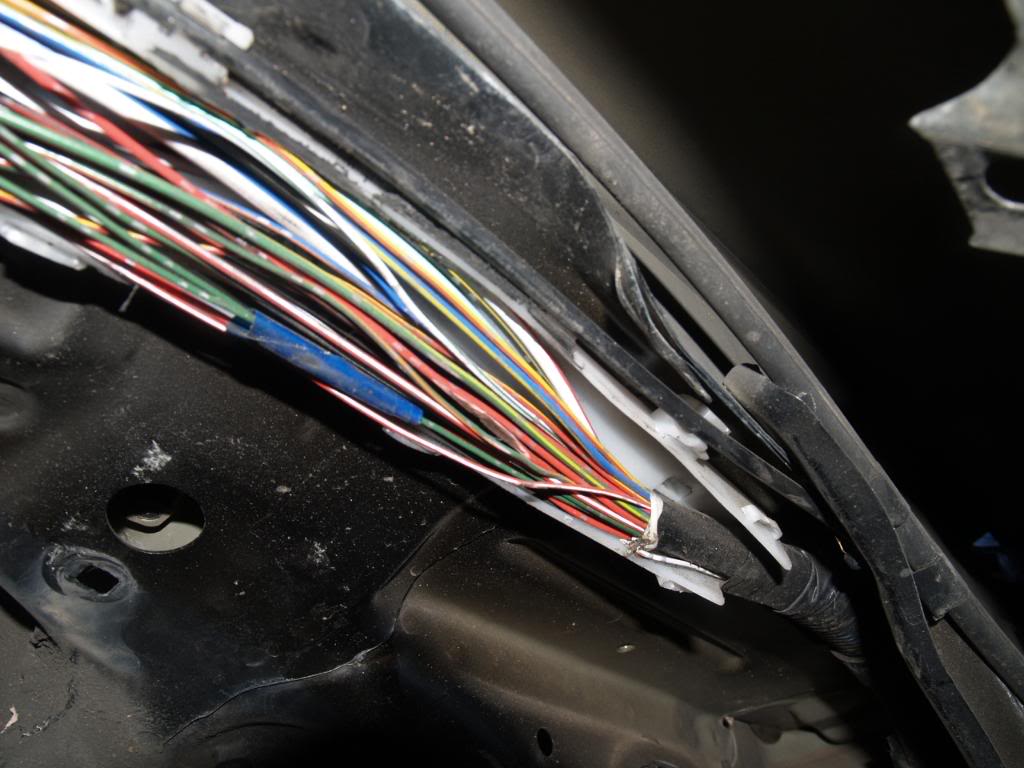
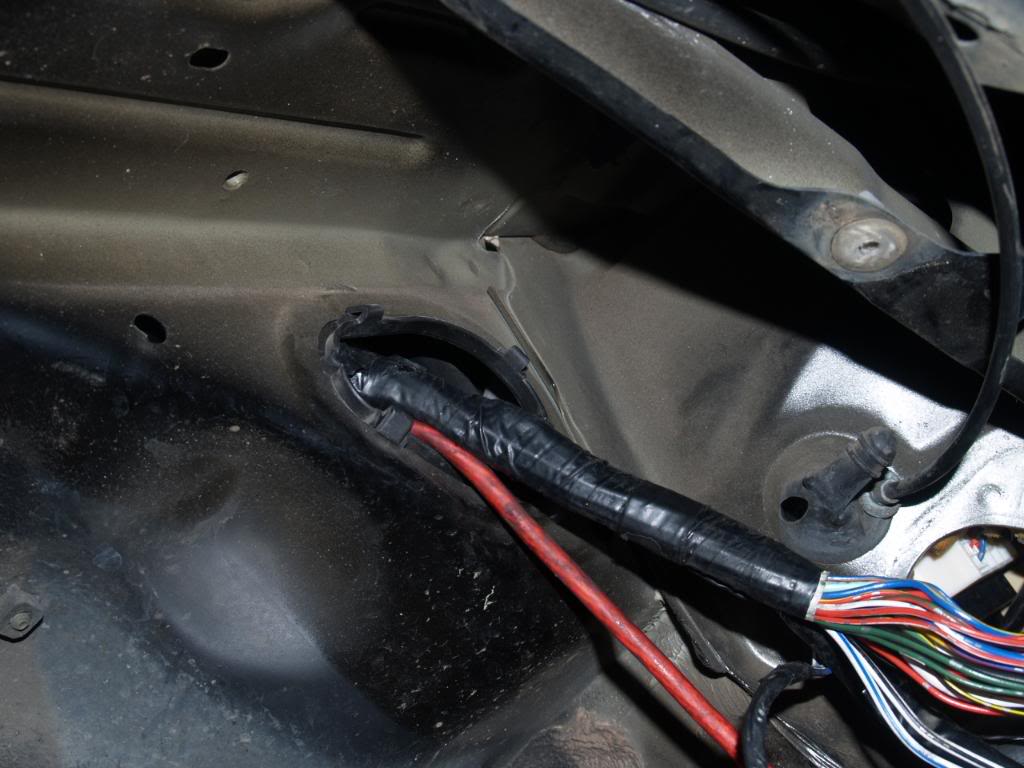
5. there is a second smaller harness here that is folded and taped up. remove the electrical tape and strech out the harness to give yourself some working room. you will be able to slide this harness in the rubber seal and you wont have to disconnect it. this next part is kind of tedious, start to pull the harness out of the car. be carefull not pull the wires too hard. You will have to just get one plug out at a time.
6. next pull off what ever electrical tape you have to to expse all of the rubber seal, then seperate the rubber seal from the metal mount. you will have to be careful not to cut the wires when doing this but use a razor blade to split the rubber so you can remove harness.
7. Next I removed all of the wire loom from the harness and put fresh electrical tape on it to make it easier to work with, you can replace the loom with a single long piece in the engine bay if you'ld like.
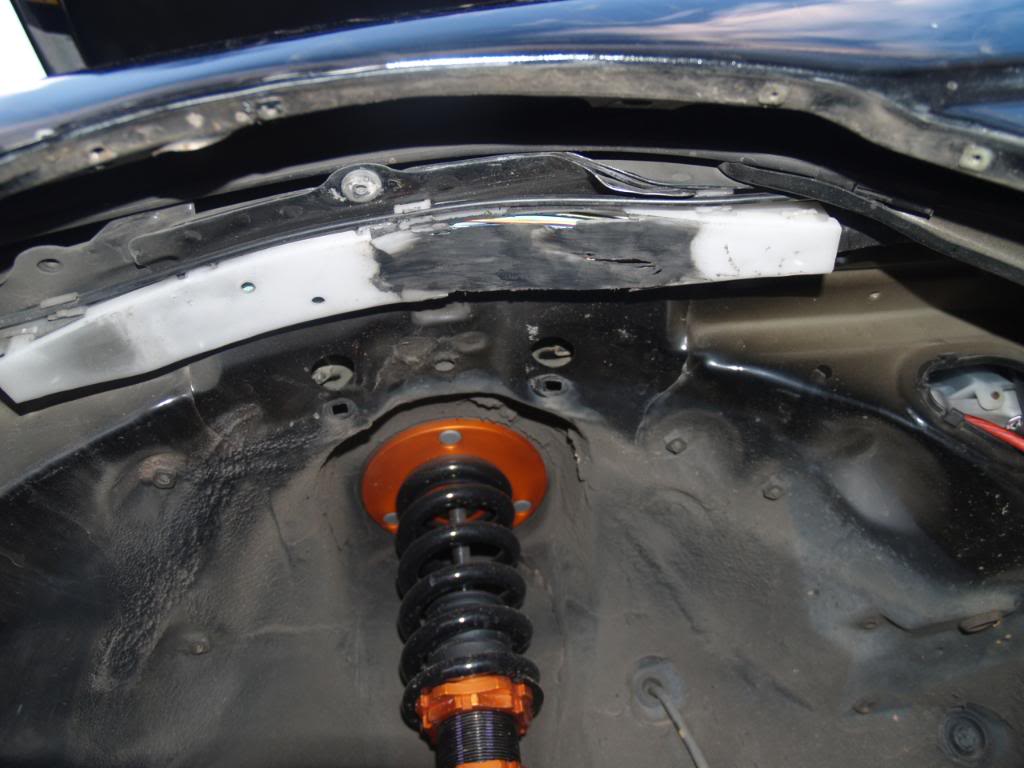
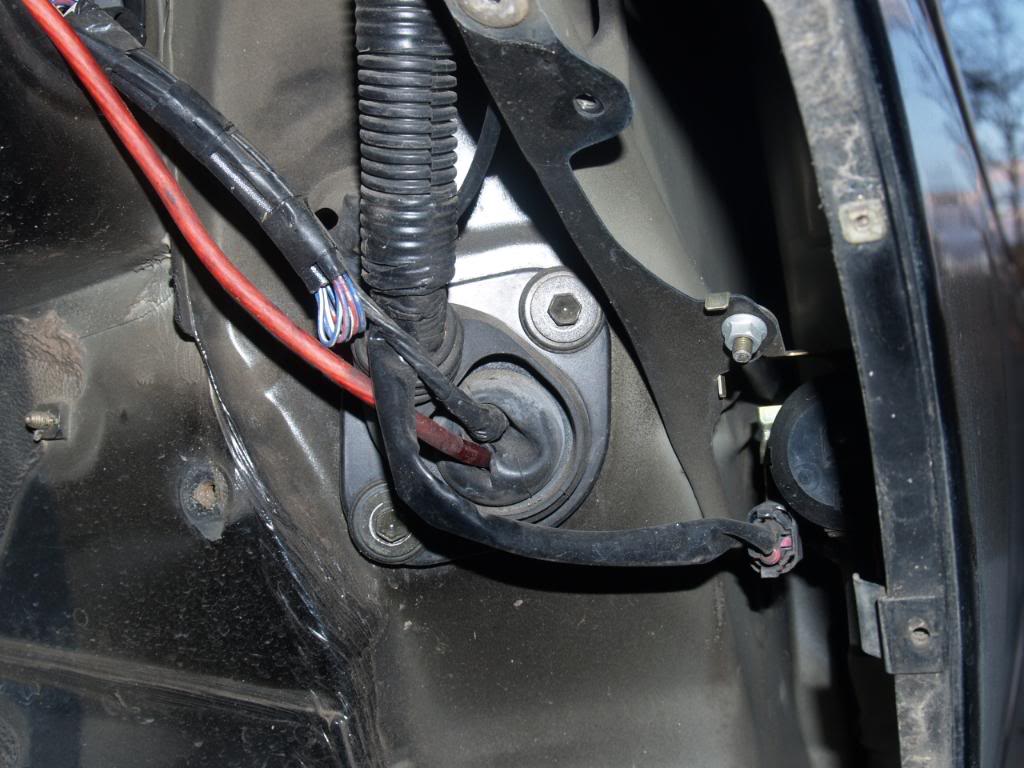
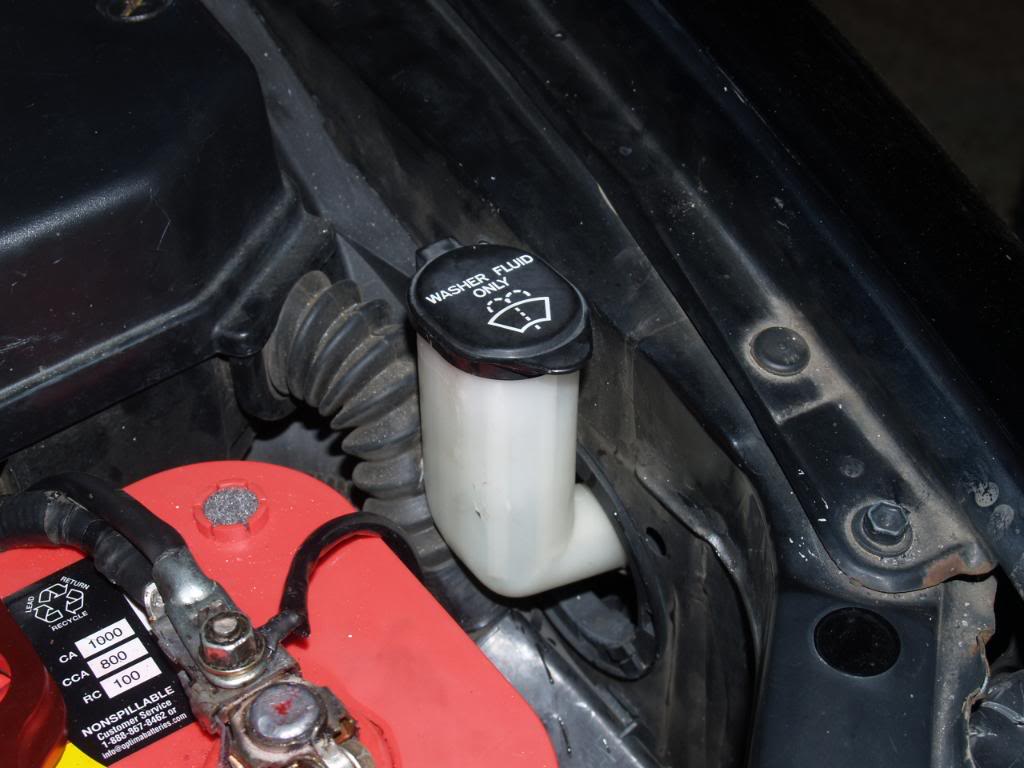
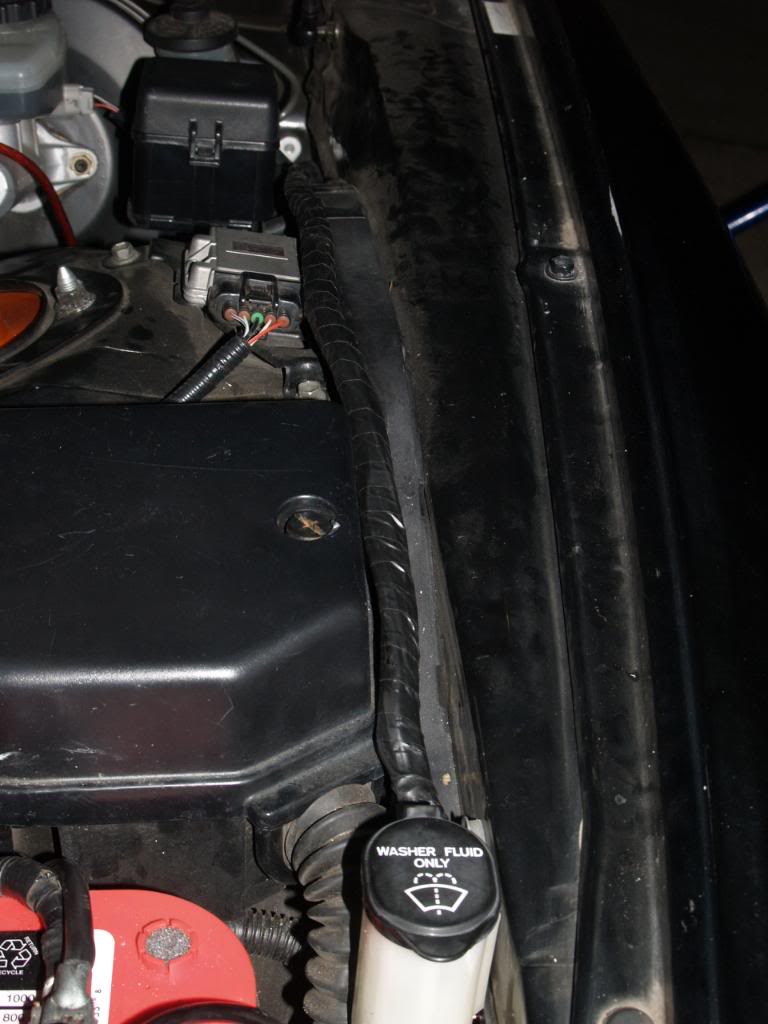
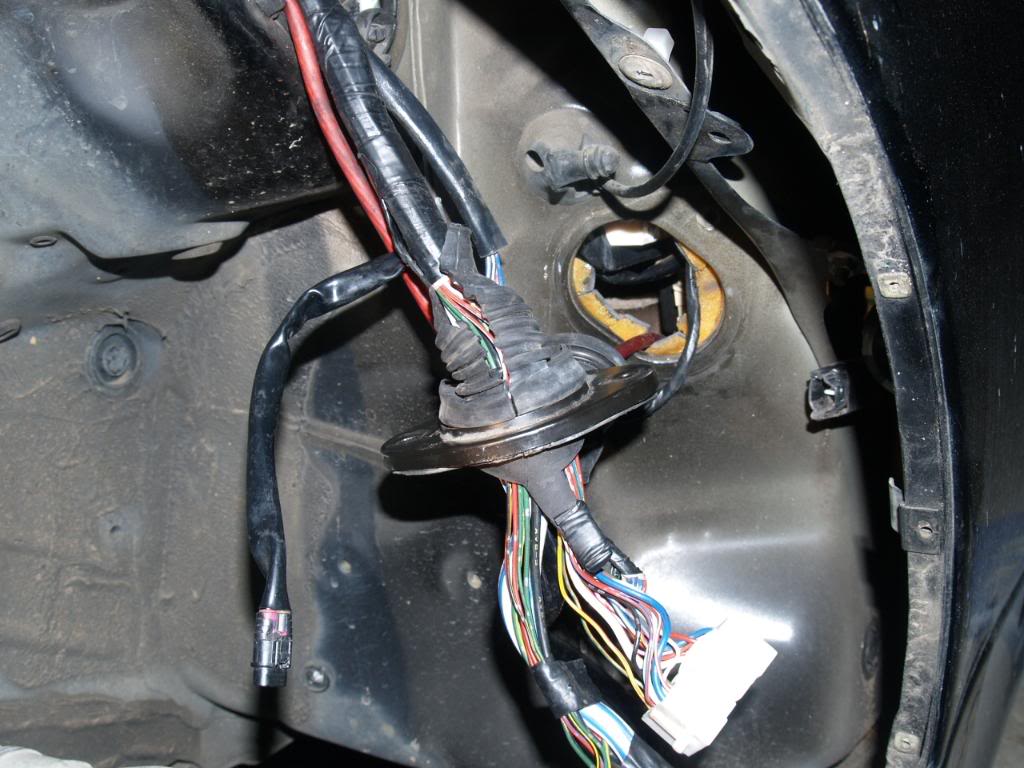
8. Next remove the top of the windshield washer fluid resivor. its held on with a single 10mm bolt and slides right out. This give you room to put the harness back inte the whole where it originally cam from. i takes alittle work to get it straight but get as much length as you can, you will need all of it.
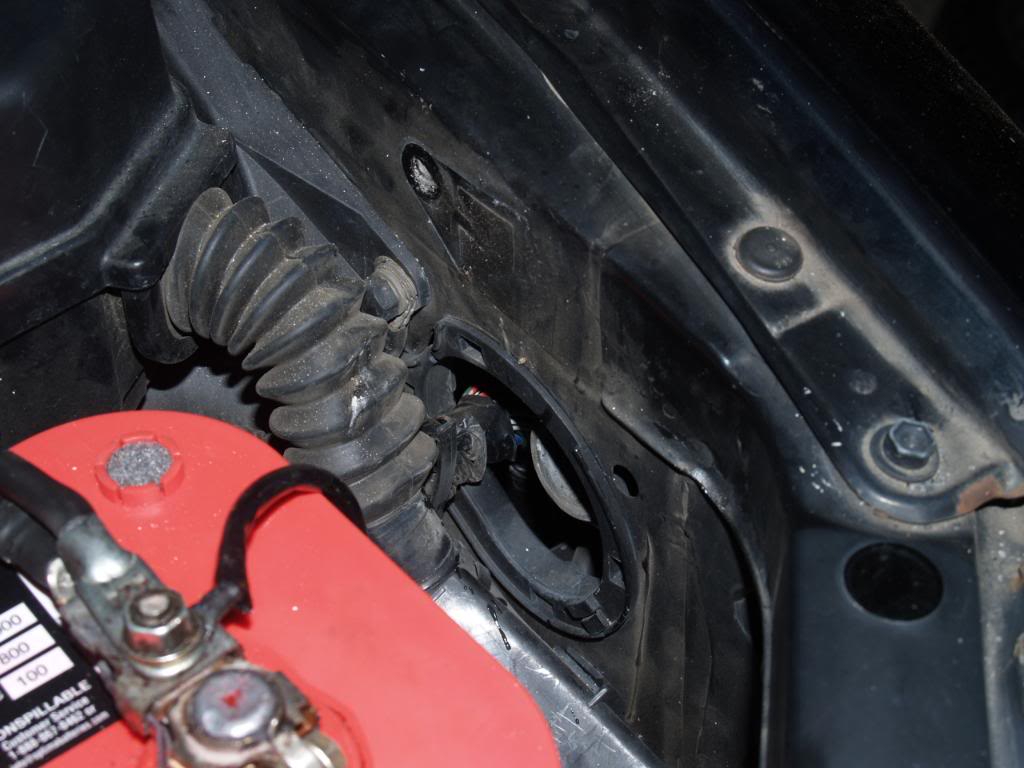
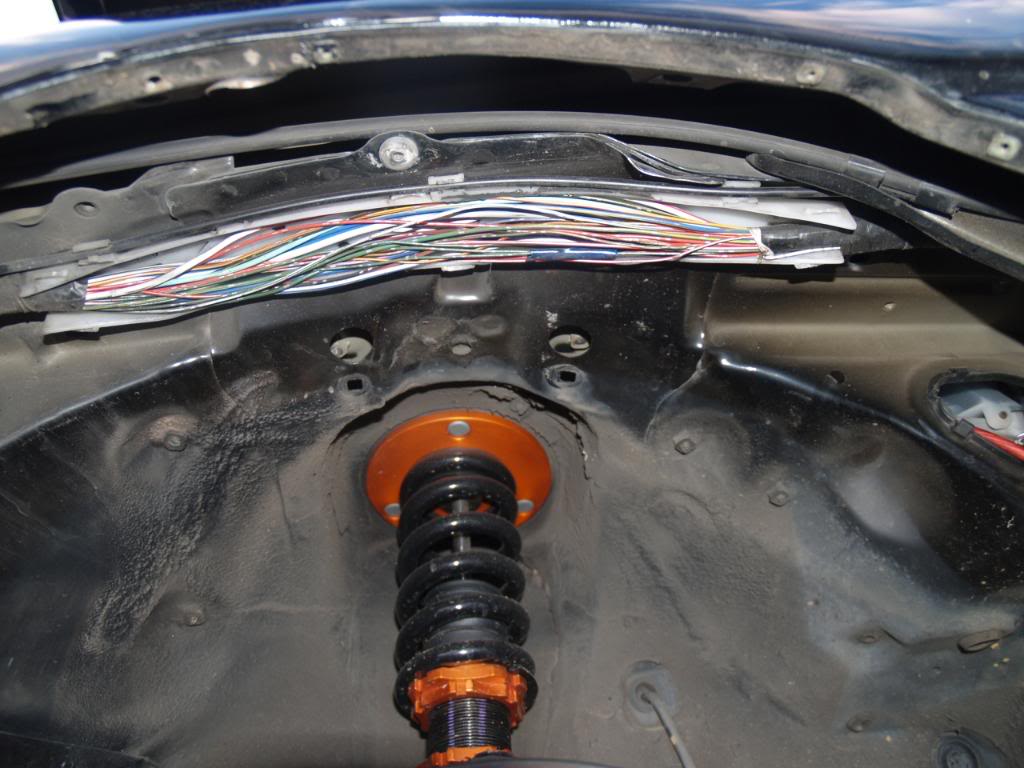
9. position the narness next the othe harness inside the plastic case, and run it back into the tire well through this whole.
10. Place the harness back into the ruber gromet. Also make sure its throught the metal cover.
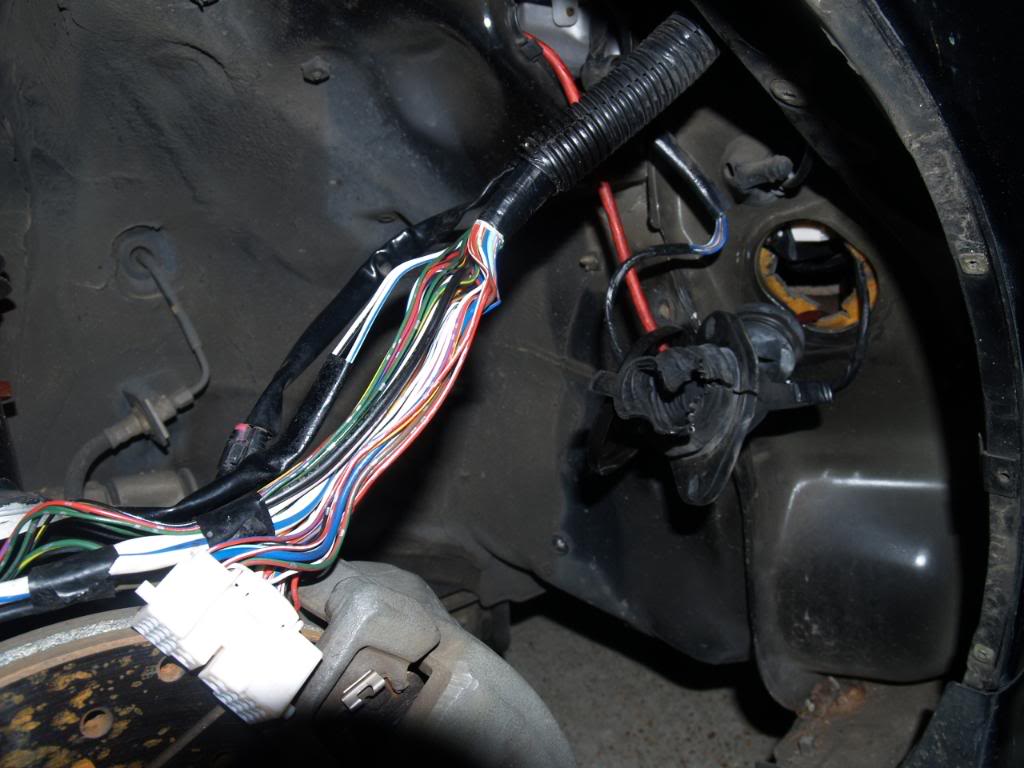
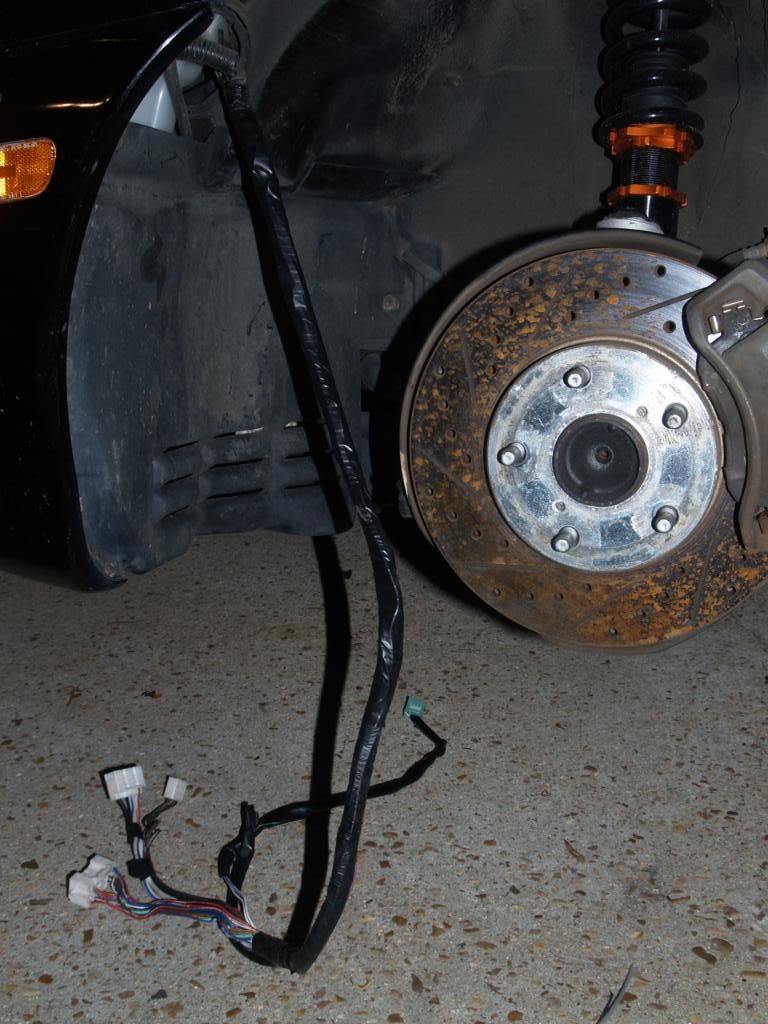
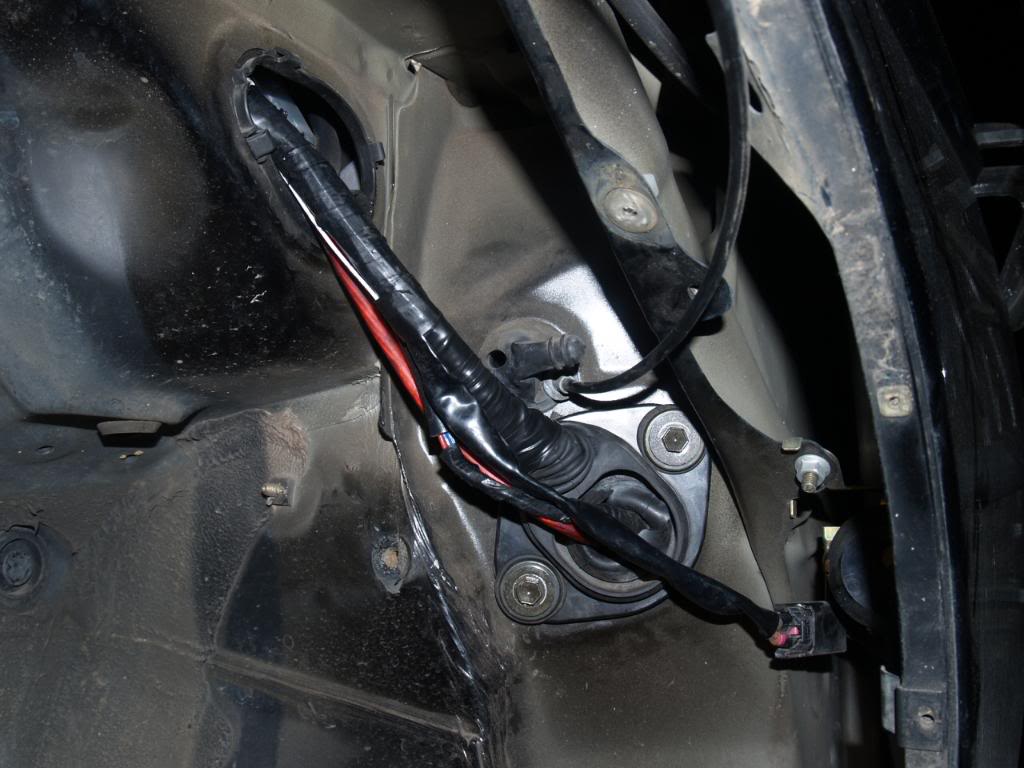
11. Next put the harness back through the whole where you pulled it out of. Then go into the foot well and plug everything back in. After Everything is back into place and plugged in, Use Electrical tape to wrap the harness and rubber seal. Mine looked like this when done.
Hope this helps, and let me know if I left anything out
Anyone who is slamming your SC should do this. I waited a few weeks after dropping mine to do it and luckily only one wire showed any damage.
This wasn't that hard, just a little time consuming. a few things were difficult, but just take your time and keep at it.
I took lot of pics, so hopefully will make it easier for anyone wanting to do this.
1. Ok to start of with here are the things you will need to do this. these are not required and can be substituted but this is what I used.
I used the Lugnut wrench from the trunk and my lug nut key to remove the wheel.
Jack
Jack Stand
3/8" Ratchet
3/8" Extension
10mm Socket
Phillips Screwdriver
Flathead Screwdriver
Needle Nose Plires
Hobby knife or razor blade
Electrical tape
I also used a flashlight and teloscopic mirror to see the Plugs in the footwell better. Unplugging the harness is probably the hardest part.
2. I would start off by unplugging the harness first. you have to lay down in the floor board and its a pain in the butt, but its doable.
3. Jack up the car as far as you can, and put the jack stand in place. The higher the car the easier it is to work inside the tire well. then remove the wheel, and remove all of the 10mm/phillips head screws to take off the plastic liner
4. Remove the white plastic case the harness is in with a flat head screwdriver, then remove the two 10mm bolts holding the harness to the car.
5. there is a second smaller harness here that is folded and taped up. remove the electrical tape and strech out the harness to give yourself some working room. you will be able to slide this harness in the rubber seal and you wont have to disconnect it. this next part is kind of tedious, start to pull the harness out of the car. be carefull not pull the wires too hard. You will have to just get one plug out at a time.
6. next pull off what ever electrical tape you have to to expse all of the rubber seal, then seperate the rubber seal from the metal mount. you will have to be careful not to cut the wires when doing this but use a razor blade to split the rubber so you can remove harness.
7. Next I removed all of the wire loom from the harness and put fresh electrical tape on it to make it easier to work with, you can replace the loom with a single long piece in the engine bay if you'ld like.
8. Next remove the top of the windshield washer fluid resivor. its held on with a single 10mm bolt and slides right out. This give you room to put the harness back inte the whole where it originally cam from. i takes alittle work to get it straight but get as much length as you can, you will need all of it.
9. position the narness next the othe harness inside the plastic case, and run it back into the tire well through this whole.
10. Place the harness back into the ruber gromet. Also make sure its throught the metal cover.
11. Next put the harness back through the whole where you pulled it out of. Then go into the foot well and plug everything back in. After Everything is back into place and plugged in, Use Electrical tape to wrap the harness and rubber seal. Mine looked like this when done.
Hope this helps, and let me know if I left anything out
Last edited by Dustin2JZ; 03-16-10 at 03:41 PM.

The following users liked this post:
ESCEE400 (02-22-24)
03-16-10, 02:30 PM
#2
Very nice, it always helps to have threads like this even if there are more than 2 of them..be sure to update the DIY thread just so its there for further reference.
https://www.clublexus.com/forums/sc-...d-threads.html
https://www.clublexus.com/forums/sc-...d-threads.html


Trending Topics
03-16-10, 03:26 PM
#9
Lexus Champion
iTrader: (8)

Join Date: Dec 2003
Location: California
Posts: 2,605
Likes: 0
Received 0 Likes
on
0 Posts
better do it soon! you ride pretty low homeboy
nicely done. Lots of pics are so helpful. A lot of people will probably be using this since going low is super awesome.
I didn't move it through the engine bay though, i simply tucked it higher in the fender well.
nicely done. Lots of pics are so helpful. A lot of people will probably be using this since going low is super awesome.
I didn't move it through the engine bay though, i simply tucked it higher in the fender well.
 03-16-10, 03:38 PM
#11
I've seen that done, but you have to be extra careful, because it can still get hit if your super low like mine.
