CAD File Sharing
 08-22-16, 11:06 AM
#1
I'm not sure who all else is willing and able to do this, but I thought I'd start this for anyone with CAD models of something useful pertaining to our cars, to share with the community.
I'm starting out with just one model here. I plan on adding more in the future, but for now this is a start.
CD009 SHORTENED SHIFTER LINKAGE
Attached is my model of the shifter linkage piece we created to work with our "DIY CD009 shortened shifter" setup. You use an ebay / off the shelf 240sx shifter, and you cut it shorter. Add roughly 19mm of shimming under it, and you can use this piece to couple it to the trans shifter shaft. I cannot take credit for this entire shifter concept as it was mostly the work of other fellow members on here, I simply created this little fitting.
I've attached both the Solidworks 2016 model, and also a STEP file so those without Solidworks can still view it.
Here's a picture of the actual piece this CAD file is for:

Here it is coupled to the trans shaft:

Here's how you modify the 240sx shifter base.

Places the shifter base center 31.75" from edge of bellhousing:

Need to space the shifter base up 19-20mm to fit this fitting correctly

I'm starting out with just one model here. I plan on adding more in the future, but for now this is a start.
CD009 SHORTENED SHIFTER LINKAGE
Attached is my model of the shifter linkage piece we created to work with our "DIY CD009 shortened shifter" setup. You use an ebay / off the shelf 240sx shifter, and you cut it shorter. Add roughly 19mm of shimming under it, and you can use this piece to couple it to the trans shifter shaft. I cannot take credit for this entire shifter concept as it was mostly the work of other fellow members on here, I simply created this little fitting.
I've attached both the Solidworks 2016 model, and also a STEP file so those without Solidworks can still view it.
Here's a picture of the actual piece this CAD file is for:
Here it is coupled to the trans shaft:
Here's how you modify the 240sx shifter base.
Places the shifter base center 31.75" from edge of bellhousing:
Need to space the shifter base up 19-20mm to fit this fitting correctly
Last edited by Halon; 08-26-16 at 07:59 AM.

The following users liked this post:
zazzn (01-29-17)

 08-26-16, 07:59 AM
#4
2JZGE SPARK PLUG COVER
Next files I have are for a basic 2JZGE Non-VVTI spark plug cover plate. There's a handful of people that have these right now (myself and Ali included). My goal when making this was not to make them a absolute perfect molded $300 show car piece, but rather to make something that fit well, looked good, while being extremely affordable so even the poorest high school kid could have one. So here it is. Very affordable because it can be cut from just flat sheet of whatever material you want (ABS Plastic, Aluminum, Stainless, CF, cardboard lol) which is what keeps it extremely affordable.
Now you have to pay particular attention to what style valve covers you have. You need to figure out if you have the 1992 style valve covers, or the 1993+ style valve covers. I never even realized there was a difference until I started making these plates. So when using these files, make sure you use the correct one for your style valve covers.
1992 Style Valve Covers - see the red boxed in portion, see how valve covers are inline with the plastic plug cover

1993+ Style Valve Covers - see the red boxed in portion, see how exhaust side valve cover IS NOT inline with the plastic plug cover. It appears in 1993 they used the same intake side cover, but the exhaust side cover was changed slightly

So once you've determined which valve covers you have, you'll know which version of these plates you need.
Spark Plug Cover Top Plate naming convention:
SC3_SPC_92_I9_RevC: This is the file for the 1992 Spark Plug Cover Top Plate
SC3_SPC_93_I9_RevC: This is the file for the 1993+ Spark Plug Cover Top Plate
Now you can run them just like that, keeps it very simple, affordable, and it actually looks very good in person this way. Honestly, this really is all you need and it will make a huge visual difference! However when some people sat and just looked at photos, the feedback I consistently got was that the side valleys were still sort of wide open to see through. Again I'll say (and Ali can attest) that even though those side valleys are open, this still looks great just like this in person! But none the less to try and help those who felt otherwise, I designed some side tabs that you can add if you'd like. You don't have to though. To attach them, you'll need to use some sort of 90* angle piece. You can go pick up aluminum 90* pieces at places like Home Depot. I personally ran 3/4" PVC angle from McMaster Carr. Go to their site and type in part # 8659K58 and you'll find it comes in 5ft lengths for around $8. I tried a couple different plastics, but this is the one I found to be the best as a lot of other plastic ones were extremely flimsy.
Spark Plug Cover Side Tabs naming convention:
SC3_SPC_S2: This is the Side Tab for 'Side 2' which is the intake side. You use this tab on the intake side on both 92 & 93+ style covers, because the intake side is the same between them.
SC3_SPC_92_S1: This is the Side Tab for 'Side 1' which is the exhaust side. You use this tab on the exhaust side for the 92 style covers.
SC3_SPC_93_S1: This is the Side Tab for 'Side 1' which is the exhaust side. You use this tab on the exhaust side for the 93+ style covers.
INSTRUCTIONS: This is a set of instructions showing how you I personally attached the sides to the top plate.
I've included for each part, both the Solidworks 3D model as well as a DXF 2D CAD drawing. Anyone with SW 2016 can open the 3D model and make any sort of edits they want. The DXF file is the file you should be able to give anyone with a CNC machine to just load onto their machine. For example if you find a local waterjet cutter, you can bring them a sheet of aluminum, and that DXF file, and they should be able to just load that file onto their machine and it will cut it.
On the top plates, in the file name I have "I9". All that stands for is "idea 9" as I was coming up with different vent slot ideas. So I have a whole bunch of other ideas, but that was the one that was my final design I liked. So if you have Solidworks, you can remove those vents and come up with your own ideas, or edit it however the hell you want in general. Our GE valve covers are higher in the back than they are in the front. Because of that, this part will slightly bow when you install it. Not a big deal at all, but I do want to point out that in my ventalation design, you'll notice that I didn't make the center 2 long slots go the entire way. I originally actually just did those 2 long slots that entire distance in my first prototype run. Ali actually has one of those. The issue is that because one you bolt them down the cover has a slight bow, that inside long piece of material between those 2 long slots doesn't really bow with it because those vent slots are so long, that long middle area of material is kind of free to just bend or not bend as it wants, so it kind of looked funny. So I redesigned it based on that lesson learned, so instead of those middle two vents going the entire length, I made them shorter to match the outter 2 slots, then kept an inch or so of material, and then just did shorter 2 slots at the end. This increased the stiffness and no longer has that bowing issue. So now it's a row of 4 slots, with 2 slots also on either end. I'm saying this because if you do decide to go in and make your own new vent design, keep that in mind. I highly recommend you don't do slots that entire length. Keep a couple little bridges in there like this design has for stiffening.
The curve that is on the front of this SPC was setup to mimic the curve of those clear Greddy style cam covers you can get on ebay. So you can either purchase one of those, or just trim your stock one.
MATERIALS:
- The aluminum one you'll see was made out of .090" Aluminum.
- The CF ones were made from 1.5mm thick CF.
- You can use your stock fasteners, otherwise adding some nice M6x20mm Stainless Button Head fasteners adds a real nice touch.
- I always use those black plastic spacers that you see in some of the pictures, they are 1/4" thick with a 1/4" center hole. The exact black ones I used can be found for around $5 on ebay for a 100pk.
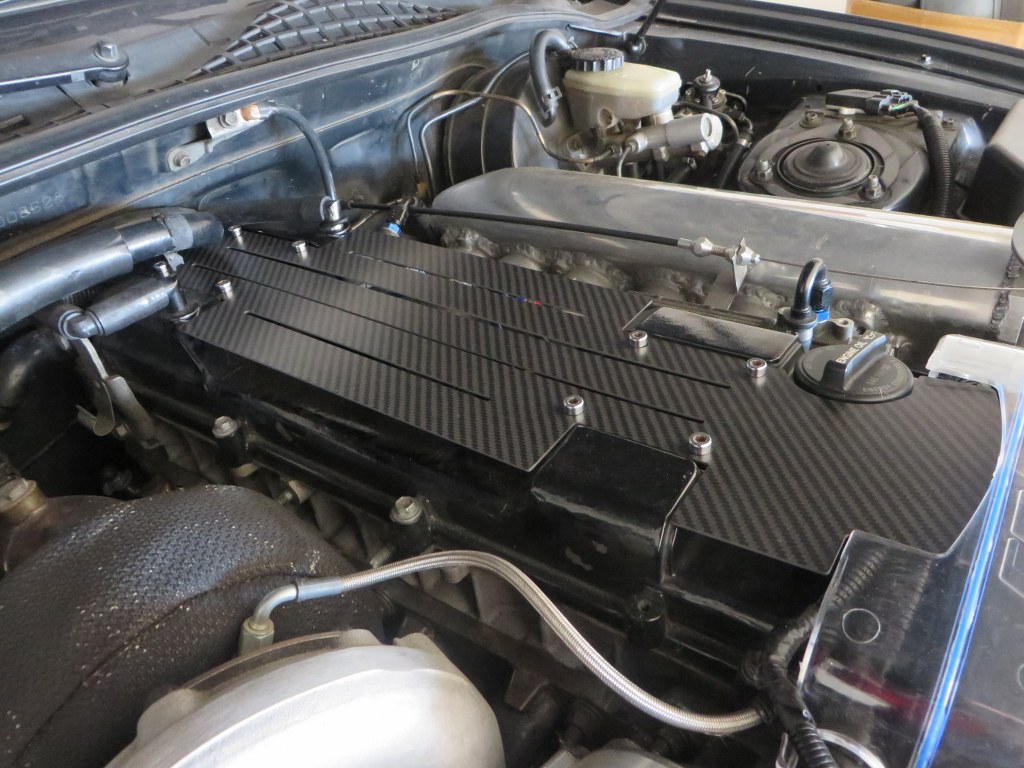
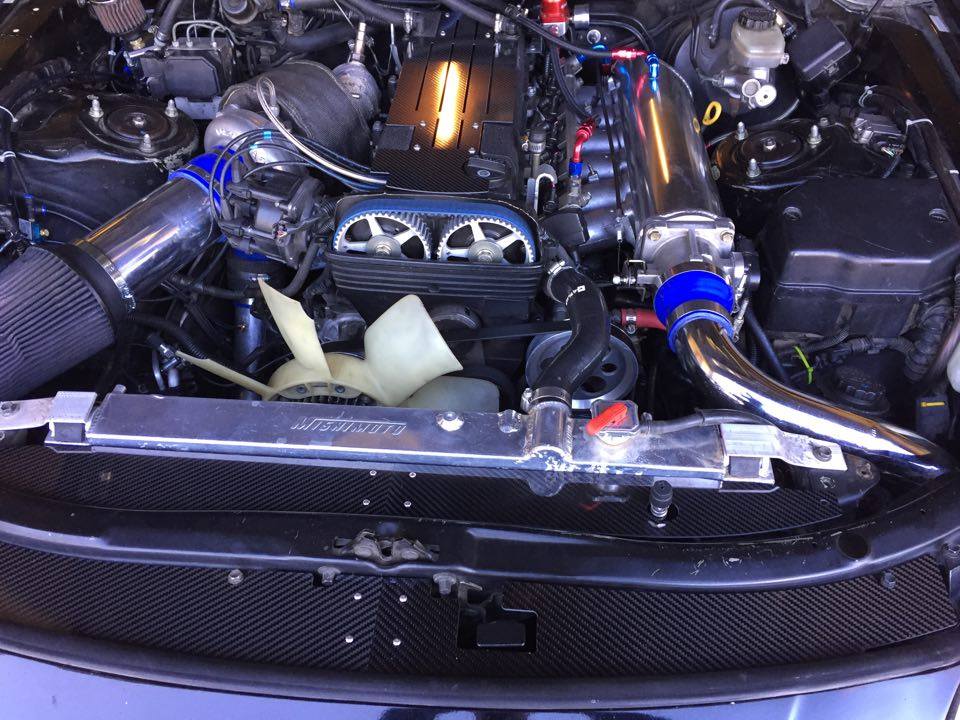
There you go. Enjoy. Here's a few photos of what they look like:
- My original design without the side tabs, on 93+ style valve covers. This design also had the vent slots going the entire length. Again I do NOT recommend this vent design:


- Another car with the 93+ style cover. This is with the new 'Idea 9' vent design which is much better:

- Ali's car with the original 93+ style cover with no side tabs, and the old vent design:


- A local guy here with my actual first prototype ever made, out of .090" Aluminum without any vents.
- And here is my car currently. This is the 92 style, with the new good 'idea 9' vent style, with the side tabs.


Next files I have are for a basic 2JZGE Non-VVTI spark plug cover plate. There's a handful of people that have these right now (myself and Ali included). My goal when making this was not to make them a absolute perfect molded $300 show car piece, but rather to make something that fit well, looked good, while being extremely affordable so even the poorest high school kid could have one. So here it is. Very affordable because it can be cut from just flat sheet of whatever material you want (ABS Plastic, Aluminum, Stainless, CF, cardboard lol) which is what keeps it extremely affordable.
Now you have to pay particular attention to what style valve covers you have. You need to figure out if you have the 1992 style valve covers, or the 1993+ style valve covers. I never even realized there was a difference until I started making these plates. So when using these files, make sure you use the correct one for your style valve covers.
1992 Style Valve Covers - see the red boxed in portion, see how valve covers are inline with the plastic plug cover
1993+ Style Valve Covers - see the red boxed in portion, see how exhaust side valve cover IS NOT inline with the plastic plug cover. It appears in 1993 they used the same intake side cover, but the exhaust side cover was changed slightly
So once you've determined which valve covers you have, you'll know which version of these plates you need.
Spark Plug Cover Top Plate naming convention:
SC3_SPC_92_I9_RevC: This is the file for the 1992 Spark Plug Cover Top Plate
SC3_SPC_93_I9_RevC: This is the file for the 1993+ Spark Plug Cover Top Plate
Now you can run them just like that, keeps it very simple, affordable, and it actually looks very good in person this way. Honestly, this really is all you need and it will make a huge visual difference! However when some people sat and just looked at photos, the feedback I consistently got was that the side valleys were still sort of wide open to see through. Again I'll say (and Ali can attest) that even though those side valleys are open, this still looks great just like this in person! But none the less to try and help those who felt otherwise, I designed some side tabs that you can add if you'd like. You don't have to though. To attach them, you'll need to use some sort of 90* angle piece. You can go pick up aluminum 90* pieces at places like Home Depot. I personally ran 3/4" PVC angle from McMaster Carr. Go to their site and type in part # 8659K58 and you'll find it comes in 5ft lengths for around $8. I tried a couple different plastics, but this is the one I found to be the best as a lot of other plastic ones were extremely flimsy.
Spark Plug Cover Side Tabs naming convention:
SC3_SPC_S2: This is the Side Tab for 'Side 2' which is the intake side. You use this tab on the intake side on both 92 & 93+ style covers, because the intake side is the same between them.
SC3_SPC_92_S1: This is the Side Tab for 'Side 1' which is the exhaust side. You use this tab on the exhaust side for the 92 style covers.
SC3_SPC_93_S1: This is the Side Tab for 'Side 1' which is the exhaust side. You use this tab on the exhaust side for the 93+ style covers.
INSTRUCTIONS: This is a set of instructions showing how you I personally attached the sides to the top plate.
I've included for each part, both the Solidworks 3D model as well as a DXF 2D CAD drawing. Anyone with SW 2016 can open the 3D model and make any sort of edits they want. The DXF file is the file you should be able to give anyone with a CNC machine to just load onto their machine. For example if you find a local waterjet cutter, you can bring them a sheet of aluminum, and that DXF file, and they should be able to just load that file onto their machine and it will cut it.
On the top plates, in the file name I have "I9". All that stands for is "idea 9" as I was coming up with different vent slot ideas. So I have a whole bunch of other ideas, but that was the one that was my final design I liked. So if you have Solidworks, you can remove those vents and come up with your own ideas, or edit it however the hell you want in general. Our GE valve covers are higher in the back than they are in the front. Because of that, this part will slightly bow when you install it. Not a big deal at all, but I do want to point out that in my ventalation design, you'll notice that I didn't make the center 2 long slots go the entire way. I originally actually just did those 2 long slots that entire distance in my first prototype run. Ali actually has one of those. The issue is that because one you bolt them down the cover has a slight bow, that inside long piece of material between those 2 long slots doesn't really bow with it because those vent slots are so long, that long middle area of material is kind of free to just bend or not bend as it wants, so it kind of looked funny. So I redesigned it based on that lesson learned, so instead of those middle two vents going the entire length, I made them shorter to match the outter 2 slots, then kept an inch or so of material, and then just did shorter 2 slots at the end. This increased the stiffness and no longer has that bowing issue. So now it's a row of 4 slots, with 2 slots also on either end. I'm saying this because if you do decide to go in and make your own new vent design, keep that in mind. I highly recommend you don't do slots that entire length. Keep a couple little bridges in there like this design has for stiffening.
The curve that is on the front of this SPC was setup to mimic the curve of those clear Greddy style cam covers you can get on ebay. So you can either purchase one of those, or just trim your stock one.
MATERIALS:
- The aluminum one you'll see was made out of .090" Aluminum.
- The CF ones were made from 1.5mm thick CF.
- You can use your stock fasteners, otherwise adding some nice M6x20mm Stainless Button Head fasteners adds a real nice touch.
- I always use those black plastic spacers that you see in some of the pictures, they are 1/4" thick with a 1/4" center hole. The exact black ones I used can be found for around $5 on ebay for a 100pk.
There you go. Enjoy. Here's a few photos of what they look like:
- My original design without the side tabs, on 93+ style valve covers. This design also had the vent slots going the entire length. Again I do NOT recommend this vent design:
- Another car with the 93+ style cover. This is with the new 'Idea 9' vent design which is much better:
- Ali's car with the original 93+ style cover with no side tabs, and the old vent design:
- A local guy here with my actual first prototype ever made, out of .090" Aluminum without any vents.
- And here is my car currently. This is the 92 style, with the new good 'idea 9' vent style, with the side tabs.
Last edited by Halon; 08-26-16 at 08:28 AM.
09-07-16, 08:09 AM
#5
SC300 RADIATOR / IS300 FAN BRACKETS
Next files I have are for a basic set of brackets to mount IS300 fans to an SC300 radiator. There's several ways one can do this, but this is simply how I did it on my car. I used 1" x 1" x 1/8" Aluminum Angle, Metric Bolts, and some window sealing strip, all obtained from my local hardware store for around $20. This is meant to be an affordable option/alternative for DIY folks who perhaps don't want to, or don't have the money to, purchase the beautiful PnP shroud for these fans that is already available from PHR.
To be clear, the components I used were an OEM style replacement SC300 Denso Radiator (221-3118) and an OEM style replacement IS300 Sunbelt Radiator Fan (LX3115108). However I believe these should work for any OEM or OEM replacement style components for the same cars (e.g. Koyo, Denso, OEM, etc factory equivalent brands/parts).
Instructions -
1) Set the radiator flat on the ground.
2) Set the fans on top of the radiator gently. There is a tab/hole in the fan assembly that is at the top, near the left (but not the one all the way at the left corner). That will line up nicely with one of the mounting holes on the radiator almost right under the radiator cap. Loosely thread in an M6 x 30mm bolt & washer to loosely hold the fan assembly in place. This is sort of your alignment bolt I'll call it. Adjust the fan as needed so that it sits nice and square/parallel on the radiator. Take note of where the edges of the fan shroud sit against the radiator.
3) Remove the fans. Where the edges of the shroud sat against the radiator, install some of the sponge strip. Because the top of the shroud sits a little further from the radiator, I did two layers of the sponge strip on the very top. The sponge strip is soft yet still firm, so it acts as a good base for sealing as well as protecting the radiator from getting damaged from the edge of the fan shroud.
4) Add a layer of the Foam strip on top of the sponge strip. This is much lighter/softer/compressible, and will help fill in any remaining open areas / voids.
5) Put the fan shroud back on, an attach the alignment bolt, make sure the fan sits nicely against the sponge/foam strip.
6) Make (or have made) the brackets per the CAD files attached.
7) Attach the brackets as seen in the photos. I used M6 x 15mm bolts with a flat and lock washer for mounting the brackets to the radiator. I used M6 x 20mm bolts with two flat washers for mounting the brackets to the fan shroud.
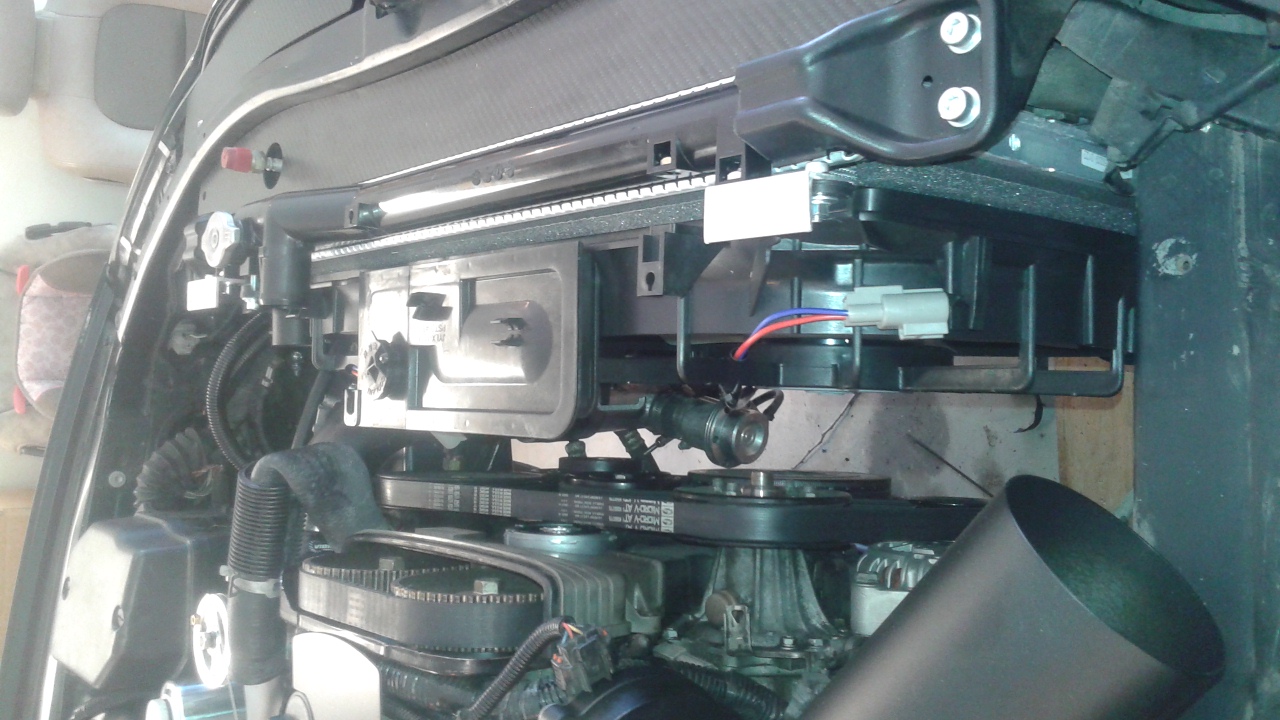
Photos -
Radiator with Sponge and Foam strips added. (you can see that the top strip sits further up from the radiator, because I did two layers of the sponge along the top w/ a layer of foam on top of that. All the others got just one layer of sponge and one layer of foam).

Fan mounted to radiator with brackets, and sponge/foam strip sealing.


Close up of top brackets, and the "allignment bolt" I was referring to you can see just to the right of the left bracket

Close up of all brackets (pics coming later)
Installed in the car

IS300 Fan Bracket naming convention:
SC3_ISFB_BD_RevA: This is the file for the IS300 Fan Bracket; Bottom Driver Side
SC3_ISFB_BP_RevA: This is the file for the IS300 Fan Bracket; Bottom Passenger Side
SC3_ISFB_TD_RevA: This is the file for the IS300 Fan Bracket; Top Driver Side
SC3_ISFB_TP_RevA: This is the file for the IS300 Fan Bracket; Top Passenger Side
Hardware: This is the file that lists the hardware I used. All was available and purchased off the shelf at my local hardware store for around $20.
I made these brackets by hand, and drew them up afterwards. It's possible when you make your setup that you'll need to adjust things 1mm here or 1mm there, but these should get you 99% of the way there. You can round the edges, make cool fancy shapes out of them after, this was just meant to get the most basic base design in front of you and you can do whatever you want from here. I'll eventually be powdercoating mine so they blend in better and I except they'll be hardly even noticeable.
Next files I have are for a basic set of brackets to mount IS300 fans to an SC300 radiator. There's several ways one can do this, but this is simply how I did it on my car. I used 1" x 1" x 1/8" Aluminum Angle, Metric Bolts, and some window sealing strip, all obtained from my local hardware store for around $20. This is meant to be an affordable option/alternative for DIY folks who perhaps don't want to, or don't have the money to, purchase the beautiful PnP shroud for these fans that is already available from PHR.
To be clear, the components I used were an OEM style replacement SC300 Denso Radiator (221-3118) and an OEM style replacement IS300 Sunbelt Radiator Fan (LX3115108). However I believe these should work for any OEM or OEM replacement style components for the same cars (e.g. Koyo, Denso, OEM, etc factory equivalent brands/parts).
Instructions -
1) Set the radiator flat on the ground.
2) Set the fans on top of the radiator gently. There is a tab/hole in the fan assembly that is at the top, near the left (but not the one all the way at the left corner). That will line up nicely with one of the mounting holes on the radiator almost right under the radiator cap. Loosely thread in an M6 x 30mm bolt & washer to loosely hold the fan assembly in place. This is sort of your alignment bolt I'll call it. Adjust the fan as needed so that it sits nice and square/parallel on the radiator. Take note of where the edges of the fan shroud sit against the radiator.
3) Remove the fans. Where the edges of the shroud sat against the radiator, install some of the sponge strip. Because the top of the shroud sits a little further from the radiator, I did two layers of the sponge strip on the very top. The sponge strip is soft yet still firm, so it acts as a good base for sealing as well as protecting the radiator from getting damaged from the edge of the fan shroud.
4) Add a layer of the Foam strip on top of the sponge strip. This is much lighter/softer/compressible, and will help fill in any remaining open areas / voids.
5) Put the fan shroud back on, an attach the alignment bolt, make sure the fan sits nicely against the sponge/foam strip.
6) Make (or have made) the brackets per the CAD files attached.
7) Attach the brackets as seen in the photos. I used M6 x 15mm bolts with a flat and lock washer for mounting the brackets to the radiator. I used M6 x 20mm bolts with two flat washers for mounting the brackets to the fan shroud.
Photos -
Radiator with Sponge and Foam strips added. (you can see that the top strip sits further up from the radiator, because I did two layers of the sponge along the top w/ a layer of foam on top of that. All the others got just one layer of sponge and one layer of foam).
Fan mounted to radiator with brackets, and sponge/foam strip sealing.
Close up of top brackets, and the "allignment bolt" I was referring to you can see just to the right of the left bracket
Close up of all brackets (pics coming later)
Installed in the car
IS300 Fan Bracket naming convention:
SC3_ISFB_BD_RevA: This is the file for the IS300 Fan Bracket; Bottom Driver Side
SC3_ISFB_BP_RevA: This is the file for the IS300 Fan Bracket; Bottom Passenger Side
SC3_ISFB_TD_RevA: This is the file for the IS300 Fan Bracket; Top Driver Side
SC3_ISFB_TP_RevA: This is the file for the IS300 Fan Bracket; Top Passenger Side
Hardware: This is the file that lists the hardware I used. All was available and purchased off the shelf at my local hardware store for around $20.
I made these brackets by hand, and drew them up afterwards. It's possible when you make your setup that you'll need to adjust things 1mm here or 1mm there, but these should get you 99% of the way there. You can round the edges, make cool fancy shapes out of them after, this was just meant to get the most basic base design in front of you and you can do whatever you want from here. I'll eventually be powdercoating mine so they blend in better and I except they'll be hardly even noticeable.
Last edited by Halon; 09-07-16 at 08:23 AM.

Trending Topics
 09-12-16, 09:22 AM
#10
1UZFE (SC400) SPARK PLUG COVER
Next file I have is for a basic 1UZFE (SC400) Non-VVTI spark plug cover plate. There's a handful of people that have these right now. My goal here again was to make something that fit well, looked good, while being extremely affordable so even the poorest high school kid could have one. So here it is. Very affordable because it can be cut from just flat sheet of whatever material you want (ABS Plastic, Aluminum, Stainless, CF, cardboard lol) which is what keeps it extremely affordable.
Spark Plug Cover Top Plate naming convention:
SC4_SPC_RevB: This is the file for the 1UZFE (SC400) Spark Plug Cover Top Plate. They are identical for each side of the motor, so you just get two of these made (one for each side).
I made these as a special request to a customer that had some of my other products, and was so happy with them he asked if I could make these. So I made these based on some measurements from a friend. They turned out spot on! Keep in mind I don't have a 1UZ so I've never installed these first hands. The ones my customers have ran I've always included M6 x 30mm fasteners w/ washers. None of them have stated they needed to use spacers underneath, they said they work great just like this with no spacers under. And everyone loves them! They obviouslly only replace the flat portion, so you either have to ditch the entire stock piece completely, or if you want to keep the molded portion that goes over the cam gear / distributor, you just need to trim the flat portion off like shown in the attached photo.
As always, I've included both the Solidworks 3D model as well as a DXF 2D CAD drawing. Anyone with SW 2016 can open the 3D model and make any sort of edits they want (add vents, add a logo, etc). The DXF file is the file you should be able to give anyone with a CNC machine to just load onto their machine. For example if you find a local waterjet cutter, you can bring them a sheet of aluminum, and that DXF file, and they should be able to just load that file onto their machine and it will cut it.
MATERIALS:
- Never made any aluminum ones, but I'd suggest trying .090" or .060" Aluminum.
- The CF ones I made were from 1.5mm thick CF.
- M6x30mm fasteners (i typically include either Button Head or Socket Head Cap fasteners).
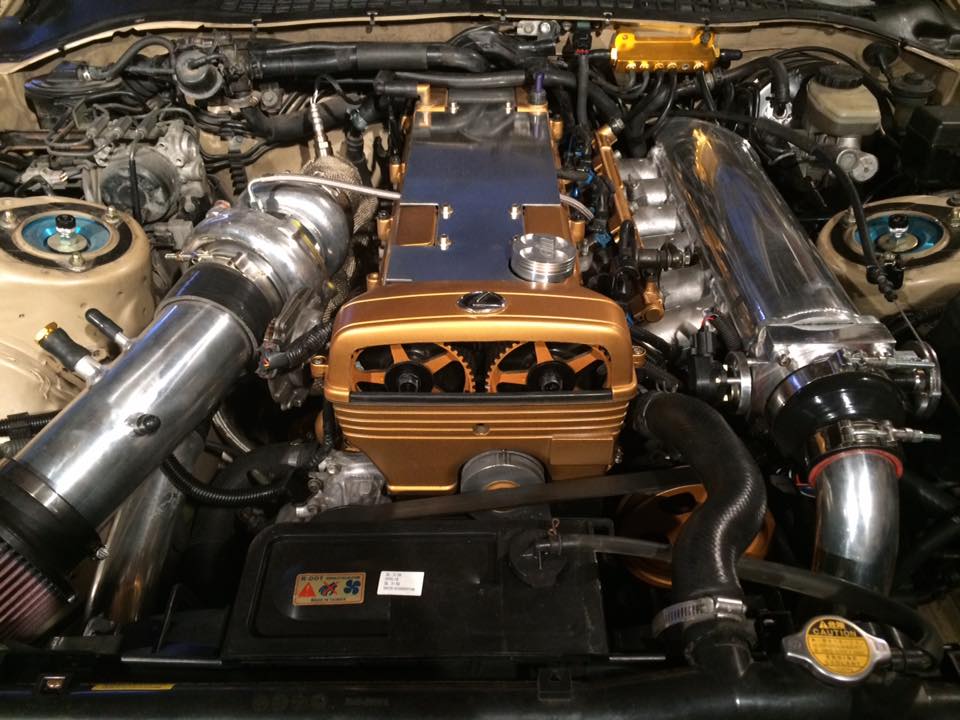
There you go. Enjoy. Here's a few photos of what they look like:


Next file I have is for a basic 1UZFE (SC400) Non-VVTI spark plug cover plate. There's a handful of people that have these right now. My goal here again was to make something that fit well, looked good, while being extremely affordable so even the poorest high school kid could have one. So here it is. Very affordable because it can be cut from just flat sheet of whatever material you want (ABS Plastic, Aluminum, Stainless, CF, cardboard lol) which is what keeps it extremely affordable.
Spark Plug Cover Top Plate naming convention:
SC4_SPC_RevB: This is the file for the 1UZFE (SC400) Spark Plug Cover Top Plate. They are identical for each side of the motor, so you just get two of these made (one for each side).
I made these as a special request to a customer that had some of my other products, and was so happy with them he asked if I could make these. So I made these based on some measurements from a friend. They turned out spot on! Keep in mind I don't have a 1UZ so I've never installed these first hands. The ones my customers have ran I've always included M6 x 30mm fasteners w/ washers. None of them have stated they needed to use spacers underneath, they said they work great just like this with no spacers under. And everyone loves them! They obviouslly only replace the flat portion, so you either have to ditch the entire stock piece completely, or if you want to keep the molded portion that goes over the cam gear / distributor, you just need to trim the flat portion off like shown in the attached photo.
As always, I've included both the Solidworks 3D model as well as a DXF 2D CAD drawing. Anyone with SW 2016 can open the 3D model and make any sort of edits they want (add vents, add a logo, etc). The DXF file is the file you should be able to give anyone with a CNC machine to just load onto their machine. For example if you find a local waterjet cutter, you can bring them a sheet of aluminum, and that DXF file, and they should be able to just load that file onto their machine and it will cut it.
MATERIALS:
- Never made any aluminum ones, but I'd suggest trying .090" or .060" Aluminum.
- The CF ones I made were from 1.5mm thick CF.
- M6x30mm fasteners (i typically include either Button Head or Socket Head Cap fasteners).
There you go. Enjoy. Here's a few photos of what they look like:
 09-12-16, 11:49 AM
#13

For the gold aluminum engine, those are 92 valve covers and the plates were simply modified by trimming the exhaust side of the plate to match the intake side. Very simple and easy, so even if you had obtained 93+ plates its no big deal. Thanks for the hard work, I love my HALON Plates!!! One day you may even catch up to Ali SC3 for Lexcharity!!