SC300/400 High Beam Retrofit DIY
 05-10-16, 08:27 PM
#1
It's my 1000th post CL!
And to celebrate I'm going to post my first DIY. No, it won't be for anything that provides any noticeable benefit, nor will it be for something that most of you are interested in doing for your SC. But it's for something I've been interested in that I had some fun doing over the past... 7 months. Yeah I drag my feet at times.
Anyways, here we go!
Tools Required:
Dremel
SC High Beams
JB Steel-Stik
JB-Weld
Oven
Screw driver set
goggles
Microfiber towels
Socket wrench, 10mm socket + 8mm socket
Flathead screwdriver
Optional* Heat Gun
If you're going to paint any part of the headlight, the below is needed
Optional* Easy Off Oven cleaner
Optional* Latex Gloves
Optional* VHT paint, your color choice
Optional* Sand Paper of Multiple Grades
If you want to be able to adjust the projectors after they're on the car, the below is needed
Optional* Custom Aluminum Mounting Bracket
BMW E46 single xenon projectors (these only came on the 99-01 BMW E46) These are one of the few projectors I was able to find that fit within the small space of the high beams. If you get the later model E46 projectors they are bi-xenon and a bit bigger than the 99-01 single xenon projectors. The single Xenons have a diameter of 2.5 inches for the front lens, while the bi-xenons are 3 inches. I have no doubt that with some modifications or removal of the factory trim that bigger projectors could be fitted, however this is the set I went with because of their size.
So the first step is to get yourself a set of projectors.
Like I said above, the BMW e46 99-01 single xenon projectors were my choice. You can either buy the individual projectors off the internet (ebay, BMW forums, etc), or buy an entire headlight from the same online vendors, these projectors can be hard to find. You can probably find two projectors for $200-$280, these are tough projectors to find, so how much you pay depends on how patient you are.
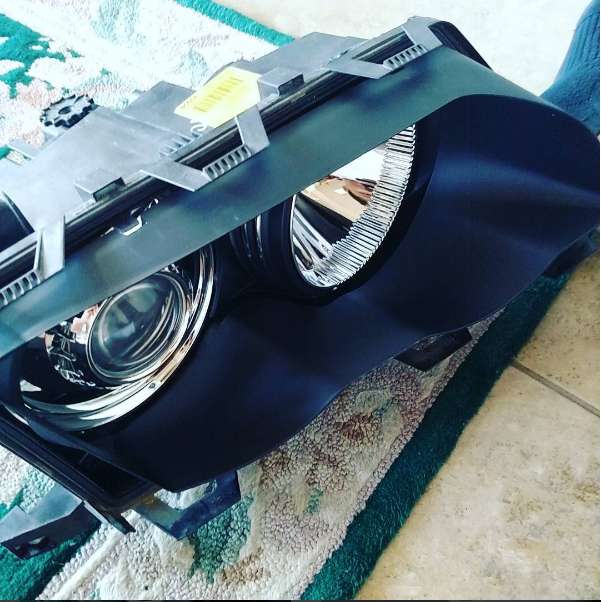
These headlights come apart easy, no oven required. The front lens is clipped on and everything else is clipped on. Once you get down to removing the projector from the housing after you've removed the shroud you're going to have to push the projector off hard as it's held on by a round clip at the back of the projector. It doesn't matter if you break it or not, since you will not be using it, so feel free to push as hard as you want.
Once you get the projectors out, take those and your shrouds. The rest of the headlight is trash, you can put the leftover parts for sale on eBay for maybe $20-$40 for each headlight, but it takes some time to sell the base parts, and they're only useful to E46 owners who want to retrofit the bi-xenon headlights into an extra set of headlights.
This is what the projectors and shrouds should look like.

Once we have those off, it's time for some of the optional fun stuff. This isn't necessary if you want bare projectors into the OEM housing, but I have a theme to upkeep.
So we need to strip the chrome from the shrouds if you intend on painting them, if you don't strip the chrome off, your paint won't fully adhere to the chrome, and the chrome may flake off the shroud, making your paint job look crappy.
To strip chrome, there are a couple methods, by far the easiest is to use oven cleaner on it. Anything applied through an electroplating process will come right off with some oven cleaner. I prefer Easy Off Heavy Duty (it's the yellow one)
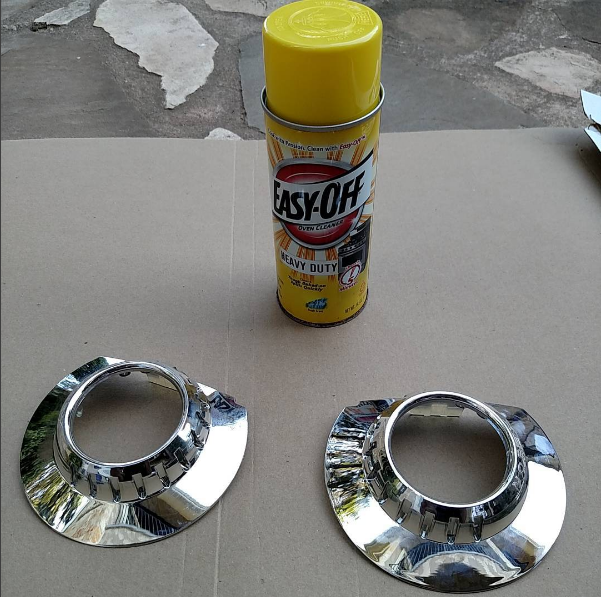
Make sure you are outside, or in a well ventilated area. Spray it down and leave it alone for 10-15 minutes.
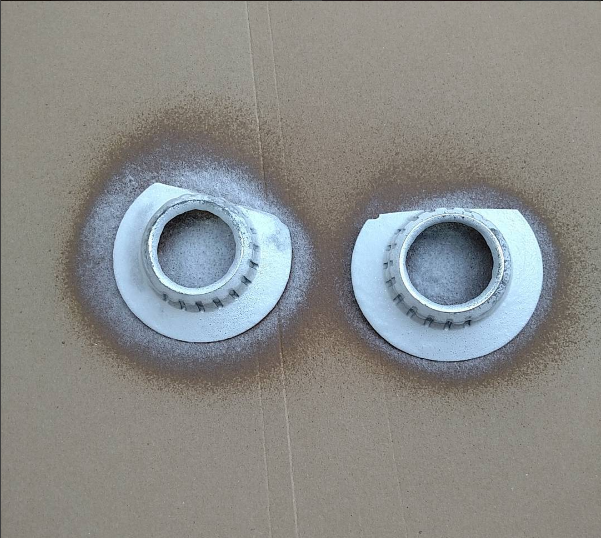
After 10-15 minutes comes back and wipe them down with a microfiber. You'll want to wear some goggles or eye protection and some latex gloves. Oven cleaner can burn if it gets in your eyes or in an open wound. Wipe the shrouds down with a microfiber, if there are any spots of chrome left, spray the shroud down again and come back in 10-15 minutes. Repeat until the shrouds are completely clear.
Once the shrouds are clear, we're done with them for now.
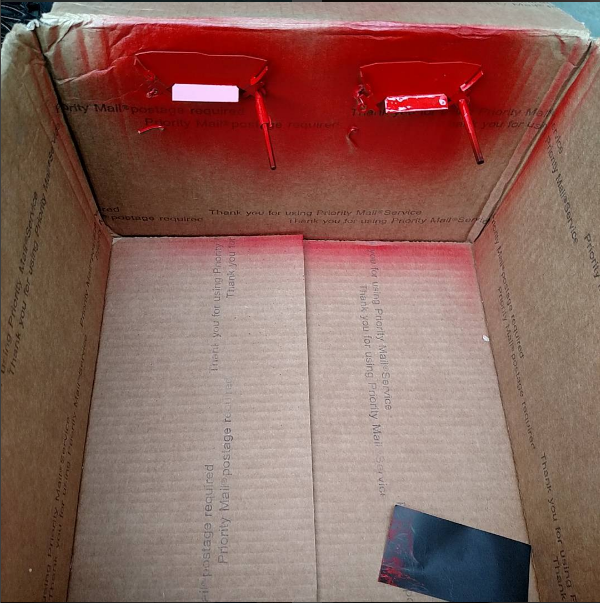
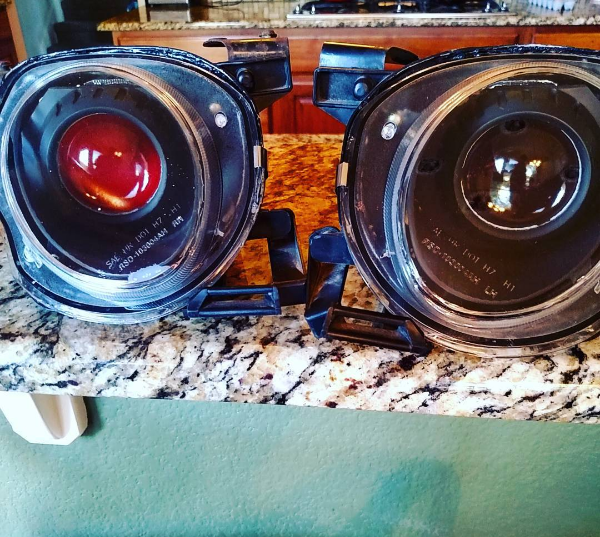
Now we're going to paint the projector shield to create a passive demon eye affect. It makes the projector appear another color when looked at directly and from specific angles. I chose red to match the theme of my headlights. The projector comes apart very easily from 4 exposed phillips screws. Unscrew them and the projector will easily fall apart. Remove the shield which we will prepare for paint.
I put mine in a box and used some wire and allen keys to hold them inside a cardboard box. You want to lightly sand the surface with 100 grit sandpaper first and then spray a coat of VHT paint.
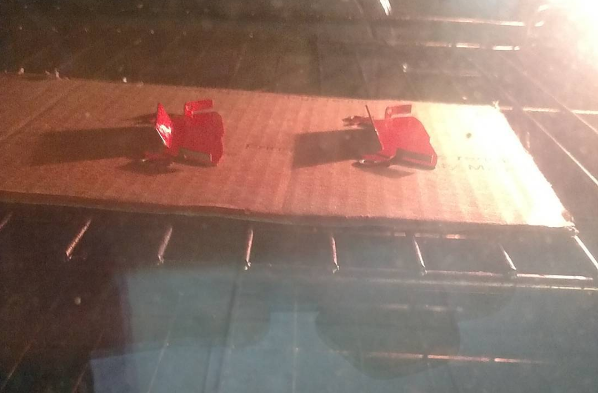
You'll want to apply 2-3 coats, each coat lighter than the last, and you're going to want to sand between coats with 1000 grit until you get a coat that's smoothish in appearance. This doesn't need to be perfect, it will be behind 2 glass lenses and mostly shrouded in darkness.
Once you get a smoothish coat, you'll want to fume the shield. As the paint cures it will release fumes. If you put everything together too soon, the shield will fume inside of your headlight leaving a yellowish film on the projector lens, or headlight lens. To avoid this you'll want to fume it yourself. You can either do this by leaving the shield outside at room temperature for 2 weeks or so. Or you can toss it in the oven at 220F for 10 minutes. I chose the oven even though at the time I still had not received the SC high beams I was going to be using.
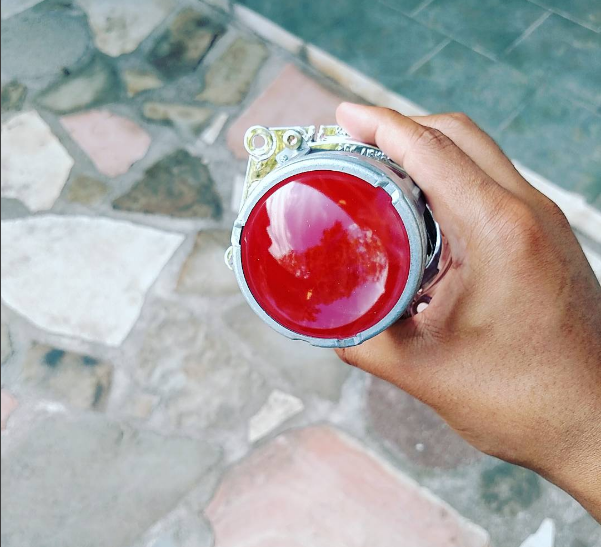
After you've properly fumed it, leave the projector shield alone for a day or so to ensure everything is super dry, once it is, put it back into place in the projector and screw the projector back together. It should look whatever color you painted it when looking straight on, and should appear clear from other angles. Whatever color you choose to paint it, it will appear darker once it is inside of the headlight assembly, so that's one thing to consider if you want to choose a color like purple or maroon that is naturally dark. Also some people choose black as they believe it makes the cutoff line sharper.
Now the projectors are ready to be mounted into the high beam! Time to get your high beams ready.

I didn't take any pictures of this process, but it is relatively simple. First we need to remove the lens from the high beams. There are two metal clips holding the leans to the housing, pry these off with a flat head screwdriver or flat edge.If you have a heat gun this process is much easier. I like to place them in the oven to soften up the glue on these first before I use the heat gun as the adhesive on these is a bit more difficult to get underneath than on the low beams. Heat the oven up to 220F. Once it gets there, turn the oven off. Then place the low beams in the oven while the oven is off and warm for 10 minutes. Once it's been ten minutes pull them out and pry a screwdriver between the lens and the housing and pry them apart, it should come apart very easily, if it needs some more coercing, get the heat gun and give any of the clinging glue a blast of warm air to further loosen it up.
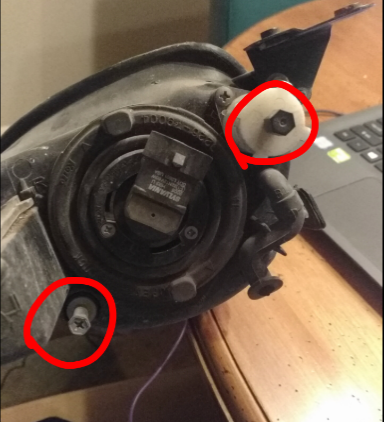
Once the lenses are off the High beam housing comes apart with a few phillips screws. Once you've taken them off you can take out the OEM chrome trim, and then pull the reflector assembly out. It's bolted into the two 8mm adjustment bolts. You'll have to back them out of the reflector assembly. These bolts are on the back of the high beam. I believe these loosen clock-wise, so keep turning both adjustment bolts and as you do the reflector assembly will come forward. The bolts are circled here in red.
Once the reflector assembly is as far forward as it will go, you'll notice it won't full come off. It needs to be pressed off of a very similar round clip, just like the E46 projector had, we don't need the clip again, so you can go ahead and push as hard as you want, even if you break this clip it doesn't matter. It does not line up with the E46 projector, so it's unusable even if you manage not to break either the one on the E46 and on the SC High Beam.
Once the assembly is empty you can begin to place the E46 projector into the high beam housing. If you leave the shroud on, you'll notice it doesn't really quite fit... at all.
Thats okay, this is why we have a Dremel!

I'm too lazy to go take a picture of mine, so here's a stock photo of a woman using a dremel.
You're going to want to use the dremel to start cutting away at the outside of the shroud until it's small enough that you can fit it into the housing. You'll want to use the top of the shroud as a guide. Once the top is completely flat when the high beam is sitting on a level surface you'll at least know the projector is flat. Then you'll want to keep cutting until you can pull the projector and shroud far enough into the housing that you can place the OEM chrome trim fully back into place.
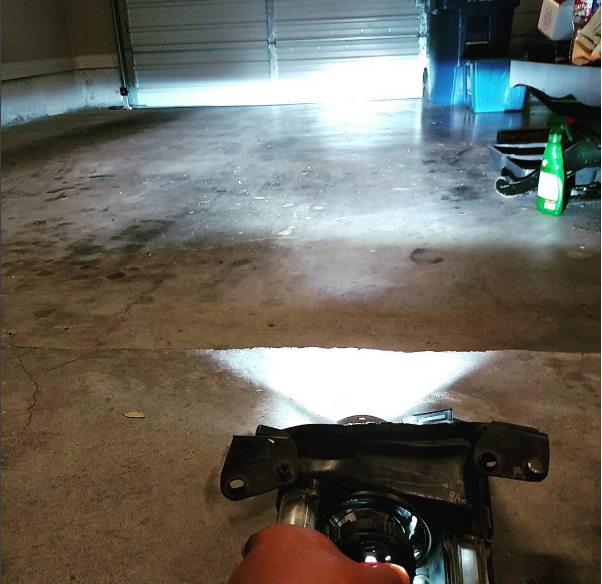
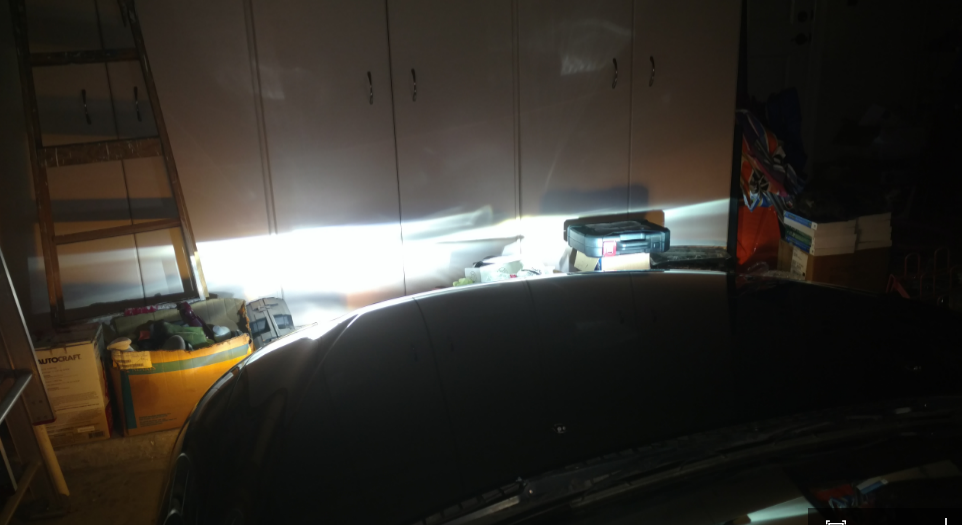
Great, now the projector and trim fit into the housing (at least the passenger side does anyways). You'll want to see if you can line it up so that the projector output is nice and flat. So I put the projector back into the shroud with a D2S bulb in it and hooked it up to a ballast and power supply and turned it on with the projector on a flat surface. I then aimed it at my garage door using the lines on the door as a guide and kept cutting and adjusting until I was able to get a nice flat output roughly where I wanted.
You can make this into much more of a science with perfect tape marks, if you want to follow the DOT standards, then the left side of the cutoff should be 2 inches lower than the light source at 25 feet of distance. I didn't care that much for these though since they are mainly just for show, and not intended as useful light since my low-beam retrofit is more than adequate.
Now that was just for the passenger side. The driver side is mostly the same, except for one small difference. To get the projector perfectly flat I had to cut into the right side of the projector (if looking at the front of the projector), so it would fit into the driver side housing. Again the dremel comes in handy right here and should make short work of the projector.
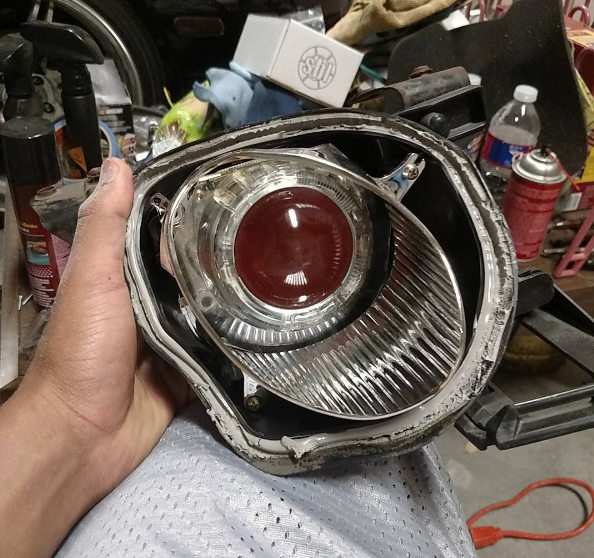
You can also see the painted projector shield here in the shot.
Once you've got both shrouds cut to how you want them you can either hook them back up to the projector with the OEM chrome trim installed into the high beam assembly. Or if you're like me and you wanted to paint them, then you have to take everything apart. I then used the same Oven cleaner to strip the chrome from the OEM trim. After doing so I painted both the projector shroud, and the OEM trim flat black.
A few coats did the trick, we then are going to want to let this dry, a day or two should do the trick. I don't tend to fume these as they aren't exposed to the same kind of heat that the projector shield is as they aren't exposed to direct light from the HID.
The next part I also forgot to take pictures of, so sorry, but there's a nice video showing it.
We're going to use Steel-Stik to start mounting the projector to the high beams. Steel-Stik is kind of like putty and when mixed with the adhesive agent will slowly become sticky after you rub them together between your hands. Once it starts getting sticky you 're going to want to spread it on the outside of the projector and pull the projector, with the shroud mounted into it's final mounting place. You should be able to get decent contact with the steel-stik between the projector and the housing.
Starting at 2:20 you can see the exact process I am talking about. You're going to want to have a D2s bulb mounted and do this while the light is on. Just like in the video you want to hold the projector in place where the light output is exactly where you want it.
Once the Steel-Stik is set You're going to want to use JB-KwikWeld, or JB-Weld to fill in the spaces and secure the projector to the housing.
Starting at 1:50 this video illustrates that process.
The other option that you can do is to have an aluminum bracket made that the back of the E-46 projector bolts to, and then hook that up to the 2 adjustment bolts on the high beam housing. This will allow you to adjust the angle and direction the projector is facing. I however was too lazy to do this, since this is mainly just for show and not about directing usable light to the road.
Let the JB-Weld cure over night, preferably over two days, at which point you can then screw in the OEM chrome trim, or in my case the now OEM black trim.
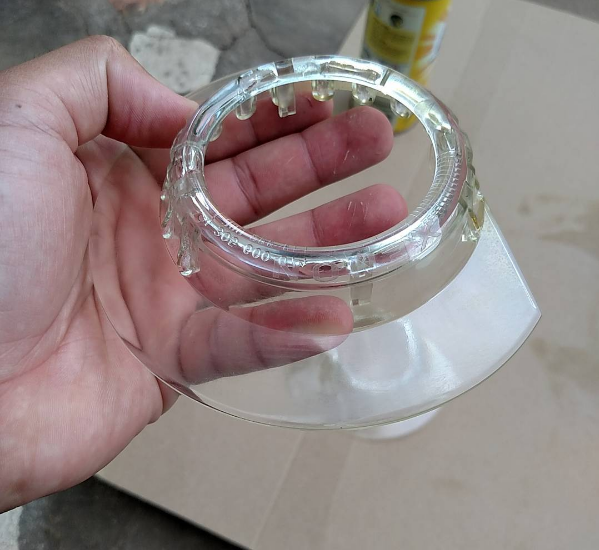
But there's a problem. You've gone through all this hard work, but the OEM lens is this crappy fluted plastic, or worse this crappy fluted glass. You can either deal with it, or try to get the lens clear.
That lens looks crappy. If you have a plastic lens, you can get to work wet sanding starting with rough grits of 60 or 100 grit, and then stepping all the way up to 2000 grit and then hitting it up with multiple waves of polish. If you have a glass lens, you can hit it up with diamond sanding pads (not as expensive as it sounds) and then some cerium oxide polishing compound. But that'll probably take forever. I took the much easier route and sent them off to Organized Garage Status and had them just make me a Clear Lens for the high beams. It came out looking great.
You can barely even tell a lens is there at all!
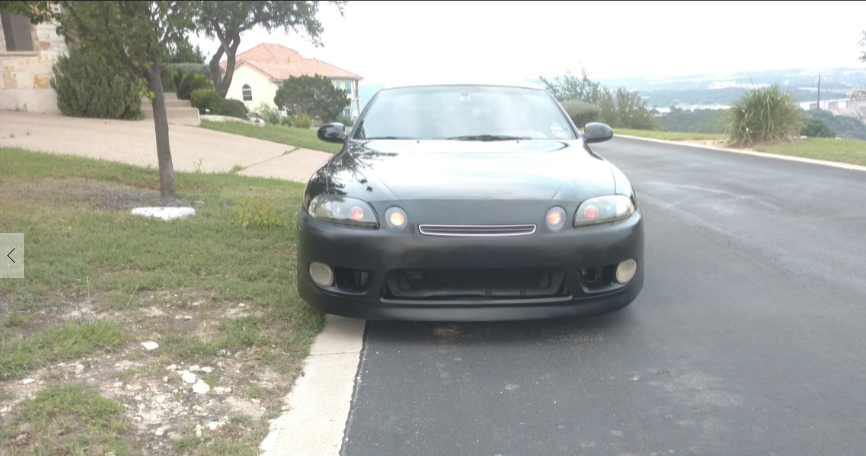
Lastly we just have to mount them to the car. This requires removing the entire front bumper. Not going to type the guide up for it here. You're going to want a proper D2S bulb for these projectors, with a proper ballast and relay system to turn them on. I personally prefer morimoto products. They are the perfect balance of quality and affordability.
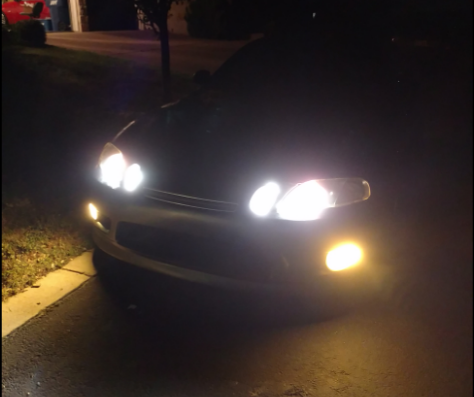
Once we got them mounted it's time to go out and enjoy them, unfortunately one of the high beams I used had a broken mounting tab, so the driver side doesn't fully bolt down, causing it to project slightly higher than the passenger side. If I was using these for usable light, this would be a massive problem, but since they are just for show, I can live with it. If you do undertake this, make sure all the mounting brackets are intact before you start retrofitting.
Here you can see the output problem. The driver side is slightly higher than the passenger side, and this is only 4 feet from the wall. The farther away I am from a flat surface the further the spread becomes due to this bracket being broken. I'm okay with it, but again, if I were to make another set, I would make damn sure that both high-beam housings are 100% intact.
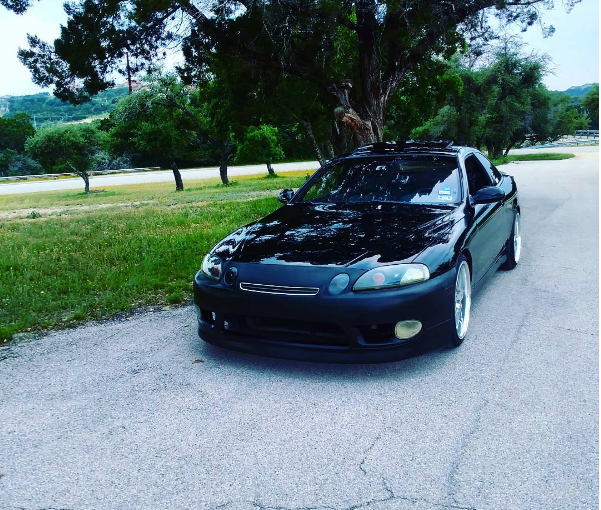
Now I just need to get my front bumper painted and I'm ready for summer!
And to celebrate I'm going to post my first DIY. No, it won't be for anything that provides any noticeable benefit, nor will it be for something that most of you are interested in doing for your SC. But it's for something I've been interested in that I had some fun doing over the past... 7 months. Yeah I drag my feet at times.
Anyways, here we go!
Tools Required:
Dremel
SC High Beams
JB Steel-Stik
JB-Weld
Oven
Screw driver set
goggles
Microfiber towels
Socket wrench, 10mm socket + 8mm socket
Flathead screwdriver
Optional* Heat Gun
If you're going to paint any part of the headlight, the below is needed
Optional* Easy Off Oven cleaner
Optional* Latex Gloves
Optional* VHT paint, your color choice
Optional* Sand Paper of Multiple Grades
If you want to be able to adjust the projectors after they're on the car, the below is needed
Optional* Custom Aluminum Mounting Bracket
BMW E46 single xenon projectors (these only came on the 99-01 BMW E46) These are one of the few projectors I was able to find that fit within the small space of the high beams. If you get the later model E46 projectors they are bi-xenon and a bit bigger than the 99-01 single xenon projectors. The single Xenons have a diameter of 2.5 inches for the front lens, while the bi-xenons are 3 inches. I have no doubt that with some modifications or removal of the factory trim that bigger projectors could be fitted, however this is the set I went with because of their size.
So the first step is to get yourself a set of projectors.
Like I said above, the BMW e46 99-01 single xenon projectors were my choice. You can either buy the individual projectors off the internet (ebay, BMW forums, etc), or buy an entire headlight from the same online vendors, these projectors can be hard to find. You can probably find two projectors for $200-$280, these are tough projectors to find, so how much you pay depends on how patient you are.
These headlights come apart easy, no oven required. The front lens is clipped on and everything else is clipped on. Once you get down to removing the projector from the housing after you've removed the shroud you're going to have to push the projector off hard as it's held on by a round clip at the back of the projector. It doesn't matter if you break it or not, since you will not be using it, so feel free to push as hard as you want.
Once you get the projectors out, take those and your shrouds. The rest of the headlight is trash, you can put the leftover parts for sale on eBay for maybe $20-$40 for each headlight, but it takes some time to sell the base parts, and they're only useful to E46 owners who want to retrofit the bi-xenon headlights into an extra set of headlights.
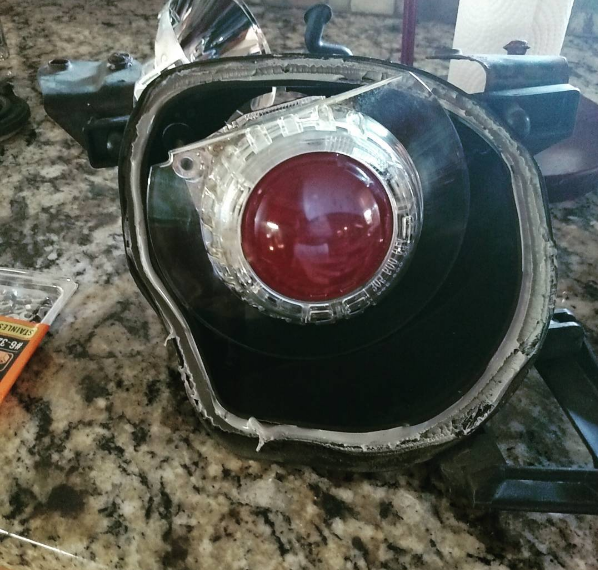
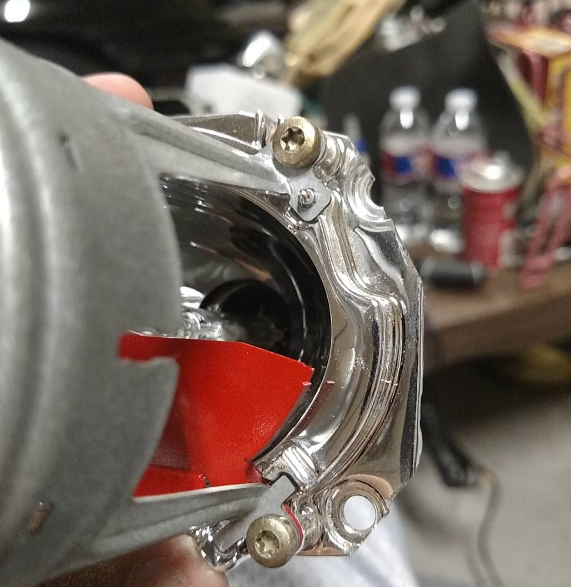
This is what the projectors and shrouds should look like.
Once we have those off, it's time for some of the optional fun stuff. This isn't necessary if you want bare projectors into the OEM housing, but I have a theme to upkeep.
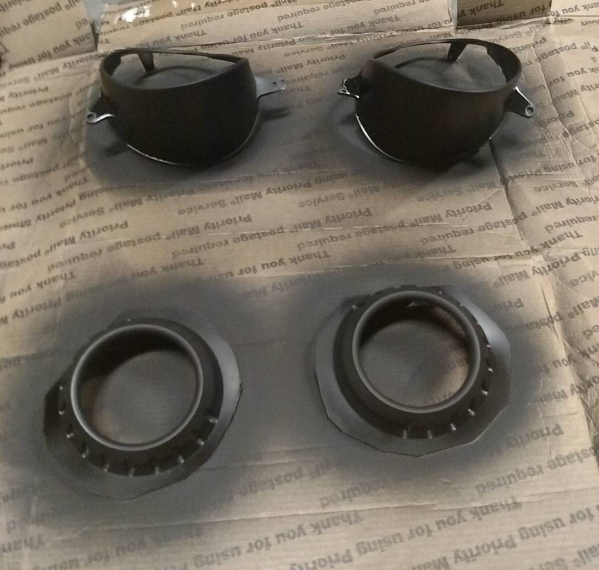
So we need to strip the chrome from the shrouds if you intend on painting them, if you don't strip the chrome off, your paint won't fully adhere to the chrome, and the chrome may flake off the shroud, making your paint job look crappy.
To strip chrome, there are a couple methods, by far the easiest is to use oven cleaner on it. Anything applied through an electroplating process will come right off with some oven cleaner. I prefer Easy Off Heavy Duty (it's the yellow one)
Make sure you are outside, or in a well ventilated area. Spray it down and leave it alone for 10-15 minutes.
After 10-15 minutes comes back and wipe them down with a microfiber. You'll want to wear some goggles or eye protection and some latex gloves. Oven cleaner can burn if it gets in your eyes or in an open wound. Wipe the shrouds down with a microfiber, if there are any spots of chrome left, spray the shroud down again and come back in 10-15 minutes. Repeat until the shrouds are completely clear.
Once the shrouds are clear, we're done with them for now.
Now we're going to paint the projector shield to create a passive demon eye affect. It makes the projector appear another color when looked at directly and from specific angles. I chose red to match the theme of my headlights. The projector comes apart very easily from 4 exposed phillips screws. Unscrew them and the projector will easily fall apart. Remove the shield which we will prepare for paint.
I put mine in a box and used some wire and allen keys to hold them inside a cardboard box. You want to lightly sand the surface with 100 grit sandpaper first and then spray a coat of VHT paint.
You'll want to apply 2-3 coats, each coat lighter than the last, and you're going to want to sand between coats with 1000 grit until you get a coat that's smoothish in appearance. This doesn't need to be perfect, it will be behind 2 glass lenses and mostly shrouded in darkness.
Once you get a smoothish coat, you'll want to fume the shield. As the paint cures it will release fumes. If you put everything together too soon, the shield will fume inside of your headlight leaving a yellowish film on the projector lens, or headlight lens. To avoid this you'll want to fume it yourself. You can either do this by leaving the shield outside at room temperature for 2 weeks or so. Or you can toss it in the oven at 220F for 10 minutes. I chose the oven even though at the time I still had not received the SC high beams I was going to be using.
After you've properly fumed it, leave the projector shield alone for a day or so to ensure everything is super dry, once it is, put it back into place in the projector and screw the projector back together. It should look whatever color you painted it when looking straight on, and should appear clear from other angles. Whatever color you choose to paint it, it will appear darker once it is inside of the headlight assembly, so that's one thing to consider if you want to choose a color like purple or maroon that is naturally dark. Also some people choose black as they believe it makes the cutoff line sharper.
Now the projectors are ready to be mounted into the high beam! Time to get your high beams ready.
I didn't take any pictures of this process, but it is relatively simple. First we need to remove the lens from the high beams. There are two metal clips holding the leans to the housing, pry these off with a flat head screwdriver or flat edge.If you have a heat gun this process is much easier. I like to place them in the oven to soften up the glue on these first before I use the heat gun as the adhesive on these is a bit more difficult to get underneath than on the low beams. Heat the oven up to 220F. Once it gets there, turn the oven off. Then place the low beams in the oven while the oven is off and warm for 10 minutes. Once it's been ten minutes pull them out and pry a screwdriver between the lens and the housing and pry them apart, it should come apart very easily, if it needs some more coercing, get the heat gun and give any of the clinging glue a blast of warm air to further loosen it up.
Once the lenses are off the High beam housing comes apart with a few phillips screws. Once you've taken them off you can take out the OEM chrome trim, and then pull the reflector assembly out. It's bolted into the two 8mm adjustment bolts. You'll have to back them out of the reflector assembly. These bolts are on the back of the high beam. I believe these loosen clock-wise, so keep turning both adjustment bolts and as you do the reflector assembly will come forward. The bolts are circled here in red.
Once the reflector assembly is as far forward as it will go, you'll notice it won't full come off. It needs to be pressed off of a very similar round clip, just like the E46 projector had, we don't need the clip again, so you can go ahead and push as hard as you want, even if you break this clip it doesn't matter. It does not line up with the E46 projector, so it's unusable even if you manage not to break either the one on the E46 and on the SC High Beam.
Once the assembly is empty you can begin to place the E46 projector into the high beam housing. If you leave the shroud on, you'll notice it doesn't really quite fit... at all.
Thats okay, this is why we have a Dremel!
I'm too lazy to go take a picture of mine, so here's a stock photo of a woman using a dremel.
You're going to want to use the dremel to start cutting away at the outside of the shroud until it's small enough that you can fit it into the housing. You'll want to use the top of the shroud as a guide. Once the top is completely flat when the high beam is sitting on a level surface you'll at least know the projector is flat. Then you'll want to keep cutting until you can pull the projector and shroud far enough into the housing that you can place the OEM chrome trim fully back into place.
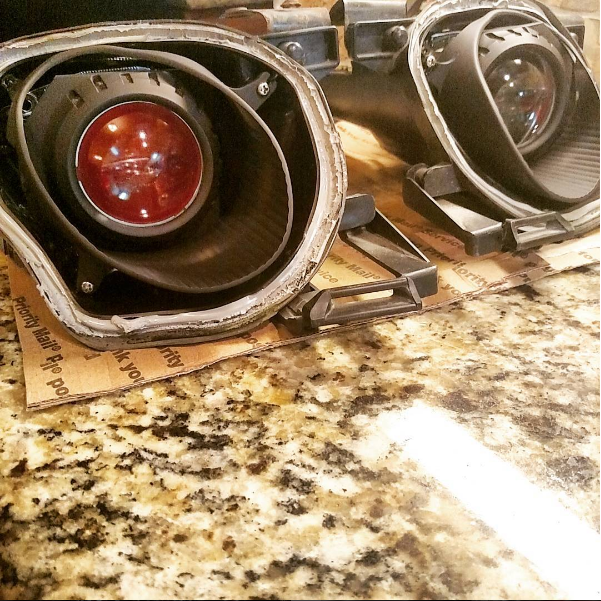
Great, now the projector and trim fit into the housing (at least the passenger side does anyways). You'll want to see if you can line it up so that the projector output is nice and flat. So I put the projector back into the shroud with a D2S bulb in it and hooked it up to a ballast and power supply and turned it on with the projector on a flat surface. I then aimed it at my garage door using the lines on the door as a guide and kept cutting and adjusting until I was able to get a nice flat output roughly where I wanted.
You can make this into much more of a science with perfect tape marks, if you want to follow the DOT standards, then the left side of the cutoff should be 2 inches lower than the light source at 25 feet of distance. I didn't care that much for these though since they are mainly just for show, and not intended as useful light since my low-beam retrofit is more than adequate.
Now that was just for the passenger side. The driver side is mostly the same, except for one small difference. To get the projector perfectly flat I had to cut into the right side of the projector (if looking at the front of the projector), so it would fit into the driver side housing. Again the dremel comes in handy right here and should make short work of the projector.
You can also see the painted projector shield here in the shot.
Once you've got both shrouds cut to how you want them you can either hook them back up to the projector with the OEM chrome trim installed into the high beam assembly. Or if you're like me and you wanted to paint them, then you have to take everything apart. I then used the same Oven cleaner to strip the chrome from the OEM trim. After doing so I painted both the projector shroud, and the OEM trim flat black.
A few coats did the trick, we then are going to want to let this dry, a day or two should do the trick. I don't tend to fume these as they aren't exposed to the same kind of heat that the projector shield is as they aren't exposed to direct light from the HID.
The next part I also forgot to take pictures of, so sorry, but there's a nice video showing it.
We're going to use Steel-Stik to start mounting the projector to the high beams. Steel-Stik is kind of like putty and when mixed with the adhesive agent will slowly become sticky after you rub them together between your hands. Once it starts getting sticky you 're going to want to spread it on the outside of the projector and pull the projector, with the shroud mounted into it's final mounting place. You should be able to get decent contact with the steel-stik between the projector and the housing.
Starting at 2:20 you can see the exact process I am talking about. You're going to want to have a D2s bulb mounted and do this while the light is on. Just like in the video you want to hold the projector in place where the light output is exactly where you want it.
Once the Steel-Stik is set You're going to want to use JB-KwikWeld, or JB-Weld to fill in the spaces and secure the projector to the housing.
Starting at 1:50 this video illustrates that process.
The other option that you can do is to have an aluminum bracket made that the back of the E-46 projector bolts to, and then hook that up to the 2 adjustment bolts on the high beam housing. This will allow you to adjust the angle and direction the projector is facing. I however was too lazy to do this, since this is mainly just for show and not about directing usable light to the road.
Let the JB-Weld cure over night, preferably over two days, at which point you can then screw in the OEM chrome trim, or in my case the now OEM black trim.
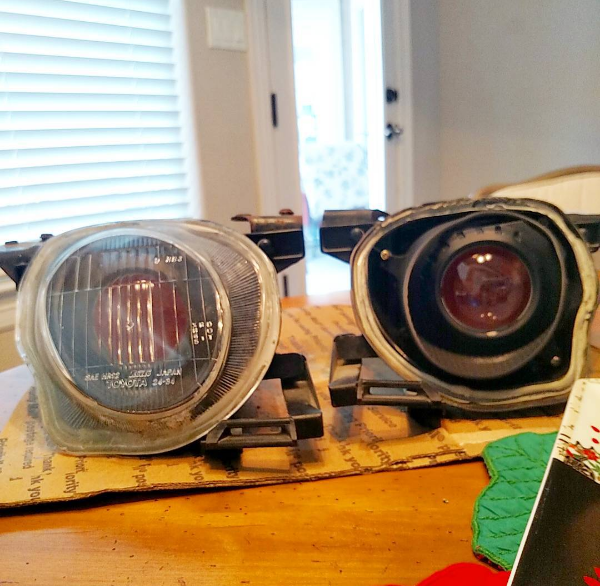
But there's a problem. You've gone through all this hard work, but the OEM lens is this crappy fluted plastic, or worse this crappy fluted glass. You can either deal with it, or try to get the lens clear.
That lens looks crappy. If you have a plastic lens, you can get to work wet sanding starting with rough grits of 60 or 100 grit, and then stepping all the way up to 2000 grit and then hitting it up with multiple waves of polish. If you have a glass lens, you can hit it up with diamond sanding pads (not as expensive as it sounds) and then some cerium oxide polishing compound. But that'll probably take forever. I took the much easier route and sent them off to Organized Garage Status and had them just make me a Clear Lens for the high beams. It came out looking great.
You can barely even tell a lens is there at all!
Lastly we just have to mount them to the car. This requires removing the entire front bumper. Not going to type the guide up for it here. You're going to want a proper D2S bulb for these projectors, with a proper ballast and relay system to turn them on. I personally prefer morimoto products. They are the perfect balance of quality and affordability.
Once we got them mounted it's time to go out and enjoy them, unfortunately one of the high beams I used had a broken mounting tab, so the driver side doesn't fully bolt down, causing it to project slightly higher than the passenger side. If I was using these for usable light, this would be a massive problem, but since they are just for show, I can live with it. If you do undertake this, make sure all the mounting brackets are intact before you start retrofitting.
Here you can see the output problem. The driver side is slightly higher than the passenger side, and this is only 4 feet from the wall. The farther away I am from a flat surface the further the spread becomes due to this bracket being broken. I'm okay with it, but again, if I were to make another set, I would make damn sure that both high-beam housings are 100% intact.
Now I just need to get my front bumper painted and I'm ready for summer!
Last edited by eknine9; 05-11-16 at 09:23 PM.


Thread
Thread Starter
Forum
Replies
Last Post