2000 SC300 spoiler LED retrofit
 09-21-14, 07:54 PM
#1
5th Gear
Thread Starter

Join Date: Mar 2013
Location: WA
Posts: 5
Likes: 0
Received 0 Likes
on
0 Posts
This post describes how to replace the LED light strip inside the 2000 SC300/400 spoiler lens. The LED's burn out gradually and eventually aside from looking like hell, it's a safety issue. The replacement from Lexus is about $200 as I recall. This fix is about $20-25. I have not been able to find any OEM lenses in the aftermarket. If you don't want to do this fix, you can still have the original lens repaired at ledfix.com for about $125.
Earlier years have a different design and require different parts but the concept is the same.
The steps involved are to remove the lens, cut it open and removed the LED strip inside, then take a similar lens, cut that open and remove the LED strip, and put that strip inside the original lens.
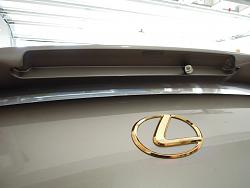
Step 1: Raise the trunk lid and remove the lens from the spoiler using a Philips head screwdriver or ratchet screwdriver. You might have to pry it slightly off the spoiler. Let it dangle there on the wire.
Step 2: Remove the fiber sheathing from the underside of the trunk lid. It's only necessary to remove the part at the back of the trunk in order to expose the wiring to the spoiler.
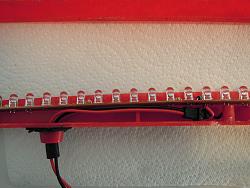
Step 3. Unplug the white connector under the trunk lid. There is a small press button on the side of the connector. When pressed it pulls apart easily. This is what it looks like at this point.
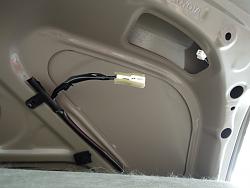
Step 4: Pull the lens carefully until you see a connector about 4" down the wire. As you do this, the wire on the underside of the trunk lid will be pulled towards the spoiler. Be careful not to pull too much or that wire will disappear inside the spoiler. Once the connector is exposed, unplug it.
Step 5: This is where I don't have a good photo record. You now have the lens out. Cut the connector off leaving enough wire to splice later and set it aside. You need it later.
Step 6: Examine the lens. You will see how the red backing plate is glued to the semi-transparent lens part. Take a utility knife and carefully cut along the glue joint. Be VERY careful doing this as it is brittle and breaks easily. With patience you will work along the glue joint and eventually be able to pull the red backing plate off the semi-transparent lens. I found that the top part (as oriented in the spoiler) was easier to cut through and once you get through that, the bottom part separates quickly.
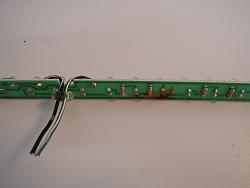
Step 7: Remove the 3 small screws which hold the LED strip onto the lens. Here is a photo of mine which clearly shows the damage.
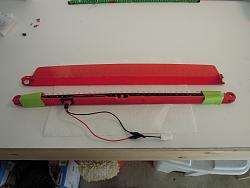
Step 8: Take the replacement lens and remove the LED strip from it. You don't have to be as careful as you were with the original lens because this one will be discarded. The wires connect to the new LED strip in the center instead of to one side as in the original lens, so you can see when you match it up against the original lens that you will need to cut some material away in order for the wires to travel inside the lens and out the back.
Step 9: Once you have fiddled with the LED strip enough for it to sit neatly inside the original lens, thread the wires through the lens exit point in the back, then place the LED strip in the lens and glue it with clear silicone adhesive. It is flexible and sits easily inside the lens so gluing goes smoothly. Using tape to hold the strip in place does help. Set aside for at least 6 hours.
Step 10: Take the connector you removed in step 5 and splice it to the wires on your newly repaired LED lens.
Step 11: Reconnect the lens to the spoiler connector and Install the lens back into the spoiler.
Step 12: Reconnect the connector under the trunk lid and replace the trunk lid sheathing.
Step 13: Test the brakes. I actually did this before I glued the LED strip into the lens in step 9. You might want to do the same.
I'll post a shot of the working light. Good luck to all. This solution worked smoothly for me and I hope you have the same experience.
Earlier years have a different design and require different parts but the concept is the same.
The steps involved are to remove the lens, cut it open and removed the LED strip inside, then take a similar lens, cut that open and remove the LED strip, and put that strip inside the original lens.
Step 1: Raise the trunk lid and remove the lens from the spoiler using a Philips head screwdriver or ratchet screwdriver. You might have to pry it slightly off the spoiler. Let it dangle there on the wire.
Step 2: Remove the fiber sheathing from the underside of the trunk lid. It's only necessary to remove the part at the back of the trunk in order to expose the wiring to the spoiler.
Step 3. Unplug the white connector under the trunk lid. There is a small press button on the side of the connector. When pressed it pulls apart easily. This is what it looks like at this point.

Step 4: Pull the lens carefully until you see a connector about 4" down the wire. As you do this, the wire on the underside of the trunk lid will be pulled towards the spoiler. Be careful not to pull too much or that wire will disappear inside the spoiler. Once the connector is exposed, unplug it.

Step 5: This is where I don't have a good photo record. You now have the lens out. Cut the connector off leaving enough wire to splice later and set it aside. You need it later.
Step 6: Examine the lens. You will see how the red backing plate is glued to the semi-transparent lens part. Take a utility knife and carefully cut along the glue joint. Be VERY careful doing this as it is brittle and breaks easily. With patience you will work along the glue joint and eventually be able to pull the red backing plate off the semi-transparent lens. I found that the top part (as oriented in the spoiler) was easier to cut through and once you get through that, the bottom part separates quickly.
Step 7: Remove the 3 small screws which hold the LED strip onto the lens. Here is a photo of mine which clearly shows the damage.

Step 8: Take the replacement lens and remove the LED strip from it. You don't have to be as careful as you were with the original lens because this one will be discarded. The wires connect to the new LED strip in the center instead of to one side as in the original lens, so you can see when you match it up against the original lens that you will need to cut some material away in order for the wires to travel inside the lens and out the back.
Step 9: Once you have fiddled with the LED strip enough for it to sit neatly inside the original lens, thread the wires through the lens exit point in the back, then place the LED strip in the lens and glue it with clear silicone adhesive. It is flexible and sits easily inside the lens so gluing goes smoothly. Using tape to hold the strip in place does help. Set aside for at least 6 hours.


Step 10: Take the connector you removed in step 5 and splice it to the wires on your newly repaired LED lens.
Step 11: Reconnect the lens to the spoiler connector and Install the lens back into the spoiler.
Step 12: Reconnect the connector under the trunk lid and replace the trunk lid sheathing.
Step 13: Test the brakes. I actually did this before I glued the LED strip into the lens in step 9. You might want to do the same.
I'll post a shot of the working light. Good luck to all. This solution worked smoothly for me and I hope you have the same experience.
 09-21-14, 08:04 PM
#2
5th Gear
Thread Starter
Join Date: Mar 2013
Location: WA
Posts: 5
Likes: 0
Received 0 Likes
on
0 Posts
OK, I forgot to include the link to the replacement light. Here it is:
http://www.ebay.com/itm/181521390890?_trksid=p2059210.m2749.l2649&ssPageName=STRK%3AMEBIDX%3AIT
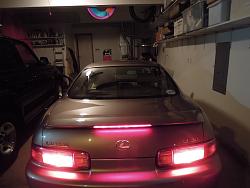
Here is a photo of the finished brake light in work. Very nice.
http://www.ebay.com/itm/181521390890?_trksid=p2059210.m2749.l2649&ssPageName=STRK%3AMEBIDX%3AIT
Here is a photo of the finished brake light in work. Very nice.

Last edited by Limey55; 09-21-14 at 08:18 PM. Reason: Add photo


 03-22-15, 07:37 PM
#6
I did the same on mine but used an OEM LED 3rd brake light out of a junkyard Mitsubishi Eclipse. It cost $3 to buy and worked great.
The stock strip goes bad because moisture gets into the assembly. If your factory LEDs still work then seal the seams of the OEM assembly and you should be good. I personally think the spaced out LEDs in the stock strip on 97+ SCs look ugly and going to a non spaced out layout is much better.
The stock strip goes bad because moisture gets into the assembly. If your factory LEDs still work then seal the seams of the OEM assembly and you should be good. I personally think the spaced out LEDs in the stock strip on 97+ SCs look ugly and going to a non spaced out layout is much better.
06-03-16, 01:31 PM
#7
Driver School Candidate

Join Date: Jun 2016
Location: Rhode Island
Posts: 5
Likes: 0
Received 0 Likes
on
0 Posts
HI, I have a smiliar issue on my '99 sc300. Some of the LED's are burnt out. What would you guys reccomened the best way to fix this issue? I have seen a few different methods, but I am thinking about buying some led's and soldering them onto the existing board.
Also, I found a replacement unit on spoilerlights website for $130. But I don't want to spend that much money. Thanks.
Also, I found a replacement unit on spoilerlights website for $130. But I don't want to spend that much money. Thanks.
Trending Topics
06-04-16, 11:36 AM
#8
Driver School Candidate

Join Date: May 2016
Location: CA
Posts: 28
Likes: 0
Received 0 Likes
on
0 Posts
most of the leds on my 98 were bad or dim. after opening up the lens i decided to just put a flex strip of leds over the existing ones. bought them on ebay as i remember. used clear calk to hold it in place. no real reason to remove the orig. leds as there is plenty of room inside of the lens and any light that comes around is helpful anyway. soldered the leads to the existing circuit board. used a sweet plastic glue from amazon. item # B0006N6ODS. had a tip like a syringe needle, but not sharp. was able to run a bead perfectly and then clamp the pieces together. the light looks like new. there are fewer leds than original but each is much brighter, so it's kind of a wash there. Spoilerlights.com said they will be making a replacement unit in 6-8 months. so if you want to wait to see if they come up with something, that's possible too. Gabriele Bisselle was my contact person there. cheers!

Thread
Thread Starter
Forum
Replies
Last Post