When you click on links to various merchants on this site and make a purchase, this can result in this site earning a commission. Affiliate programs and affiliations include, but are not limited to, the eBay Partner Network.
Hey fellas.
In the middle of doing this mod. What do you use to remove pins ?
I used a good sized needle with a fine point to move the plastic locking piece. It's pretty easy to break some of the pieces like the igniter or map plug if your not careful. The ecu has the same "style" pins but smaller.
You may want to practice on some spare plugs or invest in some proper tools.
I used a good sized needle with a fine point to move the plastic locking piece. It's pretty easy to break some of the pieces like the igniter or map plug if your not careful. The ecu has the same "style" pins but smaller.
You may want to practice on some spare plugs or invest in some proper tools.
Im on my phone at work replying so im sorry if i dont "quote" stuff correctly.
Im in australia and doing the mod on a jdm NA jza80. Followed the post for a year now.
Just following up with everyone i can get info off,
Its hard as theres not many people who do this stuff over here.
Ive got the jdm gte ecu, 1nz coils and a custom loom to bypass the igniter, gte map sensor
And IATs
With rx7 turbo 550cc injectors
W58 box....
Would be interested in any kw/hp readings (turbos a .89)
And someone somewhere else said i could only run 9 psi on a ge with stock gasket (should feel like 15 if i had a gte gasket)
If you have the engine out like that you probably should do the head gasket swap and new arp head bolts. That is unless you plan on going e85 or something like that.
If you have the engine out like that you probably should do the head gasket swap and new arp head bolts. That is unless you plan on going e85 or something like that.
Yeah its out. And nope staying high compression. Standard studs are fine.
I bought the 1.3mm gasket and so far its mixed emotions.... some say do it some say dont bother.
the new wires should go straight from the ecu to the coils, so yes leave ignitor unplugged as the wires connected to it will be removed from the ecu when you are running the new wires to the coils.
tie all 6 IGF's back together and feed to the stock IGF wire.
for the tacho, that is a tough one cause these coils do not put out a tacho signal, but if I were doing it I would try tapping the IGF wire I just mentioned above, I have a feeling its the same signal as a tach signal and will drive the tachometer but its not confirmed.
you will need to do the resistor mod to the cluster also, as the newer ignitors (or smart coils with built in ignitors like you are using) they all use a different level IGF signal than the old ignitors (coincidence that the old and new IGF signals are different and the old and new tach signals are different... I think not).\
I haven't tried it but I would give that a shot first and then move on to more complicated solutions if it doesn't work for the tacho.
stock headgasket is fine for a bar of boost maybe more with some good tuning or setup. if you want to approach 20 psi and be safe on pump gas it would be a good idea to do the headgasket at least. do not reuse the stock headbolts, if you are going to go with stock headbolts which is fine then get a new set, they are not re-usable like ARP headstuds.
Well the turbo is looking good, not all the time you see such a large turbo with water cooling.
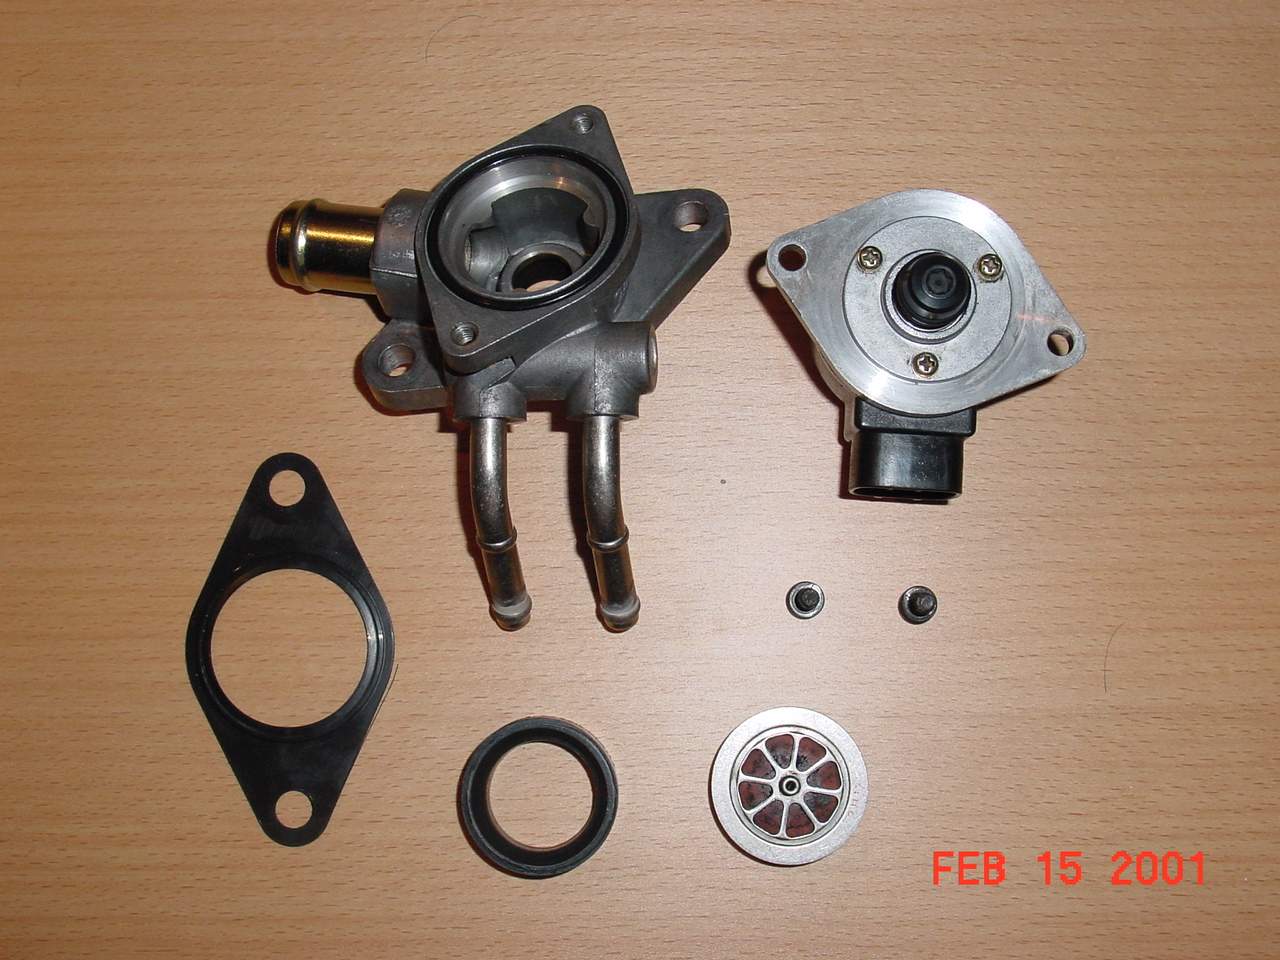
Yes for the FFIM there is no idle valve on the q45 throttle body, if you want an idle valve you need the "2jzgte IACV weld on plate" and then a 2jzgte IACV or a ls400 IACV. the ls400 one is much cheaper and has the same plug. you will need to order the "IACV check valve and washer" from toyota. ask curt on supraforums he will know the part numbers. that makes it so you can put a filter on the end of it (if you run a map sensor ecu) and it wont leak boost, otherwise you would have to run the idle valve to the intercooler piping like if you had a maf.
so weld on flange underneath, insert check valve and oring onto flange, bolt down ls400 IACV, plug in connector, enjoy proper IACV operation.
When choosing a spot to weld it on the bottom, make sure you leave enough room for your arm to get to your oil filter.
I didn't know I needed a check valve or O ring. I thought it was weld on flange then bolt on iacv.
I got this off SF.
25748-88400 valve, check list 19.74 cost 14.80
90210-25001 rubber washer list 2.07 cost 1.55
22278-46010 gasket, iac list 3.79 cost 2.84
22270-46060 iac valve list 610.99 cost 450.00
ups ground 9.80
yeah you need the check valve and O-ring or else it will leak boost.
on the weld on flange there is a lip that the check valve and o-ring sit on.
then the gasket goes between the IACV and the flange, its just a regular gasket, and bolt the IACV down.
off the web. bottom right is check valve, bottom middle is o-ring, bottom left is the iacv gasket.


 03-02-16, 03:42 PM