
Another SC restoration. Making that 17 year old car look like new!
 03-01-10, 10:22 PM
#1
Revised 11/28/11
3/2/10:
So I picked up a one owner Royal Jade 1993 SC400 with 89k on the odometer that needed a little help.
The car looked as if it had been garaged, but the interior needed some love. The exterior is pretty clean with a few dings and scratches here and there.
My goal is to keep the car completely stock and restore it to what it looked like when it was new in 1993.
Here's a poor quality pic of the car

Task List:
Exterior:
-Complete exterior paint job
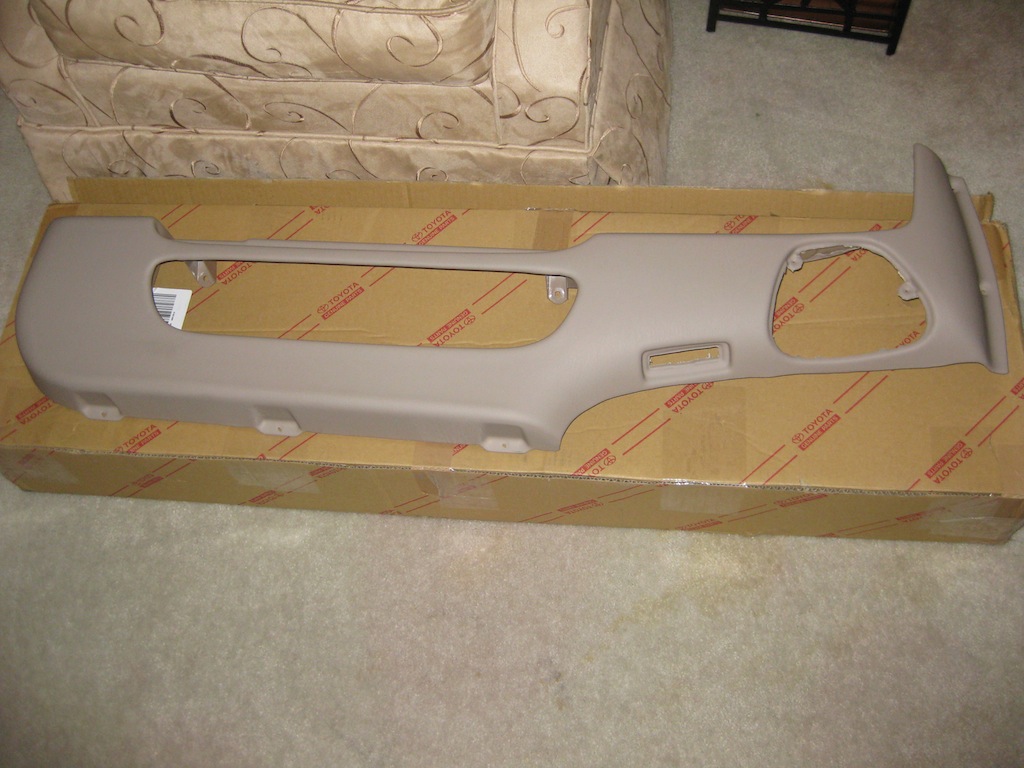
-Replace front bumper lip
-New Emblems
-New Wheel Center Caps
Interior:
-Replace all leather with kit from leatherseats.com
-Replace dash wood trim
-Replace interior upper window garnishes
-Steering wheel and shift **** new leather
-Replace carpet
-New floor mats
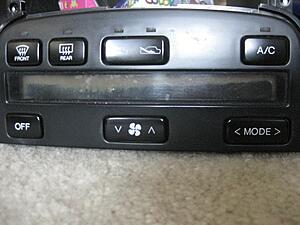
-Repair climate control screen
-Replace all dash light bulbs
-Repair Cluster needles
-Replace cracked center vent
-Replace headliner
-Replace all four speakers
-Replace front and rear speaker grills
Mechanical:
-Battery
-New tires
-All four Shocks
-Upper and lower control arms Front/Rear
-Stabilizer Links
-Every Bushing I can find
-Spark Plugs/Wires/Distributor Rotor/Cap
-Alternator
-Power Steering Pump
-Serpentine Belt
-Idler Pulley
Beginning Progress - 3/2/10
Leather Install:
First thing I did was completely remove the interior for restoration and to get it ready to send off to the body shop for repainting. It also is a perfect time to recover the seats

Here's a picture of the recovered passenger seat with the original door armrest to show color match. I also ordered new lower seat trim, as the original lower trim panels were badly cracked. The leatherseats kit fit very well, and the color match was decent. Installation time was about 5 hours, I took a lot of time making sure the leather fit just right.

Rear bench recovered. A good majority of the rear seat was actually pleather, but it actually looked very good and was very soft.

Rear Deck
Now for some more interior work. The speaker grills were badly faded so I cleaned the rear deck carpet and recovered the grilles
Here's a comparison shot to show how badly faded the grills were.

The finished product.

Back from the Body Shop - 3/9/10
Got the car back from the body shop to have a damaged rocker panel replaced
Better pics of the car:


A mint condition, fresh headliner test fitted.

I found a couple of nice clean seat backs and tightened the elastic band on the netting.

I also managed to find the original window sticker tucked away in the owners manual, an unexpected find for a 17 year old car.

First wave of parts come in. - 3/25/10
Got a few new parts in today thanks to the lovely folks at Sewell.
Brand new center vent, key cylinder trim ring, and bottom seat plastics.

New next to nasty old lower seat plastic trim.

Also picked up a brand new driver door map pocket. Couldn't find a suitable used one that wasn't torn to pieces so I decided to go all out and order a new one.
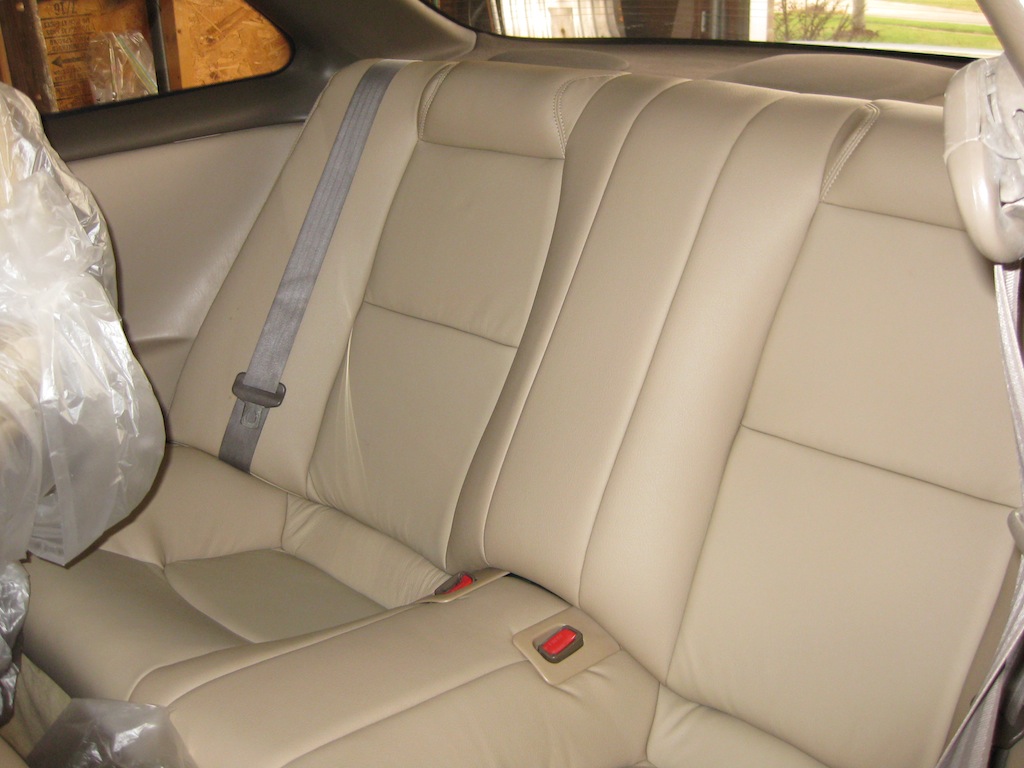
And a picture of the rear interior test fitted.
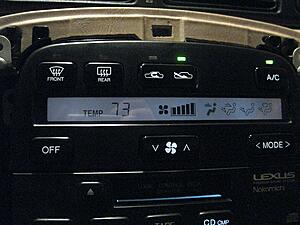
Repair climate control LCD/Interior Trim. - 4/5/10
Here's another small update.
Before shelling out $600 for a new climate control display assembly I decided to try an eBay display that I found for $60.
The installation was a tad bit tedious, but overall pretty straight forward. I also replaced all the bulbs in the climate control.
Here's a before picture with my blackened LCD and spotted display.
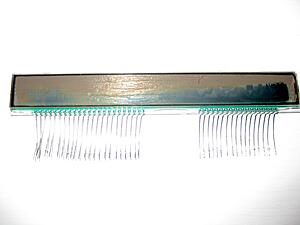
The old display desoldered.
 ]
]
Here's the finished product with a fresh display and bulbs. The result turned out excellent, with only very minimal noticeable differences from the factory display. In my opinion this was $60 very well spent. I also ended up replacing the casing and buttons with one that was in like new shape.
Also a quick picture of a fully assembled seat with the new outer trim. I left it in the plastic to protect it from scuffing. I also repaired a trace in the seat ECU and lubricated the tracks and adjustment gears, now all the motors function smoothly and quietly.

E-Brake Cover 4/21/10
Small update. Ordered and replaced the e-brake boot and shift cover plate. I also replaced the heater control valve. Once I get a bit more disposable income I will be ordering new window garnish for both doors and a new dash pad.
I've been bitten by the new parts bug and have become addicted.

3/2/10:
So I picked up a one owner Royal Jade 1993 SC400 with 89k on the odometer that needed a little help.
The car looked as if it had been garaged, but the interior needed some love. The exterior is pretty clean with a few dings and scratches here and there.
My goal is to keep the car completely stock and restore it to what it looked like when it was new in 1993.
Here's a poor quality pic of the car
Task List:
Exterior:
-Complete exterior paint job
-Replace front bumper lip
-New Emblems
-New Wheel Center Caps
Interior:
-Replace all leather with kit from leatherseats.com
-Replace dash wood trim
-Replace interior upper window garnishes
-Steering wheel and shift **** new leather
-Replace carpet
-New floor mats
-Repair climate control screen
-Replace all dash light bulbs
-Repair Cluster needles
-Replace cracked center vent
-Replace headliner
-Replace all four speakers
-Replace front and rear speaker grills
Mechanical:
-Battery
-New tires
-All four Shocks
-Upper and lower control arms Front/Rear
-Stabilizer Links
-Every Bushing I can find
-Spark Plugs/Wires/Distributor Rotor/Cap
-Alternator
-Power Steering Pump
-Serpentine Belt
-Idler Pulley
Beginning Progress - 3/2/10
Leather Install:
First thing I did was completely remove the interior for restoration and to get it ready to send off to the body shop for repainting. It also is a perfect time to recover the seats
Here's a picture of the recovered passenger seat with the original door armrest to show color match. I also ordered new lower seat trim, as the original lower trim panels were badly cracked. The leatherseats kit fit very well, and the color match was decent. Installation time was about 5 hours, I took a lot of time making sure the leather fit just right.
Rear bench recovered. A good majority of the rear seat was actually pleather, but it actually looked very good and was very soft.
Rear Deck
Now for some more interior work. The speaker grills were badly faded so I cleaned the rear deck carpet and recovered the grilles
Here's a comparison shot to show how badly faded the grills were.
The finished product.
Back from the Body Shop - 3/9/10
Got the car back from the body shop to have a damaged rocker panel replaced
Better pics of the car:
A mint condition, fresh headliner test fitted.
I found a couple of nice clean seat backs and tightened the elastic band on the netting.
I also managed to find the original window sticker tucked away in the owners manual, an unexpected find for a 17 year old car.
First wave of parts come in. - 3/25/10
Got a few new parts in today thanks to the lovely folks at Sewell.
Brand new center vent, key cylinder trim ring, and bottom seat plastics.
New next to nasty old lower seat plastic trim.
Also picked up a brand new driver door map pocket. Couldn't find a suitable used one that wasn't torn to pieces so I decided to go all out and order a new one.
And a picture of the rear interior test fitted.
Repair climate control LCD/Interior Trim. - 4/5/10
Here's another small update.
Before shelling out $600 for a new climate control display assembly I decided to try an eBay display that I found for $60.
The installation was a tad bit tedious, but overall pretty straight forward. I also replaced all the bulbs in the climate control.
Here's a before picture with my blackened LCD and spotted display.

The old display desoldered.
 ]
]Here's the finished product with a fresh display and bulbs. The result turned out excellent, with only very minimal noticeable differences from the factory display. In my opinion this was $60 very well spent. I also ended up replacing the casing and buttons with one that was in like new shape.

Also a quick picture of a fully assembled seat with the new outer trim. I left it in the plastic to protect it from scuffing. I also repaired a trace in the seat ECU and lubricated the tracks and adjustment gears, now all the motors function smoothly and quietly.
E-Brake Cover 4/21/10
Small update. Ordered and replaced the e-brake boot and shift cover plate. I also replaced the heater control valve. Once I get a bit more disposable income I will be ordering new window garnish for both doors and a new dash pad.
I've been bitten by the new parts bug and have become addicted.
Last edited by Scotty; 07-23-24 at 06:38 AM.
 03-01-10, 10:31 PM
#2

Looks like excellent progress. It took me a few months to do the leatherseats.com install, I must of installed and uninstalled many times just to get it fitting exactly like stock. Looks like you did an excellent job.
Is this going to be your daily driver?
Is this going to be your daily driver?

 03-01-10, 10:47 PM
#7
Second Part:
Map Pockets/Key Cylinder Ring 6/8/10
Well the car has been sitting around for a month now, few minor updates.
I decided I wanted the left and right map pocket to match, so I attempted to purchased a new map pocket for the passenger side, but they are currently only available in gray. I also found it impossible to find a used one that didn't have some sort of cracking, so new is the way to go.

This is where I realized there were differences in the map pockets between model years.
I also picked up a few minor things, a new key cylinder trim ring, new bulbs for the entire center console, with the exception of the stereo. Next will be the instrument cluster. For such a small part the key cylinder ring makes huge difference. The old one was was nasty and discolored, well worth it for the few bucks it costs.

Back From Body shop for Paint 6/9/10
Here's a few exterior shots after a brief visit to the shop.
They really did an excellent job, makes the car look new again. I also replaced the front spoiler while having the paint work done.


More Pictures 6/21/10
Few more shots after paint:


And one shot of the leather after being installed for a couple month now. It has really smoothed out quite a bit since installation.

Window Garnishes/Parts
Finally got the first half of my parts order in. New mounts, one control arm, couple bushings, trunk shocks, and a brand new set of window garnishes. Still waiting on another 82 items I ordered from Sewell (I think I may have overwhelmed their parts department temporarily).

More pictures and updates to come soon.
Suspension Work and More Parts 11/17/10
Well, I received the rest of my parts order. I bought every suspension nut, bolt, and bushing I could find; knowing that rusty parts can be a pain to work with, this was/is a great help.
I was able to find a passenger side map pocket and new speaker grills, but unfortunately the map pocket was only available in gray. So, I sent the map pocket off to a vinyl shop to have it dyed, as that was my only way to get a new part and they assured me a near perfect color match. I had them redo the door armrests and they turned out excellent, once I receive the pocket back, I'll be ready to rebuild the door panels.
Suspension bolts, distributor caps/rotors, spark plugs etc.. If I were to do it all over again, I would say skip the upper control arm bolts (they were still in perfect shape), but they weren't that expensive.

Control arms, mounts, wires, and speaker grills... I learned in the process of swapping out my suspension parts that the upper control arms were still in great shape...oh well, now they are new.

And a sitting room full of parts.

I've started work on the suspension, first by removing the lower control arms. Only to find out the bolts through the rear cross-member are almost impossible to remove if there is any rust at all. I had to remove the entire cross-member and still was only able to get the bolt on the driver's side dislodged. I had to order a whole new cross-member to fix this little problem. It also makes me extra happy that I ordered all the camber adjustment bolts.
Here they are, attached as can be to my cross-member. It was an extra pain to remove with the control arms still attached. I also discovered there was some damage to the cross-member after I removed it, so replacing it won't be completely in vein.

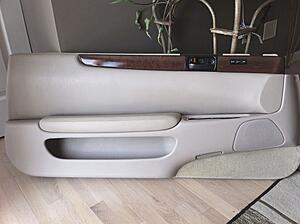
Door Panel Rebuild 11/20/10
Waiting on some more suspension parts, so I decided to put together a freshened door panel with a new armrest, map pocket, and speaker grill.
The armrest is a bit more tan than the original, but in normal light it's very difficult to tell.
Thanks! It's just my project car. I have a soft spot for SC's, my daily driver is a 99 SC400. The one thing I figured out when installing the leather is that after a number of years the foam becomes compressed causing the new covers to fit a tad loosely, after about a week the covers now look a bit more snug.
I actually took a set of grills that weren't as faded and removed and flipped the cloth over and reinstalled. It turned our very nicely and I didn't have to worry about color matching.
Thanks for the compliment!!
Map Pockets/Key Cylinder Ring 6/8/10
Well the car has been sitting around for a month now, few minor updates.
I decided I wanted the left and right map pocket to match, so I attempted to purchased a new map pocket for the passenger side, but they are currently only available in gray. I also found it impossible to find a used one that didn't have some sort of cracking, so new is the way to go.
This is where I realized there were differences in the map pockets between model years.
I also picked up a few minor things, a new key cylinder trim ring, new bulbs for the entire center console, with the exception of the stereo. Next will be the instrument cluster. For such a small part the key cylinder ring makes huge difference. The old one was was nasty and discolored, well worth it for the few bucks it costs.
Back From Body shop for Paint 6/9/10
Here's a few exterior shots after a brief visit to the shop.
They really did an excellent job, makes the car look new again. I also replaced the front spoiler while having the paint work done.
More Pictures 6/21/10
Few more shots after paint:
And one shot of the leather after being installed for a couple month now. It has really smoothed out quite a bit since installation.
Window Garnishes/Parts
Finally got the first half of my parts order in. New mounts, one control arm, couple bushings, trunk shocks, and a brand new set of window garnishes. Still waiting on another 82 items I ordered from Sewell (I think I may have overwhelmed their parts department temporarily).
More pictures and updates to come soon.
Suspension Work and More Parts 11/17/10
Well, I received the rest of my parts order. I bought every suspension nut, bolt, and bushing I could find; knowing that rusty parts can be a pain to work with, this was/is a great help.
I was able to find a passenger side map pocket and new speaker grills, but unfortunately the map pocket was only available in gray. So, I sent the map pocket off to a vinyl shop to have it dyed, as that was my only way to get a new part and they assured me a near perfect color match. I had them redo the door armrests and they turned out excellent, once I receive the pocket back, I'll be ready to rebuild the door panels.
Suspension bolts, distributor caps/rotors, spark plugs etc.. If I were to do it all over again, I would say skip the upper control arm bolts (they were still in perfect shape), but they weren't that expensive.
Control arms, mounts, wires, and speaker grills... I learned in the process of swapping out my suspension parts that the upper control arms were still in great shape...oh well, now they are new.
And a sitting room full of parts.
I've started work on the suspension, first by removing the lower control arms. Only to find out the bolts through the rear cross-member are almost impossible to remove if there is any rust at all. I had to remove the entire cross-member and still was only able to get the bolt on the driver's side dislodged. I had to order a whole new cross-member to fix this little problem. It also makes me extra happy that I ordered all the camber adjustment bolts.
Here they are, attached as can be to my cross-member. It was an extra pain to remove with the control arms still attached. I also discovered there was some damage to the cross-member after I removed it, so replacing it won't be completely in vein.
Door Panel Rebuild 11/20/10
Waiting on some more suspension parts, so I decided to put together a freshened door panel with a new armrest, map pocket, and speaker grill.
The armrest is a bit more tan than the original, but in normal light it's very difficult to tell.

I actually took a set of grills that weren't as faded and removed and flipped the cloth over and reinstalled. It turned our very nicely and I didn't have to worry about color matching.
Thanks for the compliment!!
Last edited by Scotty; 06-12-13 at 06:22 PM.
Trending Topics


 03-02-10, 01:05 AM
#14
great job so far can you put some more pics up of the exterior