

 01-09-15, 10:04 AM
Last edit by: IB Advertising
See related guides and technical advice from our community experts:
Browse all: Lexus IS Lighting Guides
- Lexus: How to install HID Headlights (on your non-HID equipped 2IS)
Step by step instructions for do-it-yourself repairs
Browse all: Lexus IS Lighting Guides

Lexus LED Fog Lamps at Sewell
09-30-15, 04:55 AM
#76
Driver School Candidate

Join Date: Sep 2015
Location: FL
Posts: 10
Likes: 0
Received 0 Likes
on
0 Posts
Would like to replace the factory 2010 RX fog light bulbs with LED. Is this what the hive recommends?
10 XB H11 H16 LED DRL/FOG LIGHT BULBS
from VLEDS
http://www.vleds.com/bulb-type/fog-l...16-1-pair.html
10 XB H11 H16 LED DRL/FOG LIGHT BULBS
from VLEDS
http://www.vleds.com/bulb-type/fog-l...16-1-pair.html
 11-04-15, 01:06 PM
#77

I have a 2013 RX350 and I was looking to get the Lexus OEM LED ones but when I talked to the parts guy and looked at a few listing they all say the LED housing is only compatible with 2014+. Has anyone done this conversion on a 2013?

 11-05-15, 10:12 AM
#80

Numerous RX members here have the OEM LED fog lights on their RX, myself included. They will fit all models of the 3G RX (2010-2015).
If I were to do it again, I would rather just buy the Morimoto LED foglights from theretrofitsource.com It's cheaper and way brighter.
http://www.theretrofitsource.com/com...l#.Vjub2tLH_cs
If I were to do it again, I would rather just buy the Morimoto LED foglights from theretrofitsource.com It's cheaper and way brighter.
http://www.theretrofitsource.com/com...l#.Vjub2tLH_cs
11-09-15, 09:33 AM
#81
Do you know the difference in Lumens between the OEM and the Morimoto LED? The Morimoto ones are rated at 2500 Lumens but I can't find anything on the Lexus OEM's. I wanted to stick with OEM but these look like they might be a better option as long as they're just as, or brighter then the OEM ones.
11-09-15, 10:56 AM
#82
Do you know the difference in Lumens between the OEM and the Morimoto LED? The Morimoto ones are rated at 2500 Lumens but I can't find anything on the Lexus OEM's. I wanted to stick with OEM but these look like they might be a better option as long as they're just as, or brighter then the OEM ones.
11-09-15, 01:57 PM
#83
They are as bright or even brighter. The 2014 MDX has OEM LED fog lights as an option as my brother has it. Told friend about the Morimoto option and he installed it on his 15 MDX and it look as bright, if not brighter than the OEM ones on my brother's MDX. I would expect the same results for the RX as well.
11-23-15, 10:57 AM
#84
I installed the Morimoto fog lights and they are amazing. Way brighter than stock with a nice cut off so no glares. I don't know how the OEM one looks so I can't compare but at this price I'm def happy I went with them. My wife drive the RX and always complains about the lights on the dark roads she has to drive on and she is extremely happy with the performance.
05-10-16, 06:38 PM
#85
Yes, received them and just installed them this morning. Here is a quick DIY.
I've been busy with work and soccer lately and haven't washed the car in over a month, so please excuse the dirty RX. Due to the tight space, I could not use my DSLR, we'll have to live with the pictures taken with my phone.
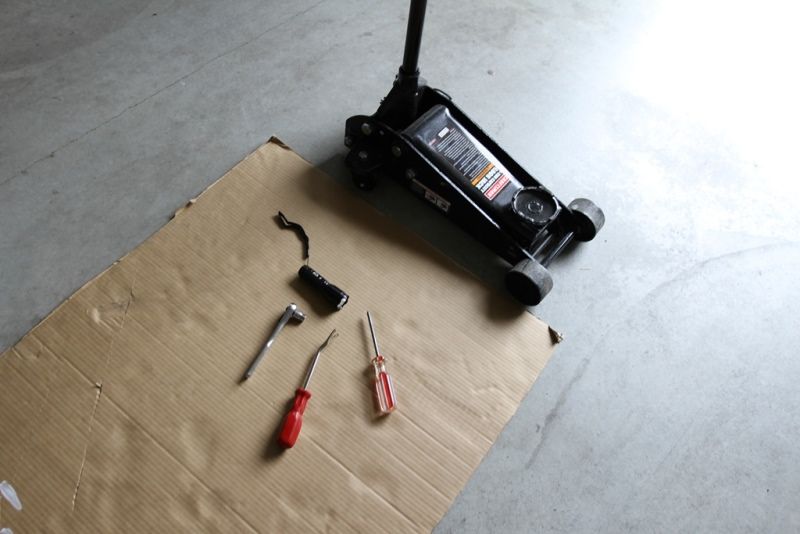
1st Picture - Tools:
- I cut out a piece of cardboard to have something to sit/lay down on
- a philips screwdriver
- ratchet wrench 10mm socket worked well for me
- trim removal tool (you can get by with a flat bladed screw driver)
- a small flashlight,
- my trusty Craftsman floor jack (optional, not needed but definitely helps)
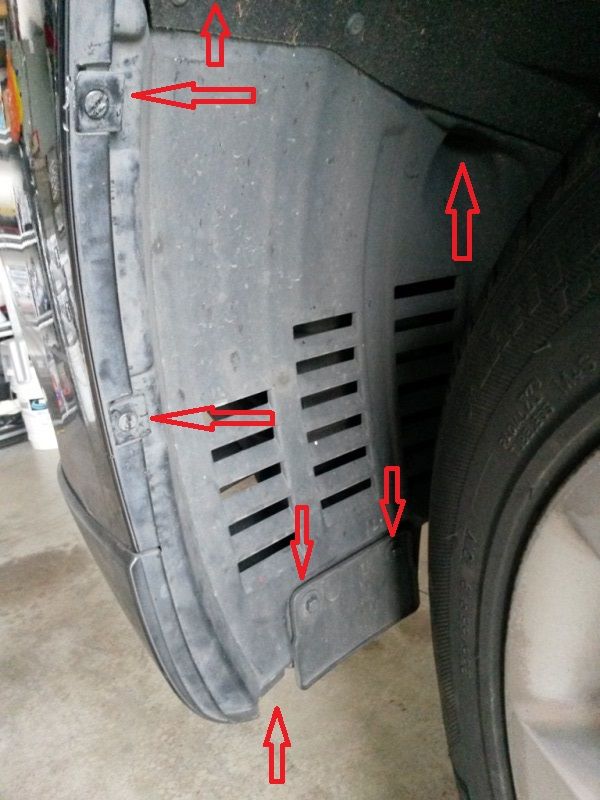
2nd Picture - Remove screws and clips of fender liner
- Turn the wheels away from the side you're working on to give more space
- remove two retaining clips on the outer edge of the fender, they stand vertical, rotate them horizontal then pull out
- remove two clips holding the carpet (top arrow and right most arrow)
- remove 3 screws as shown at the bottom, the bottom most screw is accessible from beneath
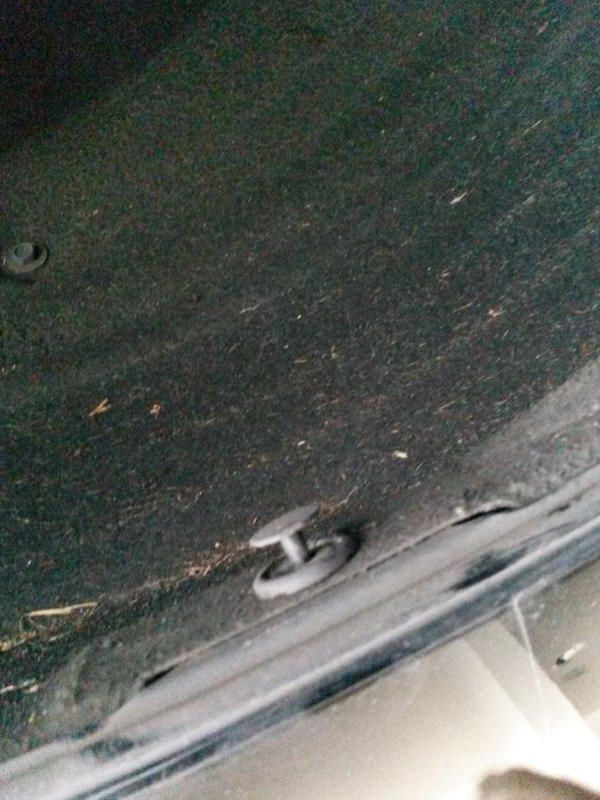
3rd Picture - Carpet clip
- to remove the carpet clip, just pry out the center then pull the entire clip out
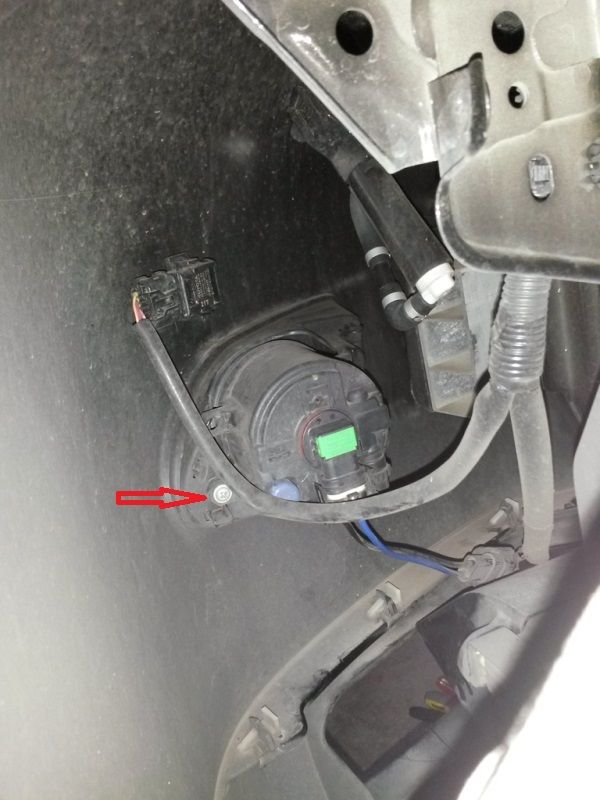
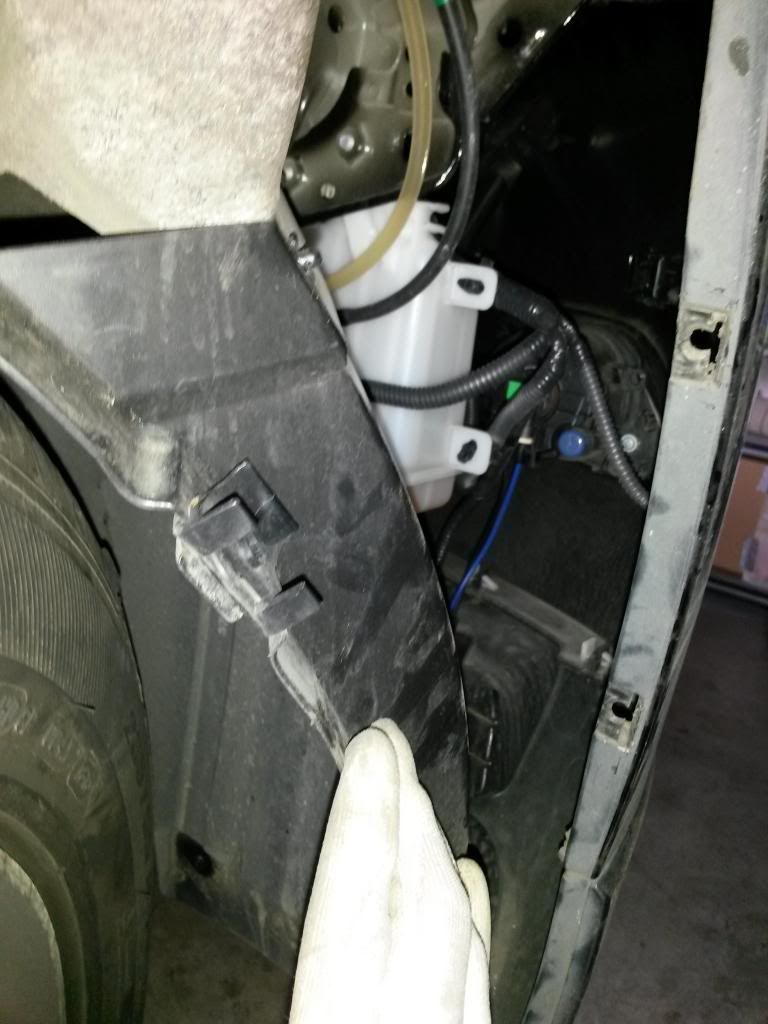
4th Picture - Driver's side fog light
- pull back the fender liner - I found it easiest to start out pulling away the bumper to release the fender liner, then pull the liner to the side
- looking inside, you can see the fog light is held on by a single screw (red arrow)
- the tabs on the opposite side simply insert into a slot
- Also visible:
-- the wire on top of the fog light is for the parking sensor
-- the black/white hose on the upper/right of the fog light is for the headlight washer
5th Picture - Passenger side fog light
- pulling back the fender liner shows the passenger side fog light
6th Picture - Inside passenger side
- Again, the passenger side fog light is held on by only a single screw

7th Picture - Detailed view (passenger side)
- A view looking from the inside the bumper, showing the screw hole (circle) and the two slots through which the fog light tabs inserts (arrows)

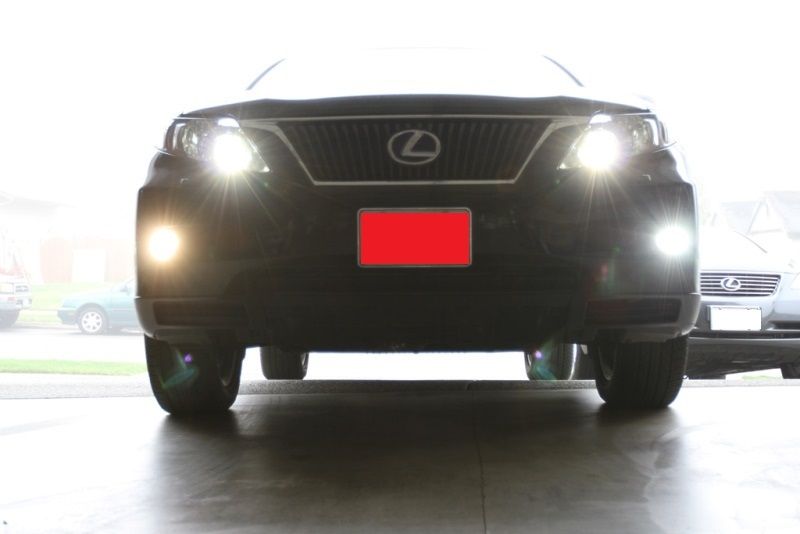
8th Picture - Comparison
- Driver's side = LED foglamp
- Passenger side = Philips X-tremeVision Ultra H11
- Notice the difference; the LED fogs looks to be even whiter than the HID.
Removal/Installation was simple. It took me about 30 minutes to do this. Everything was plug & play
I hope this helps any DIYer out there - it's not as bad as you might think. Bumper removal absolutely NOT required!
After I get it washed and cleaned up, I'll have more pictures to share.
I've been busy with work and soccer lately and haven't washed the car in over a month, so please excuse the dirty RX. Due to the tight space, I could not use my DSLR, we'll have to live with the pictures taken with my phone.
1st Picture - Tools:
- I cut out a piece of cardboard to have something to sit/lay down on
- a philips screwdriver
- ratchet wrench 10mm socket worked well for me
- trim removal tool (you can get by with a flat bladed screw driver)
- a small flashlight,
- my trusty Craftsman floor jack (optional, not needed but definitely helps)
2nd Picture - Remove screws and clips of fender liner
- Turn the wheels away from the side you're working on to give more space
- remove two retaining clips on the outer edge of the fender, they stand vertical, rotate them horizontal then pull out
- remove two clips holding the carpet (top arrow and right most arrow)
- remove 3 screws as shown at the bottom, the bottom most screw is accessible from beneath
3rd Picture - Carpet clip
- to remove the carpet clip, just pry out the center then pull the entire clip out
4th Picture - Driver's side fog light
- pull back the fender liner - I found it easiest to start out pulling away the bumper to release the fender liner, then pull the liner to the side
- looking inside, you can see the fog light is held on by a single screw (red arrow)
- the tabs on the opposite side simply insert into a slot
- Also visible:
-- the wire on top of the fog light is for the parking sensor
-- the black/white hose on the upper/right of the fog light is for the headlight washer
5th Picture - Passenger side fog light
- pulling back the fender liner shows the passenger side fog light
6th Picture - Inside passenger side
- Again, the passenger side fog light is held on by only a single screw
7th Picture - Detailed view (passenger side)
- A view looking from the inside the bumper, showing the screw hole (circle) and the two slots through which the fog light tabs inserts (arrows)
8th Picture - Comparison
- Driver's side = LED foglamp
- Passenger side = Philips X-tremeVision Ultra H11
- Notice the difference; the LED fogs looks to be even whiter than the HID.
Removal/Installation was simple. It took me about 30 minutes to do this. Everything was plug & play
I hope this helps any DIYer out there - it's not as bad as you might think. Bumper removal absolutely NOT required!
After I get it washed and cleaned up, I'll have more pictures to share.
bumping this old *** thread

Does anybody have part #'s for these?
Or can someone please confirm that all fogs for MY 2010-2015 are all the same?
I see that Sewell no longer sells parts online
who is our Lexus OEM parts vendor now?
Thanks !


