Yellow bulb to white LED
 10-10-14, 09:57 PM
#136
Driver School Candidate
Join Date: Jun 2014
Location: MN
Posts: 11
Likes: 0
Received 0 Likes
on
0 Posts
Hello to all. Long time lurker, first time poster. Great discussion here on updating the dark interior lights. Learned a lot reading and viewing the pics posted. The one thing that I noticed in the whole discussion here is that everybody complaining about how hard to change the rear dome light and I found an easier way of doing it. Basically, do not try to pop out the plastic cover using trim tool or old credit card. The whole dome light housing is held by 2 clips on the rear side, just give a firm pull downward and it should come off. Please see the series of pics I took doing this.
 10-10-14, 09:59 PM
#137
Driver School Candidate
Join Date: Jun 2014
Location: MN
Posts: 11
Likes: 0
Received 0 Likes
on
0 Posts
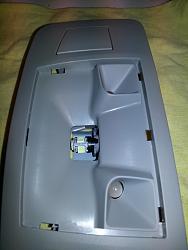
front side of the dome light
- red circles are the tabs that holds the whole housing in place
- green ovals are the tabs for the plastic cover
- yellow circle is the back side of the dome light
- red circles are the tabs that holds the whole housing in place
- green ovals are the tabs for the plastic cover
- yellow circle is the back side of the dome light
10-10-14, 10:08 PM
#139
Driver School Candidate
Join Date: Jun 2014
Location: MN
Posts: 11
Likes: 0
Received 0 Likes
on
0 Posts
here's the view of the back side of the dome light housing.
to replace the light push the tab towards the direction of the arrows, start with red first before doing the one with the green arrow.
to replace the light push the tab towards the direction of the arrows, start with red first before doing the one with the green arrow.
10-10-14, 10:16 PM
#141
Driver School Candidate
Join Date: Jun 2014
Location: MN
Posts: 11
Likes: 0
Received 0 Likes
on
0 Posts
and here's the pic of the cable on the roof liner. to detach the dome light housing, you just push the tab towards the direction of the red arrow and separate the connectors.
10-10-14, 10:22 PM
#142
Driver School Candidate
Join Date: Jun 2014
Location: MN
Posts: 11
Likes: 0
Received 0 Likes
on
0 Posts
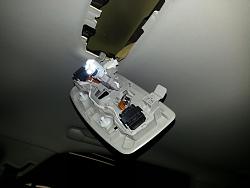
here's my led replacement. there's about 1mm distance between the top of the bulb and the edge of the plastic housing
test it for polarity before putting the holder back in place.

test it for polarity before putting the holder back in place.
 10-10-14, 10:34 PM
#143
Driver School Candidate
Join Date: Jun 2014
Location: MN
Posts: 11
Likes: 0
Received 0 Likes
on
0 Posts
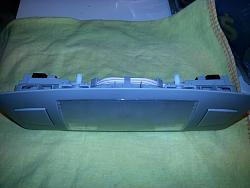
here's the plastic cover showing you the 6 tabs that keep it in place.

here's the dome light housing, showing you the location of the 2 white tabs that keep the whole thing on the roof liner. the tabs are about 3/4-1 inch from the edge of the plastic cover, and this is the area that you will need to pull downward to remove it.

here's the dome light housing, showing you the location of the 2 white tabs that keep the whole thing on the roof liner. the tabs are about 3/4-1 inch from the edge of the plastic cover, and this is the area that you will need to pull downward to remove it.


 01-27-16, 07:17 PM
#147
Driver School Candidate
Great thread, can you please specify the exact bulb used for daytime running lights? I think its the 9005 but wanted to make sure its plug and play. Thank you so much !
Cheers,
Ron
Cheers,
Ron
01-29-16, 06:15 AM
#148
Driver School Candidate

Join Date: Apr 2013
Location: MD
Posts: 5
Likes: 0
Received 0 Likes
on
0 Posts
Great thread . . . Any suggestions on how to remove the footwell lights? Mine seem pretty stuck in there and I don't want to put too much pressure with needlenose pliers causing the bulbs to break as I try to remove and put in the LEDs! BTW, I've read all the various threads including ones in the other sections for GS, IS, etc.
01-29-16, 08:33 AM
#149
No, I don't play soccer!
GCTJ, I used pliers to remove the bulbs in the footwell area. It's a tight fit. Taking it apart is also possible on the passenger side. But I couldn't quite do the driver side. Good luck.
07-02-17, 11:59 AM
#150
Driver School Candidate

Thanks a lot.
Last edited by Alfa777z; 07-02-17 at 06:43 PM.