
 12-16-14, 11:38 AM
Last edit by: IB Advertising
See related guides and technical advice from our community experts:
Browse all: Lexus IS Lighting Guides
- Lexus: How to Replace Footwell lights
Step by step instructions for do-it-yourself repairs
Browse all: Lexus IS Lighting Guides

Replaced my amber led foot well with bright white leds
09-13-11, 09:25 PM
#1
Driver School Candidate
Thread Starter

I replaced most of the lights on the car with LEDs (parking lights, license plate lights, door courtesy lights) I noticed the amber foot well lights, interior door handle lights, glove box, and the storage light seemed a bit more tricky. I was bored and wanted to see how hard it would be to replace those foot well lights with some more modern white led lights, since they are "permanent" led lights.
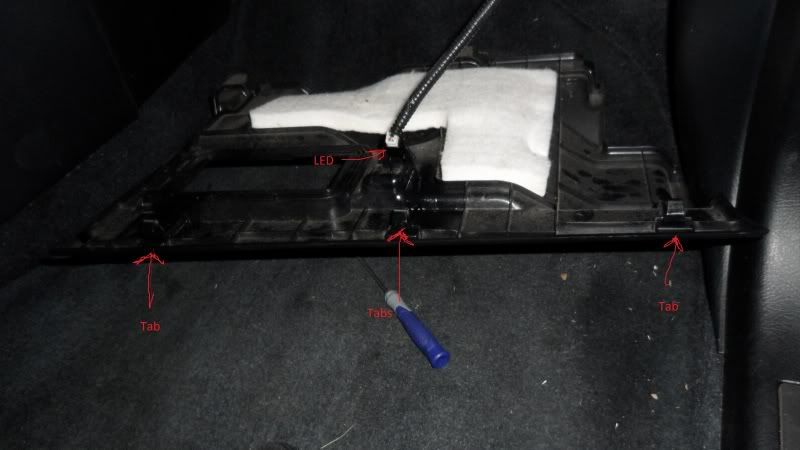
The passengers side was accessed by undoing the three tabs, then I disconnected the led and removed the led housing.
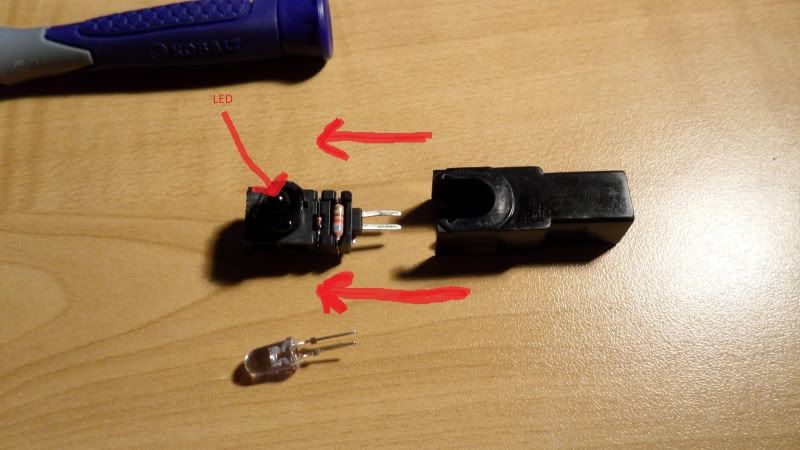
Here's the housing containing the little amber led, I pried it open with a small flat head screw driver, it slides out easily. The led on the bottom is the bright white replacement led.
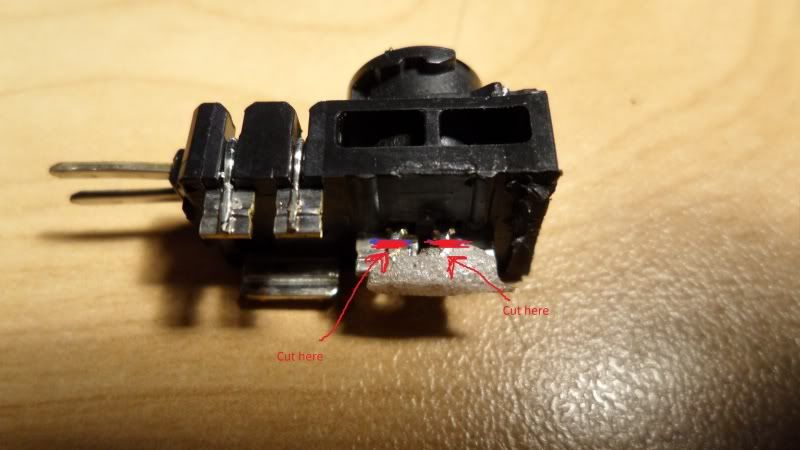
I then cut solders holding the ambers leds prongs to the metal conductor plate. Once I did that the led fell right out. ( I had already finished in the picture and added a tiny amount of glue to hold in the new led prongs)
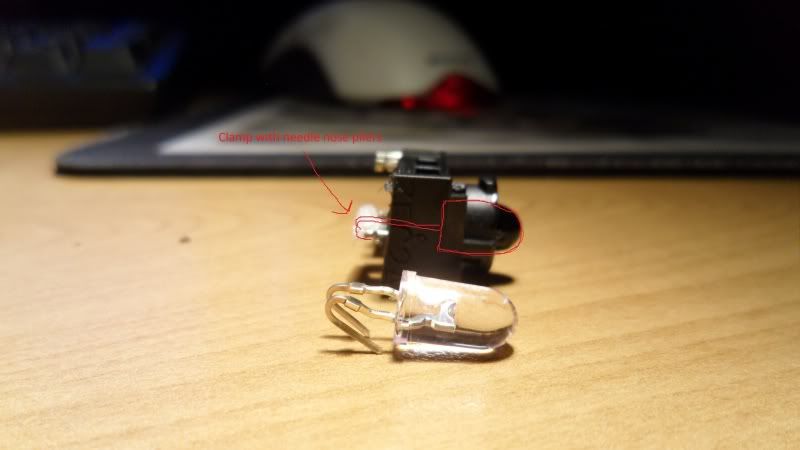
I then inserted the new led, it was a tad bigger so I had to made the hole bigger to fit the led, then I plugged it back in before I secured it to make sure it was in the right way, if it doesn't turn on just flip it around. Then I wrapped the prongs around the metal plate, and used needle nose pliers and squeezed the prongs on real tight, added a tad of glue for added security and then put it all back together. The drivers side works the same way. To get the led housing there just twist it 45 degrees downwards to undo, and then disconnect. Now ive got nice white light in the foot wells, next will be the door handles and glove box.
The passengers side was accessed by undoing the three tabs, then I disconnected the led and removed the led housing.
Here's the housing containing the little amber led, I pried it open with a small flat head screw driver, it slides out easily. The led on the bottom is the bright white replacement led.
I then cut solders holding the ambers leds prongs to the metal conductor plate. Once I did that the led fell right out. ( I had already finished in the picture and added a tiny amount of glue to hold in the new led prongs)
I then inserted the new led, it was a tad bigger so I had to made the hole bigger to fit the led, then I plugged it back in before I secured it to make sure it was in the right way, if it doesn't turn on just flip it around. Then I wrapped the prongs around the metal plate, and used needle nose pliers and squeezed the prongs on real tight, added a tad of glue for added security and then put it all back together. The drivers side works the same way. To get the led housing there just twist it 45 degrees downwards to undo, and then disconnect. Now ive got nice white light in the foot wells, next will be the door handles and glove box.


 09-15-11, 06:13 PM
#7

the glovebox light is pretty easy to access and change. See my separate write up on another thread...
also the console light. Bit fiddly, but there are writeups on removing the console. I've got photos of each stage if anyone wants me to put them up
Satz
also the console light. Bit fiddly, but there are writeups on removing the console. I've got photos of each stage if anyone wants me to put them up
Satz
Trending Topics
09-15-11, 10:35 PM
#9
Driver School Candidate
Thread Starter
I'm doing the door sills right now, just completed one, and it is by far the most best looking change of all the led swaps I've done. There is some dremel use required but it is all out of sight and very simple, I'll post some pics when I'm all done with them.


Thread
Thread Starter
Forum
Replies
Last Post
chrispy
2Gen GS430 / 400/ 300 Classifieds (98-05)
11
05-20-10 09:14 AM