Timing Belt Make-do Tools
 10-28-14, 08:08 PM
#1
Pole Position
Thread Starter

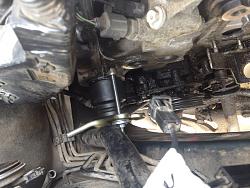
Long story short, I'm doing my timing belt, only I've discovered some tools that I borrowed aren't going to work as planned for various reasons, so I had to make do with what I had. I thought I'd share what I did in case someone else finds themselves in the same situation.
I do need a little advice as to how to get the stupid belt around the right camshaft pulley. I'm one sprocket off. If I pull really hard, I can get 1/2 sprocket off, but I can't get it to seat. Is this a brute strength issue or am I missing something? Any advice would be greatly appreciated.
Now onto the pictures:
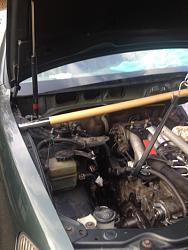
The first is my "let's not break the new windshield we had to get installed 4 months ago" brace. Any longish thing will do, I just happened to have a pitchfork handle that was supposed to be used to repair one a year ago. Placed before the hood strut, this slender model will (hopefully) arrest any wild breaker bar careening towards the glass. It's also useful for chasing away chatty neighbors who don't understand the stress/concentration involved with this type of auto surgery.
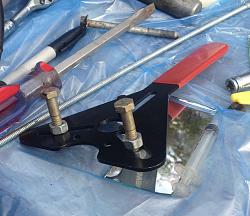
Next we have the pulley holder. This is a modified A/C pulley holder, because the local auto stores refuse to rent something appropriate. In fact, this was confidently stated to work as intended. Well, it doesn't. The bolts that come with the unit are too small (you can see one aligned with the handle), so I rustled up some thicker/longer bolts to use instead. With a long pipe attached, this ended up working well. That is, until the re-tightening, but more on that when I'm done.
While exploring the old, re-used timing belt & water pump, along with the cheap fiber gasket that was substituted for the quality gasket that came with the new set that was obviously sold on Ebay for a good profit, I decided to do the camshaft/crankshaft seals that were also supposed to be done. Yet another auto parts store rental that was guaranteed to work didn't pan out at all. After some thought on the problem, I came up with the following solution using the cheap, crappy, harmonic balancer puller that actually did work on the crankcase pulley (I may actually buy a better version of this).
This is my first attempt - I didn't have any sockets large enough, so I used the top of a Mag Lite. I was pretty proud of myself when I thought of it and giggled when thinking of posting this triumphant picture, but it didn't work. The narrow end is too narrow and the wide end, while large enough, is beveled in and only caused the seal to slide around and go on crooked. So, don't do it like this.
After a desperate call, some begging, a few tears, and promises of baked goods that I guarantee will be store-bought, my neighbor arrived with a set of very large sockets from Harbor Freight. I will admit to giving anything from HF the hairy eyeball, but these sockets definitely performed as well as the most expensive sockets money can buy for this use:
You'll need 3-4 M6 bolts: 2 for the front, 1 or 2 for the back (more on that later), one nut for each bolt, and 2-3 washers for EACH bolt, large enough in diameter to not go through the Yellow-ish Metal Thingy (YMT) . I thought the stated threads were 1.25, but the stores only sold 1.0, so I got that. Who knew, it worked. At least, I think that is the correct thread pitch. I may have gotten them mixed up. I think the length I got was 3.5". I'm a girl, I really can't tell and it wasn't marked on the bag & I can't remember, so you guys are on your own.
For the front:
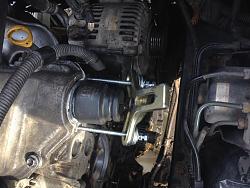
You'll be using the holes on the engine that are normally used to pull the pulley. Using 2 bolts, thread one nut onto each bolt all the way to the head and then put your washers on. You need multiple washers, otherwise one will just bend out of shape. Face the flattest part of the YMT towards the engine and pass a bolt through one arm. Screw into one of the threaded holes on either side of the pulley. Do the same with the other bolt, going through the other threaded hole. Place your giant socket between the seal and the YMT and start snugging up the nuts. Just keep turning each nut a little bit at a time and before you know it, the seal is seated.
For the back:
You are basically doing the same thing, but I found that the bolt furthest away from you gets blocked by the sidewall if it is too long. Mine were, so I cut what I thought was about 1/2" off the end. My neighbor politely stated that it was "sort of" a 1/2" so I'm guessing it as closer to 3/4". That is about as short as you can get without running into trouble. You need these bolts to fit between the engine and wall, clear both the socket being used and the YMT, plus your nut and washers. I ended up removing 2 washers from that bolt. Thankfully, I had a very tough, thick washer that didn't bend like the others. So, in the end you can either buy 1 additional bolt that is a little shorter than the front two (3 total), or you can buy two more the same smaller size (4 total). If you do the single shorter, make sure that you run the nut up onto the long bolt to make the YMT flat before starting.
Crankshaft seal: 1 length of scrap PVC pipe (8-10"?), 1.25 diameter. one spare slip-over joining sleeve for said PVC, 1 rubber mallet. Hand set seal straight, attach joining sleeve to PVC pipe (no glue), slip over crankcase post and firmly place the joining sleeve on the seal; strike gently, firmly, and straight onto exposed end of PVC pipe until the seal is set. Feel the power of a cheap solution.
As for pulling the seals, I chose to purchase the Lisle Camshaft Seal Puller. It was $15 & undoubtedly one of the best, single purpose tools I've bought in a long time. The front pulled out fast and easy, even though it was very old and very brittle. The rear probably would have come out just as easily, but I was bragging about the tool to my neighbor and it almost let me down. The crankcase seal was the easiest. No damage, no fuss.
I will accept no criticisms about this post nor responsibility for doing any of the stupid things with inappropriate tools that I have relayed here. You have been warned.
I do need a little advice as to how to get the stupid belt around the right camshaft pulley. I'm one sprocket off. If I pull really hard, I can get 1/2 sprocket off, but I can't get it to seat. Is this a brute strength issue or am I missing something? Any advice would be greatly appreciated.
Now onto the pictures:
The first is my "let's not break the new windshield we had to get installed 4 months ago" brace. Any longish thing will do, I just happened to have a pitchfork handle that was supposed to be used to repair one a year ago. Placed before the hood strut, this slender model will (hopefully) arrest any wild breaker bar careening towards the glass. It's also useful for chasing away chatty neighbors who don't understand the stress/concentration involved with this type of auto surgery.

Next we have the pulley holder. This is a modified A/C pulley holder, because the local auto stores refuse to rent something appropriate. In fact, this was confidently stated to work as intended. Well, it doesn't. The bolts that come with the unit are too small (you can see one aligned with the handle), so I rustled up some thicker/longer bolts to use instead. With a long pipe attached, this ended up working well. That is, until the re-tightening, but more on that when I'm done.

While exploring the old, re-used timing belt & water pump, along with the cheap fiber gasket that was substituted for the quality gasket that came with the new set that was obviously sold on Ebay for a good profit, I decided to do the camshaft/crankshaft seals that were also supposed to be done. Yet another auto parts store rental that was guaranteed to work didn't pan out at all. After some thought on the problem, I came up with the following solution using the cheap, crappy, harmonic balancer puller that actually did work on the crankcase pulley (I may actually buy a better version of this).
This is my first attempt - I didn't have any sockets large enough, so I used the top of a Mag Lite. I was pretty proud of myself when I thought of it and giggled when thinking of posting this triumphant picture, but it didn't work. The narrow end is too narrow and the wide end, while large enough, is beveled in and only caused the seal to slide around and go on crooked. So, don't do it like this.

After a desperate call, some begging, a few tears, and promises of baked goods that I guarantee will be store-bought, my neighbor arrived with a set of very large sockets from Harbor Freight. I will admit to giving anything from HF the hairy eyeball, but these sockets definitely performed as well as the most expensive sockets money can buy for this use:
You'll need 3-4 M6 bolts: 2 for the front, 1 or 2 for the back (more on that later), one nut for each bolt, and 2-3 washers for EACH bolt, large enough in diameter to not go through the Yellow-ish Metal Thingy (YMT) . I thought the stated threads were 1.25, but the stores only sold 1.0, so I got that. Who knew, it worked. At least, I think that is the correct thread pitch. I may have gotten them mixed up. I think the length I got was 3.5". I'm a girl, I really can't tell and it wasn't marked on the bag & I can't remember, so you guys are on your own.
For the front:

You'll be using the holes on the engine that are normally used to pull the pulley. Using 2 bolts, thread one nut onto each bolt all the way to the head and then put your washers on. You need multiple washers, otherwise one will just bend out of shape. Face the flattest part of the YMT towards the engine and pass a bolt through one arm. Screw into one of the threaded holes on either side of the pulley. Do the same with the other bolt, going through the other threaded hole. Place your giant socket between the seal and the YMT and start snugging up the nuts. Just keep turning each nut a little bit at a time and before you know it, the seal is seated.
For the back:

You are basically doing the same thing, but I found that the bolt furthest away from you gets blocked by the sidewall if it is too long. Mine were, so I cut what I thought was about 1/2" off the end. My neighbor politely stated that it was "sort of" a 1/2" so I'm guessing it as closer to 3/4". That is about as short as you can get without running into trouble. You need these bolts to fit between the engine and wall, clear both the socket being used and the YMT, plus your nut and washers. I ended up removing 2 washers from that bolt. Thankfully, I had a very tough, thick washer that didn't bend like the others. So, in the end you can either buy 1 additional bolt that is a little shorter than the front two (3 total), or you can buy two more the same smaller size (4 total). If you do the single shorter, make sure that you run the nut up onto the long bolt to make the YMT flat before starting.
Crankshaft seal: 1 length of scrap PVC pipe (8-10"?), 1.25 diameter. one spare slip-over joining sleeve for said PVC, 1 rubber mallet. Hand set seal straight, attach joining sleeve to PVC pipe (no glue), slip over crankcase post and firmly place the joining sleeve on the seal; strike gently, firmly, and straight onto exposed end of PVC pipe until the seal is set. Feel the power of a cheap solution.
As for pulling the seals, I chose to purchase the Lisle Camshaft Seal Puller. It was $15 & undoubtedly one of the best, single purpose tools I've bought in a long time. The front pulled out fast and easy, even though it was very old and very brittle. The rear probably would have come out just as easily, but I was bragging about the tool to my neighbor and it almost let me down. The crankcase seal was the easiest. No damage, no fuss.
I will accept no criticisms about this post nor responsibility for doing any of the stupid things with inappropriate tools that I have relayed here. You have been warned.
 10-28-14, 08:52 PM
#3
Moderator

Few Hints;
If your new belt has alignment marks, make sure the arrow points away from the engine, this will make sure the belt is not flipped.
When you say off by half, are you looking straight ahead ... the pulley next to the firewall may not allow a clear line of sight. Service manual tells to remove the cowl.
Line up the mark on the pulley next to the firewall and use a zip tie to lock it down to the pulley.
Then put the belt over the pulley next to the radiator, Take all the slack out get the marks right and put a tip tie.
Then comes the bottom pulley, again take all the slack out between the the top pulley and bottom pulley. All slack should be on the tensioner side.
There is a video in the DIY.
Now a question: Did you change the water pump and if yes, what did you use to remove the studs?
Salim
10-29-14, 04:57 AM
#4
Pole Position
Thread Starter
Salim,
I did remove the cowl, etc. If I lean my head on the edge of the car, I have a dead center view on the pulley mark and the TB case #3 mark behind it, so no possible distortion from a mirror.
The manual said to start with the crankcase pulley and basically go counter-clockwise. The crankcase and radiator side pulley marks line up fine, it's the area between the two camshaft pulleys that is giving me a headache. I tried starting with the firewall side pulley and going clockwise, but then the mark on the radiator side pulley is short by one, and subsequently the crankcase is then off by one.
I think I may be counting the sprockets & belt ridges to see if the factory marking line is off. I'm just not sure it should be this tight between the two pulleys. It didn't feel that tight when removing it.
I'm pretty sure I watched that video before starting, but I'll take a look again in case I missed it in my pre-work research.
Yes, I am replacing the water pump. Maybe I got lucky but the studs came out with an inverse torx bit - I didn't need to use the stud removers, although one of them had previously been removed by this manner (based on the marks on the shaft). One thing I discovered was that I didn't need to remove both studs to get the WP off - just the one closest to the radiator. When that came out, I was able to easily wiggle the lower bracket off. I ended up taking that other stud out to clean & inspect it anyway. It wasn't as easy to remove as the other.
Thanks to everyone for the tips. Has anyone else tried the heating-in-dryer trick? Would that potentially damage the TB or cause it to fail prematurely?
Last edited by thaeleelyr; 10-29-14 at 05:34 AM.
10-29-14, 08:06 AM
#5
Moderator
Due to VVT you may have to torque the the cam over.
Salim
Salim
10-29-14, 08:41 AM
#6
Pole Position
Thread Starter
At the risk of sounding idiotic, what do you mean by that? Turn it one revolution?
Also, I'm using Gates belts (which I've always used without issue). I used to hire someone to put the belts on. When I pulled this off, the factory belt marks were way off, so I used a sharpie to mark the places, only I think I didn't hit that rear (right) camshaft mark dead on. When I compare the new and old belts, the old mark is between where the factory mark is located and one spot closer to the other camshaft. Before now I had just presumed I didn't get it quite right.
I called Gates for some pointers and the tech told me that as long as the camshaft and crankshaft pulleys were lined up to their spots, the camshaft being off it's mark by one wasn't an issue. I don't know what to think of that and I don't know if my previous mechanics had always installed the belt one mark off or not.
So now it's possible the factory marks are off a bit. Has anyone ever counted the belt "valleys" between the two camshaft marks?
Thanks!
10-29-14, 10:49 AM
#7
Moderator
start by having everything at rest.
Lock the firewall side belt and cam with a zip tie at the right mark.
Stretch the belt under/over the roller and on to the cam-gear on the radiator side. Turn the cam 1/2-tooth to force a match with the mark on the belt. Proceed to the next pulley. Let things rest and the cams would move to their normal state. Confirm with the "MUST" below.
The above is safe with OEM belt with good marking.
Zip tie the belt to the cam on the radiator side.
{you may choose to work from counter clockwise}
MUST: when the tensioner is engaged, turn the crank pulley 2 or 4 or 6 rotations by hand and make sure the cams and pulley match the marks on the block. Note: the marking on the belt will not lign up, so ignore them.[I dont know the multiple of rotations that the belt would need to match the markings on the belt.]
Salim
Last edited by salimshah; 10-29-14 at 10:53 AM.
Trending Topics
10-29-14, 11:13 AM
#8
Pole Position
Thread Starter
Hi Salim,
Thanks for that. I do have a new problem. I started at the firewall cam and zip tied it, went to the front and tried to put it onto the radiator cam and the firewall cam slipped about 20 degrees forward (it's at about the 1 o'clock postion) .
Do I use the pulley wrench to back the pulley (counter-clockwise) to it's correct position or do I turn it completely around clockwise to the correct position? I can't find any specific information on this problem. Did I just break my engine? Should I start crying now or later?
I really appreciate the help, I'm nearly in full-on panic.
Thanks
Last edited by thaeleelyr; 10-29-14 at 11:16 AM.
10-29-14, 12:48 PM
#9
Moderator
Nothing is broken. As long as you do not apply excessive force.
Just turn in back gently by hand. You can try to go forward and spin it back to TDC but watch out for valve to piston contact (which can happen in a VVT). That is why I said turn by hand. For 3 cylinder on one cam I doubt that it will happen but if there is resistance then back off.
Salim
Just turn in back gently by hand. You can try to go forward and spin it back to TDC but watch out for valve to piston contact (which can happen in a VVT). That is why I said turn by hand. For 3 cylinder on one cam I doubt that it will happen but if there is resistance then back off.
Salim
10-29-14, 02:31 PM
#10
Pole Position
Thread Starter
I've got the belt on. The rear cam is off about 1/2 sprocket, maybe a little more. I'm letting it sit for the night so I can recover and get a fresh look at it in the morning. I know you said to make the front be the one that is 1/2 off, but when I got down to it, I was afraid of moving the crankshaft out of alignment.Will that make a difference or will they relax into their appropriate positions?
If they don't relax into position, should I try to force the pulley back while holding the front pulley?
Thanks!
If they don't relax into position, should I try to force the pulley back while holding the front pulley?
Thanks!
10-29-14, 03:31 PM
#12
Pole Position
Thread Starter
I took the tensioner off because I bought a new one. Since I was doing this whole mess, I thought it a good time to change that out as well. I have not reinstalled the tensioner yet. I'm going to see if things get moved/settled tomorrow.
10-29-14, 06:04 PM
#13
Moderator
If the crank and the cam next to radiator are in good position, then you can nudge the cam near the firewall .... again I am assuming your belt is right and the top roller is of the right diameter. Since you are having that much problem, you can try matching old with the new.
It should not be difficult and things should work with ease.
Salim
It should not be difficult and things should work with ease.
Salim
10-29-14, 08:14 PM
#14
Driver School Candidate
I agree with salimshah. I would recommend to compare the old and new belt. And even count the teeth. I understand this is laborious. I have done 4 TB changes on that engine, perhaps not as many as Salimshah. I have never had to take the cam sprockets off though so the difficulty you are having is puzzling. It is possible you did not get the right belt. Stranger things have happened for sure and it is not likely, but possible.
I turn the sprockets to the TDC marks and then mark with white paint the sprocket and the belt and crank and belt. I then count the teeth from left sprocket to right sprocket then right sprocket to crank twice. I then mark the new belt the same way after counting twice. Sure this is a little conservative, but being one tooth off can waste a day for sure.
Keep giving us clues and pics. I will help all I can. Thanks
10-29-14, 09:03 PM
#15
Moderator
No, I have not done many ,,, I can still count on one hand < 5. Getting ready to do 2 .. RX and GS.
People can call me Lexus/Toyota begot, as I try to stick to OEM as that eliminates the possibility of wrong parts.
Salim
People can call me Lexus/Toyota begot, as I try to stick to OEM as that eliminates the possibility of wrong parts.
Salim