
 12-15-14, 04:42 PM
Last edit by: IB Advertising
See related guides and technical advice from our community experts:
Browse all: Exterior Guides
- How to Replace Your Car Window
Step by step instructions for do-it-yourself repairs
- How to Replace Your Power Window Actuator
Step by step instructions for do-it-yourself repairs
Browse all: Exterior Guides

RX300: DIY door lock actuator fix write-up
07-28-11, 12:55 AM
#1
Rookie
Thread Starter

FIRST GEN RX300 (1999-2003) DOOR LOCK ACTUATOR FIX!!!
These instructions will probably be applicable to most RX's with just a few differences, but specific for the FIRST GEN RX300's.
All these automatic door lock actuator motors go bad eventually, so here is a simple write-up:
Mechanical difficulty: 2|5 (5 being the hardest).
Time: 2 hours for first time.
TOTAL COST: $20.00
(Make sure windows are fully up).
Step 1: Buy a MABUCHI FC280PC-22125 on eBay for about $8.00 shipped. Make sure it's a GENUINE MABUCHI motor (needs to be ROUND SHAFT 10mm LONG). Try to buy from a USA based seller, otherwise could take up to a month to get it.
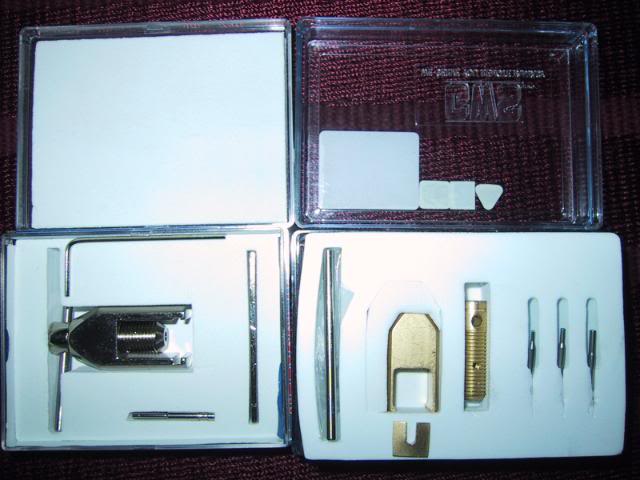
Step 2: Buy a Walkera Universal Pinion Gear Puller on eBay for about $12.00 shipped. Again try to buy from a USA based seller. Stay away from the BRASS PULLER (good for one time use then breaks). Get the metal (chrome) puller, great little tool and makes this soooo much easier. The collars are often brittle and break if not using the gear puller.
Step 3: Buy a T-30 TORX bit/socket to attach to a ratchet.
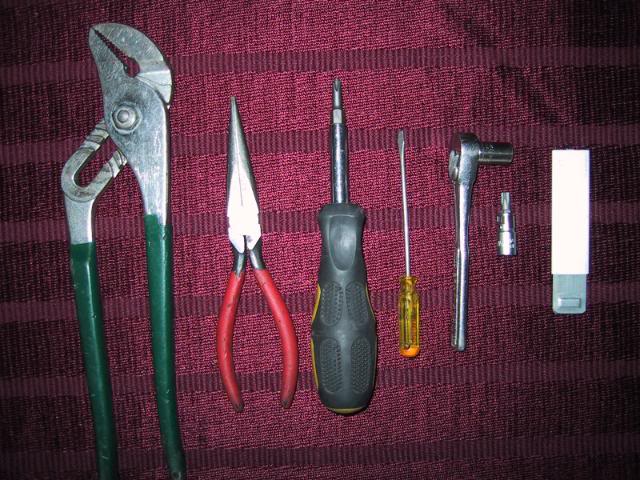
Step 4: Get tools ready. Channel locks, Needle nose pliers, Universal screwdriver, Small flat-head screwdriver, Small ratchet, 10MM socket, T-30 TORX bit with socket, Box cutter or rugged exacto knife.
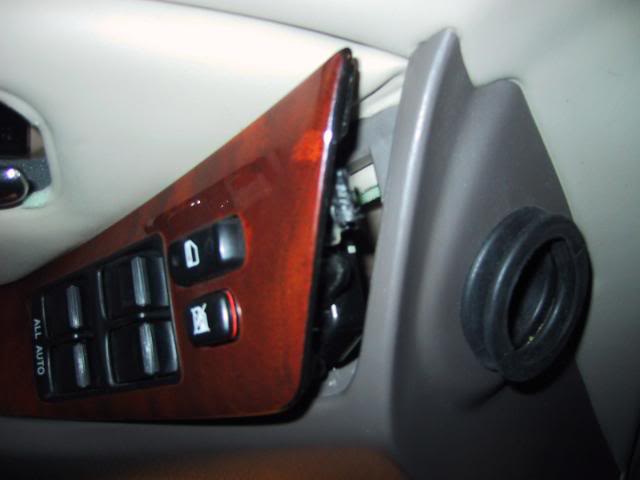
Step 5: Removal of the wood door lock/window panel. This was the hardest for me, b/c I didn't want to break or chip any of the wood panel. There are a few write-ups for this but I never found a picture. So, get your small flat-head screwdriver and wedge it through the crack on the top inner portion of the wood door lock/window panel. Gently pry this side out, there is a clip in there that is a PITA but keep trying, it will eventually give way. Then pull the top part straight up then out towards the windshield. Disconnect the power wire from the panel. Remove the hidden screw, after removal.
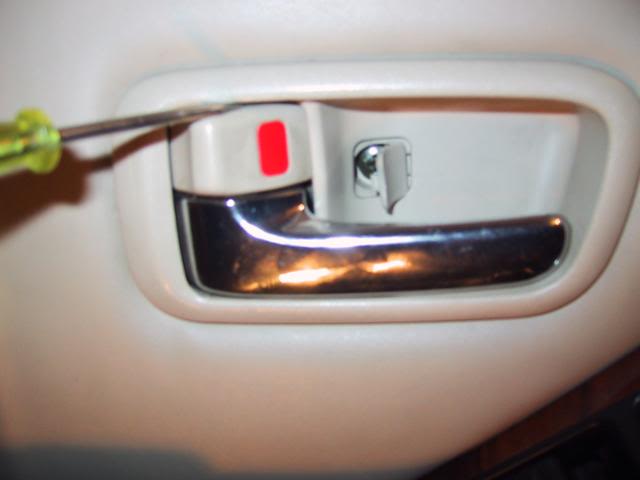
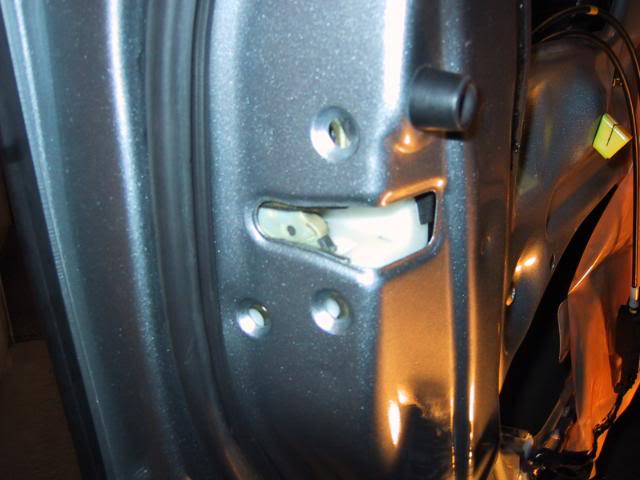
Step 6: Removal of the door handle (really easy). Remove the small philips head screw under the plastic cover. Get your small flat-head screwdriver again and wedge it between the trim and actual lock, this will pry off the door handle shroud.
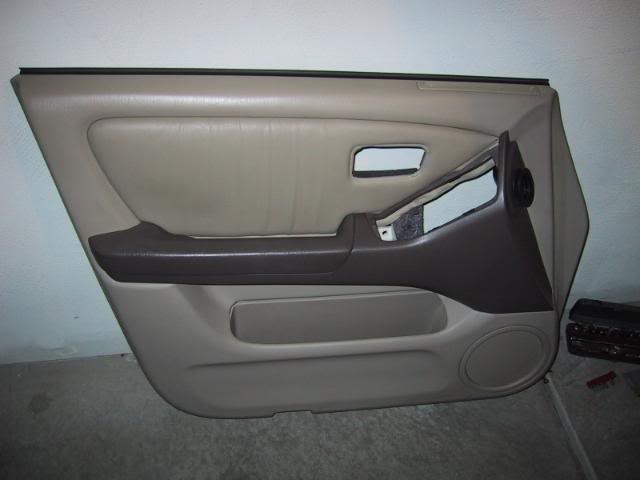
Step 7: Remove all the push in fasteners under the door panel and on the side as well. They are easy to remove, just pry up the sides (pop out). Also, remove all screws that are on the door panel.
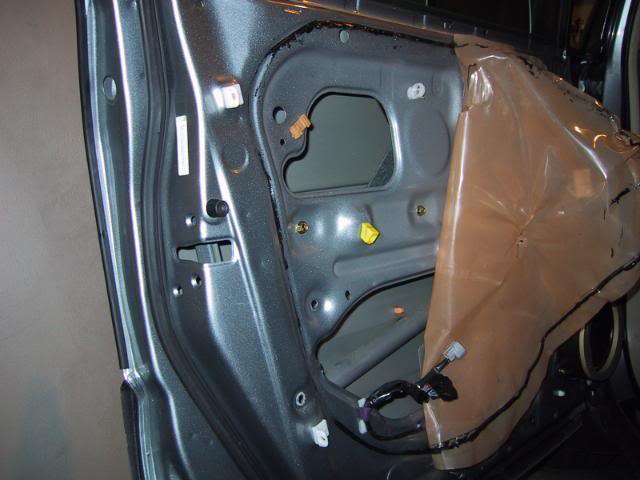
Step 8: Remove the door panel. Pull up on the door panel, don't have to remove entry light on bottom of the door. Just have to disconnect the power wire while removing door panel.
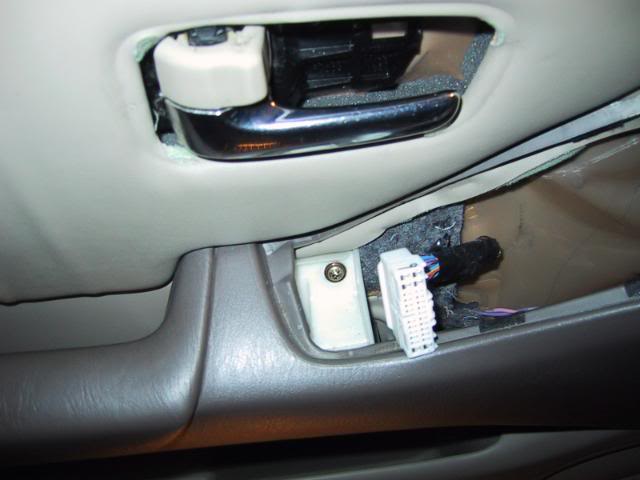
Step 9: Remove the (3) TORX bolts from the side of the door. Frees up the lock actuator.
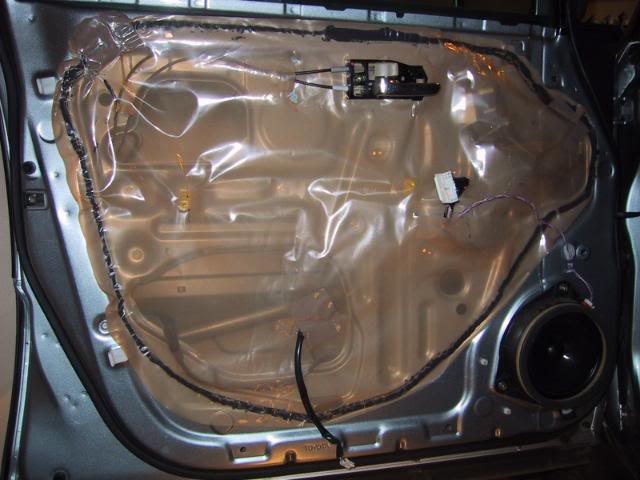
Step 10: Peel back half of the plastic dirt cover. Remove the bolts keeping the window frame arm in place, this will allow you a lot more room to work. The window frame arm will just hang there and is easy to move around.
Step 11: Now you will have to reach up into the corner inner part of the door. There are (2) plastic clips that are easy to snap free of the metal lock actuator rods. Unplug the power cord to the actuator. Once the actuator is free, maneuver the lock actuator out through the big lower hole.
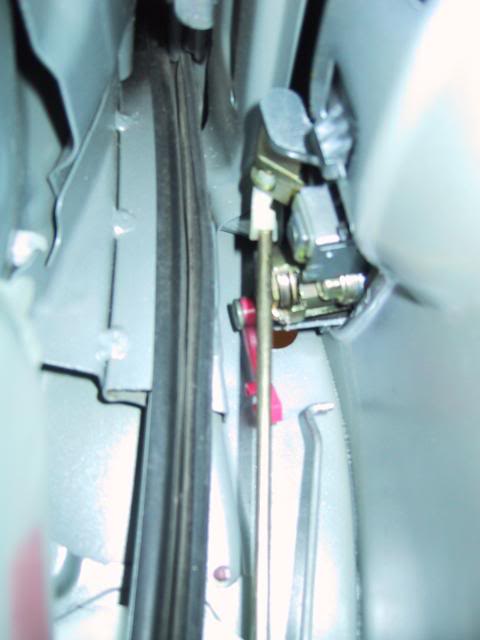
Step 12: Don't remove the cables from the lock actuator or lock handle!!! Much easier to just pull the handle with the (2) cables through the hole in the plastic dirt cover, than trying to remove the cables (easily breakable). Remove the bolts holding the door lock handle to the door frame.
Step 13: Remove the (4) screws keeping the metal bracket attached to the lock actuator. Now it is easy to maneuver the cable out of the plastic part (like a bicycle brake).

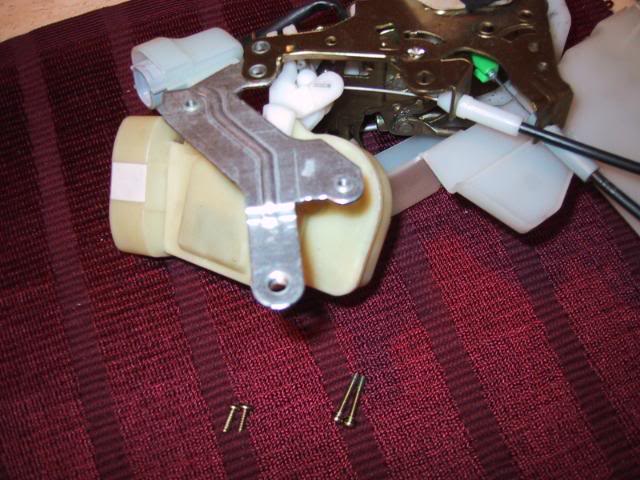
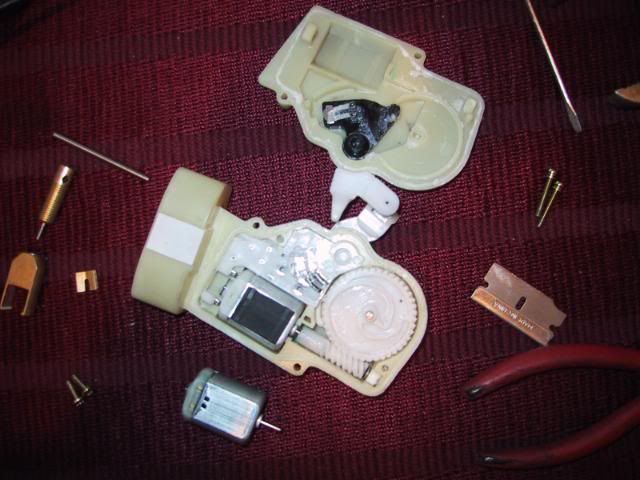
Step 14: Get your box cutter or small bladed rugged exacto knife. Now gently slide it in between the crack where you can see the two halves are connected. Don't go too deep, just cut along the seam until you can feel the connection ease apart. This will take some time going around a few times, take your time otherwise you'll break the plastic. Once you feel the depth is the same all around with the blade, gently pry the plastic halves apart in different places.
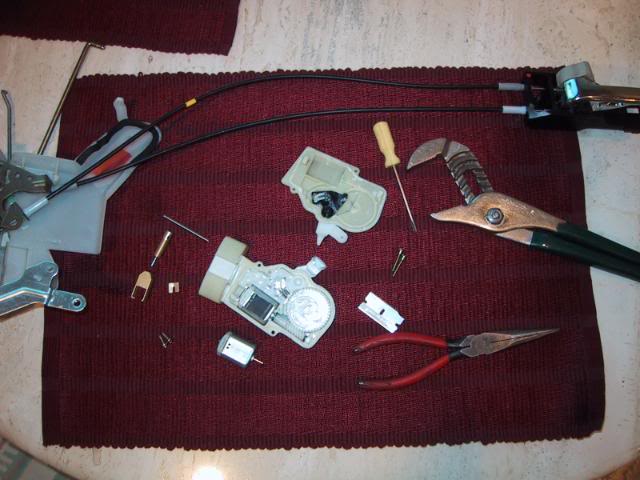
Step 15: Once the cover is off you can pry out the motor with your small screwdriver. This is where you use the PINION GEAR PULLER to remove the gear from the old motor and then squeeze it on the new motor with the channel locks. I transferred over the rubber pad on top of the old motor to the new one.
Step 16: Put the cover back on the actuator with the screws you removed (super glue optional but not necessary) to keep the cover on. Slide the cable back in (bicycle brake).
Step 17: Maneuver the actuator in through the big hole, door lock handle first. Then clip the (2) rods into the outer door handle clips. Put the (3) TORX bolts back in the door actuator, then the bolts going into the window frame rail. Bolts holding the door lock handle back in.
Step 18: Push the plastic dirt cover back into the sticky tar.
Step 19: Reconnect the entry light power wire and slide the door panel back on from the top. Reconnect the wood window/door lock panel wire and slide it back in from the top. Pull out the door handle and slide the trim back on, put screw back in.
Step 20: Put all the plastic fasteners back in the door panel and screws.
Should be good to go now. Just like OEM!!! Should last as long if not longer than original. Of course the driver's side door is going to wear out the fastest b/c of the power lock function of locking and unlocking via the remote control key.
THANKS especially to JiBBel and CODE58 for the info on installing mine last year.
These instructions will probably be applicable to most RX's with just a few differences, but specific for the FIRST GEN RX300's.
All these automatic door lock actuator motors go bad eventually, so here is a simple write-up:
Mechanical difficulty: 2|5 (5 being the hardest).
Time: 2 hours for first time.
TOTAL COST: $20.00
(Make sure windows are fully up).
Step 1: Buy a MABUCHI FC280PC-22125 on eBay for about $8.00 shipped. Make sure it's a GENUINE MABUCHI motor (needs to be ROUND SHAFT 10mm LONG). Try to buy from a USA based seller, otherwise could take up to a month to get it.
Step 2: Buy a Walkera Universal Pinion Gear Puller on eBay for about $12.00 shipped. Again try to buy from a USA based seller. Stay away from the BRASS PULLER (good for one time use then breaks). Get the metal (chrome) puller, great little tool and makes this soooo much easier. The collars are often brittle and break if not using the gear puller.
Step 3: Buy a T-30 TORX bit/socket to attach to a ratchet.
Step 4: Get tools ready. Channel locks, Needle nose pliers, Universal screwdriver, Small flat-head screwdriver, Small ratchet, 10MM socket, T-30 TORX bit with socket, Box cutter or rugged exacto knife.
Step 5: Removal of the wood door lock/window panel. This was the hardest for me, b/c I didn't want to break or chip any of the wood panel. There are a few write-ups for this but I never found a picture. So, get your small flat-head screwdriver and wedge it through the crack on the top inner portion of the wood door lock/window panel. Gently pry this side out, there is a clip in there that is a PITA but keep trying, it will eventually give way. Then pull the top part straight up then out towards the windshield. Disconnect the power wire from the panel. Remove the hidden screw, after removal.
Step 6: Removal of the door handle (really easy). Remove the small philips head screw under the plastic cover. Get your small flat-head screwdriver again and wedge it between the trim and actual lock, this will pry off the door handle shroud.
Step 7: Remove all the push in fasteners under the door panel and on the side as well. They are easy to remove, just pry up the sides (pop out). Also, remove all screws that are on the door panel.
Step 8: Remove the door panel. Pull up on the door panel, don't have to remove entry light on bottom of the door. Just have to disconnect the power wire while removing door panel.
Step 9: Remove the (3) TORX bolts from the side of the door. Frees up the lock actuator.
Step 10: Peel back half of the plastic dirt cover. Remove the bolts keeping the window frame arm in place, this will allow you a lot more room to work. The window frame arm will just hang there and is easy to move around.
Step 11: Now you will have to reach up into the corner inner part of the door. There are (2) plastic clips that are easy to snap free of the metal lock actuator rods. Unplug the power cord to the actuator. Once the actuator is free, maneuver the lock actuator out through the big lower hole.
Step 12: Don't remove the cables from the lock actuator or lock handle!!! Much easier to just pull the handle with the (2) cables through the hole in the plastic dirt cover, than trying to remove the cables (easily breakable). Remove the bolts holding the door lock handle to the door frame.
Step 13: Remove the (4) screws keeping the metal bracket attached to the lock actuator. Now it is easy to maneuver the cable out of the plastic part (like a bicycle brake).
Step 14: Get your box cutter or small bladed rugged exacto knife. Now gently slide it in between the crack where you can see the two halves are connected. Don't go too deep, just cut along the seam until you can feel the connection ease apart. This will take some time going around a few times, take your time otherwise you'll break the plastic. Once you feel the depth is the same all around with the blade, gently pry the plastic halves apart in different places.
Step 15: Once the cover is off you can pry out the motor with your small screwdriver. This is where you use the PINION GEAR PULLER to remove the gear from the old motor and then squeeze it on the new motor with the channel locks. I transferred over the rubber pad on top of the old motor to the new one.
Step 16: Put the cover back on the actuator with the screws you removed (super glue optional but not necessary) to keep the cover on. Slide the cable back in (bicycle brake).
Step 17: Maneuver the actuator in through the big hole, door lock handle first. Then clip the (2) rods into the outer door handle clips. Put the (3) TORX bolts back in the door actuator, then the bolts going into the window frame rail. Bolts holding the door lock handle back in.
Step 18: Push the plastic dirt cover back into the sticky tar.
Step 19: Reconnect the entry light power wire and slide the door panel back on from the top. Reconnect the wood window/door lock panel wire and slide it back in from the top. Pull out the door handle and slide the trim back on, put screw back in.
Step 20: Put all the plastic fasteners back in the door panel and screws.
Should be good to go now. Just like OEM!!! Should last as long if not longer than original. Of course the driver's side door is going to wear out the fastest b/c of the power lock function of locking and unlocking via the remote control key.
THANKS especially to JiBBel and CODE58 for the info on installing mine last year.
Last edited by 2002RX300; 07-30-15 at 12:59 AM. Reason: Appropriate motor shaft and "GENUINE MABUCHI"

The following users liked this post:
Gduerson (03-10-24)
07-28-11, 07:50 AM
#4
Moderator

Please add a link to the DIY sticky.
I would also suggest to drive a day or two without the door panel attached to test out the mechanism.
Gear puller is nice, but not necessary. One can tap off the gear by using a old drill bit.
For completeness sake please add
* Disconnect battery. [I had the power on and window started moving on me but that is another story].
* Measure the distance from motor bottom to the top of the gear before you pull it off. As you tap the new gear on the new motor, you need to match it to the measurement you made.
Lastly I would say it is 3.5/5 skill level. Keep in mind the task was relatively easy for your skill level. We need to bring it to the the level of an average DIYer.
Great work.
Salim
Last edited by salimshah; 07-28-11 at 08:06 AM.


Trending Topics
 08-08-11, 02:46 PM
#9
Question...
In step 15 you state
What does the gear look like? Is it the small pin sticking out of the rubber pad? Or the longer pin sticking out of the metal side? (or are they the same?)
Also, you mentioned transferring over the rubber pad. How did you remove this?
BTW - I purchased everything you mentioned above.
In step 15 you state
This is where you use the PINION GEAR PULLER to remove the gear from the old motor and then squeeze it on the new motor with the channel locks. I transferred over the rubber pad on top of the old motor to the new one.
Also, you mentioned transferring over the rubber pad. How did you remove this?
BTW - I purchased everything you mentioned above.
Last edited by SethP; 08-08-11 at 02:50 PM.
08-08-11, 03:12 PM
#10
Moderator
Question...
In step 15 you state
What does the gear look like? Is it the small pin sticking out of the rubber pad? Or the longer pin sticking out of the metal side? (or are they the same?)
Also, you mentioned transferring over the rubber pad. How did you remove this?
BTW - I purchased everything you mentioned above.
In step 15 you state
What does the gear look like? Is it the small pin sticking out of the rubber pad? Or the longer pin sticking out of the metal side? (or are they the same?)
Also, you mentioned transferring over the rubber pad. How did you remove this?
BTW - I purchased everything you mentioned above.
It is used to pull off the pinion gear from the motor shaft. The replacement motor does not have the pinion gear on its shaft.
Picture between Step1 and Step2 shows the two motors. One has the white nylon gear on the shaft of the motor and the other does not.
Salim
08-08-11, 06:32 PM
#11
I'm going through this DIY now and holy crap cutting my actuator case in half is taking forever.... i've been working on it for a couple hours now...
Also a tip for those who do this in the future. In Step 11 it mentions pulling the rods out of the plastic clips... The red clip is easy enough, the white one stumped me for at least 10 minutes... I eventually figured it out. You actually lift the clip up, you don't pop it out of the plastic. It's like a doggy door setup. So it lifted from bottom to top, from there it slides right out. Hopefully this helps someone.
Also a tip for those who do this in the future. In Step 11 it mentions pulling the rods out of the plastic clips... The red clip is easy enough, the white one stumped me for at least 10 minutes... I eventually figured it out. You actually lift the clip up, you don't pop it out of the plastic. It's like a doggy door setup. So it lifted from bottom to top, from there it slides right out. Hopefully this helps someone.
08-08-11, 08:46 PM
#12
Moderator
If you have dremmel or similar tool it helps. Vibrating saw tool works good. My last choice would be utility knife or exacto knife.
Take couple of pictures as you separate the lock from the door latch. There is a spin and a twist action.
Salim
Take couple of pictures as you separate the lock from the door latch. There is a spin and a twist action.
Salim
08-09-11, 12:51 AM
#13
Seth, maybe your blade isn't sharp enough. I cut 4 of them apart (3 door and the deck lock) and didn't have a lot of problem with any of them. They didn't just "pop" apart, they didn't always stay right on the seam all the way around, but didn't vary much. When I Super Glued them back together, they fit like a glove, slight deviations and all. I would suggest not using anything that takes "meat" out because they need to fit just like they did before. Meaning a saw or Dremel because they would both take material out and then possibly fit a little to tight when glued back together.
08-09-11, 04:29 AM
#14
Moderator
There are some places where the plastic would separate without much effort and then some areas where it would not. My tool of choice is the roto-zip (just because I have it) and for cutting I used those thin sandpaper discs 3/4" dia and 1/16" thick. I opted to use the screw to hold things together and applied hot glue to seal it. Not as robust as super glue.
I am not too good with utility knife -exacto. One has to use the tools one is most comfortable with.
If you are not as careful as code and are like me, and take too much meat (plastic) out, use toothpicks as a stand-off for the gap. Put hot-glue to bridge the gap and then pull the stand-offs out and seal the thing.
Salim
08-09-11, 05:03 PM
#15
Using the dremel worked like a charm. Now I'm trying to figure out how to use the gear puller.
Anyone have any tips for how to get the gear out, or what the gear even looks like?
Anyone have any tips for how to get the gear out, or what the gear even looks like?
