DIY IACV clean picture write-up
 06-01-08, 10:20 AM
#1
Lexus Test Driver
Thread Starter
First off I'd like to thank Ron (Lexmex), our moderator here in the RX300 forums, for guiding me through this and many other projects. He is a goldmine of information for maintenance and modifications on our vehicles.
The Idle Air Control Valve, or IACV which I will be referring to it as, is very commonly clogged with carbon/dirt deposits and overtime becomes less efficient and unable to do it's job as controlling air flow to the engine during idle (butterfly valves are closed so it redirects air). With that said, the common symptoms are rough turnover from cranking to idle, having to throttle lightly to stablize the engine, and even not being able to idle the car for periods of time.
I'll try my best to make sense and walk everyone through how to simply clean the IACV and if anyone as questions feel free to ask, I'll answer to the best of my ability.
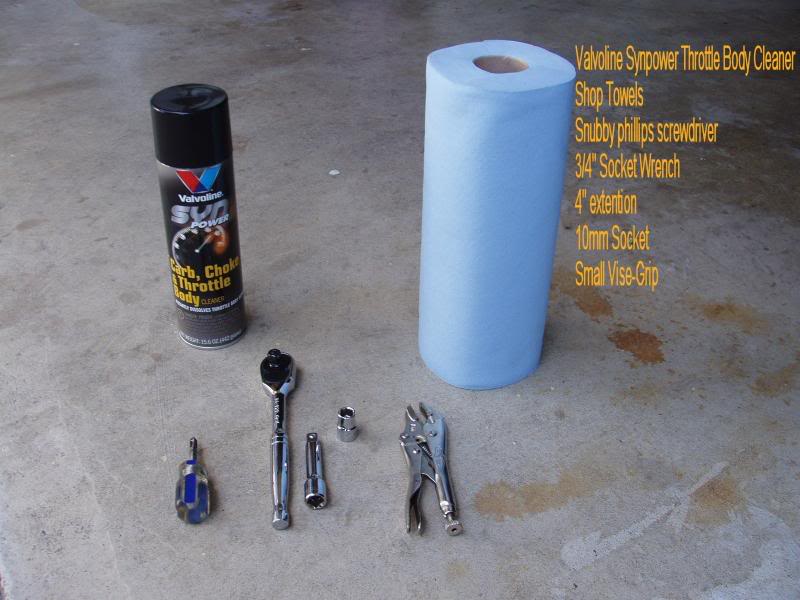
First thing's first, gather the proper arsenal for any battle, what isn't pictured here is safety glasses which everyone should wear, I'm wearing mine as I took this picture.
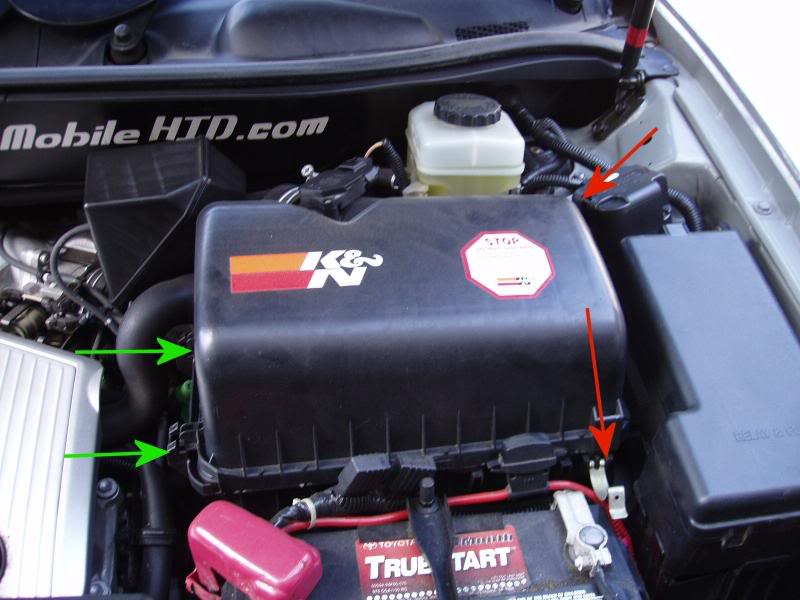
Pop the hood, and remove the airbox lid. The red arrows are pointing to two metal clamps which pop off, and the green arrows refer to two plastic pieces which you slide to the right (direction of the arrows) to remove the lid.
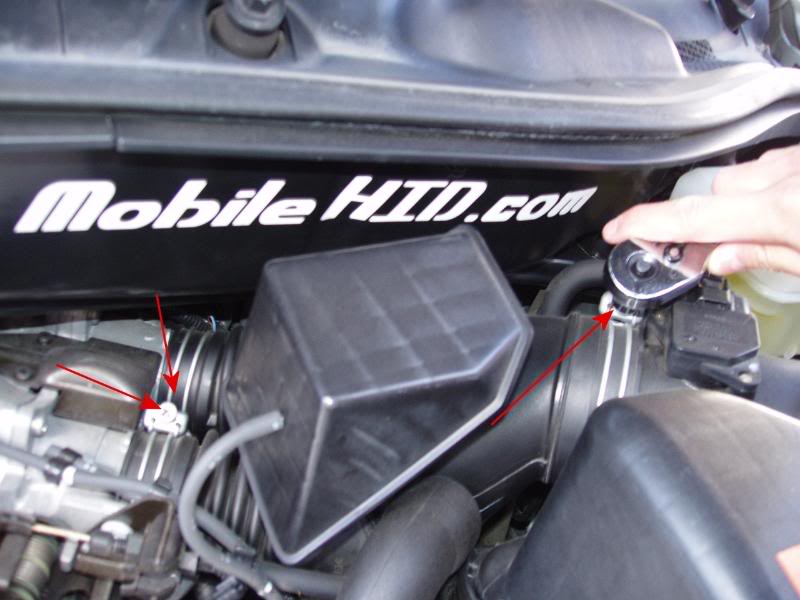
Next, are three 10mm screws which are also hexes. Since they are I chose to go the socket wrench with 10mm socket to loosen these. They do not have to come off just loose enough for you to remove the hoses from the throttle body. The first screw I'm shown removing in the picture removes the airbox lid from the hose, the second and third screws in the picture remove this hose from the throttle body, when everything is loose just pull and move out of the way of the throttle body.
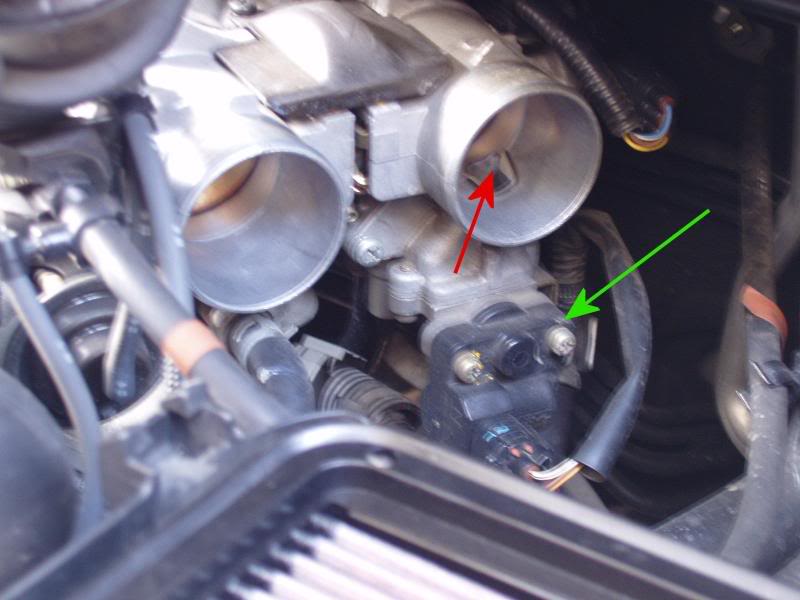
Now here is a picture of your exposed throttle body. The 1MZ-FE in our RX300's have two, the right (Closer to firewall) of which contains the IACV. It's the black motor outlined by my green arrow. The red arrow is where air is redirected during idle times and where most of the deposits build up and mess up the idling.
Unplug the wire leading to the motor, it's just a clip-off. This part was fairly tough if you're impatient, you need to remove the two bronze screws but they are extremely soft and the Lexus/Toyota techs have overtorqued it. You may work at it with your snub screwdriver but if ***** hits the fan then get yourself a small vise-grip, clamp on the head and twist. Should break the seal here. Be CAREFUL as these screws are soft, be patient.
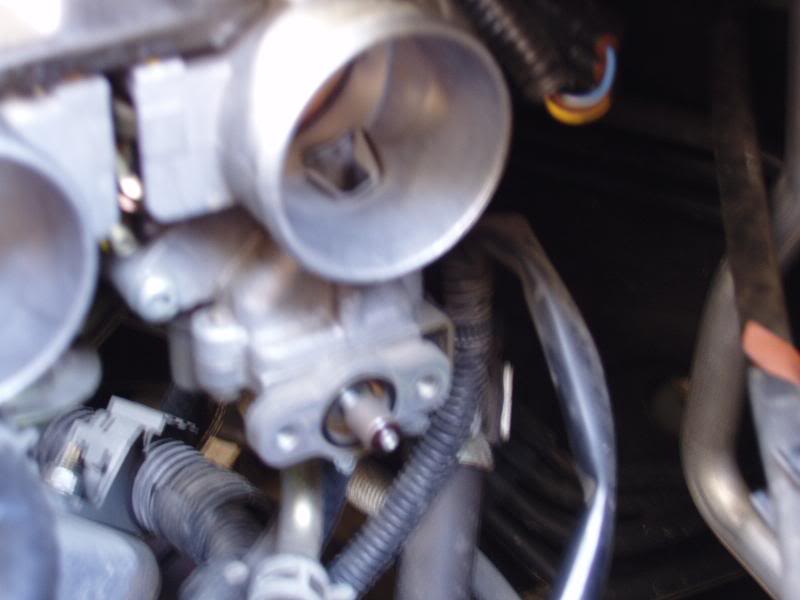
Once removed this is what shows, the bottom is a lever that rotates to open/close the IACV. Try rotating it, if it is sticky then this is a sign of deposits clogging it up, not allowing it to open/close freely causes the idling problem.
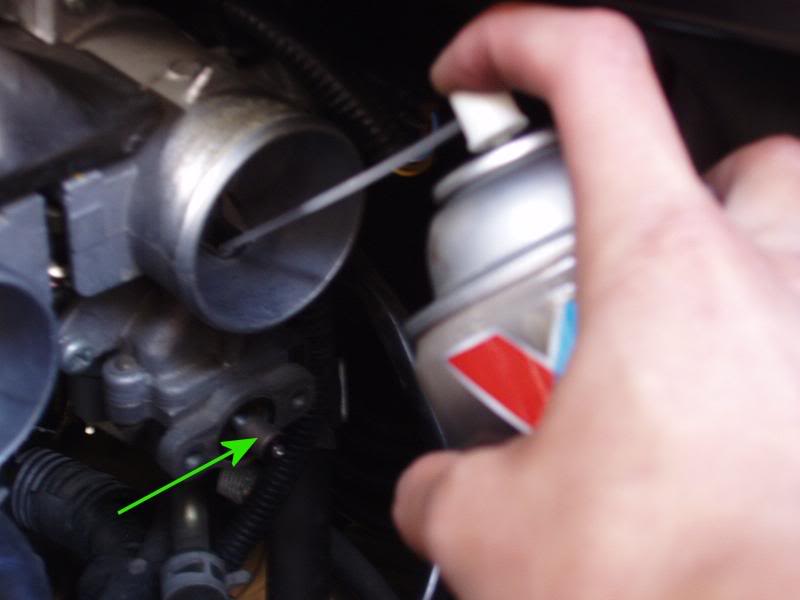
Here you want to take your can of throttle body cleaner, spray into the valve opening and use your other free hand (not shown as I was taking the picture) to rotate the bottom part. Once you can rotate the bottom lever without any resistance your IACV should be fine. Take some extra time to continue to clean the butterfly plates and use a few Q-TIPS to clean the area leading into the IACV.
As stated before, be careful when putting the screws back on. Re-clip the wire to the motor. Take some time to carefully put the intake hoses back onto the throttle body, tighten the screws and put the airbox lid back in place.
After you double-check everything make sure that there is no equipment/tools left lying in the engine bay and fire her up. You may need to give a little throttle on your first start-up and she may choke on it a little but then it should smoothen out.
Congratulations and go wash your hands, unless you wore gloves.
The Idle Air Control Valve, or IACV which I will be referring to it as, is very commonly clogged with carbon/dirt deposits and overtime becomes less efficient and unable to do it's job as controlling air flow to the engine during idle (butterfly valves are closed so it redirects air). With that said, the common symptoms are rough turnover from cranking to idle, having to throttle lightly to stablize the engine, and even not being able to idle the car for periods of time.
I'll try my best to make sense and walk everyone through how to simply clean the IACV and if anyone as questions feel free to ask, I'll answer to the best of my ability.
First thing's first, gather the proper arsenal for any battle, what isn't pictured here is safety glasses which everyone should wear, I'm wearing mine as I took this picture.
Pop the hood, and remove the airbox lid. The red arrows are pointing to two metal clamps which pop off, and the green arrows refer to two plastic pieces which you slide to the right (direction of the arrows) to remove the lid.
Next, are three 10mm screws which are also hexes. Since they are I chose to go the socket wrench with 10mm socket to loosen these. They do not have to come off just loose enough for you to remove the hoses from the throttle body. The first screw I'm shown removing in the picture removes the airbox lid from the hose, the second and third screws in the picture remove this hose from the throttle body, when everything is loose just pull and move out of the way of the throttle body.
Now here is a picture of your exposed throttle body. The 1MZ-FE in our RX300's have two, the right (Closer to firewall) of which contains the IACV. It's the black motor outlined by my green arrow. The red arrow is where air is redirected during idle times and where most of the deposits build up and mess up the idling.
Unplug the wire leading to the motor, it's just a clip-off. This part was fairly tough if you're impatient, you need to remove the two bronze screws but they are extremely soft and the Lexus/Toyota techs have overtorqued it. You may work at it with your snub screwdriver but if ***** hits the fan then get yourself a small vise-grip, clamp on the head and twist. Should break the seal here. Be CAREFUL as these screws are soft, be patient.
Once removed this is what shows, the bottom is a lever that rotates to open/close the IACV. Try rotating it, if it is sticky then this is a sign of deposits clogging it up, not allowing it to open/close freely causes the idling problem.
Here you want to take your can of throttle body cleaner, spray into the valve opening and use your other free hand (not shown as I was taking the picture) to rotate the bottom part. Once you can rotate the bottom lever without any resistance your IACV should be fine. Take some extra time to continue to clean the butterfly plates and use a few Q-TIPS to clean the area leading into the IACV.
As stated before, be careful when putting the screws back on. Re-clip the wire to the motor. Take some time to carefully put the intake hoses back onto the throttle body, tighten the screws and put the airbox lid back in place.
After you double-check everything make sure that there is no equipment/tools left lying in the engine bay and fire her up. You may need to give a little throttle on your first start-up and she may choke on it a little but then it should smoothen out.
Congratulations and go wash your hands, unless you wore gloves.

 I should've censored the decals in my engine bay. I assume we're all fine with it though.
06-01-08, 03:47 PM
I should've censored the decals in my engine bay. I assume we're all fine with it though.
06-01-08, 03:47 PM
#3
 06-01-08, 05:44 PM
#4
Super Moderator
For those of you in E10 (Ethanol 10%) states, I highly recommend doing what our colleague tcheung87 has demonstrated. Already have some issues with my IACV due to this gasoline being used here in Florida.
 06-10-08, 05:03 AM
#6
Super Moderator
06-10-08, 09:29 AM
#7
Moderator

For folks who have not done this, the RX would not just fire-up like normal. It may take longer start time and a bit rough right after the process. Once things burn off, it should be fine.
Another tip from an other forum is ... tap the screw with the phillips screw driver/head in them. This helps break the bond in the threads and seats the screw driver head better. Just dont use the sledge hammer.
Salim
Another tip from an other forum is ... tap the screw with the phillips screw driver/head in them. This helps break the bond in the threads and seats the screw driver head better. Just dont use the sledge hammer.
Salim
Trending Topics
06-10-08, 10:10 AM
#8
Lexus Champion

For folks who have not done this, the RX would not just fire-up like normal. It may take longer start time and a bit rough right after the process. Once things burn off, it should be fine.
Another tip from an other forum is ... tap the screw with the phillips screw driver/head in them. This helps break the bond in the threads and seats the screw driver head better. Just dont use the sledge hammer.
Salim
Another tip from an other forum is ... tap the screw with the phillips screw driver/head in them. This helps break the bond in the threads and seats the screw driver head better. Just dont use the sledge hammer.
Salim
Not to mention it smoked like an old forklift going down the road for a few miles.
Last edited by lexus114; 09-24-08 at 11:22 AM.
06-11-08, 07:19 AM
#9
Super Moderator
That can happen. I screwed up a coil about 3 years ago after adding too much carb cleaner through the hole. That's when I had to get that Camry coil and modify it until I could get an RX coil down from the US.
09-30-08, 05:15 PM
#10
Moderator
iTrader: (3)
Join Date: Jun 2007
Location: West Virginia soon to be Virginia
Posts: 819
Likes: 0
Received 1 Like
on
1 Post
thanks tcheung87 for posting a bad *** DIY
i just did this one as soon as i got home from work and it seems to have worked really well, the real test will be tomorrow in the infamous stop n go traffic of NoVA, was gonna do the MAF sensor cleaning too but right before i started putting the hoses on a torrential downpour happened with nickel sized hail so i just pulled the laptop from under the hood and threw it in the car hurried up and got my *** indoors lol, ordered a pizza and pulled up a fosters big boy and called it a day lol, thanks again
i just did this one as soon as i got home from work and it seems to have worked really well, the real test will be tomorrow in the infamous stop n go traffic of NoVA, was gonna do the MAF sensor cleaning too but right before i started putting the hoses on a torrential downpour happened with nickel sized hail so i just pulled the laptop from under the hood and threw it in the car hurried up and got my *** indoors lol, ordered a pizza and pulled up a fosters big boy and called it a day lol, thanks again
 12-02-08, 08:23 AM
#13
Driver School Candidate

I would not clean the IACV without removing the lower hose as well. All of the cleaner is going to drain into that hose and then end up in your intake. Ahhh the smoke... I estimate I used about 4 to 6 ounces of product to clean mine. Oh and my PCV was completely inoperable. No wonder it idled like crap. I should know better.
The following users liked this post:
siddfynch (12-01-17)
12-02-08, 08:52 AM
#14
Super Moderator
I would not clean the IACV without removing the lower hose as well. All of the cleaner is going to drain into that hose and then end up in your intake. Ahhh the smoke... I estimate I used about 4 to 6 ounces of product to clean mine. Oh and my PCV was completely inoperable. No wonder it idled like crap. I should know better.