When you click on links to various merchants on this site and make a purchase, this can result in this site earning a commission. Affiliate programs and affiliations include, but are not limited to, the eBay Partner Network.
There may already be a 330 writeup, but here's another one with some switch autopsy pictures. I tried an inferior aftermarket switch that would not fit, so I have pictures of it versus the latest update of the oem toyota part.
I would call this job a 2/10 difficulty if you already own the tool (14mm stubby open end wrench). If you don't already own that wrench, it's a 4/10 if it is your first time in such a tight spot. It took me 15 minutes the first time (with the Wells switch) , and 8 minutes the second time with the Toyota part.
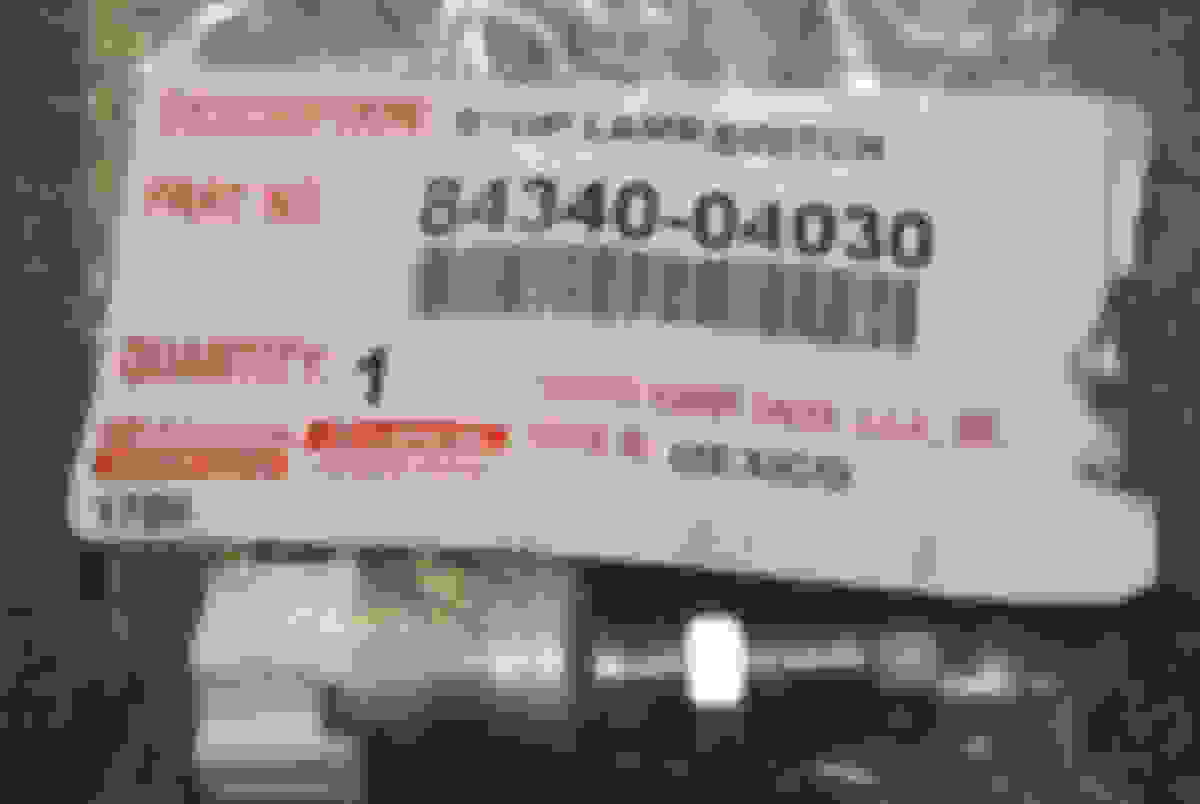
1. Acquire the Switch 84340-04030 and gather your tools: 14 mm stubby wrench and a worklight
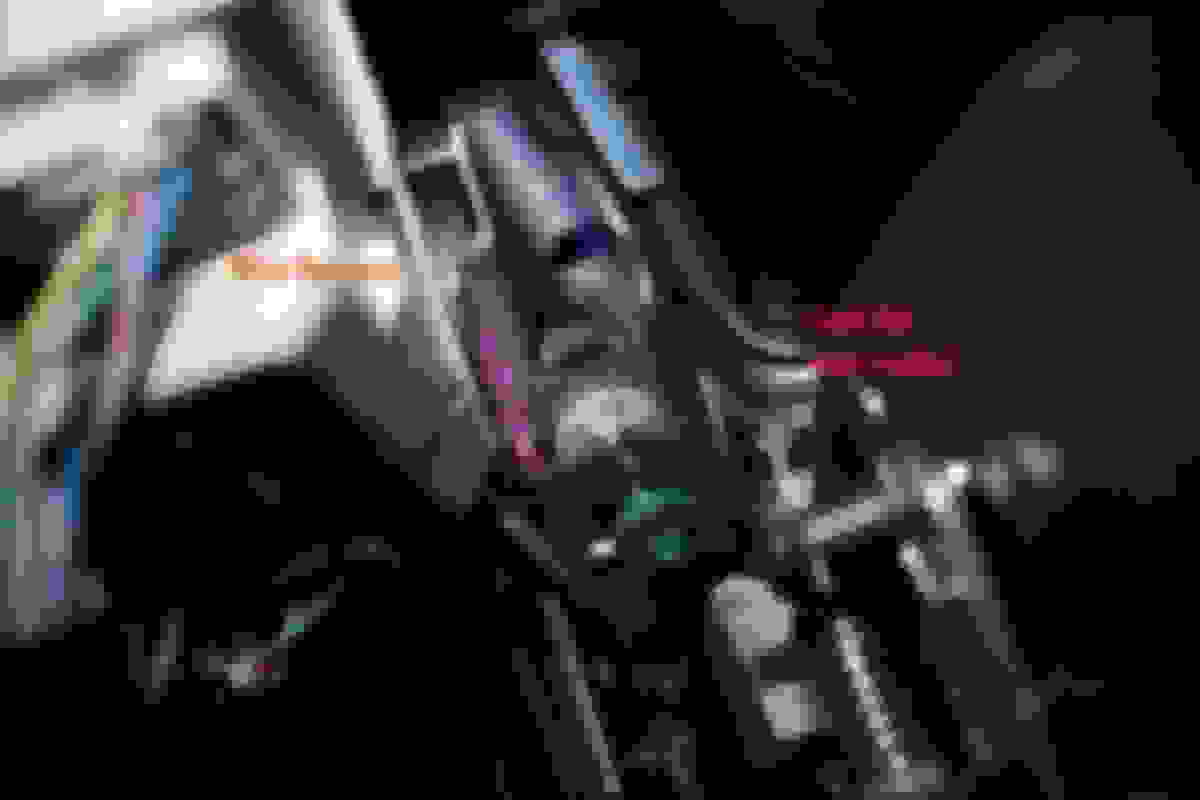
2. Locate the switch:
Hint: It's under the dash, Directly behind the brake pedal arm, Just above the pedal pad (green thumb-tack looking thing)
3. Disconnect The return spring. It simply hooks over the arm and slips into a groove. There is little pressure and no tools are required. The arm with the spring already removed is a bit out of focus in the following pic but is more readily visible in the picture above.
4. Shove your arm up in the gap, depress the latch on the harness side of the connector, and lift the connector out of the switch.
5. Note the position of the switch in the bracket. The threaded portion of the switch extends about 1/8" beyond the welded nut. Then there is a 1/16" to 5/64" gap between the pedal pad and the threaded portion. The threaded portion of the switch should not touch the green pedal pad.
(no picture, see above)
6. Loosen the lock nut. This will require the adept use of the 14mm stubby open end. I put the closed end of the wrench around my finger and guided it onto the lock nut. It took two swings of the wrench in such a tight spot. One in the initial position of the wrench, then I flipped the wrench over so the angled neck was pointing the other way and made one more swing of the wrench which loosened it enough to unscrew the whole switch If you are counting at home, that was two 30 degree swings of the wrench, less than a quarter turn. It doesn't take much wrenching at all.
7. Unthread the switch from the bracket by hand (do NOT touch the welded nut with the pinched sides at all during this process, it is fixed in position and needs nothing in this process!). Try not to move the locknut much to get an idea of where it needs to go on the new switch, but don't sweat it if it moved because it is so easy to adjust by eyeball. The following picture is with the switch removed.
8. Prepare the new switch:
Don't buy Autozone's CRAP! The switch with the blue plug is small enough to fit under that metal plate you can see in the precious picture, but too big to allow room for the harness to be reconnected.
Try to put the lock nut where it will be (close to the housing), but I suggest adjusting by eyeball and not by counting threads or measuring exactly.
9. Install the switch! Don't be shy or try to use tools! Just shove your right hand up there until it disappears, then find the hole by touch and thread it in. I had no luck with my hand lower in position and working with my fingertips, but is was super easy once I shoved my hand in to the wrist. Getting the thread started might be slightly tricky, I imagined raising the back of the switch up towards the steering wheel and probably spun it 5 revolutions before the threads caught. It never wanted to cross-thread or anything, it's just difficult to push in as you turn.
Thread it in until the plunger starts to compress and about 5/64" inch of the plunger is visible (an RCH over 1/16"). The threaded portion should not touch the pedal pad. Spin the lock nut down and then two short swings of the wrench (flipping after the first swing)
to get it tight. It really is close quarters, but very do-able with a stubby wrench.
I am a 210 pound hand-balancer, so that is not a small wrist! If I can get my arm up there, anybody can!
10. Look at the switch to see where the plug should be oriented. Shove your hand up there again and reconnect the harness plug. This was easier than I expected after my experience with the oversized duralast switch.
11. Reconnect the pedal return spring
12. Double-check your work.
a.) is the switch adjusted correctly?
b.) is the locknut tight?
c.) is the harness plug locked in?
d.) Is the pedal pring reconnected?
13. Test your work. Crank the car (in a safe manner for testing... not on a steep hill, or with someone in the danger zones)
a.) no lights indicating a brake failure
b.) shifter interlock disengages with the pedal depressed
c.) brake lights come on when the pedal moves slightly.
All done. Let's take it apart:
The sliding contacts have some uneven wear and the spring-loaded contacts have a little carbon on the face. I only saw the christmas tree of lights 3 times before replacing the switch, so I knew it was a very slight issue. Restarting the car made it go away each time.
Good writeup. My Brake light works, but I have x-mas tree
Originally Posted by sladerx
There may already be a 330 writeup, but here's another one with some switch autopsy pictures. I tried an inferior aftermarket switch that would not fit, so I have pictures of it versus the latest update of the oem toyota part.
I would call this job a 2/10 difficulty if you already own the tool (14mm stubby open end wrench). If you don't already own that wrench, it's a 4/10 if it is your first time in such a tight spot. It took me 15 minutes the first time (with the Wells switch) , and 8 minutes the second time with the Toyota part.
1. Acquire the Switch 84340-04030 and gather your tools: 14 mm stubby wrench and a worklight
2. Locate the switch:
Hint: It's under the dash, Directly behind the brake pedal arm, Just above the pedal pad (green thumb-tack looking thing)
3. Disconnect The return spring. It simply hooks over the arm and slips into a groove. There is little pressure and no tools are required. The arm with the spring already removed is a bit out of focus in the following pic but is more readily visible in the picture above.
4. Shove your arm up in the gap, depress the latch on the harness side of the connector, and lift the connector out of the switch.
5. Note the position of the switch in the bracket. The threaded portion of the switch extends about 1/8" beyond the welded nut. Then there is a 1/16" to 5/64" gap between the pedal pad and the threaded portion. The threaded portion of the switch should not touch the green pedal pad.
(no picture, see above)
6. Loosen the lock nut. This will require the adept use of the 14mm stubby open end. I put the closed end of the wrench around my finger and guided it onto the lock nut. It took two swings of the wrench in such a tight spot. One in the initial position of the wrench, then I flipped the wrench over so the angled neck was pointing the other way and made one more swing of the wrench which loosened it enough to unscrew the whole switch If you are counting at home, that was two 30 degree swings of the wrench, less than a quarter turn. It doesn't take much wrenching at all.
7. Unthread the switch from the bracket by hand (do NOT touch the welded nut with the pinched sides at all during this process, it is fixed in position and needs nothing in this process!). Try not to move the locknut much to get an idea of where it needs to go on the new switch, but don't sweat it if it moved because it is so easy to adjust by eyeball. The following picture is with the switch removed.
8. Prepare the new switch:
Don't buy Autozone's CRAP! The switch with the blue plug is small enough to fit under that metal plate you can see in the precious picture, but too big to allow room for the harness to be reconnected.
Try to put the lock nut where it will be (close to the housing), but I suggest adjusting by eyeball and not by counting threads or measuring exactly.
9. Install the switch! Don't be shy or try to use tools! Just shove your right hand up there until it disappears, then find the hole by touch and thread it in. I had no luck with my hand lower in position and working with my fingertips, but is was super easy once I shoved my hand in to the wrist. Getting the thread started might be slightly tricky, I imagined raising the back of the switch up towards the steering wheel and probably spun it 5 revolutions before the threads caught. It never wanted to cross-thread or anything, it's just difficult to push in as you turn.
Thread it in until the plunger starts to compress and about 5/64" inch of the plunger is visible (an RCH over 1/16"). The threaded portion should not touch the pedal pad. Spin the lock nut down and then two short swings of the wrench (flipping after the first swing)
to get it tight. It really is close quarters, but very do-able with a stubby wrench.
I am a 210 pound hand-balancer, so that is not a small wrist! If I can get my arm up there, anybody can!
10. Look at the switch to see where the plug should be oriented. Shove your hand up there again and reconnect the harness plug. This was easier than I expected after my experience with the oversized duralast switch.
11. Reconnect the pedal return spring
12. Double-check your work.
a.) is the switch adjusted correctly?
b.) is the locknut tight?
c.) is the harness plug locked in?
d.) Is the pedal pring reconnected?
13. Test your work. Crank the car (in a safe manner for testing... not on a steep hill, or with someone in the danger zones)
a.) no lights indicating a brake failure
b.) shifter interlock disengages with the pedal depressed
c.) brake lights come on when the pedal moves slightly.
All done. Let's take it apart:
The sliding contacts have some uneven wear and the spring-loaded contacts have a little carbon on the face. I only saw the christmas tree of lights 3 times before replacing the switch, so I knew it was a very slight issue. Restarting the car made it go away each time.
Great write-up. I have the Christmas tree of ABS, VUS and flashing low pressure tire warning lights, but my brake lights work. Do you think this still could be brake switch, or likely something else like wheel speed sensor? Did your brake lights ever stop working?
I took my switch apart today. The small terminals were not closing properly and when tested with a multimeter I could not get a beep for a closed circuit. I took it apart, scraped up the bent contact prongs with sand paper, and bent them a little more. Also scrape dup the embedded stationary contact surface. After putting it back together I was able to test a successful closed circuit. Put it back together and it worked fine. Will see if I still get lights or not. The reason I decided to test the switch is that although I am fine paying $100 for a new switch, I just want to know what the problem is and if the switch is actually faulty.
THANK YOU for this DIY steps. I didn't know how important stubby wrench is until I did this. Thanks again!
Originally Posted by sladerx
There may already be a 330 writeup, but here's another one with some switch autopsy pictures. I tried an inferior aftermarket switch that would not fit, so I have pictures of it versus the latest update of the oem toyota part.
I would call this job a 2/10 difficulty if you already own the tool (14mm stubby open end wrench). If you don't already own that wrench, it's a 4/10 if it is your first time in such a tight spot. It took me 15 minutes the first time (with the Wells switch) , and 8 minutes the second time with the Toyota part.
1. Acquire the Switch 84340-04030 and gather your tools: 14 mm stubby wrench and a worklight
2. Locate the switch:
Hint: It's under the dash, Directly behind the brake pedal arm, Just above the pedal pad (green thumb-tack looking thing)
3. Disconnect The return spring. It simply hooks over the arm and slips into a groove. There is little pressure and no tools are required. The arm with the spring already removed is a bit out of focus in the following pic but is more readily visible in the picture above.
4. Shove your arm up in the gap, depress the latch on the harness side of the connector, and lift the connector out of the switch.
5. Note the position of the switch in the bracket. The threaded portion of the switch extends about 1/8" beyond the welded nut. Then there is a 1/16" to 5/64" gap between the pedal pad and the threaded portion. The threaded portion of the switch should not touch the green pedal pad.
(no picture, see above)
6. Loosen the lock nut. This will require the adept use of the 14mm stubby open end. I put the closed end of the wrench around my finger and guided it onto the lock nut. It took two swings of the wrench in such a tight spot. One in the initial position of the wrench, then I flipped the wrench over so the angled neck was pointing the other way and made one more swing of the wrench which loosened it enough to unscrew the whole switch If you are counting at home, that was two 30 degree swings of the wrench, less than a quarter turn. It doesn't take much wrenching at all.
7. Unthread the switch from the bracket by hand (do NOT touch the welded nut with the pinched sides at all during this process, it is fixed in position and needs nothing in this process!). Try not to move the locknut much to get an idea of where it needs to go on the new switch, but don't sweat it if it moved because it is so easy to adjust by eyeball. The following picture is with the switch removed.
8. Prepare the new switch:
Don't buy Autozone's CRAP! The switch with the blue plug is small enough to fit under that metal plate you can see in the precious picture, but too big to allow room for the harness to be reconnected.
Try to put the lock nut where it will be (close to the housing), but I suggest adjusting by eyeball and not by counting threads or measuring exactly.
9. Install the switch! Don't be shy or try to use tools! Just shove your right hand up there until it disappears, then find the hole by touch and thread it in. I had no luck with my hand lower in position and working with my fingertips, but is was super easy once I shoved my hand in to the wrist. Getting the thread started might be slightly tricky, I imagined raising the back of the switch up towards the steering wheel and probably spun it 5 revolutions before the threads caught. It never wanted to cross-thread or anything, it's just difficult to push in as you turn.
Thread it in until the plunger starts to compress and about 5/64" inch of the plunger is visible (an RCH over 1/16"). The threaded portion should not touch the pedal pad. Spin the lock nut down and then two short swings of the wrench (flipping after the first swing)
to get it tight. It really is close quarters, but very do-able with a stubby wrench.
I am a 210 pound hand-balancer, so that is not a small wrist! If I can get my arm up there, anybody can!
10. Look at the switch to see where the plug should be oriented. Shove your hand up there again and reconnect the harness plug. This was easier than I expected after my experience with the oversized duralast switch.
11. Reconnect the pedal return spring
12. Double-check your work.
a.) is the switch adjusted correctly?
b.) is the locknut tight?
c.) is the harness plug locked in?
d.) Is the pedal pring reconnected?
13. Test your work. Crank the car (in a safe manner for testing... not on a steep hill, or with someone in the danger zones)
a.) no lights indicating a brake failure
b.) shifter interlock disengages with the pedal depressed
c.) brake lights come on when the pedal moves slightly.
All done. Let's take it apart:
The sliding contacts have some uneven wear and the spring-loaded contacts have a little carbon on the face. I only saw the christmas tree of lights 3 times before replacing the switch, so I knew it was a very slight issue. Restarting the car made it go away each time.

 12-06-16, 10:19 AM