When you click on links to various merchants on this site and make a purchase, this can result in this site earning a commission. Affiliate programs and affiliations include, but are not limited to, the eBay Partner Network.
Radiator Removal (without removing the A/C condenser) and Replacement of Radiator, Fan Assembly, & Transmission Cooler Line
It is possible to remove the radiator without discharging the A/C. Since I did not remove the condenser, the radiator removal is a bit more involved. A second person was needed to help with this. If your A/C is already discharged or you need to make repairs to it as well, it is much easier to remove the condenser to make enough room for the radiator removal.
Note on radiator width: from what I�ve read the width of the radiator can be either 16mm or 27mm (~1�). The 27mm wide radiator is the towing package radiator. Lexus was not able to tell me which radiator size was in my vehicle by the VIN number; it is a visual determination.
Tools Needed:
3/8�Socket wrench
deep well or standard sockets(I used deep well as I found it a bit easier, but standard should work as well)
10mm socket
12mm socket
19mm socket
10mm shallow socket & wrench (you may be able to get to the particular bolt with a box wrench
min. 8� socket extension
broad-nose pliers
needle-nose pliers
#1 flat head screwdriver
4 rubber stoppers 9/16� x 3/8�x 1� OR 1/2� x 1� bolts
2 empty gallon water jugs (or something to catch coolant)
clear vinyl tubing 1/4� 1� long
paper towels (for clean-up)
tarp or plastic sheeting (for clean-up)
piece of cardboard slightly larger than the radiator (cut from the new radiator box)
Parts Needed:
radiator (either 16mm or 27mm (5/8�or 1� wide))
Toyota Red antifreeze, 1 gallon
1 gallon distilled water
transmission cooler line
Fan Assembly
Opt. Parts Needed (depending on condition):
transmission cooler line hoses
radiator support (lower) bushings (2 needed) - Toyota part #16535-0T020
radiator support (upper) bushings (2 needed) - Toyota part #16523-74010
Proceed at your own risk! I am only relaying what I did and I am a complete amateur.
Step 2: Remove the bolts holding the lower dust shield to gain access to the lower radiator hose and petcock.
6mm body bolt with integrated washer. I’ve had some success using M6 x 1.00 x 16mm bolts with washers.
Step 4: Remove the radiator cap. Attach a 10-12” long piece of 1/4” tubing to the radiator petcock located near the bottom of the radiator on the driver’s side. Put the other end into an empty gallon jug and open the petcock until fluid starts to emerge. It won’t drain very fast (see the photo). Be careful not to remove the petcock completely. I squeezed the upper & lower radiator hoses to discharge that fluid into the radiator and drained about 1.5 gallons from the radiator.
I had just replaced the fluid, so I was only draining out of the radiator. If you are planning to do a complete fluid change, you can unhook the reservoir and drain that down into the radiator before removing the hose. There are two petcocks located on the engine block that you can attach some tubing to drain directly into a container. Draining from all these points should get about 2 gallons out.
Step 7: Remove the clip holding the upper radiator hose and pull the hose off the radiator. Hold it up for a few seconds to drain back into the engine.
The following picture is of the radiator and fan assembly already removed. They must come out as a unit (they are bolted together). I’m including it to help clarify the various attachments that will be removed in the following steps. (note: "Transmission Oil Temp Sensor" is a typo. It should read "Coolant Temp Sensor".
Last edited by thaeleelyr; 03-14-16 at 06:10 PM.
Reason: correction
Step 8: Remove various hoses from the bottom of the radiator.
Place a plastic sheet or tarp under the vehicle. Have paper towels at the ready to clean up spills. Get your rubber plugs / bolts ready to plug transmission hoses.
Using the wide-nose pliers,remove the pinch clamp holding the lower radiator hose (I have a regular screw band clamp on mine).
Step 9: Remove the transmission cooler hoses.
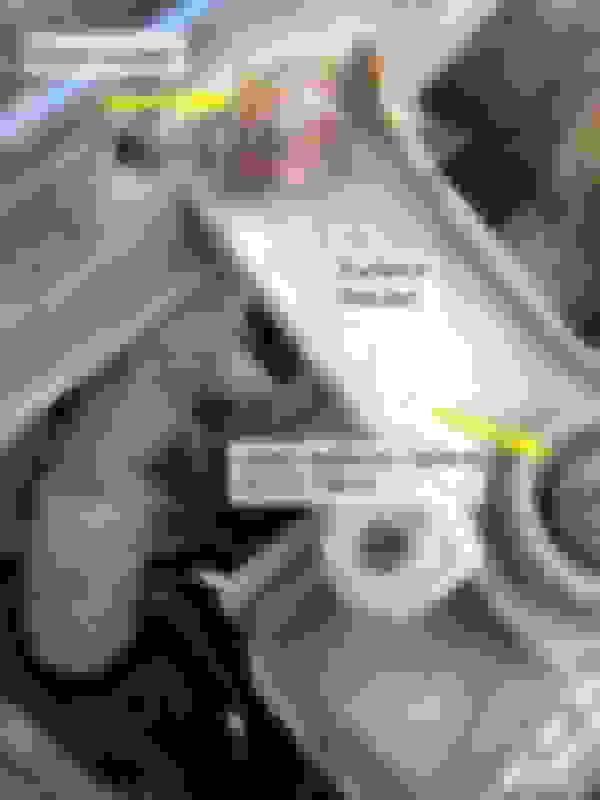
The following two photos are of the connections at the bottom of the radiator. They are taken from two different angles. The letters indicate the same hose/connection in the photos. All of these hoses are attached with pinch clamps.
Start with the hose that attaches to the transmission post #1. Remove the pinch clamp and pull the hose (B) from the radiator. Quickly plug the hose to keep transmission fluid from spilling. Alternatively, you can just collect what comes out - I don’t think it will drain the transmission. In the first photo, the hose is still attached. In the second, it is not attached yet.
Remove hoses A & C. On the passenger side of the radiator is one more hose not visible in these photos that needs to be disconnected.
Unplug the coolant temperature sensor located on the passenger side of the radiator.
Step 10: Disconnect Passenger Side Fan Connection
From the top, look down along the fan assembly on the right (passenger) side for fan plug #2 (first photo) and disconnect (2nd photo is taken from the passenger side looking towards the front). Push the clip in (pliers are touching) to unlock and pull apart.
Step 11: Disconnect Coolant Temperature Sensor Wire from Fan Assembly
Follow the coolant temperature sensor wire bundle down the side of the fan assembly to the first clip. Take a flat head screwdriver and work it into the wire clip as shown to release. There is another clip below this one. Gently pull the wires away from the fan assembly.
Step 13: Remove the radiator support brackets.
Using a 12mm socket, remove the bolt holding each of the two radiator support brackets. On these brackets is a rubber cushion. Mine needed to be replaced. Toyoto part # 16523-74010, cost about $10 a piece. Lower support bushings cost about $15 a piece.
The radiator is now fully disconnected from the vehicle. The fan assembly is bolted to the radiator with 6 bolts. It may be possible to unbolt the fan assembly and pull just the radiator, in which case the following steps are unnecessary. However, given the age, I chose to replace both, so they came out together.
Step 14: Make room to remove the radiator and fan assemblies.
Remove the bolts securing the two A/C condenser brackets to the frame (one each bracket). The following photos were taken after I had already removed the radiator and are just to illustrate the location of the brackets. DO NOT REMOVE any brackets/bolts connected directly to the A/C Condenser - it will DISCHARGE the A/C violently.
Step 15: Move the A/C condenser forward towards the front.
The A/C condenser is now free from the vehicle. Only the A/C lines connected directly to the condenser are holding it in place. These run along the front of the condenser. The condenser is seated into two rubber supports on the bottom. GENTLY wiggle the condenser up a bit and forward.
Step 16: Retract the center bolt on the A/C condenser to prevent damage to the radiator during installation.
In this photo, the radiator is lifted out as far as it can go at this point and you can see the damage from a bolt holding the A/C line bracket to the top of the condenser. Retract this bolt just until it it flush with the bracket.
 03-13-16, 07:05 PM