

 12-16-14, 12:36 PM
Last edit by: IB Advertising
See related guides and technical advice from our community experts:
Browse all: Lexus IS Engine and Powertrain Guides
- Lexus IS GS: How to Replace Oxygen Sensor
Step by step instructions for do-it-yourself repairs
Browse all: Lexus IS Engine and Powertrain Guides

Oxygen Sensor (O2) Bank 1, Sensor 2 DIY
03-01-13, 11:22 AM
#76
Lexus Test Driver
Join Date: Jun 2005
Location: South Bay
Posts: 1,193
Likes: 0
Received 0 Likes
on
0 Posts
Do you expect us to install it for you too?
Unbelievable!......

 03-01-13, 01:25 PM
#77
Moderator

Peace
Salim
 03-04-13, 10:05 PM
#78
Lexus Test Driver
Join Date: Jun 2005
Location: South Bay
Posts: 1,193
Likes: 0
Received 0 Likes
on
0 Posts
Go easy on the newbie please. It is very hard to gauge the experience/expertise on the internet. Keep in mind this is RX forum where the enthusiasts vs users ratio is a skewed a lot towards users. I would say most of members who post questions are mechanic/cost avert reluctant DIYers.
Peace
Salim
Peace
Salim
03-05-13, 09:40 AM
#79
Driver School Candidate

Join Date: Sep 2011
Location: NY
Posts: 20
Likes: 0
Received 0 Likes
on
0 Posts
you know, every time I ask a question in this forum I feel like a bother, is it too difficult to understand there are people asking questions who are NOT mechanics, you should make a forum just for yourselves maybe, so you can discuss your topics and no outsider can bother you with"stupid" questions, I wish you can experience the same when you go to the doctor;s office and ask you stupid questions millions of time, this is to the moderator as well, maybe you should make forum for Lexus mechanics and Lexus drivers, I am completely disappoined, yes moron , come and change my censor Sylvia
03-05-13, 10:31 AM
#80
Moderator
I think both had an opportunity to vent and counter-vent.
Please no more counters in the public forum. If any one has the urge to type, please use private mail.
Lets enjoy the life and our vehicles.
Salim
Please no more counters in the public forum. If any one has the urge to type, please use private mail.
Lets enjoy the life and our vehicles.
Salim
The following users liked this post:
GroovyMom (10-30-17)
03-24-13, 01:45 PM
#81
Driver School Candidate

Join Date: Sep 2012
Location: IN
Posts: 2
Likes: 0
Received 0 Likes
on
0 Posts
Thank you to all! This forum is one of the better ones that I have experience with. The post on replacing the sensor was great. For those DIYers it may not be that clear however . I have done mechanical work all of my life. I did need to study photos a bit to really "see" the location of the sensor connectors. If you have very basic mechanical experience you can do this repair. Thank you ! A side note..... Patience is a virtue. I know repetitive questions are annoying. We are all interested in our own probs and sometimes get in a hurry to our destination. That being said human nature will not change. I suggest being humble when your buttons are pushed. Not easy ! I leave you all now with the words of an old Robin Trower tune. Takers get the honey givers sing the blues. Keep up the great posts!
 05-29-13, 07:50 PM
#83
Driver School Candidate

Join Date: May 2013
Location: Illinois
Posts: 7
Likes: 0
Received 0 Likes
on
0 Posts
Just wanted to say thank you to you guys for the awesome write up. I got tired of throwing money into this thing and figured I would give it a try. Thanks LexMex for the amazing pictures, and RoX300 for the double ended studs.
06-25-13, 12:11 PM
#84
Rookie
Join Date: Aug 2011
Location: MA
Posts: 67
Likes: 0
Received 0 Likes
on
0 Posts
My 02 RX300 has a P0136 150k miles on the clock ,I just replaced new Oxygen Sensor (bank 1, sensor 2) downstream 02 sensor , I have two tap-end studs to replace rusted originals, I bought them at autozone dorman double-ended studs part number 675-330.1 and new nuts M8-1.25, everything is working good now, no more CEL , thanks Lexmex and RoX300 .
07-01-13, 07:58 PM
#85

My 02 RX300 has a P0136 150k miles on the clock ,I just replaced new Oxygen Sensor (bank 1, sensor 2) downstream 02 sensor , I have two tap-end studs to replace rusted originals, I bought them at autozone dorman double-ended studs part number 675-330.1 and new nuts M8-1.25, everything is working good now, no more CEL , thanks Lexmex and RoX300 .
I have the same rusted studs, no bolts, but sensor still holding there (like photo on #62). Did you remove the rusted stud ? How did you remove the rusted studs ? after removing the rusted stud, did the new dorman studs gets into the old thread without problem ?
Thanks,
Mike
07-04-13, 12:09 AM
#86
Rookie
Join Date: Aug 2011
Location: MA
Posts: 67
Likes: 0
Received 0 Likes
on
0 Posts
Hi RX300CE,
I have the same rusted studs, no bolts, but sensor still holding there (like photo on #62). Did you remove the rusted stud ? How did you remove the rusted studs ? after removing the rusted stud, did the new dorman studs gets into the old thread without problem ?
Thanks,
Mike
I have the same rusted studs, no bolts, but sensor still holding there (like photo on #62). Did you remove the rusted stud ? How did you remove the rusted studs ? after removing the rusted stud, did the new dorman studs gets into the old thread without problem ?
Thanks,
Mike
01-17-14, 02:21 PM
#87
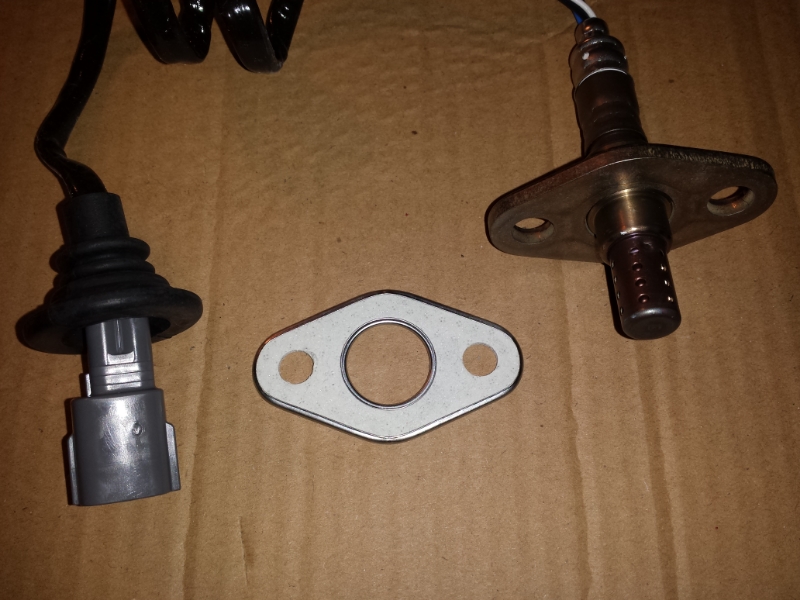
Just got the 02 sensor (234-4215) and was wondering if the diamond shaped metal/cork object in the middle of the first pic is the gasket. Hopefully it is, so I don't have to shell out another $9 at the stealership. 
Also, does it matter which way the gasket (if it is) faces (2nd pic)? They are different on each side...

Also, does it matter which way the gasket (if it is) faces (2nd pic)? They are different on each side...
01-17-14, 05:19 PM
#89
Sweet, thanks. That just made my life a whole lot easier.
Now time to tackle those completely rusted studs and nut.
My thanks to RoX300 for providing alternative replacement options.
Now time to tackle those completely rusted studs and nut.
My thanks to RoX300 for providing alternative replacement options.
01-17-14, 10:02 PM
#90
Moderator
I would say watch and follow the way the old washer comes off.
IMHO the smaller flat area (left in picture) faces the sensor and the larger flat area (right in picture) faces the exhaust. If you mount it the other way, you would create a lip between the exhaust and the gasket which can collect stuff over time .. that would set in corrosion. If you do it the way I suggest then everything would be streamlined. There is enough flat surface to prevent a leak in either position.
Lastly, it is important that you torque both nuts evenly .. 1/2 turn at a time. I dont have the spec handy.
Salim
Last edited by salimshah; 01-17-14 at 10:07 PM.