DIY IACV clean picture write-up
 12-08-12, 01:18 AM
#91

how often does the electric part of the iacv itself fail?
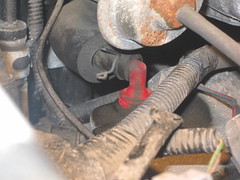
I went through this like a dozen times, I have the oring on there screws are good, moves very smooth.
either I get a high idle if I move the **** to the right before reassembly, or I get a low idle if I move it to the left before reassembly. its like my iacv is not moving the **** at all. has this happened to anyone else to have the motor part fail. Im thinking I need a whole new iacv now, which is a bummer.
 12-08-12, 08:55 AM
#92

good news is I have gotten really good at taking it off, got it down to like under 5 minutes.
The factory manual gives instructions as to how to test the IACV, though when I tested it per the instructions it tested bad, but worked like a new one. Can't explain it but those are the facts. For what it costs, I'd for sure do the testing 1st., I hate throwing parts at a car, It is possible it's the input and not the valve. The test calls for an ohms test and gives the range for each side.
I was reading that when you pull it off, and as you put in and remove the connector you should see it "adjusting".
does that mean the inside cavity of the black housing which turns the slug, actually moves itself? cause if thats the case maybe mine is stuck.
before I go trying to free up a part which I am not sure if it even moves I thought I would ask.
I know sometimes it one of those stationary things where just the signals cause the slug to move. Thanks for the help guys.
Last edited by Ali SC3; 12-08-12 at 09:00 AM.
12-12-12, 09:21 PM
#93
Driver School Candidate

Join Date: Nov 2012
Location: ID
Posts: 3
Likes: 0
Received 0 Likes
on
0 Posts
John O...I'm not one to ever claim I have any idea what 'normal' is, but in an attempt to help with your 1st question, I started my 2000 ES300 this unusually cold Georgia morning (low 30's) and noticed high/cold idle at around 1350...drove it around the block (water temp really never reached normal) and the idle dropped to around 900.
Don't know if that helps, but I'm not sure you have a problem...is it jittering when idling high? It shouldn't...but 5 mins seems a bit long, but then again I'm in Atlanta, so not sure what 'normal' temps are for you as cold weather here is not normal.
Don't know if that helps, but I'm not sure you have a problem...is it jittering when idling high? It shouldn't...but 5 mins seems a bit long, but then again I'm in Atlanta, so not sure what 'normal' temps are for you as cold weather here is not normal.
Thank you for the response. Looking at other threads 1200 seems to be a normal idle when cold. Not sure why I cannot find that specified in the Factory Service Manuals (I must not be looking in the right place). The manual does show the normal temp idle speed, which this car is meeting. The only reason I really noticed it was that the shift into gear is a bit harder then I would expect from a car of this stature, but is understandable given the 1200 RPM. My wife is loving the car. Snow is falling this week, so we will get to try out the AWD system. We both have a lot of 4WD experience, so it will be interesting to see how the traction control works.
Have a Merry Christmas!
John O.
 02-25-13, 09:10 PM
#94
Rookie

Join Date: Feb 2013
Location: NY
Posts: 66
Likes: 0
Received 0 Likes
on
0 Posts
Thanks for this wonderful DIY.
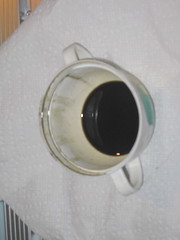
Decided not to remove the IACV without two new screws to fallback on, and used almost a full can of throttle cleaner over 12 spray iterations down the hole. Here are a few photos:
Liquid in acordian tubing (could not identify it by smell)
http://www.flickr.com/photos/93573312@N02/8508388291/

Dirty air intake:
http://www.flickr.com/photos/93573312@N02/8509495856/
Are these prime exhibits for engine problems? All comments welcome !
Decided not to remove the IACV without two new screws to fallback on, and used almost a full can of throttle cleaner over 12 spray iterations down the hole. Here are a few photos:
Liquid in acordian tubing (could not identify it by smell)
http://www.flickr.com/photos/93573312@N02/8508388291/
Dirty air intake:
http://www.flickr.com/photos/93573312@N02/8509495856/
Are these prime exhibits for engine problems? All comments welcome !
Last edited by tarzan17; 02-25-13 at 09:18 PM.
02-25-13, 09:29 PM
#95
Moderator

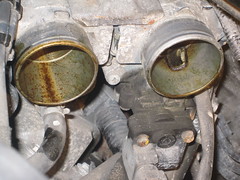
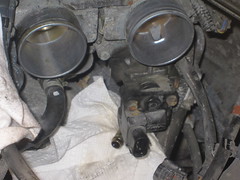
imho, you just cleaned the throttle body. For IACV you must spray down the opening into the rectangular hole (that goes into IACV ... at minimum.
For proper cleaning, you need to make sure the slug moves freely.
Salim
For proper cleaning, you need to make sure the slug moves freely.
Salim
 02-25-13, 09:48 PM
#96
Rookie
Join Date: Feb 2013
Location: NY
Posts: 66
Likes: 0
Received 0 Likes
on
0 Posts
As for spraying down the rectangular hole, I managed to get it to a point where it looked reasonably clear (lost count, but probably did it close to 12 times).
Here are some pictures:
First pass:
http://www.flickr.com/photos/9357331...in/photostream
Final pass:
http://www.flickr.com/photos/9357331...in/photostream
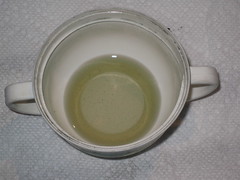
Throttle body after cleaning:
http://www.flickr.com/photos/9357331...in/photostream
 02-26-13, 05:55 AM
#97
Pole Position

Thanks for this wonderful DIY.
Decided not to remove the IACV without two new screws to fallback on, and used almost a full can of throttle cleaner over 12 spray iterations down the hole. Here are a few photos:
Liquid in acordian tubing (could not identify it by smell)
http://www.flickr.com/photos/93573312@N02/8508388291/
Dirty air intake:
http://www.flickr.com/photos/93573312@N02/8509495856/
Are these prime exhibits for engine problems? All comments welcome !
It's kind of hard to tell from the photo but do you have a lot of carbon/soot in the bellows shown above? If so, you should check your PCV to make sure it is hooked up and working properly. Also clean your breather hose. If the PCV valve is not functioning properly the crankcase fumes will back up through the breather hose and into the intake belows causing it to get all gunked up. This should not happen. After 150K miles mine is still clean but I had a little oily deposit around the hole where the breather hose connects to the bellows. I found that the PCV was disconnected and the fumes weren't being sucked out of the crankcase so they just vented out the breather hose and the gromment in the valve cover leaving a black oily deposit.
Baetke
02-26-13, 06:19 PM
#98
Rookie
Join Date: Feb 2013
Location: NY
Posts: 66
Likes: 0
Received 0 Likes
on
0 Posts
Tarzan17
It's kind of hard to tell from the photo but do you have a lot of carbon/soot in the bellows shown above? If so, you should check your PCV to make sure it is hooked up and working properly. Also clean your breather hose. If the PCV valve is not functioning properly the crankcase fumes will back up through the breather hose and into the intake belows causing it to get all gunked up. This should not happen. After 150K miles mine is still clean but I had a little oily deposit around the hole where the breather hose connects to the bellows. I found that the PCV was disconnected and the fumes weren't being sucked out of the crankcase so they just vented out the breather hose and the gromment in the valve cover leaving a black oily deposit.
Baetke
Yes, there was a lot of carbon (and med brown liquid) in the bellows. In fact I know I didn't clean all of it out as it is almost impossible to get at the bottom of the accordian sections (I used qtips as best I could). Each time I removed a qtip it had dark black thick crap stuck to it.
I replaced the PCV about 3 years ago and this is the first time cleaning it. Was surprised it was so easy to lift up and remove this time - maybe it is not sealing well and I need a new one. After removing, during inspection phase, thought it was clogged at the bottom, but once I inserted a paper-clip I realized there was a spring mechanism at that end. After spraying and cleaning with throttle body cleaner (black liquid came out) I inserted the paper-clip against the spring again and realized it depressed *much* further than before cleaning ! If I was to guess, I would say 400% further so it was definitely clogged.
Just took it out for a drive and response is noticably better. Before cleaning, I always felt a small brake force (feels like engine braking) when lifting my foot off the throttle. Don't feel that anymore. And much smoother acceleration.
I can't believe that this one part can make such a difference. Environmental issues aside, due to it's nominal cost and ease of replacement, the PCV should be replaced every oil change. No more "clogging" and "brittle breakage" issues.
Need to do reading on what the PCV does.
BTW, Is the breather hose the one connected to the horizontal end of PCV? And how did you clean it - did you remove it? I did spray some throttle body cleaner into it and then angled it to drain into a cloth. And is the crankcase the piece where the PCV inserts into?
http://www.flickr.com/photos/9357331...in/photostream
Last edited by tarzan17; 02-26-13 at 06:27 PM.
02-26-13, 06:38 PM
#99
Pole Position
tarzan17,
The PCV valve plugs into the Bank1 valve cover. The hose on the other end of the PCV valve goes to the intake manifold. The intake manifold provides the vacuum that sucks the blowby gases out of the crankcase (the bottom of the engine below the pistons where the crankshaft resides). The breather tube goes from the Bank2 valve cover to the intake bellows. Its the one with the padded (neoprene?) hose around it. This hose provides filtered fresh air to replace the gasses drawn out of the crankcase. This is why a clogged PCV valve results in gunk in the intake belows. The crankcase pressure builds up and escapes out through the breather hose instead of getting sucked into the intake manifold for re-burning in the engine.
Glad this fix worked out so well for you . I can't explain why your "braking action with foot off the accelerator" problem went away as a result. Maybe someone else can explain it. Others have complained of this symptom in other threads so it would be great to figure out if this is the cause.
Baetke
02-26-13, 06:52 PM
#100
Rookie
Join Date: Feb 2013
Location: NY
Posts: 66
Likes: 0
Received 0 Likes
on
0 Posts
tarzan17,
The PCV valve plugs into the Bank1 valve cover. The hose on the other end of the PCV valve goes to the intake manifold. The intake manifold provides the vacuum that sucks the blowby gases out of the crankcase (the bottom of the engine below the pistons where the crankshaft resides). The breather tube goes from the Bank2 valve cover to the intake bellows. Its the one with the padded (neoprene?) hose around it. This hose provides filtered fresh air to replace the gasses drawn out of the crankcase. This is why a clogged PCV valve results in gunk in the intake belows. The crankcase pressure builds up and escapes out through the breather hose instead of getting sucked into the intake manifold for re-burning in the engine.
Glad this fix worked out so well for you . I can't explain why your "braking action with foot off the accelerator" problem went away as a result. Maybe someone else can explain it. Others have complained of this symptom in other threads so it would be great to figure out if this is the cause.
Baetke
The PCV valve plugs into the Bank1 valve cover. The hose on the other end of the PCV valve goes to the intake manifold. The intake manifold provides the vacuum that sucks the blowby gases out of the crankcase (the bottom of the engine below the pistons where the crankshaft resides). The breather tube goes from the Bank2 valve cover to the intake bellows. Its the one with the padded (neoprene?) hose around it. This hose provides filtered fresh air to replace the gasses drawn out of the crankcase. This is why a clogged PCV valve results in gunk in the intake belows. The crankcase pressure builds up and escapes out through the breather hose instead of getting sucked into the intake manifold for re-burning in the engine.
Glad this fix worked out so well for you . I can't explain why your "braking action with foot off the accelerator" problem went away as a result. Maybe someone else can explain it. Others have complained of this symptom in other threads so it would be great to figure out if this is the cause.
Baetke

Cheers mate.
03-10-13, 09:20 PM
#101
Driver School Candidate

Join Date: Jul 2003
Location: California
Posts: 3
Likes: 0
Received 0 Likes
on
0 Posts
Thanks for the great DIY.
Some issues I encountered.
1) This was the first time I've taken apart the intake hoses. They took a bit of effot to 'slide' off. Also, I wasn't sure how tight the clamp screws need to be. I used a 10mm socket and wrench, so I was afraid of overtightening. I eventually just hand tightened them.
2) The brass screws were difficult to remove. I tried the screwdriver+tapping method, but that didn't work. When I started stripping the front screw, I got my long nosed pliers and went at it. The back screw broke free pretty easily. The front screw took a bit more effort. I eventually got the screws off and they were pretty chewed up from the pliers. When I put the doohickey back on, I hand tightened the brass screws back on. I hope it doesn't fall off.
3) I used CRC throttle body cleaner. It didn't foam and show white, like the previous pics showed. I shook the can up beforehand as well, even though the can didn't specify to do that. It pretty much ran out of the metal tube as an oily liquid. A bunch of black bits came out with the liquid, so I hope it did something. I used a folded up newspaper and paper towel under the tube to catch the cleaner.
4) I found the rotating object to be a little gritty in its action. After the cleaner went through, the action was much smoother. I hope this helps my rough idle. If not, more troubleshooting to do. Thanks for the DIY!
05-22-13, 01:29 PM
#102
First, I am having no trouble with my '99 RX300. This is just part of my normal maint.
1. I use CRC Throttle Body Cleaner with a helper who starts the car and holds the brake, so I can spray into the throttle body while holding the throttle with my left hand keeping the engine running, in order to get the cleaner downstream clearing out any crud in the intake system, like the instructions used to call for before cars wouldn't put up too much fuss. CRC's instructions as well as those on this list no longer call for this step, I believe, because it is a fine throttle touch to keep the system working (and could be dangerous if done without care). Also, this usually sets off DTC's which need to be reset. Are there other reasons I should not use this method to clean out injectors and carbon in other places that aren't easily cleaned other ways?
2. (The real important question!) When cleaning the IACV and reassembling, does it matter if the wheel is turned clockwise or counterclockwise? Which way is correct, or does the system readjust it anyway?
Thanks!
Jay in So Cal.
05-22-13, 04:29 PM
#103
Moderator
I let the crud fall to ground instead of feeding it to chamber.
Clock-wise and counter clock-wise are both correct .. you spin it one way till stop and then the other way.
Salim
Clock-wise and counter clock-wise are both correct .. you spin it one way till stop and then the other way.
Salim
05-23-13, 11:09 AM
#104
Thanks Salim, I meant after the "crud" in the TB/butterfly area has already been cleaned up... Is there no reason to also actively clean downstream the way we used to (but without disassebly) by spraying TB cleaner while controlling moderate revs? The manifold, injectors, etc. Apparently, that's gone the way of the dinasaurs.
During cleaning, the IACV spins easily both directions. Before I reassemble the electric "motor" portion, is the position of the valve, either one way or the other important when I put it back together (or since I've always guessed, I just turned it to the middle). Does the system really have no preference and adjust it regardless of the position at reassembly?
Thanks for sharing.
Jay in So Cal
05-23-13, 12:24 PM
#105
Pole Position
The little metal cylinder that rotates the IACV is a permanent magnet. The black housing, with the wires on it, that installs over the IACV magnet is an electromagnet. If the computer applied no voltage to it it would go all the way in one direction. If it applied voltage all the time it would go all the way in the other direction. The computer controls the position of the valve by switching the voltage on and off. The duty cycle (ratio of on to off time) then determines the position of the valve. Therefore, to answer your question, it does not matter what position it is in when you assemble it. The computer will adjust it automatically.