When you click on links to various merchants on this site and make a purchase, this can result in this site earning a commission. Affiliate programs and affiliations include, but are not limited to, the eBay Partner Network.
Using the info previously shown, I just swapped both serp belts on the wife's RX. I'll break it up into two parts, as you may just want to do the AC/Alternator (outer) belt.
Part 1 - the AC/Alternator (outer) belt:
Tools required:
1/4" drive 12mm socket
3/8" drive 12mm socket
3/8" to 1/4" drive adapter
3/8" drive ratchet
3/8" drive 14mm socket (a 9/16ths is close enough if you don't have one)
Optional Tools:
1/4" drive 10mm socket - needed for doing the second belt anyway)
1/4" drive bit-driver (like a screwdriver with a 1/4" drive adapter on the end)
1/2" drive breaker bar - needed for the second belt
1/2" drive 14mm socket (again, a 9/16ths with six-points is close enough)
Small Flat-head screwdriver
One Zip Tie
Optional: First, I removed the coolant cap and placed it on the engine cover to get the coolant hose out of the way. I then used the small flat head screwdriver to release the clip that holds the electrical bundle off the alternator, so I could zip-tie those wires out of the way. I'll say this is optional, but it will make your life 100x easier to have them out of the way.
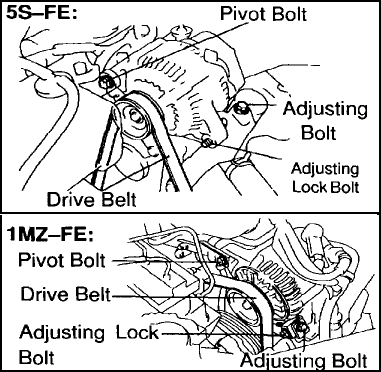
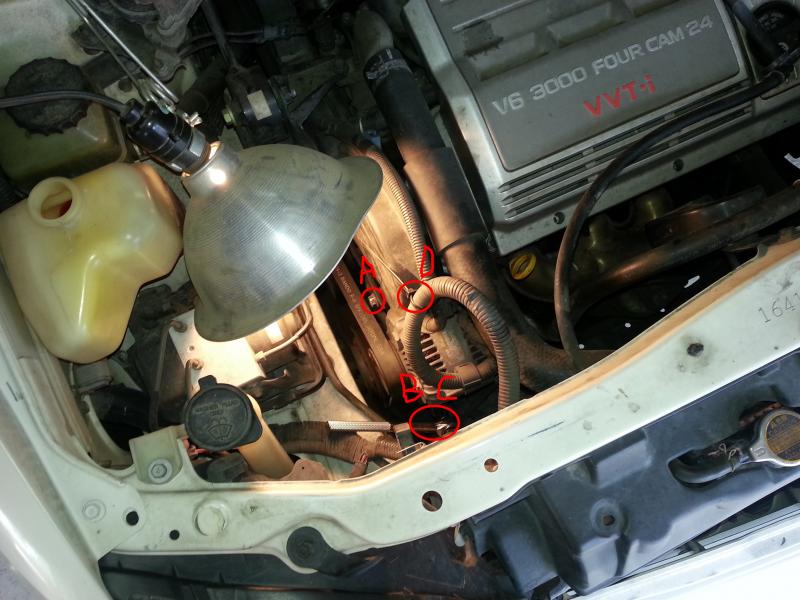
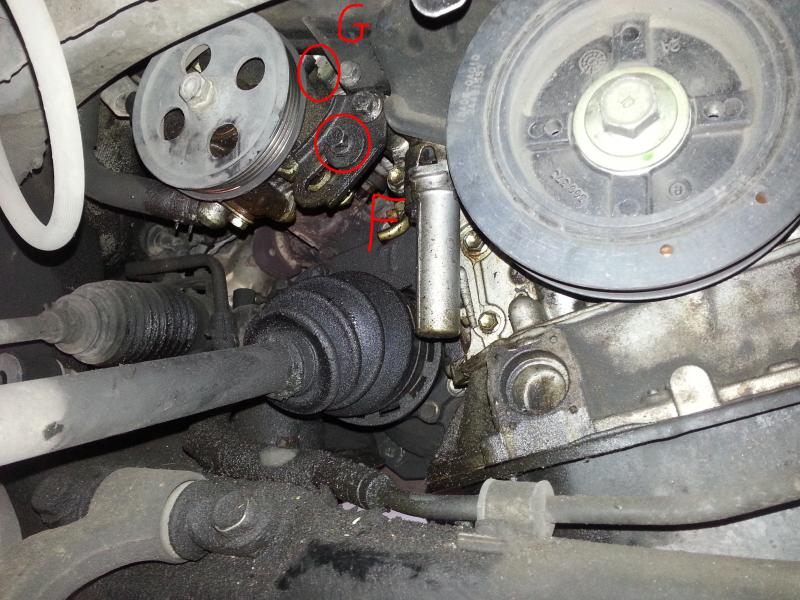
Second, break loose bolt A in the picture below. It's the 14mm, and I had to use a breaker on mine with a 6 point 9/16ths. This is fine, just be careful that the socket is all the way on the bolt, and that you don't round it off.
You will then need to loosen bolt B, a 12mm. I used my 3/8" ratchet, 3/8" to 1/4" adapter, and the 1/4" drive 12mm socket. Without the little gap from the adapter the alternator pulley gets in the way. This is a slow process as you really only have thirty degrees or so to play with of rotation, but get it nice and loose (finger loose).
Then use the 3/8" drive 12mm socket and the 3/8" ratchet to loosen bolt C. This bolt will be the bane of your existence. No space to work, and slow moving. Once you get it somewhat loose, you can use one hand to pull up on the alternator to release any tension on the bolt, and use your other hand to thread it out quickly. Still wasn't that easy, as I had to wear gloves because the engine was hot.
Note - you can see bundle D - that's the electrical bundle off the alternator zip tied out of the way.
In the lower diagram below, I have the Pivot Bolt marked as A, Adjusting Lock Bolt as B, and Adjusting Bolt as C:
Second view with same notes:
The optional 10mm may come in handy to remove the bolts holding the front bumper undertray (panel between the bumper and the engine undertray - bolts toward the back of the car). I dropped the 12mm socket twice loosening B, and once the whole ratchet loosening C. Removing the 10mm's (four of them) will allow you enough clearance to pull it off the body and shake out whatever you drop.
Once it's good and loose, remove the belt. I went on to do Part 2 - replacing the Power Steering (inner) belt.
If you're just doing the outer belt replace the belt, swear some as it's a PITA to get over all the pulleys, and tighten using Bolt C. (Routing is easy - no rollers to worry about, just get it around all three pulleys.) Once it's as tight as you want (I had to exert some force to get 90* twist in the middle), lock down Bolts A and B. Clip the zip-tie on bundle D, put the bundle back in the factory clip on the front of the car, and replace the coolant cap. You're all set.
Part 2 - the Power Steering (PS - inner) belt:
Tools required:
3/8" drive 12mm socket (should have from Part 1)
3/8" drive ratchet (from part 1)
1/4" drive 10mm socket (may have from part 1)
1/4" drive ratchet or adapter for 3/8" ratchet (which you would have from Part 1)
1/2" drive 21mm socket
1/2" drive breaker bar or ratchet (may have from part 1)
Jack
Jackstand
Long (12") flathead screw driver
At this point my helper had to go inside - don't want him messing around when the car is on a jack/jackstands.
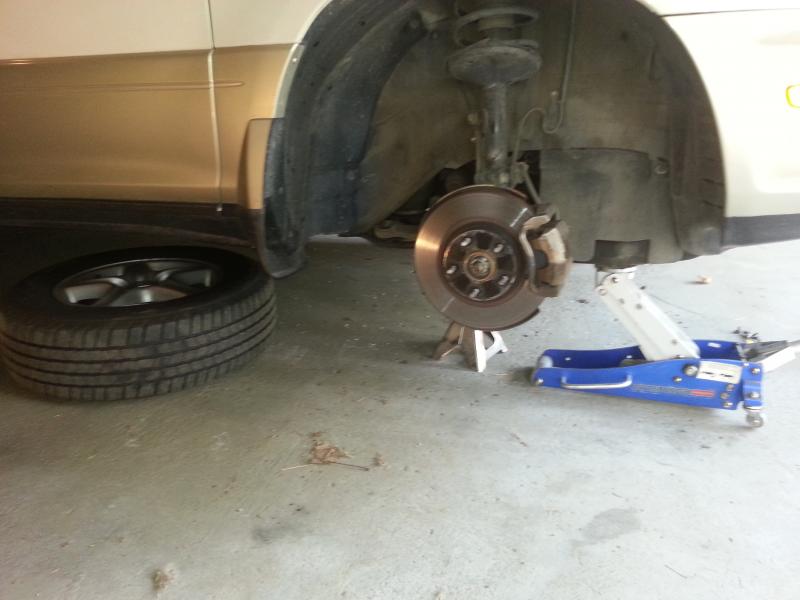
Use the 21mm socket and 1/2" drive ratchet or breaker bar to loosen the lugs on the front right wheel. Just a couple threads.
Jack up the front right corner of the car and place it on a jackstand. I put the jack in from the front, and placed the jack stand behind it along the frame - kinda behind the susp/brakes.
Remove the wheel and place it out of the way. I as a practice always place the wheel under the side of the car, and lower onto the jackstand, then place pressure back on the jack. This way the jack and jackstand are holding the car, and if it slips the wheel will break some of the fall. (More important in little sports cars, the height of the RX means it likely wouldn't hit the wheel anyhow.) You may sacrifice a wheel if it falls on it, but better the wheel than your face (assuming you are working under the car).
There you can see the jackstand behind the brake area, along the frame.
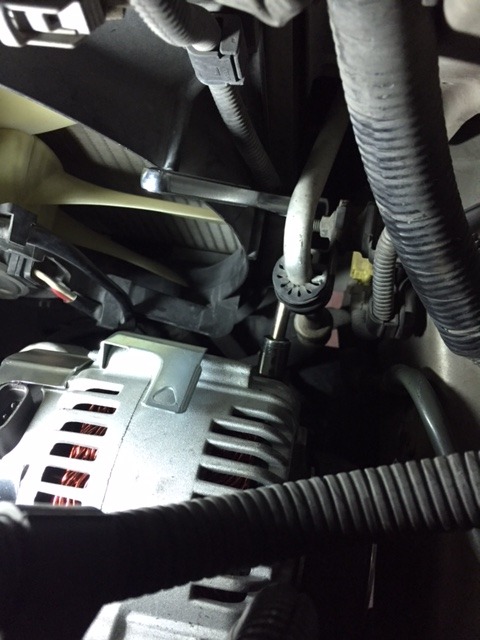
Now use the 10mm to remove the two E bolts shown below (inside the passenger wheel well, towards the front of the car).
I neglected to take a picture before I removed the inner belt, but you will have to loosen bolt F below, a 12mm. Mine was super tight, so I used my 1/2" drive 12mm and breaker bar.
Bolt F can then be loosened pretty easily with the 12mm. I used the 3/8" drive ratchet and short extension with the 3/8" drive 12mm socket to loosen it quite a bit (without the extension it didn't have clearance, and using the breaker bar with the 1/2" drive socket would take forever).
Once F is good and loose, I squeezed both sides of the belt to move the PS pump up and release tension on it (making gap G smaller). Remove the belt, replace with the new one. (PITA just like the belt for part 1, but eventually it goes on.)
To tighten the belt, I put a long flathead screwdriver in gap G and pried downwards toward bolt F. Once I liked how tight it was, I tightened bolt F up and was ready to go.
I did not make the inner belt as tight as the outer. A.) it would have been a pain to pry that hard. B.) as previously noted the PS pump rotates pretty easily and likely doesn't need to be that tight.
Since I was doing 1 and 2, I waited to replace the cover panel ant bolts E until after I got the outer belt on from part 1.
Put the panel back in place, replace the E bolts. Put the wheel back on, remove it from the jack/ jackstands. Finish up the Part 1 ending, and you're set.
Thank you for the feedbacks of third party parts experience. This is a very useful information. I just replaced Alternator belt with Gates belt, the belt looks good, but the belt thickness is thin, and it squeels badly. I have adjusted it 4th times, little by little, and I don't want to overtight it. Gates Belt is not for this car.
Originally Posted by code58
My personal recommendation would be to not ever use belt conditioner. I have had experience with this very thing (the squealing, not the use of belt conditioner). I bought a new Dayco ribbed belt at PB's, only because I was there for some car polish. The ORIGINAL belt said Toyota/ Dayco on the belt. Had over 100K mi. so thought better change it, though it didn't look very bad. With no noise from the old belt, I started it and had quite a bit of squeal from the new belt. Checked tension and was convinced it was plenty tight. Removed it and compared to the old belt and with a mic found that the angle of the grooves was off a few thousanths from the old belt AND the pulley grooves! Put the old belt back on and it was silent. Went to Toyota dealer and purchased a new OEM belt (for several dollars less than PB's belt) and when installed, it was once again silent. I have completely stopped buying aftermarket parts for the most part because I've found them to be problematic in a way they never used to be. I think one of the problems is so many being manufactured in 3rd word countries to save money.
I put a new timing belt on the RX (Goodyear Gatorback, which I had always respected) and about 30K mi. later was chasing a small noise and was amazed when I pulled the TB cover off and ran it and found that that TB had become a snake! It was perfectly true when I installed it and yet now it was tracking in a zig-zag pattern about 1/4in. Pulled it off and replaced with an OEM belt and problems gone. It's taken a little while to learn my lesson but I think even the major brand names are too focused on profit and to little on quality control. I was not real happy when I saw on the belt that it was made in some hard to pronounce African country but figured Goodyear would have good quality control to protect their name, even in "loin cloth country". Guess I was wrong about that one, huh? When I stretched it from the crossbar on my vise I could readily see why it tracked like a snake- It LOOKED like a snake!
hey guys, new member, i came across this while trying to replace my wife's alternator. everything went well except when i was tightening the adjusting bolt. i did it the same way and it seemed to take forever at one small turn at a time. i was like "there has to be a faster way" turns out you can fit a smaller ratchet, extension, and socket in between the small gap shown. it made my job a lot easier and was way faster. hope this helps someone!
Leo
]
Our RX300 had her AC/Alternator and power steering belt replaced with the timing belt service.
The brand used is Bando and after 30k, it started to squeal in the morning after car is cooled down.
The squeal lasts for 3-5 seconds, is this likely to be the AC/Alternator belt tension?
It sounds similar to this video, for 3-5 seconds duration. His car squeal lasts much longer.
Interesting user name. Just keep in mind, the user name will be there for a long time.
Reminds me of a unique user name '**** Star' ... A member wrote "please please tell us you are a female artist". Never heard from **** Star ever again.
Hah, I've been using the name so long on racing related forums, I forget that it was originally an attempt at a stupid joke. Now it just auto fills on any forum registration, so I just roll with it.
Hi all. I just went through this ordeal tonight and figured I'd share a few variations I had to employ. Hopefully they can help someone else in this Fraternity of Misery:
My lock bolt was was actually 13 mm, not 12 mm.
The bolt threads through a nut on other side of housing, which will - yep - turn if you don't also lock it down. I ended up getting a 13 mm open-ended wrench in there.
I could not get a ratcheting box end wrench (store sold out - Murphy's Law). Best tool in lieu of this turned out to be a small 1/4" drive ratchet with adapters.
AssFault's trick of accessing the adjustment screw thru the front didn't work for me - there is no angle that would do it.
As others have pointed out, several wires and brackets had to be moved.
Overall, I'm a little pissed that anyone would design an alternator belt so tough to adjust. Maybe I'm a little bitter because I also discovered today that the same perp apparently also designed the oil filter placement.
1 & 2 must be loosened before you attempt to move 3.
I am still looking for the best tool to move 3. One of these days I will buy a cable (flexible) drive. If any one knows of a better tool, please post.
Salim
Hi Salim, I'm undertaking this process (wrestling with Aternator bolts) right now in conjunction with digging to doing my timing belt kit maintenance job. I didn't realize I was going to have to learn each component removal/replacement trick in order just to get to my main project. Does anyone know if best method on the adjusting bolt is to use a long 3/8s extension + a swivel attached to a socket and then try it from above? Its no easy task keeping a swivel + socket on the thing. I do have a flex head 12MM racheting wrench and I'll give that a try. Saw that tip on this forum. Also going to do the serpentine loaner tool as the locking nut was no fun loosening with 3/8s ratchet + reducer atached to 1/4 inch drive 12MM socket. this combo cleared the belt. My fat hands dont want to fight these belts again so I'm going to buy more OEM Toyota Dayco belts as a part of my timing belt replacement journey.
Lobra 97 - Thanks so much if you posted these pics with the long extension sticking out the front of RX. I tried with limited success using a wobble thing on extension from above.
Assfault - thank you for this picture of the straight on approach to the adjusting bolt coming in from front of RX. Looks much better than monkeying with a flexhead on a rachet extension from above.


 06-11-13, 10:08 AM