DIY LS1 Motor Mounts, LS1/T56 Swap
 07-12-14, 09:57 AM
#1

I decided to do an LS1/T56 swap on my road race SC300, the weight distribution should become close to 50/50 and lose 150lbs from the aluminum block vs the GTE. The car is completely stripped race car and should be around 2500lbs dry weight.
So the problem I ran into was the only motor mount kit was $1000, having access to a welding machine and time I was initially going to build them from the ground up. With some late night searching I stumbled upon a Supra LS1 swap from Austrailia, in which the owner used stock GTO upper brackets (didn't know what they were at the time of reading). These mounts allow the use of regular lower motor mounts that can come from many different cars. Very helpful thread for me. http://www.driftworks.com/forum/drif...a-no-clue.html
I ended up buying corvette top aluminum motor brackets, which I assumed were nearly the same as the ones in the thread I had read. Turns out the other guy used GTO mounts. Reversing the side of the mounts made the engine hit the fire wall. Mounted correctly, it would sit about 5" from the firewall. The solid Supra motor mounts from PHR I had laying around, were about 3.25" or 82.55mm, and were way too tall. I also tried stock 97+ supra mounts and they were the same length. I went to the autozone for E36 M3 mounts, but they were rubber and wanted $120, RockAuto had them for $20. I didn't feel like waiting.
I ended up making my own spacers for the upper aluminum brackets and solid motor mounts for the lower mounts(2"/50mm). I had the 1.75" DOM tubing lying in the garage from my roll cage, which is what I used for the lower mounts, welded some big washers on each end and a grade 8 bolt. They basically ended up looking like very short PHR solid mounts. The upper bracket gets moved forward by drilling holes in 3/4" flat bar. This gave about 1.5" of clearance from the head to the firewall. This also allows me to run the stock Camaro 1-piece driveshaft directly to my TT LSD rear end with some adapters.
The Camaro pan is a tighter fit on the rear part of the subframe where the castor arm mounts, but I'm going to cut the hump, which should give enough clearance.
My motor came with longtubes, which have no way of fitting, but I was told the pontiac G8 headers will work.
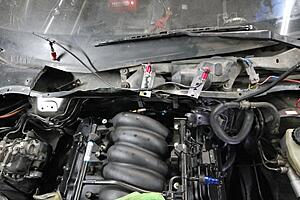
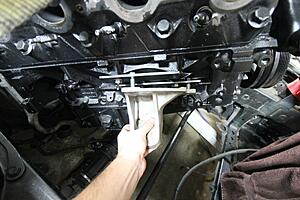
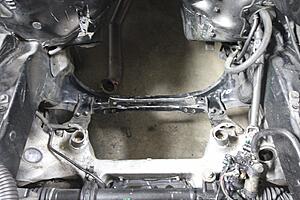
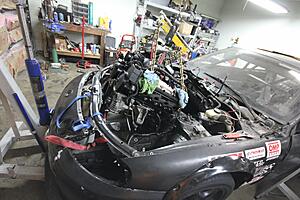
Firewall clearance.
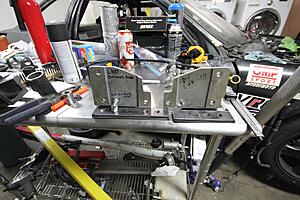
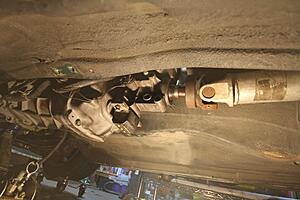
Modified Corvette motor mounts and flat bar spacers, to move the motor to the perfect location. My friend's Left is actually the right of the car, which had us miss-placing mounts a few times,
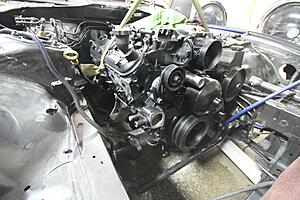
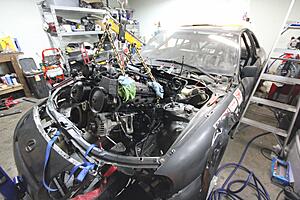
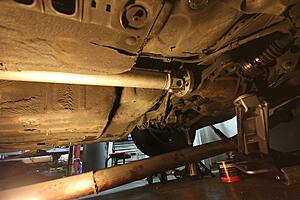
A view of the lower mounts, without the top bolt completed. Also the motor is a couple inches forward in this picture as it was earlier in the mock up stage. Just showing the lower mounts
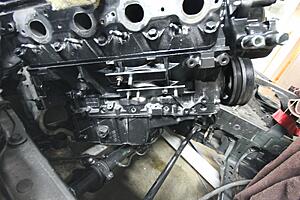
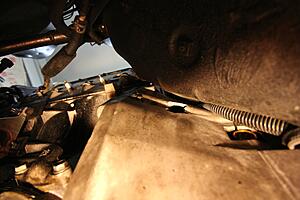
Flat Bar on motor.

So the problem I ran into was the only motor mount kit was $1000, having access to a welding machine and time I was initially going to build them from the ground up. With some late night searching I stumbled upon a Supra LS1 swap from Austrailia, in which the owner used stock GTO upper brackets (didn't know what they were at the time of reading). These mounts allow the use of regular lower motor mounts that can come from many different cars. Very helpful thread for me. http://www.driftworks.com/forum/drif...a-no-clue.html
I ended up buying corvette top aluminum motor brackets, which I assumed were nearly the same as the ones in the thread I had read. Turns out the other guy used GTO mounts. Reversing the side of the mounts made the engine hit the fire wall. Mounted correctly, it would sit about 5" from the firewall. The solid Supra motor mounts from PHR I had laying around, were about 3.25" or 82.55mm, and were way too tall. I also tried stock 97+ supra mounts and they were the same length. I went to the autozone for E36 M3 mounts, but they were rubber and wanted $120, RockAuto had them for $20. I didn't feel like waiting.
I ended up making my own spacers for the upper aluminum brackets and solid motor mounts for the lower mounts(2"/50mm). I had the 1.75" DOM tubing lying in the garage from my roll cage, which is what I used for the lower mounts, welded some big washers on each end and a grade 8 bolt. They basically ended up looking like very short PHR solid mounts. The upper bracket gets moved forward by drilling holes in 3/4" flat bar. This gave about 1.5" of clearance from the head to the firewall. This also allows me to run the stock Camaro 1-piece driveshaft directly to my TT LSD rear end with some adapters.
The Camaro pan is a tighter fit on the rear part of the subframe where the castor arm mounts, but I'm going to cut the hump, which should give enough clearance.
My motor came with longtubes, which have no way of fitting, but I was told the pontiac G8 headers will work.
Firewall clearance.

Modified Corvette motor mounts and flat bar spacers, to move the motor to the perfect location. My friend's Left is actually the right of the car, which had us miss-placing mounts a few times,

A view of the lower mounts, without the top bolt completed. Also the motor is a couple inches forward in this picture as it was earlier in the mock up stage. Just showing the lower mounts

Flat Bar on motor.


Last edited by fried_rice; 07-12-14 at 10:57 AM.
 07-12-14, 10:08 AM
#2
Would like to thank turbodremz for answering my many PM's about what all was needed, and comparing motor locations
Other items Needed
-Russel 648060 Power Steering adapter to -6AN
-Driftmotion Power Steering line adapter -6an for stock rack
-Russel 640850 Camaro LS1 3/8" to -6AN fuel fitting
-Fuel Pressure Regulator w/lines
-Moser 718-5U211 CONVERSION U-JOINT
-625-TC-1000LS1U LS1 THROTTLE CABLE
-Neapco 2-1153
-DM221 Diff Adapter for MK4/GS/SC 3-Bolt to 4-Bolt 1350 flange
-Stock 1-piece Camaro Driveshaft
Other misc items, but those are the main things, that took me a bit of time to look up and search for. You will also need wiring, though I have no stock body harness, universal gauges and just run a switch panel, making wiring very simple. I'm not done yet, but figured I'd get the thread started for anyone who may need the info.
Here are some pictures, since they were asked below. I'll update the other post with new pictures, got the transmission on last night.
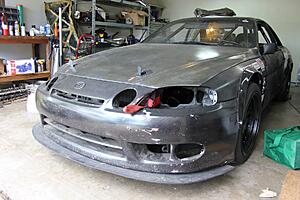
The LS1 sits so much further back than the JZ motor.

Attachment 496820
Attachment 496821
Lifted the front to get on the trailer, still got stuck. May cut exhaust into floor and make a flat panel bottom.
Attachment 496823
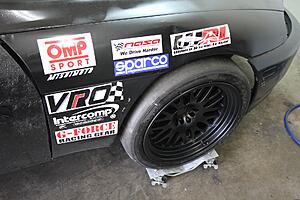
18X11's up front with 315's, could have towed the car to a hella flush car meet
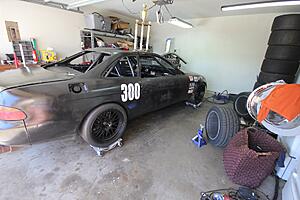

2809lbs with 20.6 gallons of fuel and the 2JZ-GE, more weight will be taken out.
Attachment 496827
Other items Needed
-Russel 648060 Power Steering adapter to -6AN
-Driftmotion Power Steering line adapter -6an for stock rack
-Russel 640850 Camaro LS1 3/8" to -6AN fuel fitting
-Fuel Pressure Regulator w/lines
-Moser 718-5U211 CONVERSION U-JOINT
-625-TC-1000LS1U LS1 THROTTLE CABLE
-Neapco 2-1153
-DM221 Diff Adapter for MK4/GS/SC 3-Bolt to 4-Bolt 1350 flange
-Stock 1-piece Camaro Driveshaft
Other misc items, but those are the main things, that took me a bit of time to look up and search for. You will also need wiring, though I have no stock body harness, universal gauges and just run a switch panel, making wiring very simple. I'm not done yet, but figured I'd get the thread started for anyone who may need the info.
Here are some pictures, since they were asked below. I'll update the other post with new pictures, got the transmission on last night.
The LS1 sits so much further back than the JZ motor.

Attachment 496820
Attachment 496821
Lifted the front to get on the trailer, still got stuck. May cut exhaust into floor and make a flat panel bottom.

Attachment 496823
18X11's up front with 315's, could have towed the car to a hella flush car meet


2809lbs with 20.6 gallons of fuel and the 2JZ-GE, more weight will be taken out.
Attachment 496827
Last edited by fried_rice; 07-13-14 at 09:16 AM.


 07-14-14, 03:16 PM
#7
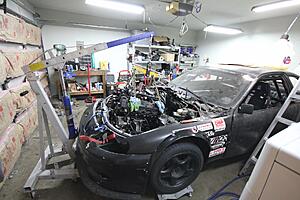
Got the harness and transmission put back on. Had to cut the caster subframe bar for a little extra clearance. Will make the transmission bracket tomorrow. Also need to figure out my headers, may try to modify my longtubes.
I had a fun time getting the motor in, as my load leveler broke half way through making it a ***** to get it in by myself, I had to take all the chains off and put the strap back on to get it the rest of the way.
All wires seem to have enough clearance, and I can reach the map sensor and brake booster line on the back of the intake manifold. Should be a few days away from being complete, as I'm taking my time working a few hours a day.
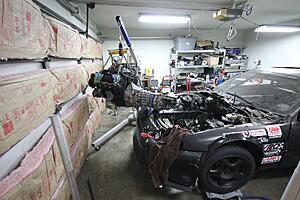
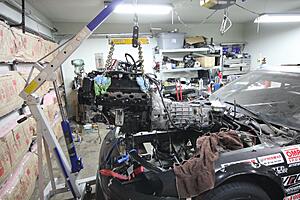
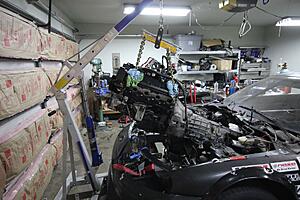


Trending Topics
07-14-14, 04:00 PM
#8
Pole Position
Join Date: Dec 2012
Location: Delaware
Posts: 393
Likes: 0
Received 0 Likes
on
0 Posts
Looking good. I've got a bazillion photos similar when shoving the same combo in my last car. You may want to check out speedhut for your gauges (I got the revolution style for the rx7). Other than that, the only major issue is tranny > dif alignment. Iirc 3* is perfect and 0* is bad.
Good luck I'll be following along maybe shoot some pointers. Love that motor and tranny. In my rx7 I never used 1st gear because toouch tire spin lol.
Good luck I'll be following along maybe shoot some pointers. Love that motor and tranny. In my rx7 I never used 1st gear because toouch tire spin lol.
07-14-14, 05:29 PM
#9
I have a universal tach, oil pressure, oil temp, water temp, a/f gauges. I don't have a speedometer, due to only driving the car on the road course. I have a timer that allows me to log speed and anything else after sessions for comparisons. I should never be below 50mph, which means I won't be shifting below 3rd, especially since the car is so light with extremely wide tires.
Thanks for the info on the transmission angle, I'll read up what the optimal angle is and shoot for that.
Thanks for the info on the transmission angle, I'll read up what the optimal angle is and shoot for that.
Last edited by fried_rice; 07-15-14 at 06:36 PM.
07-15-14, 11:22 AM
#10
Driver School Candidate

Join Date: Jul 2014
Location: California
Posts: 1
Likes: 0
Received 0 Likes
on
0 Posts
Hi my name is rich, I'm in the middle of the same swap with the ls1/t56 in my 92 Lexus sc400..i got the motor and tranny mounts done already, but I'm having trouble with the drive shaft...i seen u said u had adapters put in...were did u search and find these parts?please do call 619-410-7118
 07-15-14, 03:57 PM
#12
Hi my name is rich, I'm in the middle of the same swap with the ls1/t56 in my 92 Lexus sc400..i got the motor and tranny mounts done already, but I'm having trouble with the drive shaft...i seen u said u had adapters put in...were did u search and find these parts?please do call 619-410-7118
If your going to be making your mounts, be sure to measure 4 or 5 times before going forward to assure your driveshaft wont need to be modified.
For those of you needing any measurements or info (including pics) let me know, Im always willing to help. And my car is probably going to get torn down pretty soon, so if you need info drop me a line asap.
OP, also forgot to get back to you the other day. The 14'' from SB to WP is spot on, and the alignment front to back appears to be about 1/2'' or so farther forward than mine, so I think your good. I also meant to ask, what fender flares are you using? Im planning on a new wheel setup and stock fenders arent going to cut it.
07-15-14, 04:25 PM
#13
^Thanks for the info, I purchased the fender flares from ebay and they were pretty crappy quality, chipped and what not, but I decided to keep them. Type in Nissan fender flares into Ebay and it will pull up a lot of sellers. The rears are bigger than the front, and the stock SC body is wider in the rear. The wheels are XXR 531's 18X11 20 offset, I would recommend either a lower offset in the rear or the same size flares for a better look.
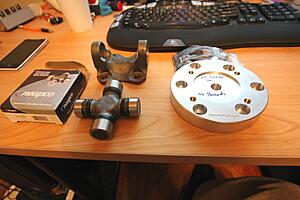
I purchased the Spicer flange and U joint from Jegs, and the Driftmotion adapter from Driftmotion.
Jegs:
-Moser 718-5U211 CONVERSION U-JOINT
-Neapco 2-1153
Driftmotion:
DM221 Diff Adapter for MK4/GS/SC 3-Bolt to 4-Bolt 1350 flange
I will update the thread tonight once I finalize my driveshaft and mount locations. The the flat bar on the stock motor brackets, allows me to drill the hole out further if I needed to move it, while keeping the lower mounts the same. I spent the afternoon driving to a few places, trying to get the stock U-Joint pressed out. Ended up cutting the stock out, but the U-joint ends were still pressed in. My mini harbor freight press would not push the U joint pieces out and my vice was on a borrowed drill press. I ended up going to Lawell Motorsports, and Terry had the driveshaft ready for the new components in no time.
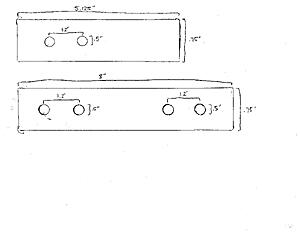
Once everything is perfected I will post exact measurements and drawings of everything. Here's the bracket adapter measurements, and completed driveshaft, which fit perfectly. I will figure the transmission mount out tomorrow, possibly using the stock SC trans cross member and new bolt holes, trying to save weight with the aluminum. And a trip to buy steel.

I purchased the Spicer flange and U joint from Jegs, and the Driftmotion adapter from Driftmotion.
Jegs:
-Moser 718-5U211 CONVERSION U-JOINT
-Neapco 2-1153
Driftmotion:
DM221 Diff Adapter for MK4/GS/SC 3-Bolt to 4-Bolt 1350 flange
I will update the thread tonight once I finalize my driveshaft and mount locations. The the flat bar on the stock motor brackets, allows me to drill the hole out further if I needed to move it, while keeping the lower mounts the same. I spent the afternoon driving to a few places, trying to get the stock U-Joint pressed out. Ended up cutting the stock out, but the U-joint ends were still pressed in. My mini harbor freight press would not push the U joint pieces out and my vice was on a borrowed drill press. I ended up going to Lawell Motorsports, and Terry had the driveshaft ready for the new components in no time.
Once everything is perfected I will post exact measurements and drawings of everything. Here's the bracket adapter measurements, and completed driveshaft, which fit perfectly. I will figure the transmission mount out tomorrow, possibly using the stock SC trans cross member and new bolt holes, trying to save weight with the aluminum. And a trip to buy steel.


Last edited by fried_rice; 07-15-14 at 06:31 PM.
07-17-14, 10:18 AM
#15
Just a quick update. There are two tabs on the T56 that are hitting the trans tunnel which make it unable to move backwards any further. The slave cylinder line is extremely close to the trans tunnel. I'll likely cut the tabs off the tranny and drill a hole to pass the braided slave line through.
The drive-shaft seems to be about 1" from where it was on the camaro at this point. Only way to move it back the extra inch is to cut the tabs off the tranny. This should still allow a bit of clearance between the firewall and valve covers, but not much.
A custom driveshaft would leave you the ability to mount the motor a little further away from the firewall, but I have this stock Camaro driveshaft for free, so working with what I have.


Last edited by fried_rice; 07-18-14 at 11:40 AM.

