DIY 1992 SC400 Alternator Rebuild--
 01-14-07, 06:00 PM
#1
Lexus Test Driver
Thread Starter

Hello all-- If you're having problems with your SC's battery dying, lights dimming while idling, or already know you've got a bad alternator, you should read this writeup.
The Nippondenso alternator the SC400 uses from 92-94 are the same, but any of them will have a similar design with all modular parts concerning the rectifier, which is a common problem part, the brushes, which should be changed anytime you have the alternator off for service if the originals have a good many miles on them, and lastly the voltage regulator can also be easily accessed and replaced, though it isn't a common problem part and you shouldn't change it unless an alternator test reveals a problem with it. It is normal for the volt regulator to last a very long time in these ND alternators, but if you want to change it for your own peace of mind, this writeup will tell you how..
There is a h/d rectifier with higher capacity diodes that will in turn last longer under the same load available from www.nationsautoelectric.com--- for $44.95 as a direct replacement. Apparently there was an obvious problem with the original as certain manufacturers decided to market an upgraded version.
The rectifier is a common problem on these alternators, but the bearings are sealed high quality units and unless your alternator doesn't spin freely and quietly upon inspection after removal, you shouldn't worry with them--
So if you're having problems with your charging system you should have your alt tested, and if it is the "diode" (rectifier) or the volt regultor you can replace the brush/holder, rectifier, and volt regulator if needed without cracking the case halves at all-- since it's all under the back cover-- and replacing all 3 takes about 10 minutes.
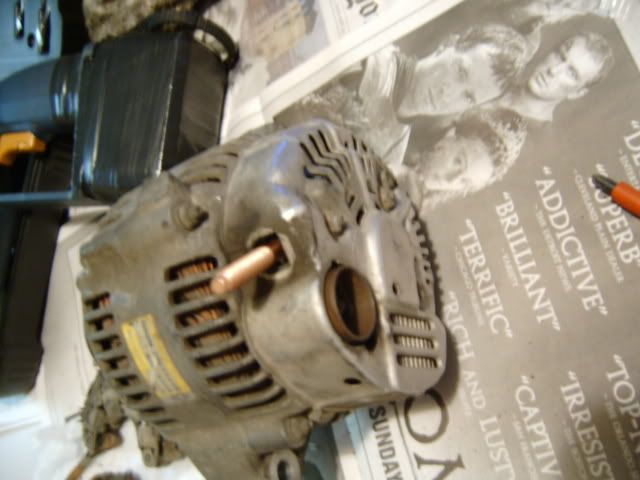
The Toyota part # for the rectifier is: Toyota Part # 2735774170 -- The rectifier is #7 in the image-- and it's accessible under the back cover beneath the voltage regulator-- It requires no soldering--- bolt on affair.
Here's the rectifier:

Here's a blowup of the SC400 alternator--

Here's a full parts list for cross referencing all the internals-- here
You can do a drill-down of your car's make year and model from the home page of that site, and find a blowup with all part #s referenced as well as cross references for each part-- This particular alternator interchanges parts with Acura's, Mazdas, and Toyota's as well as Lexus--
Once you find the part# from the cross reference-- you can supply the alternator supply house I provided a link to with the part # you find and they can get it for you--
The rectifier is responsible for converting the alternating current in combined negative and positive voltage into seperated negative and positive direct current-- when diodes in the rectifier go out, your battery simply won't charge as quickly, or at all after complete failure-- You will also see the cluster and control lights dimming at idle, and brightening when rpm's increase. When this happens the bad rectifier can actually kill your battery sending a mixed signal to your battery.
I'm not actually doing a full rebuild, but only changing the rectifier pack-- which is a very common problem with alternators, as well as the voltage regulator--
I had mine tested at Oreilly auto parts, and the tester he connected to my car said "bad diode"-- this would translate to a bad rectifier-- since I would rather just replace the pack vs. resoldering all 8 diodes back in--
I may replace the bearings while I'm in there unless they appear flawless, and should be about $20 total--
It's also a good idea to replace the brushes and holder, but upon inspection, if there's a lot of material left in the brushes, I'll just leave the originals in-- Why replace them if they work right?
This should bring the alternator back to life for a long time to come--- and this way I know what was replaced and what wasn't vs. buying a "rebuilt unit" you know nothing about--
I thought this may be interesting to all those DIY'ers out there that want to keep the Lex runnin on the cheap--
Pics will come when I get the parts and start working on it--
The Nippondenso alternator the SC400 uses from 92-94 are the same, but any of them will have a similar design with all modular parts concerning the rectifier, which is a common problem part, the brushes, which should be changed anytime you have the alternator off for service if the originals have a good many miles on them, and lastly the voltage regulator can also be easily accessed and replaced, though it isn't a common problem part and you shouldn't change it unless an alternator test reveals a problem with it. It is normal for the volt regulator to last a very long time in these ND alternators, but if you want to change it for your own peace of mind, this writeup will tell you how..
There is a h/d rectifier with higher capacity diodes that will in turn last longer under the same load available from www.nationsautoelectric.com--- for $44.95 as a direct replacement. Apparently there was an obvious problem with the original as certain manufacturers decided to market an upgraded version.
The rectifier is a common problem on these alternators, but the bearings are sealed high quality units and unless your alternator doesn't spin freely and quietly upon inspection after removal, you shouldn't worry with them--
So if you're having problems with your charging system you should have your alt tested, and if it is the "diode" (rectifier) or the volt regultor you can replace the brush/holder, rectifier, and volt regulator if needed without cracking the case halves at all-- since it's all under the back cover-- and replacing all 3 takes about 10 minutes.
The Toyota part # for the rectifier is: Toyota Part # 2735774170 -- The rectifier is #7 in the image-- and it's accessible under the back cover beneath the voltage regulator-- It requires no soldering--- bolt on affair.
Here's the rectifier:
Here's a blowup of the SC400 alternator--
Here's a full parts list for cross referencing all the internals-- here
You can do a drill-down of your car's make year and model from the home page of that site, and find a blowup with all part #s referenced as well as cross references for each part-- This particular alternator interchanges parts with Acura's, Mazdas, and Toyota's as well as Lexus--
Once you find the part# from the cross reference-- you can supply the alternator supply house I provided a link to with the part # you find and they can get it for you--
The rectifier is responsible for converting the alternating current in combined negative and positive voltage into seperated negative and positive direct current-- when diodes in the rectifier go out, your battery simply won't charge as quickly, or at all after complete failure-- You will also see the cluster and control lights dimming at idle, and brightening when rpm's increase. When this happens the bad rectifier can actually kill your battery sending a mixed signal to your battery.
I'm not actually doing a full rebuild, but only changing the rectifier pack-- which is a very common problem with alternators, as well as the voltage regulator--
I had mine tested at Oreilly auto parts, and the tester he connected to my car said "bad diode"-- this would translate to a bad rectifier-- since I would rather just replace the pack vs. resoldering all 8 diodes back in--
I may replace the bearings while I'm in there unless they appear flawless, and should be about $20 total--
It's also a good idea to replace the brushes and holder, but upon inspection, if there's a lot of material left in the brushes, I'll just leave the originals in-- Why replace them if they work right?
This should bring the alternator back to life for a long time to come--- and this way I know what was replaced and what wasn't vs. buying a "rebuilt unit" you know nothing about--
I thought this may be interesting to all those DIY'ers out there that want to keep the Lex runnin on the cheap--
Pics will come when I get the parts and start working on it--
Last edited by MJHSC400; 01-21-07 at 09:04 PM.
 01-20-07, 12:43 PM
#2
Lexus Test Driver
Thread Starter
What's up everybody-- Here's the update on the progress--
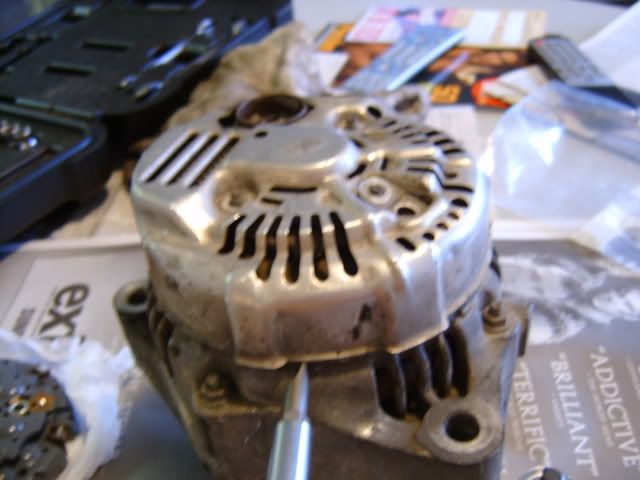
To remove the alternator, you first need to disconnnect the pos. battery terminal, this will keep the pos. wire from shorting on the car-- and I was able to just push down pretty hard on the belt tensioner and just slip the belt off one of the smooth idler pulleys with no grooves-- it just slid right off-- but took a little thinking to figure that out, so there's a freebie for ya.... You may just appreciate that one when you get on this job-- I was scratching my head on this one for a minute and I was in a hurry, so that was aggravating for a second-- Then I did that and it slipped right off--
I got the alt. out and I must say-- In short, it's a bi#$%! You have to disconnect a few brackets that hold the (ps?) lines in place, which are soft lines so they flex pretty well once you do this and you can squeeze the alt in and out below the car---- Don't even try pulling it from the top-- unless you have electric fans-- After doing this, I will be installing electric fans soon-- Unplugging the plug on the back of the alternator was a major pain, you really have to squeeze the tab to get it to release, the positive terminal/wire removal isn't too bad-- but I had to hold the alternaor with the long bolt to remove the positive wire with a socket wrench, as it was torqued pretty well--
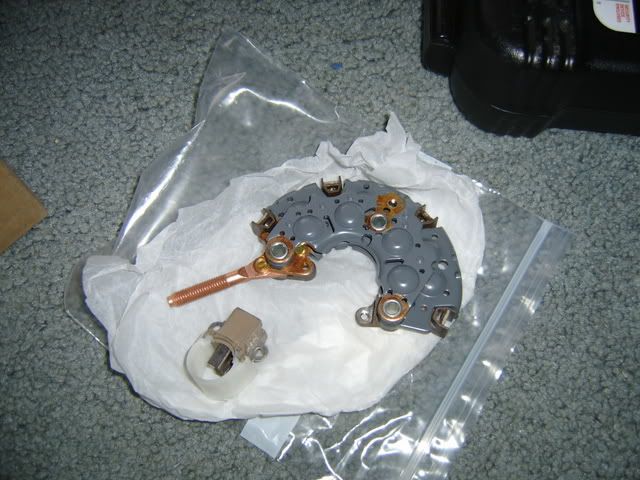
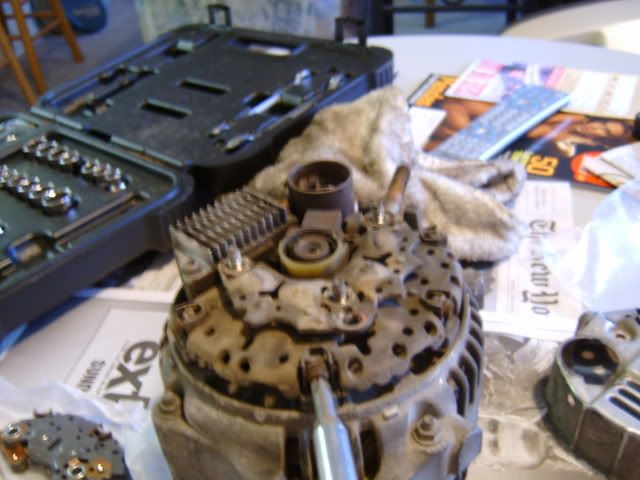
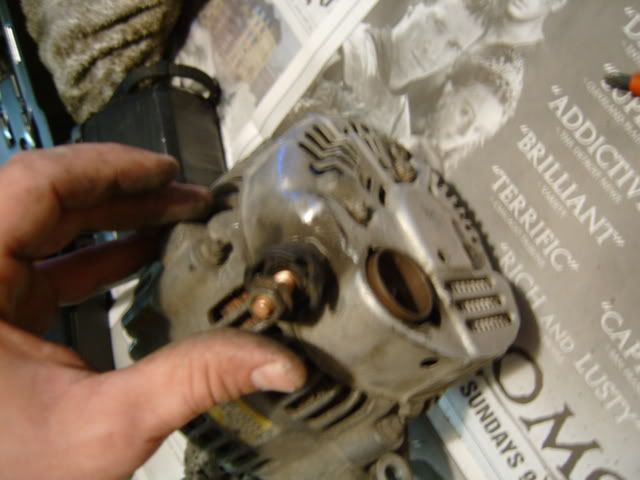
Everything looked good, the bearings are quiet, tight, and smooth, but as you see in the following pics, there was a lot of brush dust inside the holder that may have been responsible for shorting the rectifier pack over time---
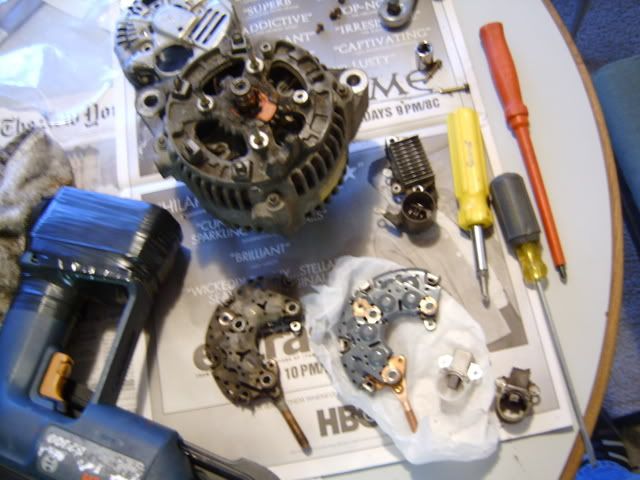
I replaced the rectifier pack and the brush/holder only, and it took 10 minutes to pull the back cover, remove the originals (dirty!!), and reinstall the new parts--
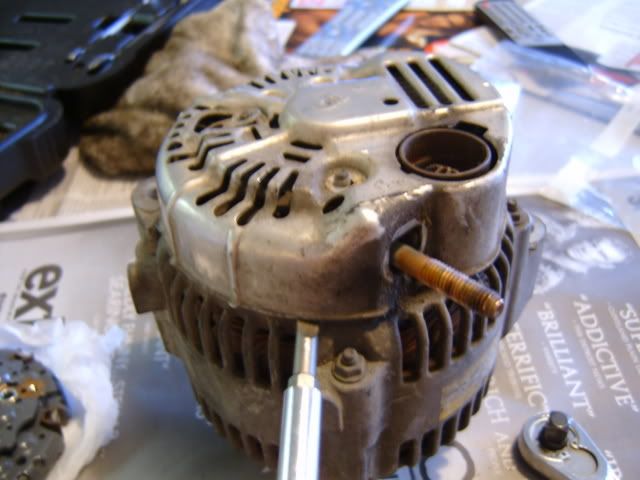
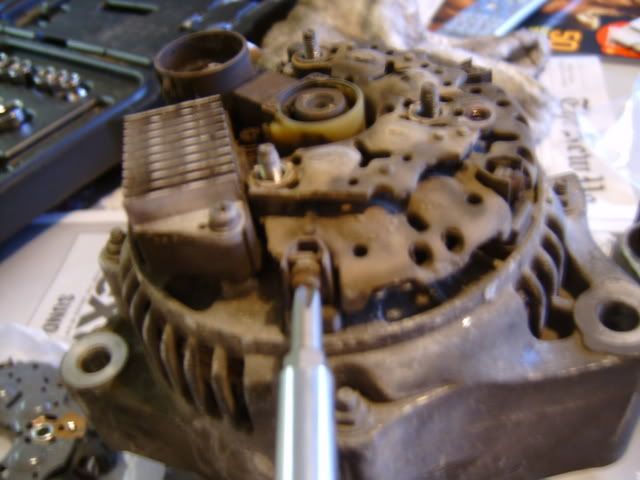
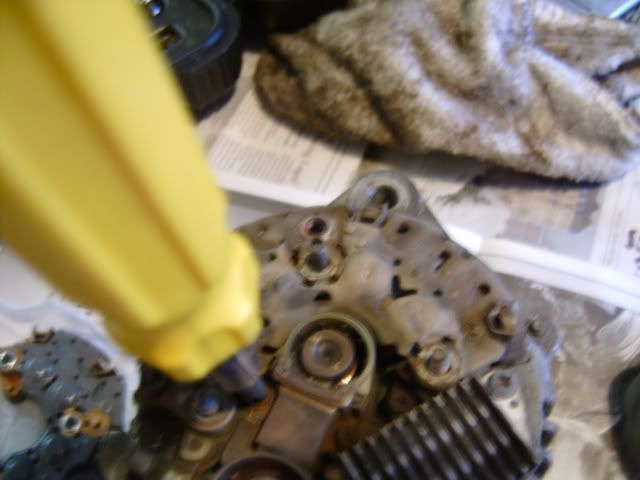
When you remove the brush holder, you have to unscrew and remove about 7 or 8 screws from the actual rectifier to be able to remove the brush holder itself, then you need to use a long skinny flat blade to push the spring loaded brushes back and out of the grooves on the rotor shaft so you can pull the holder off the case--
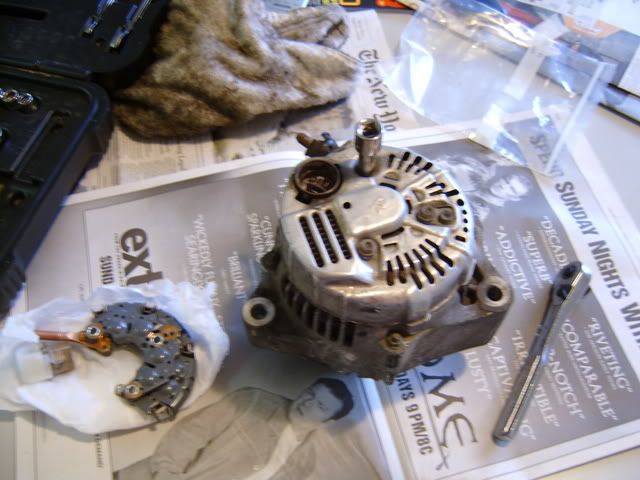
The rear case cover comes off with 3 small nuts, and 1 small screw-- holding the ground strap to the rear case cover--
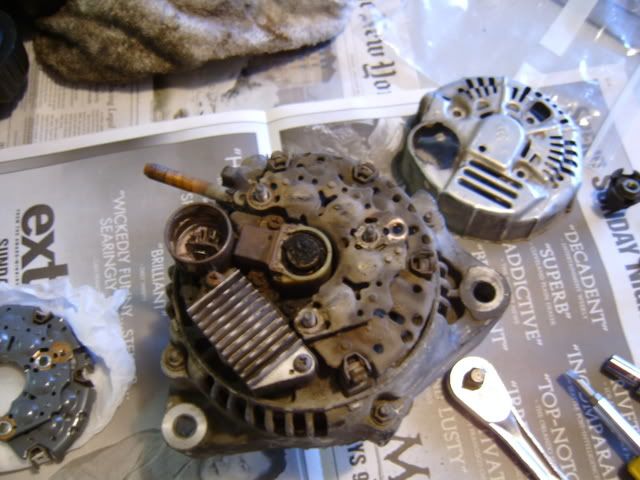
After removing the case cover on the back by prying with a flat blade (after removing the 3 nuts and 1 screw-- plus the positive terminal nut and insulator), you can then remove the brush holder and rectifier along with the volt regulator with a few screws in each-- you can install the new parts in the order pictured-- The rectifier pack installs first, then the volt regulator, then the brush/holder-- The brush/holder is a bit tricky to install, but I used a skinny flat blade to fully depress the brushes into their spring loaded housing, then sliding the brush holder over the rotor shaft being sure the brushes seat in the grooves properly -- if the holes are lined up properly they will be seated properly-- Take your time and be patient with this part as you don't want to force the brush holder on the shaft...
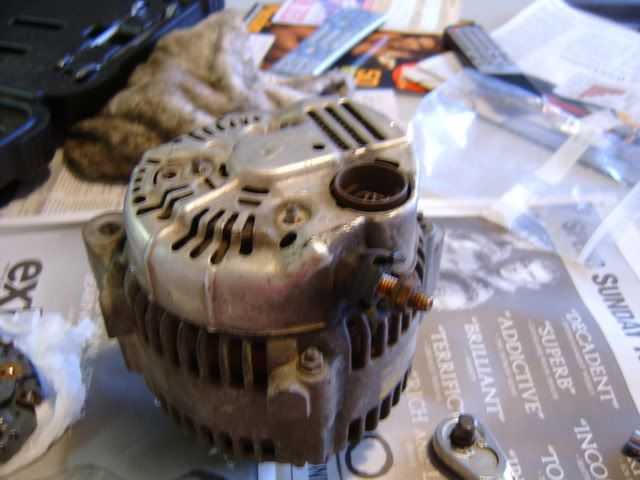
Now re-install and tighten all the screws down nice and tight, put the case cover back on, reinstall the positive terminal insulator and nut (positive terminal is on the end of the rec. pack -- bronze colored with nut on it)--
NOTE: -- THIS IS IMPORTANT!!!---- To seat the rectifier properly, you want to use the 3 nuts that hold the case cover on the back of the alt. to hold it in place (while you still have the cover off) while you tighten the individual contact screws that line the outer perimeter of the rectifier, -- there are 4 of these screws I believe-- After you have done this and the outer screws are tight you need to remove the 3 nuts and then reinstall the cover after you checked that all the screws are nice and tight. ------
Now you're done, and your alt will work again for a long time-- and you did it for $75 instead of $500 new OEM with labor (maybe more), or $150 for a re-man that may not even have a new rectifier in it-- but likely that's all they did is replace the rectifer and brushes -- which take 10 minutes, and they charged you $75 ~ for that 10 minutes of labor--
If you want to, you can take the alt. to Auto Zone while it's off (assuming you have another grocery getter/part hauler in the parker)-- and have them test it on the alternator dyno machine.... I will be doing this today just to be sure nothing was missed, as I don't want to install/remove this sucker twice, and I promise you don't either! I will update the post with the results from AutoZone's tester to keep everyone up with how it worked. Just for mine and your own reference and well being (and your knuckles well being!!)
This will assure that you don't need any more parts, which will be easy to replace while it's off the car (the only part that would be left at this point would be the voltage regulator, which is not a common problem part on these Nippondenso alternators) --
Happy DIY'ing guys!!! I hope you liked the writeup!!
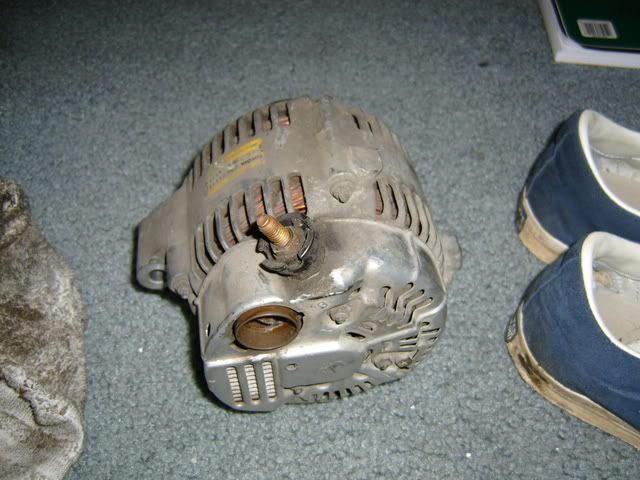

To remove the alternator, you first need to disconnnect the pos. battery terminal, this will keep the pos. wire from shorting on the car-- and I was able to just push down pretty hard on the belt tensioner and just slip the belt off one of the smooth idler pulleys with no grooves-- it just slid right off-- but took a little thinking to figure that out, so there's a freebie for ya.... You may just appreciate that one when you get on this job-- I was scratching my head on this one for a minute and I was in a hurry, so that was aggravating for a second-- Then I did that and it slipped right off--
I got the alt. out and I must say-- In short, it's a bi#$%! You have to disconnect a few brackets that hold the (ps?) lines in place, which are soft lines so they flex pretty well once you do this and you can squeeze the alt in and out below the car---- Don't even try pulling it from the top-- unless you have electric fans-- After doing this, I will be installing electric fans soon-- Unplugging the plug on the back of the alternator was a major pain, you really have to squeeze the tab to get it to release, the positive terminal/wire removal isn't too bad-- but I had to hold the alternaor with the long bolt to remove the positive wire with a socket wrench, as it was torqued pretty well--
Everything looked good, the bearings are quiet, tight, and smooth, but as you see in the following pics, there was a lot of brush dust inside the holder that may have been responsible for shorting the rectifier pack over time---
I replaced the rectifier pack and the brush/holder only, and it took 10 minutes to pull the back cover, remove the originals (dirty!!), and reinstall the new parts--
When you remove the brush holder, you have to unscrew and remove about 7 or 8 screws from the actual rectifier to be able to remove the brush holder itself, then you need to use a long skinny flat blade to push the spring loaded brushes back and out of the grooves on the rotor shaft so you can pull the holder off the case--
The rear case cover comes off with 3 small nuts, and 1 small screw-- holding the ground strap to the rear case cover--
After removing the case cover on the back by prying with a flat blade (after removing the 3 nuts and 1 screw-- plus the positive terminal nut and insulator), you can then remove the brush holder and rectifier along with the volt regulator with a few screws in each-- you can install the new parts in the order pictured-- The rectifier pack installs first, then the volt regulator, then the brush/holder-- The brush/holder is a bit tricky to install, but I used a skinny flat blade to fully depress the brushes into their spring loaded housing, then sliding the brush holder over the rotor shaft being sure the brushes seat in the grooves properly -- if the holes are lined up properly they will be seated properly-- Take your time and be patient with this part as you don't want to force the brush holder on the shaft...
Now re-install and tighten all the screws down nice and tight, put the case cover back on, reinstall the positive terminal insulator and nut (positive terminal is on the end of the rec. pack -- bronze colored with nut on it)--
NOTE: -- THIS IS IMPORTANT!!!---- To seat the rectifier properly, you want to use the 3 nuts that hold the case cover on the back of the alt. to hold it in place (while you still have the cover off) while you tighten the individual contact screws that line the outer perimeter of the rectifier, -- there are 4 of these screws I believe-- After you have done this and the outer screws are tight you need to remove the 3 nuts and then reinstall the cover after you checked that all the screws are nice and tight. ------
Now you're done, and your alt will work again for a long time-- and you did it for $75 instead of $500 new OEM with labor (maybe more), or $150 for a re-man that may not even have a new rectifier in it-- but likely that's all they did is replace the rectifer and brushes -- which take 10 minutes, and they charged you $75 ~ for that 10 minutes of labor--
If you want to, you can take the alt. to Auto Zone while it's off (assuming you have another grocery getter/part hauler in the parker)-- and have them test it on the alternator dyno machine.... I will be doing this today just to be sure nothing was missed, as I don't want to install/remove this sucker twice, and I promise you don't either! I will update the post with the results from AutoZone's tester to keep everyone up with how it worked. Just for mine and your own reference and well being (and your knuckles well being!!)
This will assure that you don't need any more parts, which will be easy to replace while it's off the car (the only part that would be left at this point would be the voltage regulator, which is not a common problem part on these Nippondenso alternators) --
Happy DIY'ing guys!!! I hope you liked the writeup!!
01-20-07, 12:45 PM
#3
Lexus Test Driver
Thread Starter
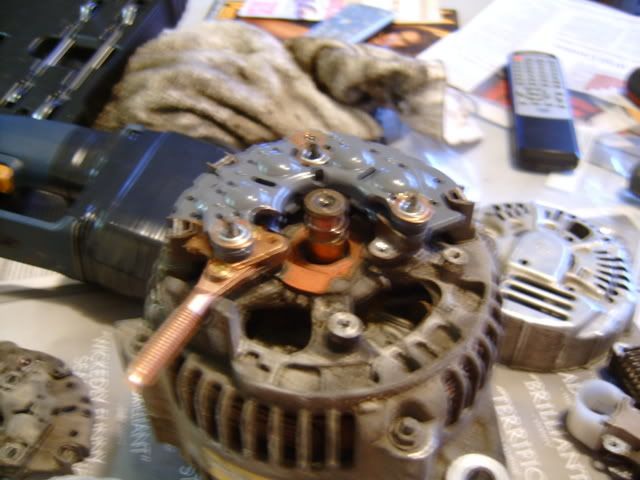
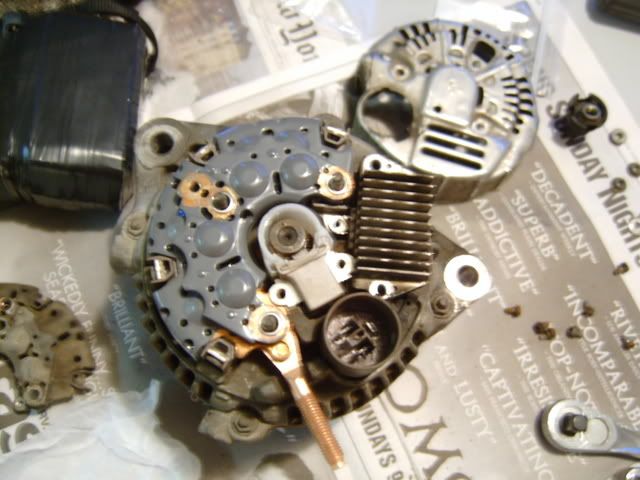
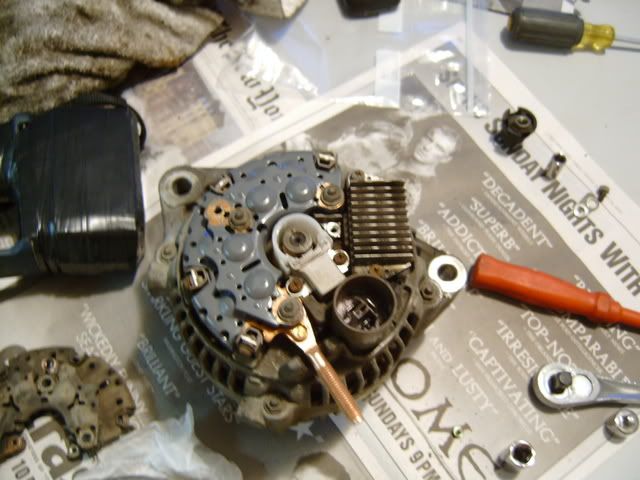
The rest of the pics:

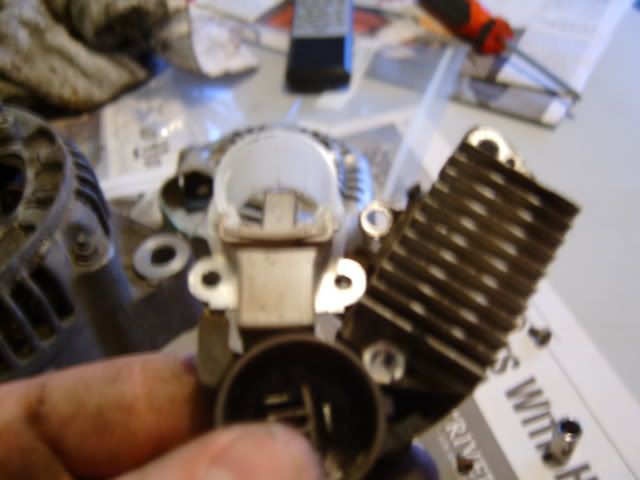
This is how the Volt Regulator and Brush holder fit together--
The Rectifier in place
The Rectifier and the Volt Regulator in place
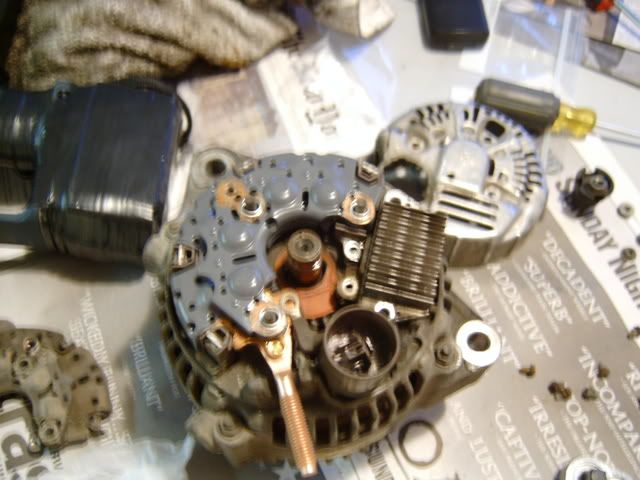
Finally, The previous in place plus the brush/holder-- this takes a little precision
Another pic
The positive terminal--
The insulator and terminal post nut in place-- You tighten this down snug
This is how the Volt Regulator and Brush holder fit together--
The Rectifier in place
The Rectifier and the Volt Regulator in place
Finally, The previous in place plus the brush/holder-- this takes a little precision
Another pic
The positive terminal--
The insulator and terminal post nut in place-- You tighten this down snug
01-20-07, 03:54 PM
#4
Lexus Test Driver
Thread Starter
AutoZone Test Status:
Pass--
Their fancy alternator dyno machine tested the alt after rectifier and brush install to be in proper working order. Ready for another 150k ---
Pass--
Their fancy alternator dyno machine tested the alt after rectifier and brush install to be in proper working order. Ready for another 150k ---
Last edited by MJHSC400; 01-20-07 at 11:29 PM.
01-22-07, 12:34 PM
#5
Lexus Test Driver
Thread Starter
There you have it, a $75 rebuild, I did the labor, and it's back in proper working condition ready to go wherever I want again. WHEW!!
After 35 minutes the alternator was back in and serpentine belt was back in place.
I fired her up and it works perfectly.
No more dimming lights at idle, the blower runs at max speed at idle and doesn't speed up when I rev the motor a bit anymore, showiing that the alt. is producing enough amperage/voltage now to run all the accessories at idle--
When you put the alternator back in , you should detach the alt. wiring harness that includes the positive wire and the wires to the plug on the back of the alternator... This will allow you to have a great deal more length to work with when reconnecting the terminal and plug to the alternator prior to re-installation. You'll see what I'm talking about when you get in there, and you detach the wiring harness where a clip/holder is wrapped around it securing it to the car just under the MAF sensor on the fender well. Doing this gives you 18" of length extra and makes it much easier, though I doubt it's possible without doing this step at all. It is also impossible to remove/install the alternator without unbolting the two p/s hoses parallel to the swaybar from their mounts-- one is attached to the rack/bushing clamp on the pass. side of the steering rack and both are loosened with a 10mm socket fairly easily.
It's not so bad if you do these steps, and the serpentine belt has a trick of it's own to install/remove it.
To install/remove the serpentine belt, you just depress the tensioner arm (spring loaded) very firmly downward while slipping the belt off the topmost pulley on the right, which I believe is just an idler, and when you reinstall, you just route the belt around all the pulleys properly except for the topmost right side idler, and once you've got the belt pulled over the tensioner pulley, which will take a bit of strength and work to push the tensioner arm down enough to slip it over, you can then push down very firmly again on the tensioner arm while pulling up very firmly on the belt and slipping it over the last idler pulley (topmost right one-- again) and you're done.
This belt removal only takes 5 minutes and is ingeniously designed. My particular belt looked ready for another 50k but I may just wait til it breaks, and keep a replacement in the trunk-- or maybe I'll be not-lazy and just replace it in a week or two.
I hope this writeup helps anybody that needs it and feel free to pm with questions.
Later,
Matt

 01-23-07, 11:23 AM
#7
Lexus Test Driver
Thread Starter
Haha, thanks, well, I'm working on my passenger side LCA replacing the bushings and I'll be writing that job up too, but MAN are the swaybar endlinks a STUPID design!!!! How could anyone think a 5mm allen wrench could support enough torque to remove a rusted on 14mm bolt--- Just another testament to Lexus engineers-- Thank you lexus-- for making ***** so D*AMN hard to do......
I could probably do the alternator in less than two hours including the rebuild now that I've done it.... So I guess it's not so bad..
I could probably do the alternator in less than two hours including the rebuild now that I've done it.... So I guess it's not so bad..
Trending Topics
01-27-07, 07:55 PM
#9
Keeper of the light
iTrader: (17)
Great writeup, kudos.
Before you guy's go tearing your alts to pieces over dimming lights however, check your grounds!
PPS- if your rectifier is dead your alt might have lived long enough to have bearing damage, so this might cause more headache than good if you have a spun bearing. I'd suggest getting someone higher than autozone knowledge to look at it to make a proper assessment.
01-27-07, 09:19 PM
#10
Lexus Test Driver
Thread Starter
The NipponDenso unit does use a high quality sealed "non serviceable" bearing (they're still replaceable) -- and according to one of the leading auto electric supply houses, it's not a common problem in these particular units--
Not ruling it out but if the shaft turns smoothly and quietly, I wouldn't worry about them for a long time-- If it's hard to turn or sloppy and noisy (aside from normal brush noise when brushes are newly replaced) you can source replacements and replace them using a slide hammer and a vise, being very careful of course-- or you could disassemble the alt. and take the case halves to a shop with a press along with your new bearings and they will probably do it quickly and for very little cash. (at least around here) -- Just go to the shop that doesn't turn their nose up to small jobs-- It's really one of the simplest procedures you'll ever do if you work on your SC yourself.
Not ruling it out but if the shaft turns smoothly and quietly, I wouldn't worry about them for a long time-- If it's hard to turn or sloppy and noisy (aside from normal brush noise when brushes are newly replaced) you can source replacements and replace them using a slide hammer and a vise, being very careful of course-- or you could disassemble the alt. and take the case halves to a shop with a press along with your new bearings and they will probably do it quickly and for very little cash. (at least around here) -- Just go to the shop that doesn't turn their nose up to small jobs-- It's really one of the simplest procedures you'll ever do if you work on your SC yourself.
06-19-07, 01:35 PM
#11
Lead Lap

Join Date: Nov 2005
Location: NY
Posts: 573
Likes: 0
Received 0 Likes
on
0 Posts
hows the alternator been? i bought a brand new one from lexus so i have my old one sitting here. contemplating rebuilding it myself or dropping it off at an alternator rebuild shop. this one has 150K+ miles on it. lexus is only going to give me $30 back for the core, lol, i'll pay half that to ship it back.
06-19-07, 07:59 PM
#13
Former Sponsor - Cancelled

I'm not sure, but it looks like you forgot to mention dielectric grease on the positive post when you put it all back together.
Alot of people overlook this, and its just stupid to not use it when its cheap (8$ for a big can) and takes maybe an extra 5-10 seconds while you're doing the install.
Alot of people overlook this, and its just stupid to not use it when its cheap (8$ for a big can) and takes maybe an extra 5-10 seconds while you're doing the install.
06-19-07, 09:04 PM
#14
Lexus Test Driver
Thread Starter
I see you're from Utah, maybe it'd be necessary up there, but this is a Texas car, and there isn't any corrosion anywhere on the car after 15 years--
I don't see the need--
I don't see the need--
06-22-07, 08:29 PM
#15
Lead Lap
iTrader: (1)

Join Date: Jun 2006
Location: oregon
Posts: 448
Likes: 0
Received 0 Likes
on
0 Posts
Matt,
That stuff is used to increase the "quality" of the electrical connection. Thats the stuff they pack in the spendy switches betwee the contacts...silicone grease!!!!!
Back to your alternator write up. I bought tech pubs for the Navy and you are up there with the best I have seen. Great job. I can't do it now mind you, I can recognize it though.
Got bad news. The rotor slip rings are supposed to be flat. They do have a little thickness to them but they do wear through. If you get oil on the little darlins' it makes the brush a cutting tool. Mine was of the oil soaked varity so my slip ring had deep groves, like your seem to have. I told the rebuilder I was having trouble getting the tarnish off of the slip rings and he glanced at them and said "that is bakelit/resinset from under the rings...they are worn completely through. The new slip ring cost $15. You have to chip the epoxy from around the thing and then peal it off and dig out the little wires. UGH! Then a little slather of epoxy and slip the ring on and then resolder the wires. Total bill was $45 and I dropped off a twelve pack iout of conscience.
Again, professional jobwith the writeup.
John