Another O. L. T. DIY - In depth with the heater core control valve
 11-03-12, 08:01 PM
#46
Driver School Candidate

Is there a way to check this part and make sure that, this is my problem? My a/c works wonderfully but I have no heat at all... 93 Sc300
 09-12-13, 11:31 PM
#47
As someone mentioned earlier, AutoZone has these under the Everco brand. I bought one but didn't like how it is reverse. It closes when there is vacuum instead of open. So I went to their website and look through ALL their heater control valves. Found four that might be an exact replacement:
Everco / Four Seasons (ebay):
74004 (1.8L - 2.2L Celica)
74636 (3L Siena)
74637 (1.6L Corolla and Geo Prism)
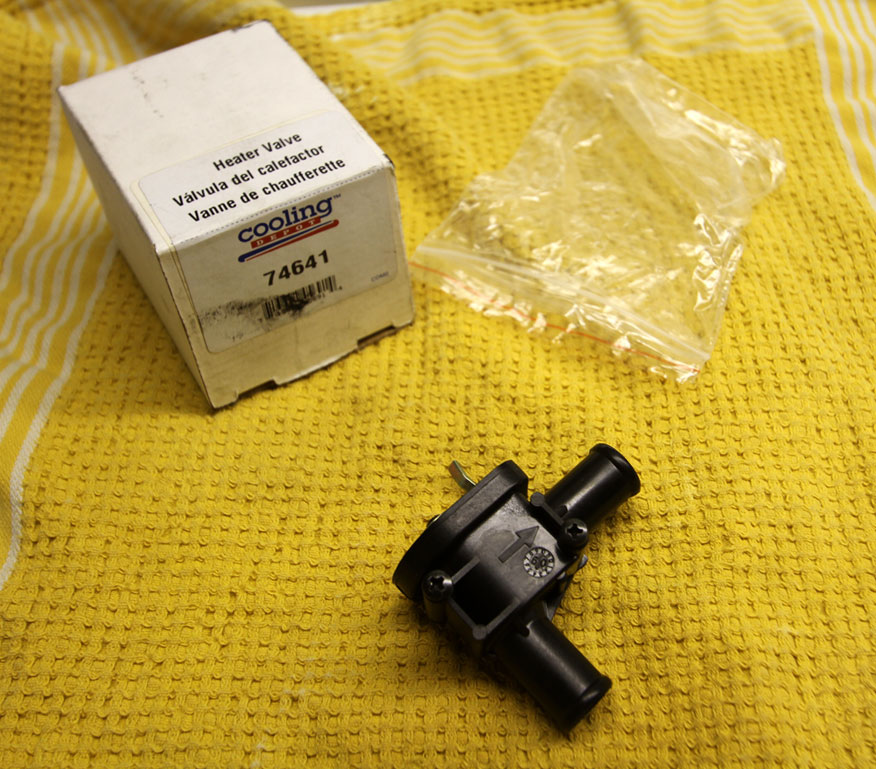
74641 (2L Celica and 2L-2.5L Camry)
Who has time or access to these to find the best match? My local AutoZone don't have these in stock.
Everco / Four Seasons (ebay):
74004 (1.8L - 2.2L Celica)
74636 (3L Siena)
74637 (1.6L Corolla and Geo Prism)
74641 (2L Celica and 2L-2.5L Camry)
Who has time or access to these to find the best match? My local AutoZone don't have these in stock.
Further edit:
Autozone online is having issues. I found the Four Seasons #74641 part (identical) on Rockauto for $27.
Last edited by KahnBB6; 09-13-13 at 12:15 AM. Reason: clarification
09-26-13, 01:27 AM
#49
I have the part in my garage but my leak appears to have been a one-time thing between the heater control valve and my water pump (I'm glad because that's a very new Toyota pump that shouldn't be weeping). Without a persistent issue I won't dig into replacing anything (yet) but I will take pictures of the Model #74641 if it helps. Out of all those parts on the website that was the only one to have the arm facing in a VERY similar position to stock.
10-10-13, 10:43 PM
#51
mtommer, I haven't tried it yet but I have the part ready to go. The reason for this is that despite some dried pink coolant on my heater control valve and water pump (go figure, right?) I haven't had a recurrence of either leak despite frequent checking. I'm reluctant to tear apart a factory control valve that still works (for now). I would be happy to furnish a full set of pictures for the thread so that everyone can see why I felt this was extremely similar to the factory valve.
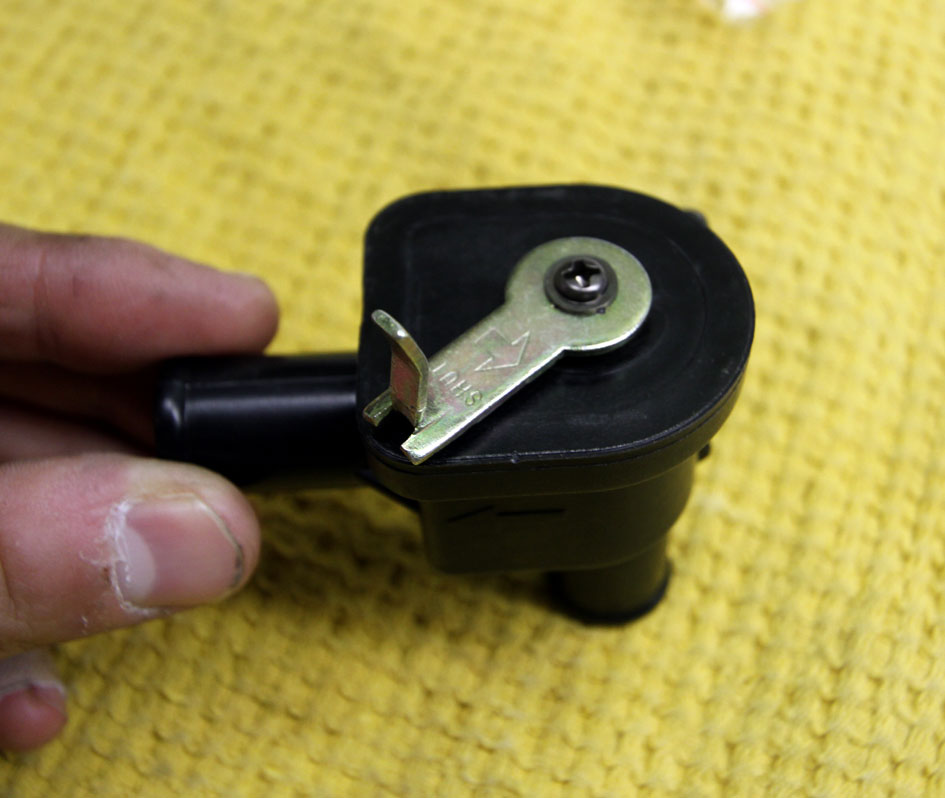
Currently I can guarantee you that it needs at least one modification: you will have to remove the metal arm from your blown factory control valve, remove the arm on the 74641 and put your factory arm on there. That much I can tell even without putting it on. The arc of travel and direction is very similar to factory on the valve itself (and I believe it is the only model in the batch 206BRUCE found with the arm facing in the correct direction) but it just makes sense to swap the metal arms to make fitment easier.
I have to take several pictures tomorrow for something else so I will put a few up here. Sorry for not doing so sooner-- it's been a busy last month into this one for me.
Last edited by KahnBB6; 10-10-13 at 10:46 PM.
10-11-13, 10:52 AM
#52
Driver School Candidate

Join Date: Jul 2013
Location: MI
Posts: 16
Likes: 0
Received 0 Likes
on
0 Posts
So, OLT, where are we taking the vacuum hose from? Are we putting a splitter on there to run two hoses from one existing line?
Either way, I'm going to pull my heater valve off today and try the replacement arm trick of your's, KahnBB6. Thanks for the original heads up too about the vacuum flow issue.
 10-11-13, 11:24 PM
#54
Driver School Candidate
Join Date: Jul 2013
Location: MI
Posts: 16
Likes: 0
Received 0 Likes
on
0 Posts
Okay. So I've taken a few pictures of the heater core control valve and how things orient with the changes. Hope it makes sense.
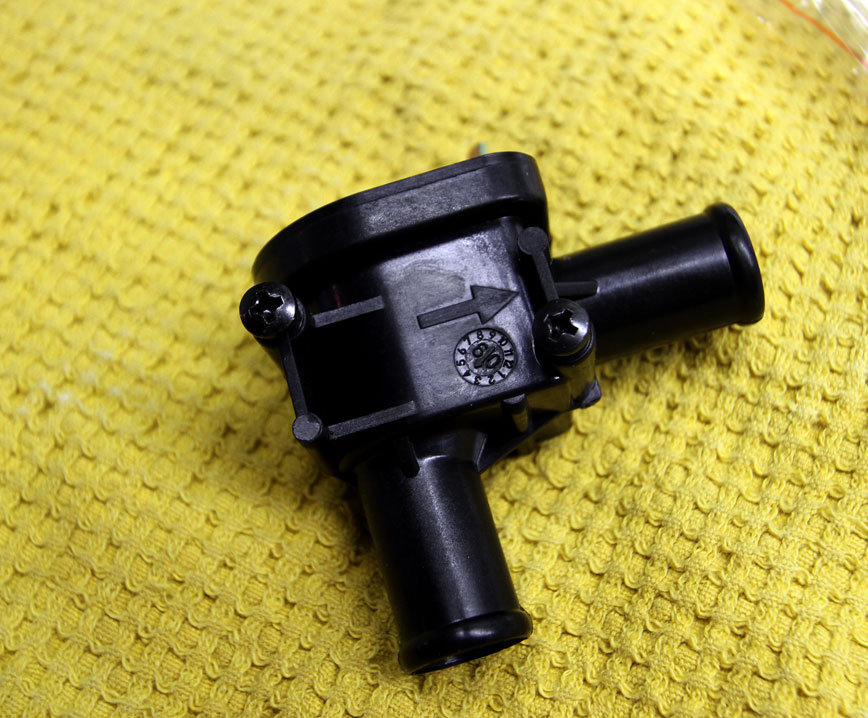
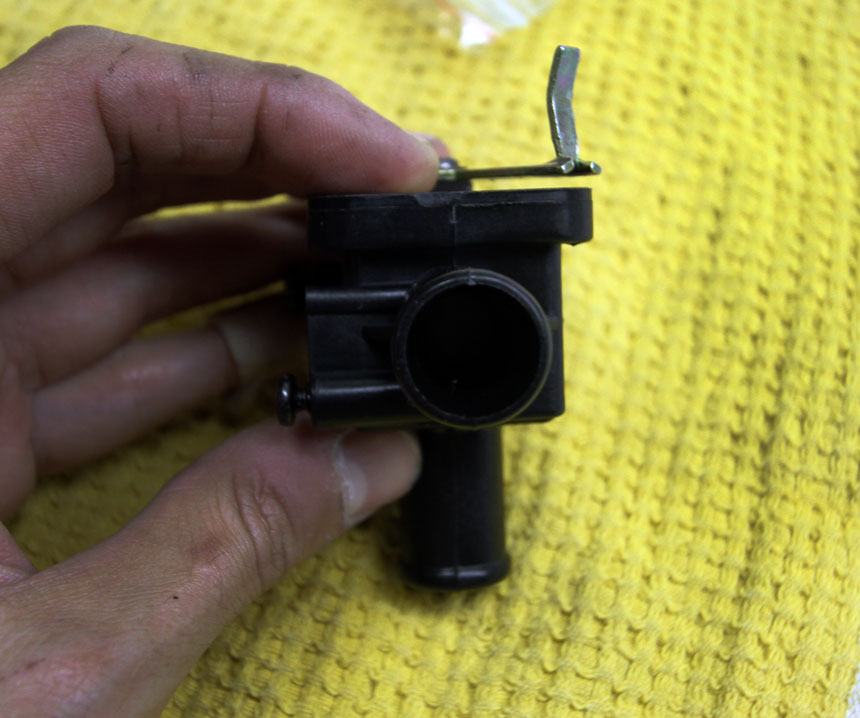
Picture 1: The HCCV straight out of the box. The default is for the fluid to flow as opposed to the OEM version where it's set to be closed.
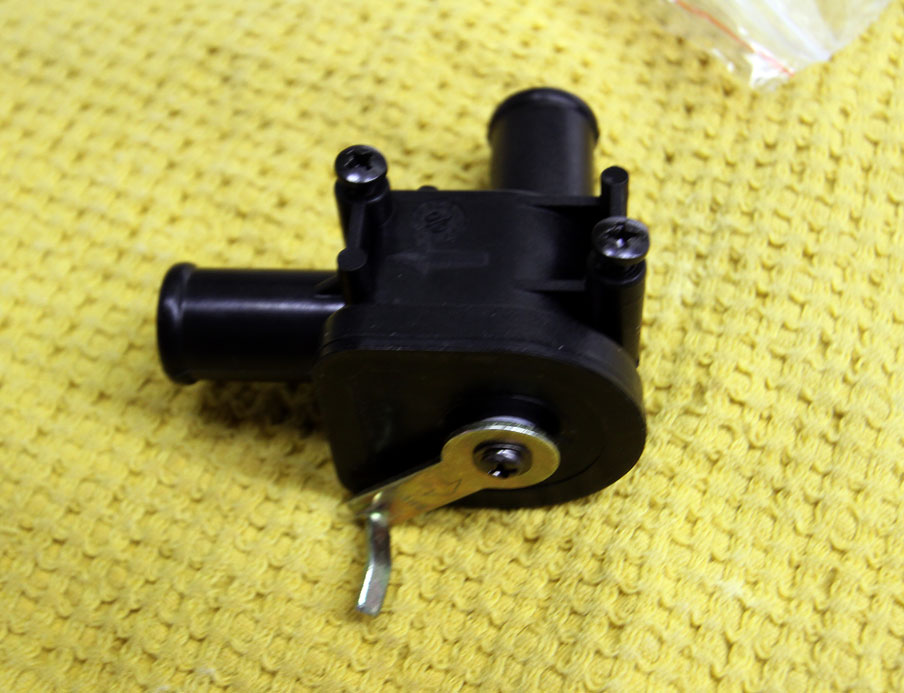
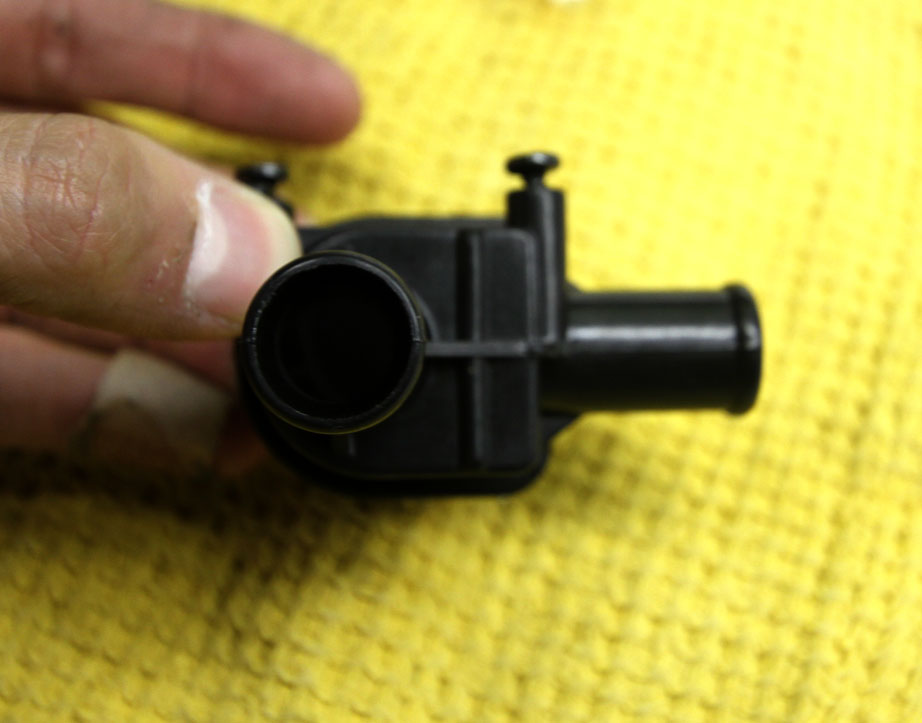
Picture 2: The HCCV modified.
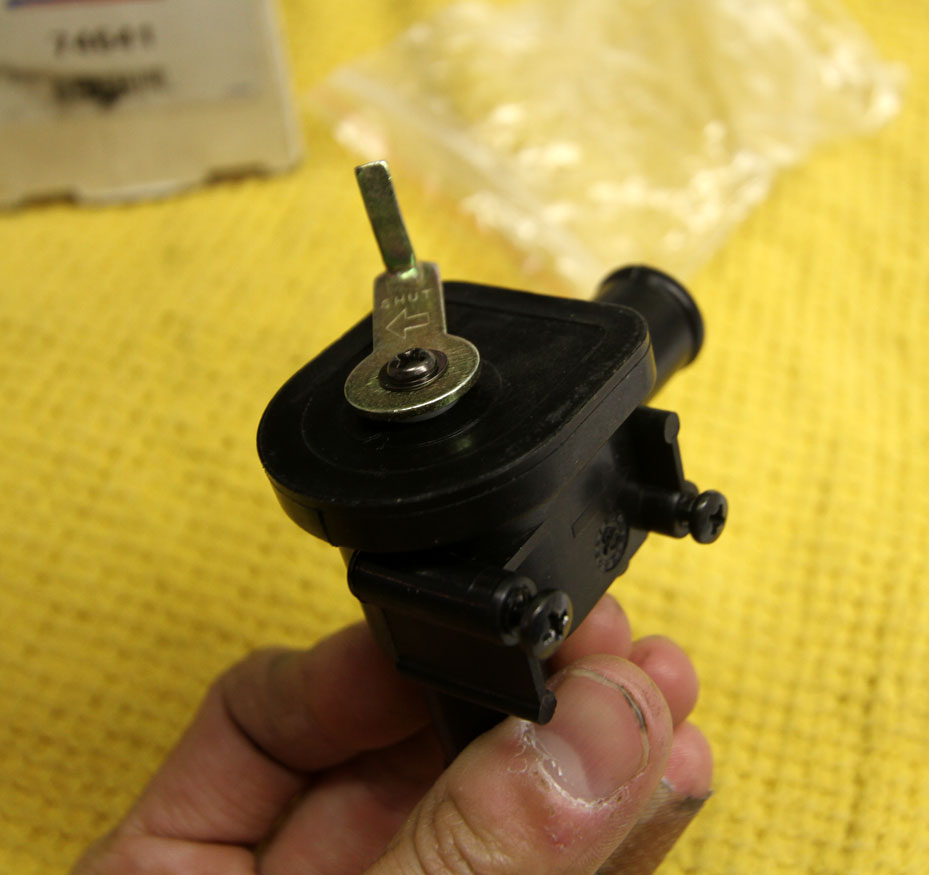
Picture 3 (bottom right): How the two compare straight out of the box. I ran into an issue whereby using the original bracket is almost impossible without modifying anything.
* Now, what I'm not sure about is whether the flow direction arrow show on the valve has to be oriented the same way. If not, then ideally all one needs to do is make no modifications to the Motorcraft part, just spin it so the flow arrow is opposite and voila, heat is now "cold" and cold is now "heat".
Picture 1: The HCCV straight out of the box. The default is for the fluid to flow as opposed to the OEM version where it's set to be closed.
Picture 2: The HCCV modified.
Picture 3 (bottom right): How the two compare straight out of the box. I ran into an issue whereby using the original bracket is almost impossible without modifying anything.
* Now, what I'm not sure about is whether the flow direction arrow show on the valve has to be oriented the same way. If not, then ideally all one needs to do is make no modifications to the Motorcraft part, just spin it so the flow arrow is opposite and voila, heat is now "cold" and cold is now "heat".
Last edited by mtommer; 10-11-13 at 11:39 PM.
10-11-13, 11:45 PM
#55
Driver School Candidate
Join Date: Jul 2013
Location: MI
Posts: 16
Likes: 0
Received 0 Likes
on
0 Posts
So a question that came to mind is: "Is it the actual valve itself that goes bad or is it the vacuum canister that's really the culprit here?"
It seems to me that if the valve failed it would seize in the closed position for if it failed in the other direction there would always be heat. However, if the vacuum canister failed then it wouldn't pull the arm into the open position so the heated fluid could get to the heater core.
It seems to me that if the valve failed it would seize in the closed position for if it failed in the other direction there would always be heat. However, if the vacuum canister failed then it wouldn't pull the arm into the open position so the heated fluid could get to the heater core.
01-12-14, 02:42 PM
#56
Well it happened: my heater control valve didn't fail so much as completely snap at the block hose connection. So now I am forced to try my solution with the Four Seasons control valve.
Some good news: the #74641 basically identical to the Lexus valve and bolts right in. The little template connection for the arm fits as well. All would be good EXCEPT: Four Seasons made their arm guide template face in another direction. Now this isn't the position of the arm itself, just the mounting template it (and the Lexus part) fit into. So this is a VERY CLOSE solution but I suspect I will need to order either the #74004, #74636, or #74637 versions. I forget which one was basically identical with the arm facing 180-degrees opposite of the Lexus valve but that's the one I am going to try to identify and order now.
It sounds counterintuitive but it may be the ticket since basically everything else bolts right up. If the other version means the Lexus valve arm bolts into the correct position, I think we'll have yet another viable alternative. I'll post my pictures and findings into my valve thread as well once I know more.
Another thing this tells us is that Toyota/Lexus really doesn't re-engineer everything. They undoubtedly used an existing valve design and added the Soarer control hardware and solenoid to it.
Update: The Four Seasons (aka Everco) #74637 is NOT a potential fit either, as the arm still rotates in the opposite direction compared to the Lexus valve. Tomorrow I am trying #74636 and if that doesn't work, #74004 the following day (soonest it could be obtained). Note: all of these still bolt in exactly the same way.
So far (updated 1/15/2014):
F.S./Everco #74641 -- fits, but arm rotates in wrong direction
F.S./Everco #74637 -- fits, but same as above
F.S./Everco #74636 -- WORKS, but requires slight Dremel modification to non-mounting side and re-use of Lexus valve arm
F.S./Everco #74004 -- fits, but arm rotates in wrong direction
Last edited by KahnBB6; 01-15-14 at 08:13 PM. Reason: Update
01-15-14, 12:19 AM
#57
I'm reposting here to keep things consolidated.
So I recalled talking with the guy at the Autozone store I've been going to and he owns an MKIII Supra Turbo. He mentioned that the HCV assembly for his Supra looked very similar to mine and that he was having a hard time looking for a new valve himself.
So I researched here:
http://www.supramania.com/forums/sho...ol-valve/page2
And especially here:
http://www.supraforums.com/forum/sho...-valve-bypass&
And this led me to the Four Seasons / Everco #74850 heater control valve. Unlike the others so far, this one has an arm moving 45-degrees in the CORRECT direction. If you look it up anywhere for sale you can see that the arm's direction arrow is facing correctly. It also appears to bolt up just like the others do.
I'll be ordering one of them tomorrow to test along with the #74636 (which I now think won't work either but who knows -- update: it DOES).
Last edited by KahnBB6; 01-15-14 at 08:16 PM.
01-15-14, 01:19 PM
#58
Everyone, the Everco (aka Four Seasons) #74636 valve WORKS. It fits and the arm rotates in the correct direction for open and closed. All that is required is that you swap the arm over from your blown Lexus SC valve. It mounts in exactly the same position with the template guide. The mounting points on one side protrude too much into the rest of the assembly but this is an easy fix with a Dremel. Pictures to follow.
The #74850 was mentioned as a tried and true fix in Supra MKIII threads and I was going to try that one next but I'd consider it a mere footnote now.
If the rest of your assembly now works, buy the Everco #74636 valve.
The #74850 was mentioned as a tried and true fix in Supra MKIII threads and I was going to try that one next but I'd consider it a mere footnote now.
If the rest of your assembly now works, buy the Everco #74636 valve.
Last edited by KahnBB6; 01-15-14 at 01:23 PM.
The following users liked this post:
boughtnew (10-14-22)
01-15-14, 01:24 PM
#59
Everyone, the Everco (aka Four Seasons) #74636 valve WORKS. It fits and the arm rotates in the correct direction for open and closed. All that is required is that you swap the arm over from your blown Lexus SC valve. It mounts in exactly the same position with the template guide. The mounting points on one side protrude too much into the rest of the assembly but this is an easy fix with a Dremel. Pictures to follow.
The #74850 was mentioned as a tried and true fix in Supra MKIII threads and I was going to try that one next but I'd consider it a mere footnote now.
If the rest of your assembly now works, buy the Everco #74636 valve.
The #74850 was mentioned as a tried and true fix in Supra MKIII threads and I was going to try that one next but I'd consider it a mere footnote now.
If the rest of your assembly now works, buy the Everco #74636 valve.
It's rare to see someone exhaust so many options in search of something cheaper that works just as well.
My half-assed flipped valve is still working.
 01-15-14, 10:00 PM
#60
Your valve does the same job, so I'd say its golden. I would have tried that next if none of these Everco valves had worked out.