Distributor Delete Pics w/ 7m-gte CPS / vvti Coilpacks
 11-28-10, 03:00 PM
#1

So I finally got around to it, this isn't a full write up but just some pics and I'll throw in a little info that is hard to find.
Please realize the stock ecu cannot run coilpacks, you will need a TT ecu or standalone etc.. etc..
Thanks to Omar once again for helping me get the CPS done.
for coil on plug info please see this thread and post 6 for more info.
post 6 is like a summary of this thread or what i did based off of it.
http://www.supraforums.com/forum/sho...d.php?t=347719
note that coil 2 and 3 are swapped in that pic.
pin 9 should be coil 3 and pin 10 should be coil 2
also the middle coilpack (cylinders 3+4) is coil 3
and the front coilpack (cylinders 2+5) is coil 2.
To use the 7M CPS without having to do any cutting and rewiring, you will need a couple toyota parts.
(UPDATE 7/30/2012: I recommend people use the stock distributor if theirs is still working, you just need to remove the cap/rotor and make a new cap)
Cam Position Sensor Conn.
90980-11122 (harness side) (Grey Plug)
90980-11037 (cps side) (also grey)
you used to be able to order the Harness side connector for the CPS, It slides into both the green and grey one perfectly and latches (go figure). I have heard that this is getting harder to find at the dealer.
I now just tell people to use an aftermarket 4 pin plug like a gm weatherpack connector.
the 7mgte connector isn't the best designed, and with the high price and non availability, using another connector or just hardwiring are both good ways to go. you wont have to wiggle the wires with the weatherpack connector.
7M-GTE CPS
NE = RED
G1 = YELLOW
G2 = GREEN
G- = WHITE
2JZ-GE Distributor on a 95 Lexus SC300 (different colors on a supra!!)
NE = BLUE PIN1
G1 = RED PIN2
G2 = YELOW PIN3
G- = BLACK PIN4
I like to keep it all OEM when I can
Also note that some people say the G1 and G2 are swapped from the 2JZ engine to the 7M engines, so I connected the green wire on the CPS to the Red wire on my 2jz-ge harness. Since Im using wasted spark I can use either G1 or G2 but once again might as well get everything perfect
***EDIT**** I went back and tried G1 to G1 and the car runs about the same. I'm sticking with G2 to G1 but still not positive which is correct. I'll leave it to someone with a stock ecu which requires both G1 and G2 in the right order to figure it out.
Step 1: Install coilpacks of choice and appropriate Ignitor for your ecu.
I went with vvti coilpacks and DS-62 ignitor, work great with aem, no DLI needed for 25+ psi
I drove the car for a few weeks using the stock distributor for the CPS.
Once I knew the coilpacks were working great, I moved on to the 7m CPS.
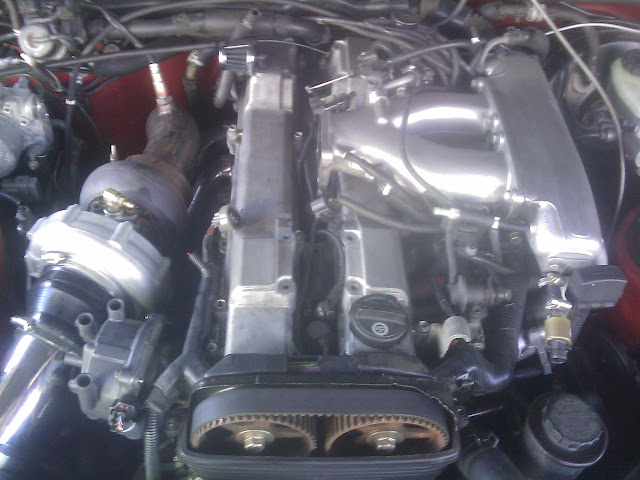
Step 2: remove old clunky distributor as shown in this picture
Step 3: Install 7m-gte CPS. Note the hole for bolting down the CPS to the head is in a different Spot than the distributor.
The trick is to drill a hole/slot to accomodate the stud on the 2jz-ge and use a slimmer nut to fasten the 7M CPS to the existing Stud.
In this picture you can see the spot where you need to drill for the stud, and yes me and my buddy drilled a huge slot that was way off at first

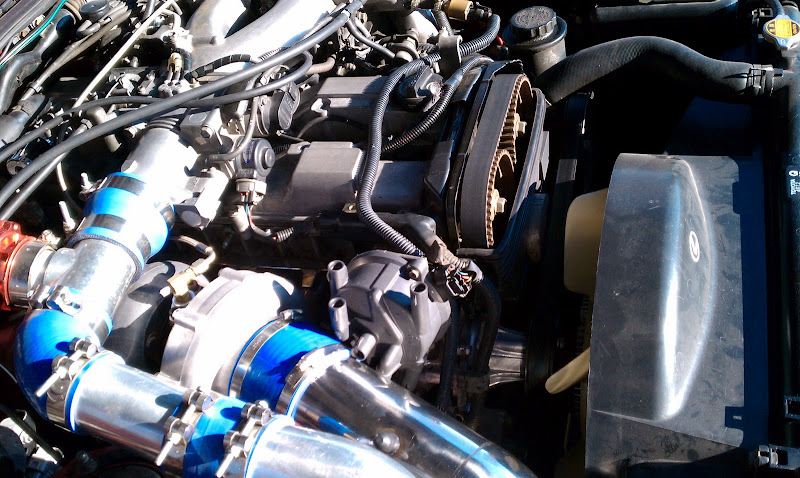
Step 4: Sit back and enjoy how your 4" intake no longer makes love to your distributor

****edit****
Got the valvecover plastics on, no need to even mod it. I just ran the coil wires to the Drivers side through the stock harness protector thing where all the wires run behind the timing belt. it has like 6 clips you pop em open and run your additional wires through there and make a slit by the intake manifold for them to pop out. The wire thats going in from the passenger side is for my Map sensor, unrelated to the coil on plug stuff but I ran it the same way for cleanliness.


short vid:
heres a diagram 8052jz helped me make over at clubna-t for the wiring on a SC300 (Updated 05/2014)
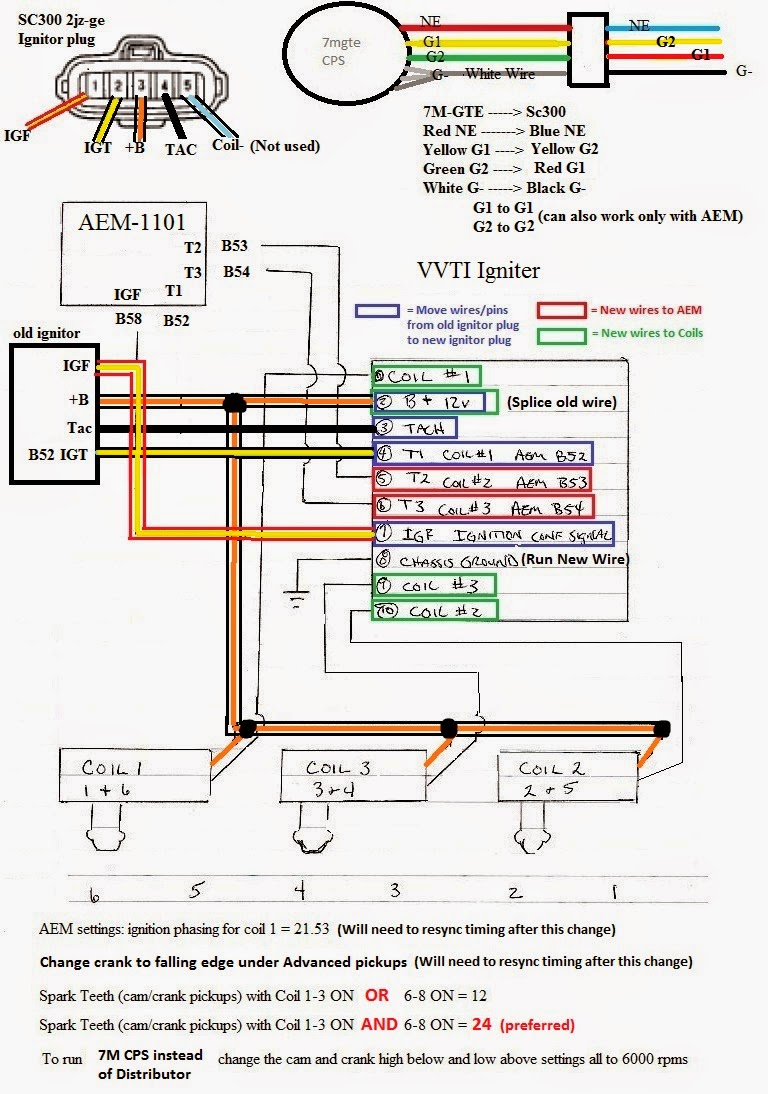
Here are some screenshots of the settings to change on the aem V1. aem V2 is different I have those in another thread.
You can also use the base of the stock distributor for this mod so the settings for that are shown, along with settings for the 7M cps.

Gone NA-T and Need Good/Reliable/Inexpensive Engine managment???
read this thread: https://www.clublexus.com/forums/sc-...-odb1-sc3.html
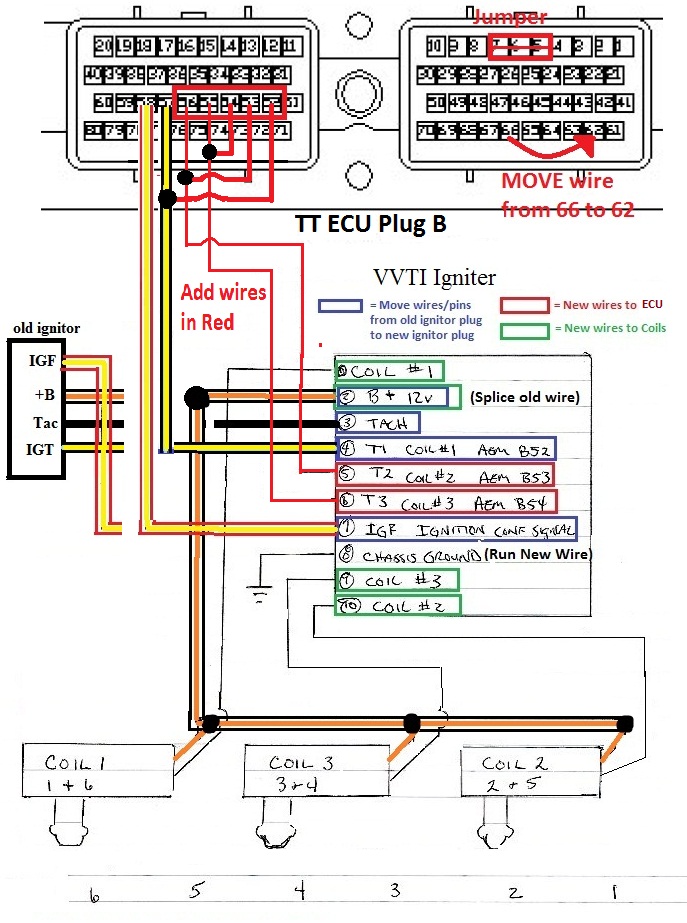
heres a diagram for the coil wiring from the tt ecu thread using a stock 2jzgte ecu instead of an aem unit.
You may notice they are very similar and wiring the ignitor/coils for the tt ecu mod just needs an extra couple wires at the ecu.
Please realize the stock ecu cannot run coilpacks, you will need a TT ecu or standalone etc.. etc..
Thanks to Omar once again for helping me get the CPS done.
for coil on plug info please see this thread and post 6 for more info.
post 6 is like a summary of this thread or what i did based off of it.
http://www.supraforums.com/forum/sho...d.php?t=347719
note that coil 2 and 3 are swapped in that pic.
pin 9 should be coil 3 and pin 10 should be coil 2
also the middle coilpack (cylinders 3+4) is coil 3
and the front coilpack (cylinders 2+5) is coil 2.
To use the 7M CPS without having to do any cutting and rewiring, you will need a couple toyota parts.
(UPDATE 7/30/2012: I recommend people use the stock distributor if theirs is still working, you just need to remove the cap/rotor and make a new cap)
Cam Position Sensor Conn.
90980-11122 (harness side) (Grey Plug)
90980-11037 (cps side) (also grey)
you used to be able to order the Harness side connector for the CPS, It slides into both the green and grey one perfectly and latches (go figure). I have heard that this is getting harder to find at the dealer.
I now just tell people to use an aftermarket 4 pin plug like a gm weatherpack connector.
the 7mgte connector isn't the best designed, and with the high price and non availability, using another connector or just hardwiring are both good ways to go. you wont have to wiggle the wires with the weatherpack connector.
7M-GTE CPS
NE = RED
G1 = YELLOW
G2 = GREEN
G- = WHITE
2JZ-GE Distributor on a 95 Lexus SC300 (different colors on a supra!!)
NE = BLUE PIN1
G1 = RED PIN2
G2 = YELOW PIN3
G- = BLACK PIN4
I like to keep it all OEM when I can
Also note that some people say the G1 and G2 are swapped from the 2JZ engine to the 7M engines, so I connected the green wire on the CPS to the Red wire on my 2jz-ge harness. Since Im using wasted spark I can use either G1 or G2 but once again might as well get everything perfect
***EDIT**** I went back and tried G1 to G1 and the car runs about the same. I'm sticking with G2 to G1 but still not positive which is correct. I'll leave it to someone with a stock ecu which requires both G1 and G2 in the right order to figure it out.
Step 1: Install coilpacks of choice and appropriate Ignitor for your ecu.
I went with vvti coilpacks and DS-62 ignitor, work great with aem, no DLI needed for 25+ psi
I drove the car for a few weeks using the stock distributor for the CPS.
Once I knew the coilpacks were working great, I moved on to the 7m CPS.
Step 2: remove old clunky distributor as shown in this picture
Step 3: Install 7m-gte CPS. Note the hole for bolting down the CPS to the head is in a different Spot than the distributor.
The trick is to drill a hole/slot to accomodate the stud on the 2jz-ge and use a slimmer nut to fasten the 7M CPS to the existing Stud.
In this picture you can see the spot where you need to drill for the stud, and yes me and my buddy drilled a huge slot that was way off at first
Step 4: Sit back and enjoy how your 4" intake no longer makes love to your distributor
****edit****
Got the valvecover plastics on, no need to even mod it. I just ran the coil wires to the Drivers side through the stock harness protector thing where all the wires run behind the timing belt. it has like 6 clips you pop em open and run your additional wires through there and make a slit by the intake manifold for them to pop out. The wire thats going in from the passenger side is for my Map sensor, unrelated to the coil on plug stuff but I ran it the same way for cleanliness.
short vid:
heres a diagram 8052jz helped me make over at clubna-t for the wiring on a SC300 (Updated 05/2014)
Here are some screenshots of the settings to change on the aem V1. aem V2 is different I have those in another thread.
You can also use the base of the stock distributor for this mod so the settings for that are shown, along with settings for the 7M cps.
Gone NA-T and Need Good/Reliable/Inexpensive Engine managment???
read this thread: https://www.clublexus.com/forums/sc-...-odb1-sc3.html
heres a diagram for the coil wiring from the tt ecu thread using a stock 2jzgte ecu instead of an aem unit.
You may notice they are very similar and wiring the ignitor/coils for the tt ecu mod just needs an extra couple wires at the ecu.
Last edited by Ali SC3; 05-01-14 at 02:17 PM.

The following users liked this post:
Amel2jzgte (04-28-20)
11-28-10, 03:27 PM
#2
Thank you very much sir. subcribed,bookmarked, and printed LoL. SO using the 7M CPS i wont need to run the cps welded on the head with TT oil pump like other cop setups ? Or does it still require crank position sensor, and it still have to run GE cams ?
Last edited by YeA 2jZ; 11-28-10 at 04:12 PM.
 11-28-10, 04:45 PM
#4
EDIT 5/23
For people reading this now, if your distributor is in good shape, i recommend just using that without the cap and rotor, and fashion a shorty cap.
Alot of people have issues switching to the 7m cps, due to them being old, needing adjustment etc..
A working 7m cps wired correctly is just fine still, but the distributor does the same job and is already in there, just have to make a shorty cap.
That is correct it puts out the crank signal and 2 cam signals exactly like the 2jzge distributor. Everything the ecu needs to run a 2j 
It has larger sensors inside of it so i feel like you get a cleaner signal to the aem over using the base of the old distributor as everything inside the distributor is more compact to make room for the rotor etc...
GE sensors: see cam sensor on left, crank sensor on top side, another cam on right side (hidden).

7M CPS installed on a 2jz-ge I found on the net, good photo for seeing where to drill.
the top and bottom magnets are the cam sensors. notice how much larger they are than the GE. the crank gear is underneath on the 7M CPS instead of on top like the GE.

Thanks, I was shocked at how much space it cleared up.
For the first time I was able to put the 4" intake pipe on straight and realized my air filter could touch the fan shrowd. always had to clamp it at an angle before.
For people reading this now, if your distributor is in good shape, i recommend just using that without the cap and rotor, and fashion a shorty cap.
Alot of people have issues switching to the 7m cps, due to them being old, needing adjustment etc..
A working 7m cps wired correctly is just fine still, but the distributor does the same job and is already in there, just have to make a shorty cap.
It has larger sensors inside of it so i feel like you get a cleaner signal to the aem over using the base of the old distributor as everything inside the distributor is more compact to make room for the rotor etc...
GE sensors: see cam sensor on left, crank sensor on top side, another cam on right side (hidden).
7M CPS installed on a 2jz-ge I found on the net, good photo for seeing where to drill.
the top and bottom magnets are the cam sensors. notice how much larger they are than the GE. the crank gear is underneath on the 7M CPS instead of on top like the GE.
Thanks, I was shocked at how much space it cleared up.
For the first time I was able to put the 4" intake pipe on straight and realized my air filter could touch the fan shrowd. always had to clamp it at an angle before.
Last edited by Ali SC3; 05-23-12 at 08:18 PM.
11-28-10, 06:58 PM
#6
TT ecu or standalone
Vvti coils and ignitor Dh61 (or use camry ignitor ds62) + wiring
Exhaust cam needs to be for a 2jzge.
Cps is optional, it saves space over distributor even without plugs as you can see in my pics. Does take some extra work to put the cps in.
Just finished modding the valve cover plastics for the ignitor wires.
****Edit****
got a lot of pm's for more details on going coil on plug so here is one of my responses.
you need the coilpacks, I recommend the IS300 coilpacks for na-t.
you need a toyota 3 channel ignitor to match (you can use the is300 one DH-61 which is really expensive or you can use a camry ignitor DS-62 which can be had for $30) they are the exact same, have the same plugs everything, completely interchangeable. I have been using the camry one for over a month now boosting very happy.
and then you just run the extra 2 wires from the aem to the new ignitor for T2 and T3 (remember you only had 1 coil before now you have 3), you can leave the original T1 and IGF in place no need to run new wires.
Next you depin all the wires from the old ignitor and plug them into the new ignitor's connector, like T1, IGF, +12v and tach (technically IGF is not used by the aem but I plug it in anyways). the only wire you dont need from the old ignitor is the one going to the old coil, you leave that unplugged.
The old ignitor doesnt have a ground wire but the new one does, add a wire and run it to battery ground, pretty simple.
so now you have everything but the 3 coil wires from the ignitor to the coilpacks, cause we are not using the old coil wire cause it goes to the wrong place. so you need to make a harness of 4 wires that run to the coilpacks, 1 trigger for each and a +12v that runs to each one (all 3 coils spliced into 1 12v wire).
It should look very similar to the following: http://store.driftmotion.com/static/...torharness.php
In fact I would just buy this and extend it, then you will have a new harness with new clips.
I made mine from scratch because i didn't think toyota sold this part.
If you have a Aem V1 skip to settings you need to change in aem v1.
If you have a AEM V2 they changed the way you turn on and off the coils.
They have coils 1-6 and for each number there are A and B coils.
In the supra TT file, notice there are values for 1-6 but nothing for the B's because TT uses sequential ignition.
with the vvti setup it uses waste spark so we have 3 coils that fire twice, so instead of thinking of it as 1-6, the AEM V2 thinks of it as 1-3A and 1-3B.
so you need to turn off coils 4-6, but we will borrow their values and move them to the right spots.
Since 1 and 6 are paired cylinders, we turn off 6 and turn on 1B and put the values for 6 into the 1B box.
repeat for 2 and 5, you would turn off 5 and turn on 2b and move the number over again.
repeat for 3 and 4, turn off 4 and turn on 3b and move the number over again.
I dont have the software in front of me right now so all of this is off memory, be sure to take a look at the n/a cal file and the TT cal file and you should see what I talking about with the "A" and "B" coils.[/B]
SETTINGS YOU NEED TO CHANGE IN AEM V1
Go to: Ignition > Advanced Ignition > Ignition Phasing > options.
change the settings in the ignition phasing for coil 1 in the aem to the correct settings 21.53
The 1101 base cal the setting for coil 1 is 22 which can blow your motor when you do this mod if you don't change it.
You will need to sync your ignition timing it will throw it off about 14 degrees.
Go to: Options > Coil
To turn on the extra coils check Activate for coils 2, 3 and 6-8
once you are running coilpacks, you can swap out the distributor for the 7M CPS to clean up the bay. both the dizzy and the CPS will get the job done but the CPS sensors work better with the AEM cause you can turn the cam/crank to high sensitivity (with the distributor it may stall if you do this).
Go to: Setup > sensors > cam/crank > advanced cam/crank > advanced pickups
You can leave spark teeth at 24 if you turned on coils 2, 3 and 6-8 (recommended).
to change to the 7M cps you need to change the sensitivity on the cam and crank high below and low above settings all to 6000 rpms, exactly like it is in the 1130 cal file (for a 7m-gte). If you are using the stock distributor, leave the stock settings alone.
Last edited by Ali SC3; 05-30-13 at 08:54 AM.

Trending Topics
11-29-10, 07:00 AM
#8
Rookie

Join Date: Aug 2004
Location: New Mexico
Posts: 68
Likes: 0
Received 0 Likes
on
0 Posts
Wow, it looks really good. It really did make a lot of room for the intake. It looks much cleaner. Now, all you have to do is get a polished CPS cover to finish off that swap.
11-30-10, 01:27 PM
#10
Driver School Candidate

Join Date: Sep 2010
Location: NC
Posts: 25
Likes: 0
Received 0 Likes
on
0 Posts
damn i'm glad this popped up. i was looking for this all weekend to only come up empty. now has anyone done this with the tt spark plug cover? where did you mount the ignitor bro?
11-30-10, 01:58 PM
#11
mounted the ignitor in the same spot as the stock ge ignitor. You can see it on my last picture right above the fusebox. the reason you missed it is cause I mounted it to the original ignitor bracket, you can only fit one of the 2 screws on but it looks OEM and stays down perfectly.
As for the TT spark plug cover, you need to get rid of the overhead intake manifold first cause it won't fit under there. So when you go FFIM you can get the TT valvecovers and spark plug cover.
I just modded my valve cover plastics by making the holes for the harness on each side a little bit larger and you can run all the wires out right next to the stock harness. I havent had time to install it or take pics but I'll get around to it.
Last edited by Ali SC3; 11-30-10 at 02:01 PM.
11-30-10, 02:04 PM
#12
11-30-10, 02:16 PM
#13
lol yeah, I put that pipe back on a little bit crooked, I was pretty tired after leaning over and doing the coilpacks. I need to get rid of that throttle body coolant hose I spend like a half hour putting that thing back on every time I take off the throttle body.
Maybe if I delete that I could do it like you used to in under 10 minutes.
Maybe if I delete that I could do it like you used to in under 10 minutes.
11-30-10, 02:40 PM
#14
gte & na-t
iTrader: (44)
Join Date: Jan 2007
Location: Maryland /Germantown
Posts: 5,139
Likes: 0
Received 7 Likes
on
7 Posts
Yeah man i need to hook you up, clean up the bay a little.
Talking about leaning over haha my back is gone , after leaning for 12hrs working on my SC it's not fun .
I keep telling Bart that i'm done working on SCs and the very next day am back doing the same.
The hose you are talking about goes from the bypass pipe that comes from the WP to the heater hoses right by the turbo to the TB and the side side goes from the Tb to the upper pipe on the cylinder HD where the upper radiator hose attaches to.
I had deleted mine, and never look back.