
Distributor Delete Pics w/ 7m-gte CPS / vvti Coilpacks

 04-13-11, 08:03 AM
#32
Lexus Test Driver
iTrader: (44)
Join Date: Jan 2007
Location: Maryland /Germantown
Posts: 5,139
Likes: 0
Received 7 Likes
on
7 Posts
Hell yeah it will work lol.
If you are not gonna weld the cam sensor on the head, you can just keep the distributor or get 7M CPS and just delete the distributor to clear up some room.
You already have the cam sensor on your ge it's on the distributor gear, on the GE engine it uses the distributor to pick up the cam and crank signal.
So really if you think about it you don't need a Gte cam or crank sensor just keep the distributor in there or get the cPS it's way smaller than the 2jz distributor it will give you all the room you need and look way better than 2jz the distributor.


 05-01-11, 04:56 PM
#35

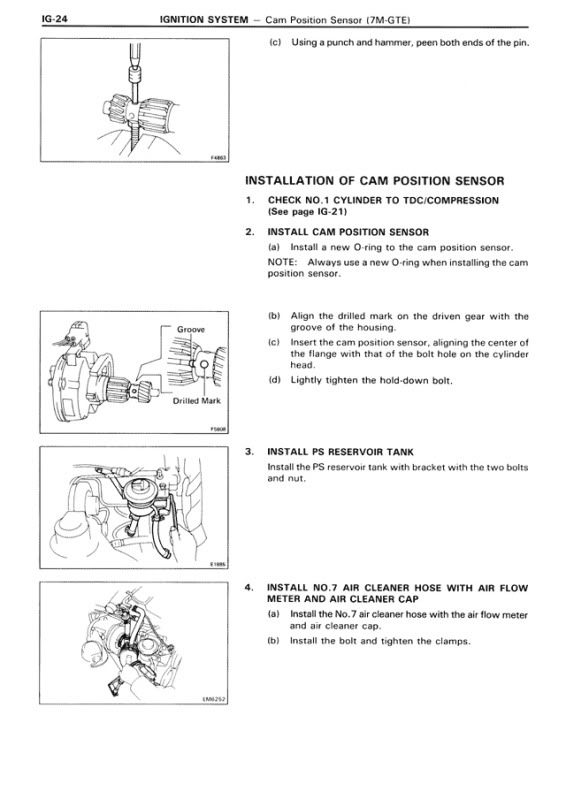
I just followed the factory manual i found online for a mk3 supra 7m-gte.
its amazing how similar the 7m and 2j really are.
basically line the motor up to TDC, line the CPS up via the marks on its shaft (important, sets the rotor at tdc), now turn it back counter clockwise one click and then stab it into the motor. you should feel it sort of turn clockwise as it goes into its final spot when it hits the gear on the cam, and it should feel pretty snug.
make sure you have drilled out a new hole to fasten the cps and tighten it down. connect the wires and when you get it fired up sync ignition timing with the light in case you are a tooth off or something like that.
05-04-11, 08:38 AM
#36
alright boys this mod is in full affect i picked up the 7m cps last night! (green plug)
i'm going to give toyota a call and get the harness side.
pass by my boys crib and pick up the is300 coils and ignitor.
and i should be good with the parts portion of this project!!!
now i dont fully understand the wiring portion to much...
what do i have to do to get the coils to work with out the 7m cps?
and will the plug for the factory ignitor clip on to the is300?
plus i will be going MS like next week and i want to get this working before i wire up the standalone but will it be better if i wait?
05-04-11, 09:38 AM
#37
Lexus Test Driver
iTrader: (44)
Join Date: Jan 2007
Location: Maryland /Germantown
Posts: 5,139
Likes: 0
Received 7 Likes
on
7 Posts
It's very easy look on page 1 and go thru it
on the stock ignitor you have five wires
IGF wires goes to pin 58B at the ECU
Tach Signal goes to the cluster
B+ Power for the ignitor
C-
IGT wire goes to ECU 57B
On the IS300 ignitor you have 9 wires coming off
Coil 1
Coil 2
Coil 3
IGF
Tach
B+ power for the ignitor
B- Ground for the ignitor
IGT 1
IGT2
IGT3
and then you just run the extra 2 wires from the aem to the new ignitor for T2 and T3 (remember you only had 1 coil before now you have 3), you can leave the original T1 and IGF in place no need to run new wires.
Next you depin all the wires from the old ignitor and plug them into the new ignitor's connector, like T1, IGF, +12v and tach (technically IGF is not used by the aem but I plug it in anyways). the only wire you dont need from the old ignitor is the one going to the old coil, you leave that unplugged.
The old ignitor doesnt have a ground wire but the new one does, add a wire and run it to battery ground, pretty simple.
so now you have everything but the 3 coil wires from the ignitor to the coilpacks, cause we are not using the old coil wire cause it goes to the wrong place. so you need to make a harness of 4 wires that run to the coilpacks, 1 trigger for each and a +12v that runs to each one (all 3 coils spliced into 1 12v wire).
It should look very similar to the following: http://store.driftmotion.com/static/...torharness.php
In fact I would just buy this and extend it, then you will have a new harness with new clips.
I made mine from scratch because i didn't think toyota sold this part.
Last edited by 99SC42; 05-04-11 at 10:37 AM.
05-04-11, 09:47 AM
#38
thanks for copying that over you saved me from writing it again.
remember you do not reuse C- (stock coil) from old ignitor because the wire goes to the wrong place (we have 3 new coils now that sit on the engine, not on the passenger side of the engine bay)
This is the only wire from the old ignitor you do not reuse!!
when depinning just tape it off so it doesn't get in the way.
So to recap, you will be moving over all the old wires except C- to the new ignitor (basically IGF, Tach, B+ and IGT).
you will also be adding in some new wires: new coils1-3 (that harness i linked from driftmotion, just extend), a ground wire (run to battery ground), and IGT 2 and 3 (must be run from ecu).
remember the old ignitor does not have a ground so thats one of the new wires you add one to the new ignitor.
Last edited by Ali SC3; 05-04-11 at 11:42 AM.
05-04-11, 11:49 AM
#39
alright boys this mod is in full affect i picked up the 7m cps last night! (green plug)
i'm going to give toyota a call and get the harness side.
pass by my boys crib and pick up the is300 coils and ignitor.
and i should be good with the parts portion of this project!!!
now i dont fully understand the wiring portion to much...
what do i have to do to get the coils to work with out the 7m cps?
and will the plug for the factory ignitor clip on to the is300?
plus i will be going MS like next week and i want to get this working before i wire up the standalone but will it be better if i wait?
i'm going to give toyota a call and get the harness side.
pass by my boys crib and pick up the is300 coils and ignitor.
and i should be good with the parts portion of this project!!!
now i dont fully understand the wiring portion to much...
what do i have to do to get the coils to work with out the 7m cps?
and will the plug for the factory ignitor clip on to the is300?
plus i will be going MS like next week and i want to get this working before i wire up the standalone but will it be better if i wait?
05-18-11, 05:38 AM
#40
Driver School Candidate

Join Date: Sep 2010
Location: NC
Posts: 25
Likes: 0
Received 0 Likes
on
0 Posts
I just followed the factory manual i found online for a mk3 supra 7m-gte.
its amazing how similar the 7m and 2j really are.
basically line the motor up to TDC, line the CPS up via the marks on its shaft (important, sets the rotor at tdc), now turn it back counter clockwise one click and then stab it into the motor. you should feel it sort of turn clockwise as it goes into its final spot when it hits the gear on the cam, and it should feel pretty snug.
make sure you have drilled out a new hole to fasten the cps and tighten it down. connect the wires and when you get it fired up sync ignition timing with the light in case you are a tooth off or something like that.
its amazing how similar the 7m and 2j really are.
basically line the motor up to TDC, line the CPS up via the marks on its shaft (important, sets the rotor at tdc), now turn it back counter clockwise one click and then stab it into the motor. you should feel it sort of turn clockwise as it goes into its final spot when it hits the gear on the cam, and it should feel pretty snug.
make sure you have drilled out a new hole to fasten the cps and tighten it down. connect the wires and when you get it fired up sync ignition timing with the light in case you are a tooth off or something like that.
Hope it's not to big or small to see
05-18-11, 09:28 AM
#41
hey, i just went MegaSquirt and my next move is the coil on plug before tuning and i want to know do i have to send the 2 extra wires like the guys with the aem do?
and does anybody have a diagram like the one that was posted for the tt ecu mod that could break down the ignitor harness wire up?
and does anybody have a diagram like the one that was posted for the tt ecu mod that could break down the ignitor harness wire up?
05-18-11, 09:55 AM
#42
Lexus Test Driver
iTrader: (44)
Join Date: Jan 2007
Location: Maryland /Germantown
Posts: 5,139
Likes: 0
Received 7 Likes
on
7 Posts
You mean the (2) wires for the ignitor to the ecu?
Yes you will still need to run those extra to wires since you already have one on your ignitor that goes from the ignitor to the ecu at the pin 57b.
if you are running the vVti coils you just need to add (2) more with from the ecu to the ignitor at the 56b and 55b and your are done.
If you are using TT coils and ignitor you will need to (5) more wires since you aleady have 57b from your stock ge ignitor you just add 5 wires 56b,55b,54b,53b and 52b and your are done.
it's really not bad i did 1jzgte with single 67mm turbo and R154 instead of using the VVti coils i just used the TT coils and ignitor since that's what my friend had from his cut 1jz harness , so i just added them to the ge harness and wired the cams, crank sensors, ait sensor, map sensor and i was done, it was a little time consuming since this was the second time that i used the tt coils and ignitor i usually use the vvti coils because they are better and no DLI will be needed for 30psi.
This is one off the cheapest and best mods you can do if you are na-t, 1jzgte and 2jzgte using the ge harness and run the aristo or tt ECU.
Goodluck and let me know if you need more help.
05-22-11, 06:50 PM
#44
Rookie
Join Date: Mar 2009
Location: Fl
Posts: 32
Likes: 0
Received 0 Likes
on
0 Posts
Great writeup guys. The more I read about how easy it is to use the tt ecu w. The stock harness, easy to convert to cop ignition, cheap turbo manifolds, and readily available ffim for the ge, the more i'm tempted to yank out my 1j and find a stock ge and start over! Lol!