
 12-15-14, 03:58 PM
Last edit by: IB Advertising
See related guides and technical advice from our community experts:
Browse all: Tires and Wheels Guide
- How to Replace Your Wheel Hub Bearing
Step by step instructions for do-it-yourself repairs
Browse all: Tires and Wheels Guide

Tutorial: Front Wheel Bearing Replacement
05-12-10, 03:12 AM
#1
Driver
Thread Starter
iTrader: (2)

Join Date: Aug 2009
Location: Bridgeport,CT/Scotland,UK
Posts: 159
Likes: 0
Received 2 Likes
on
2 Posts
Hi Folks,
I had a problem with my wheel bearings, the one on the front right was faulty. One of the things I noticed was a harmonic noise when I drive over 50 mph. More like WooWooWooWoo. This means the hub is not rotating freely. The garage who I generally use put the car up on a ramp with the wheels hanging, proved it to me that the wheel bearing is making the noise by rotating the wheels on both side. The one on the right (o/s/f) was not rotating freely and was also making some noise compared to the one on the left (n/s/f).
I did do a search and put up a post for this but never managed to find decent info about the work, time and complexity involved in replacing a wheel bearing. So I decided to put this post put for a tutorial on replacing the front wheel bearings.
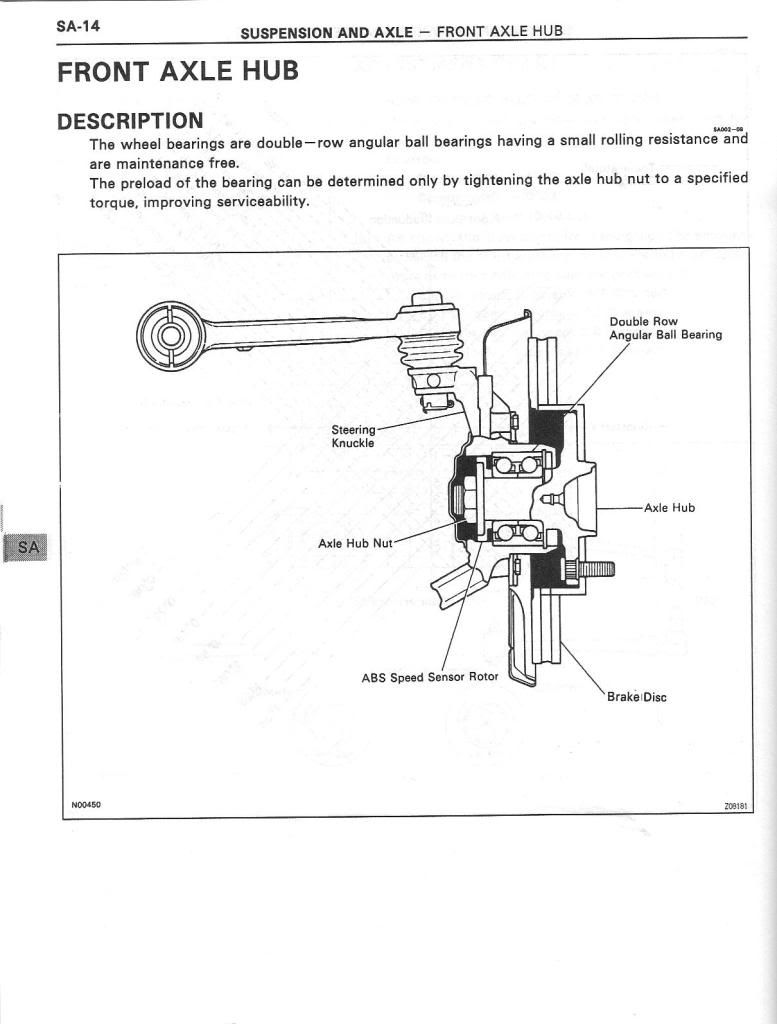
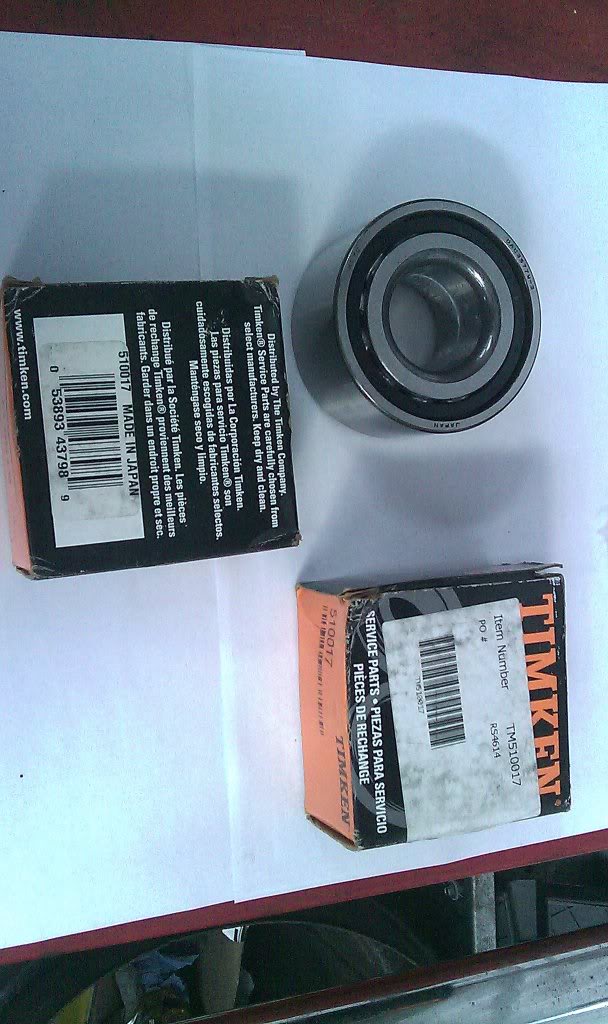
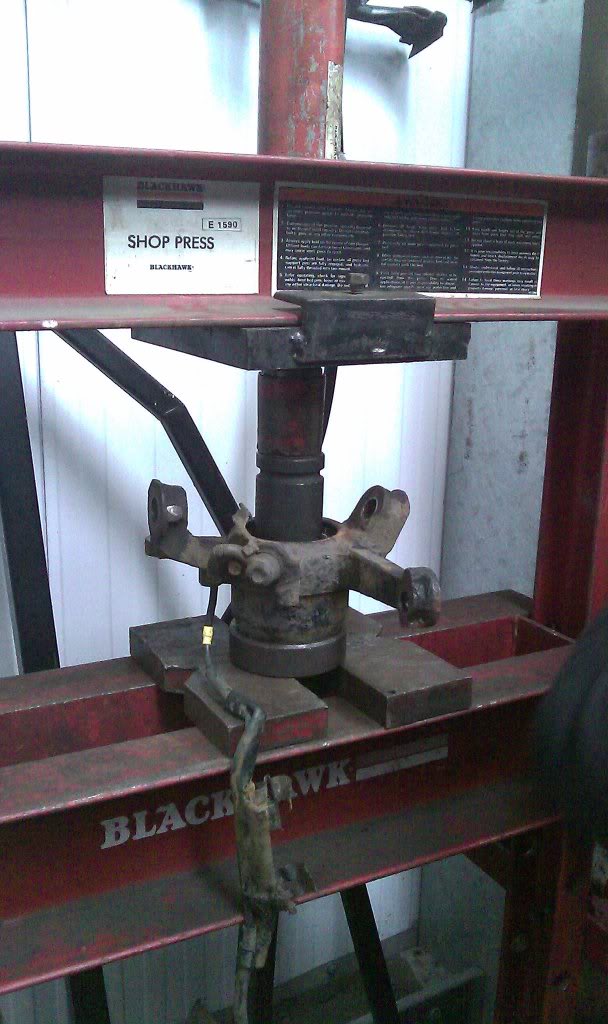
The replacement parts you need from the catalogue are shown highlighted in the following pic along with the part numbers. You need a set for each side of the axle. Also the garage should be equipped with a decent hydraulic press to press out the bearing and press in the new bearing. If you use a hammer or something else to press the bearing in you have a very high chance of damaging it.
1) Hole Snap Ring (Front Axle) - 90521-82001
2) Oil Seal (Front Axle) - 90311-50008
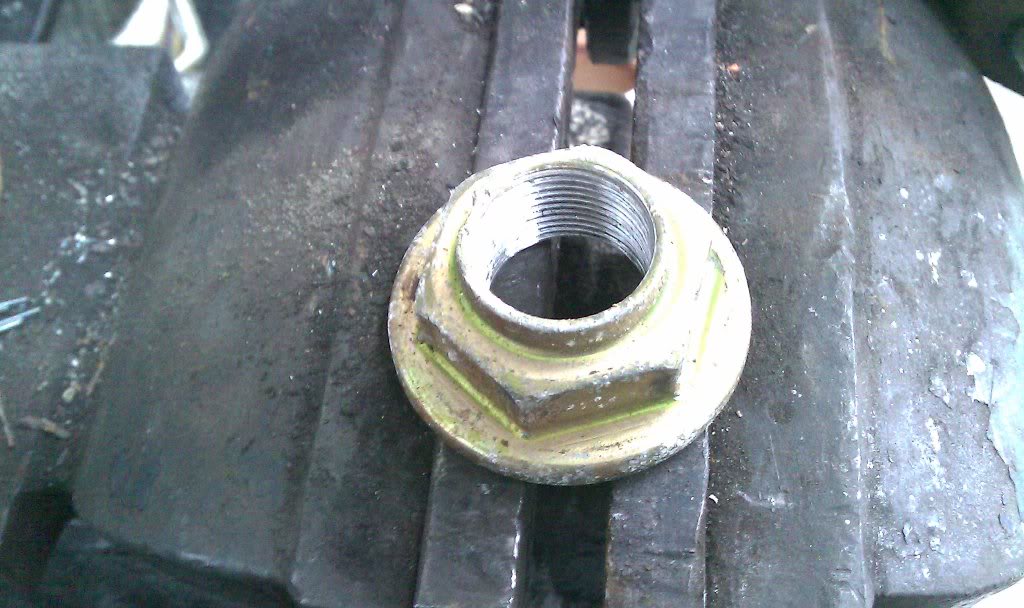
3) Nut (Locking nut) - 90179-24005
4) Grease Cap (front Axle Hub) - 43514-24010

To do this job we had to
I had a problem with my wheel bearings, the one on the front right was faulty. One of the things I noticed was a harmonic noise when I drive over 50 mph. More like WooWooWooWoo. This means the hub is not rotating freely. The garage who I generally use put the car up on a ramp with the wheels hanging, proved it to me that the wheel bearing is making the noise by rotating the wheels on both side. The one on the right (o/s/f) was not rotating freely and was also making some noise compared to the one on the left (n/s/f).
I did do a search and put up a post for this but never managed to find decent info about the work, time and complexity involved in replacing a wheel bearing. So I decided to put this post put for a tutorial on replacing the front wheel bearings.
The replacement parts you need from the catalogue are shown highlighted in the following pic along with the part numbers. You need a set for each side of the axle. Also the garage should be equipped with a decent hydraulic press to press out the bearing and press in the new bearing. If you use a hammer or something else to press the bearing in you have a very high chance of damaging it.
1) Hole Snap Ring (Front Axle) - 90521-82001
2) Oil Seal (Front Axle) - 90311-50008
3) Nut (Locking nut) - 90179-24005
4) Grease Cap (front Axle Hub) - 43514-24010
To do this job we had to
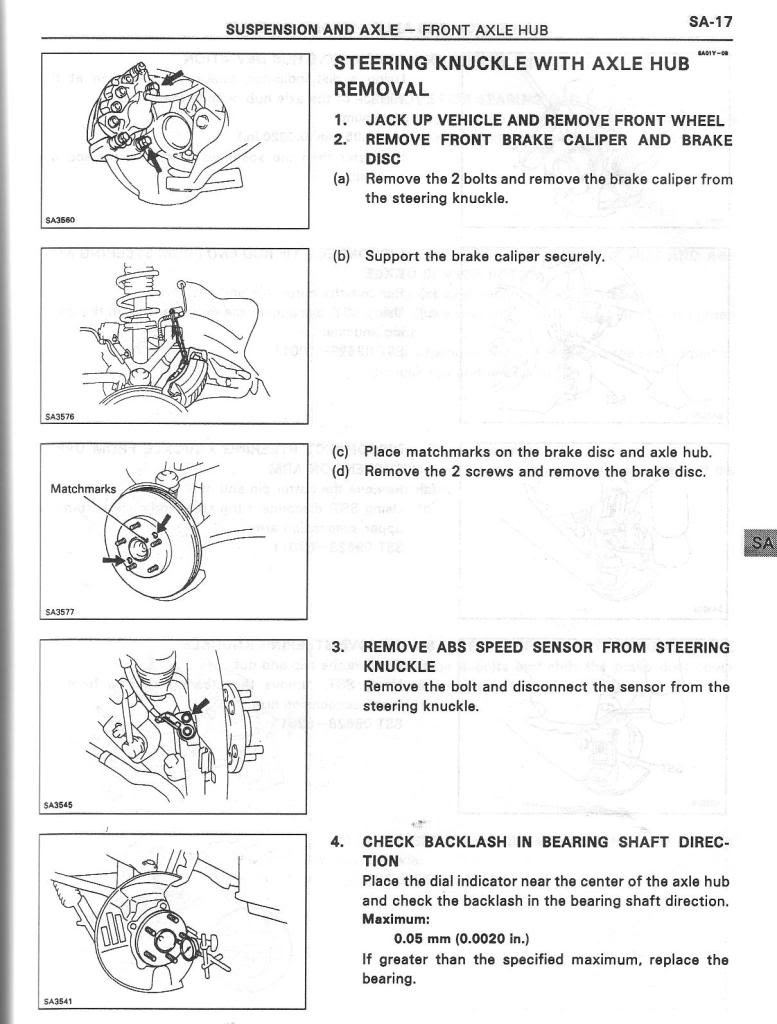
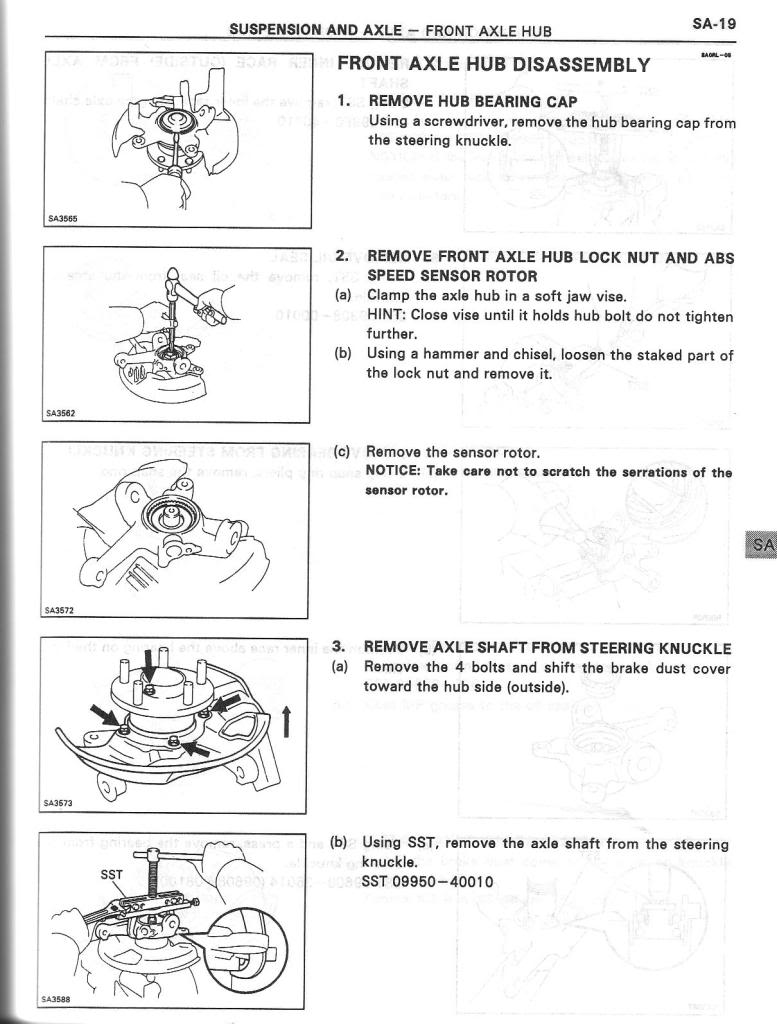
- Remove the wheel
- Remove the brake disc
- Remove the brake caliper (see that it is secured properly)
- Disconnect all the control arms from the hub
- Disconnect and remove the ABS sensor from the top of the hub (recommended but we did not)
- Remove the studs on the wheel hub (recommended but we did not)
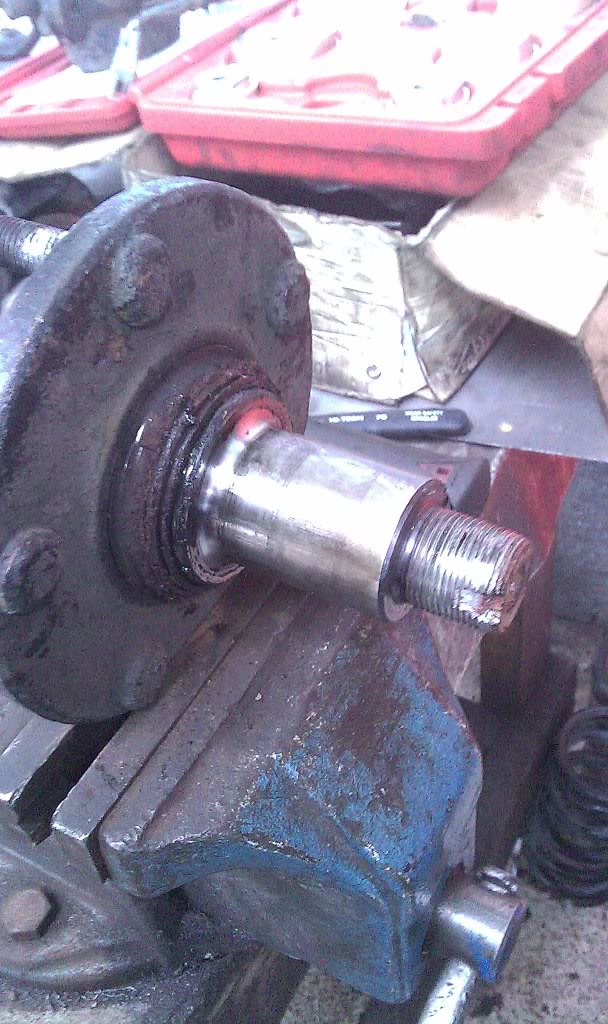
- Remove the the wheel hub which contains the bearing.
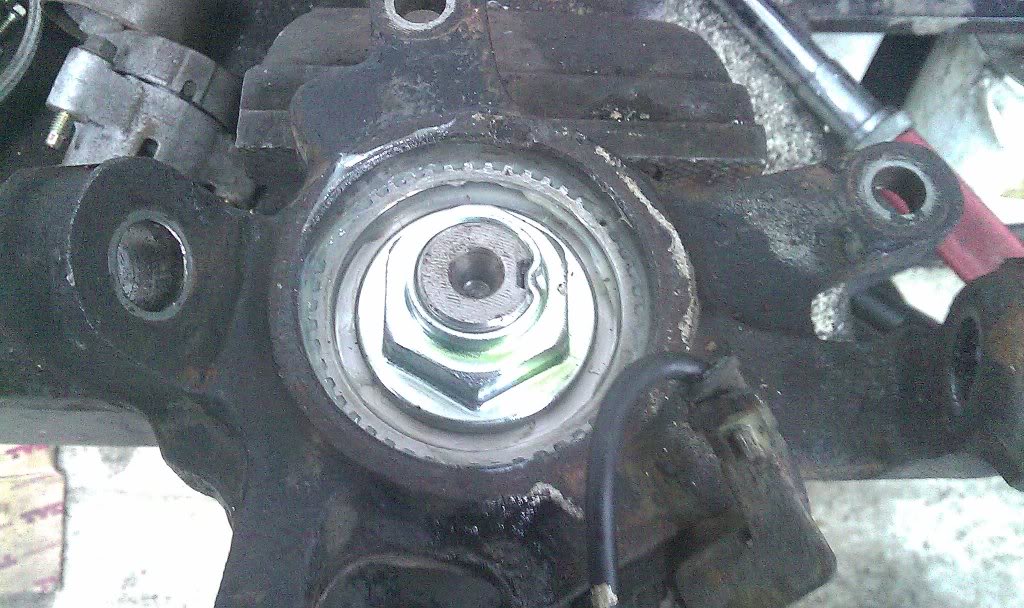
- Remove the centre grease cap
- Remove the nut under the grease cap
- Remove the ABS skid control rotor
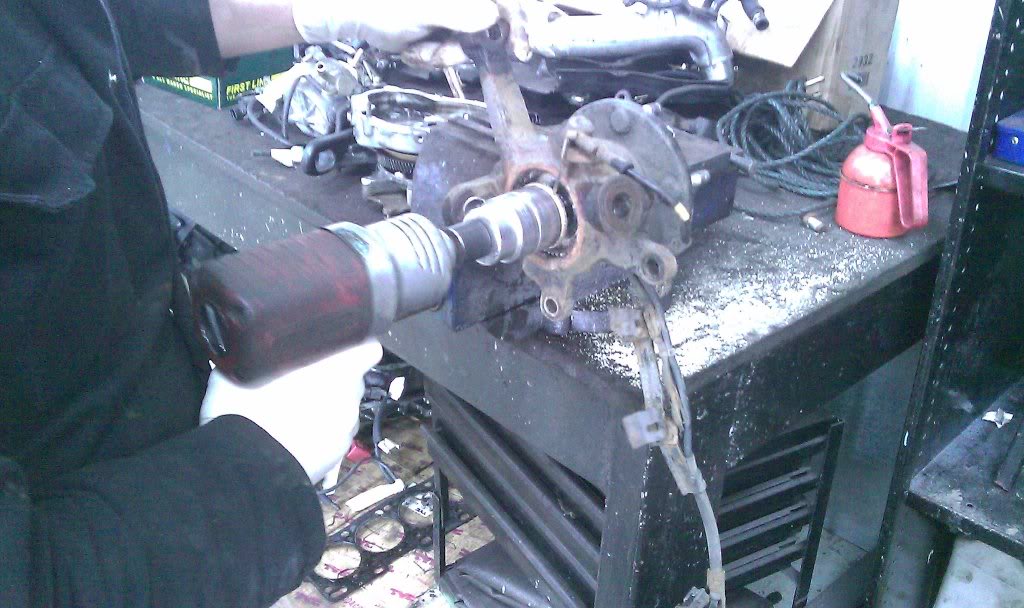
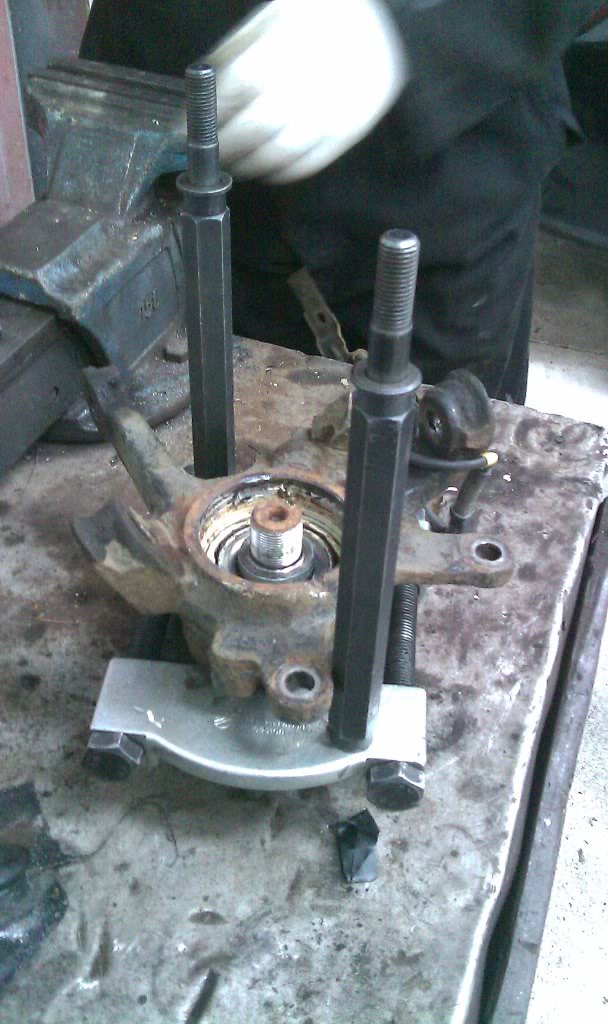
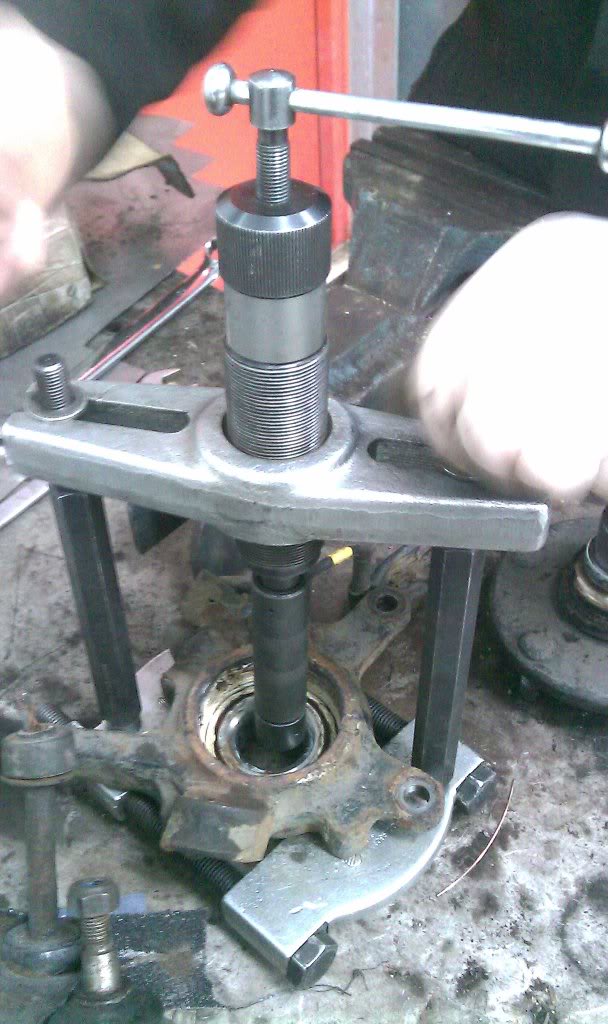
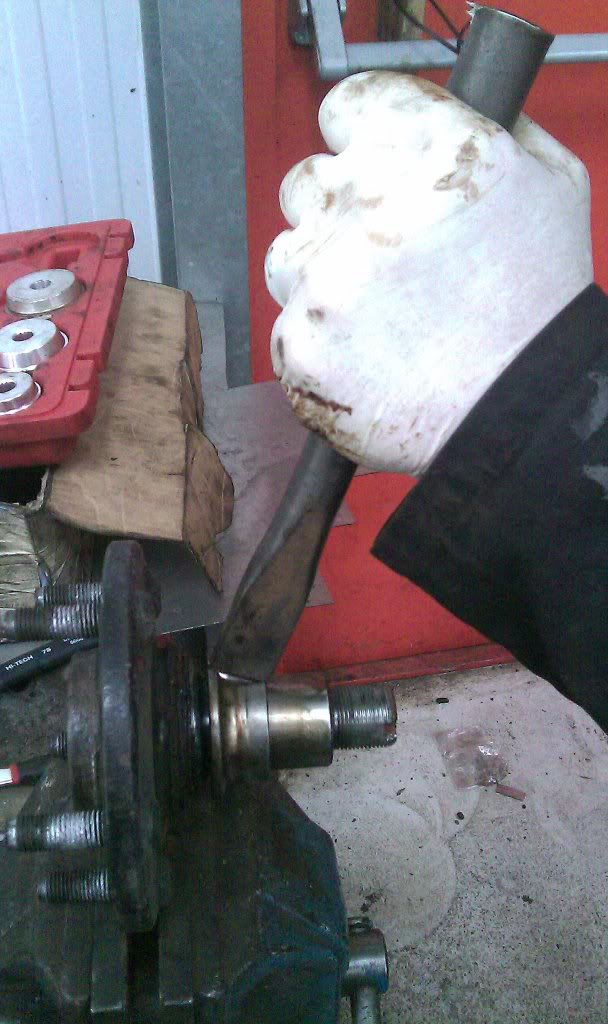
- Using the press remove the Hub sub assay out
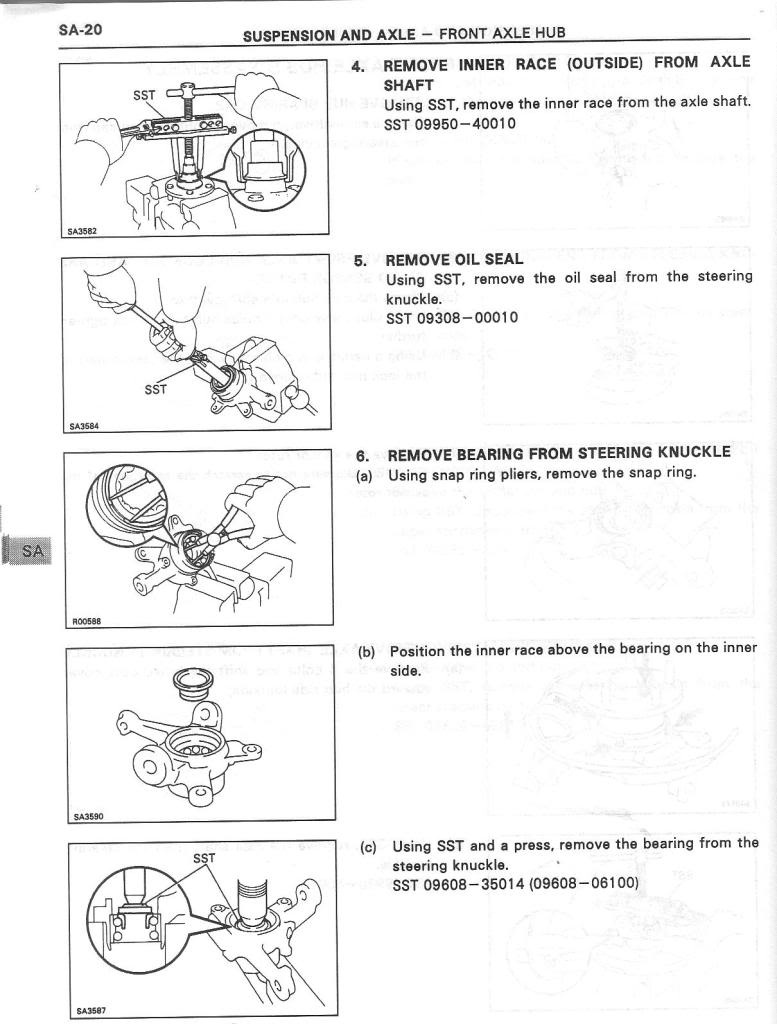
- Remove the oil seal
- Remove the snap ring
- Using the press remove the bearing out
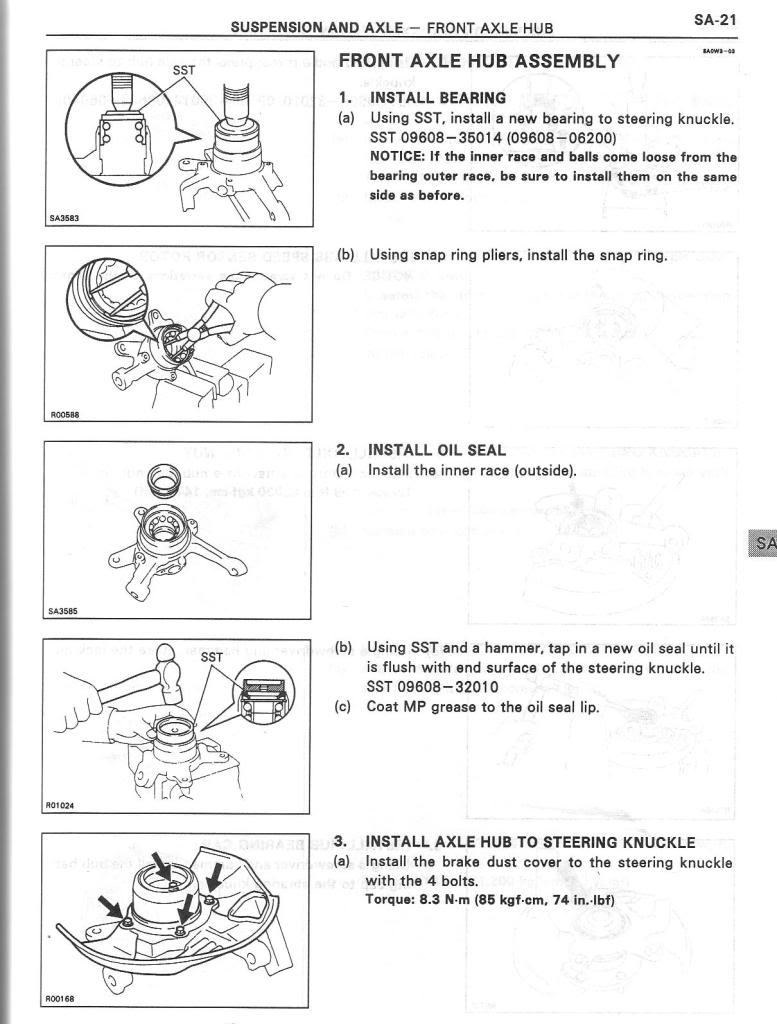
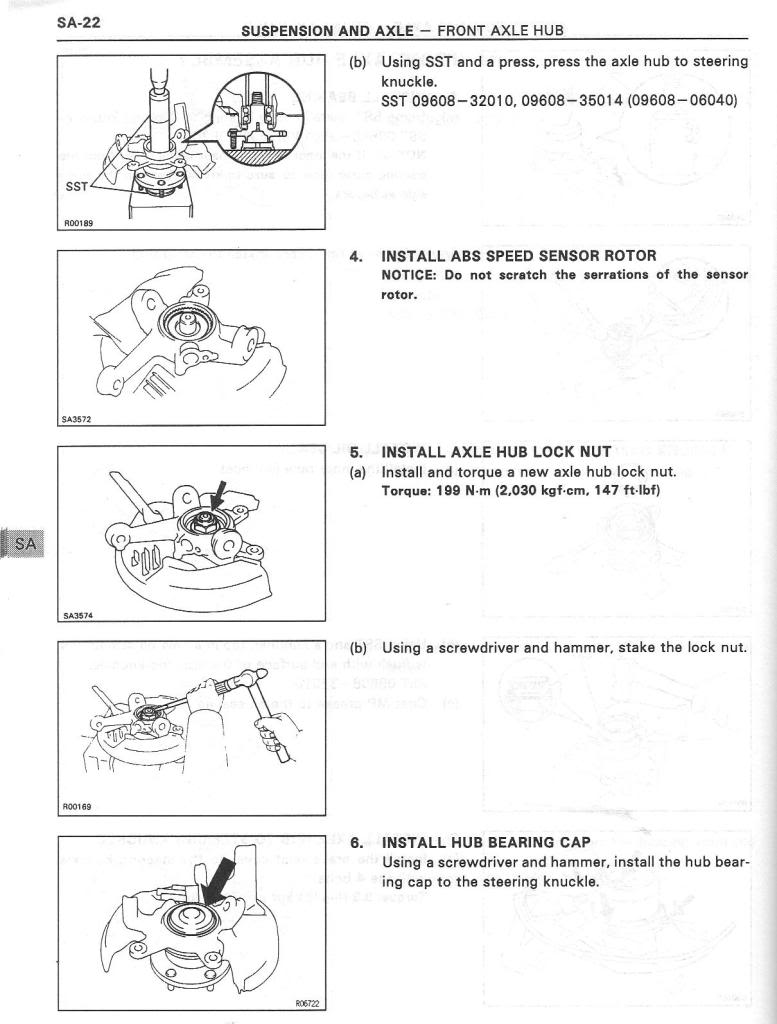
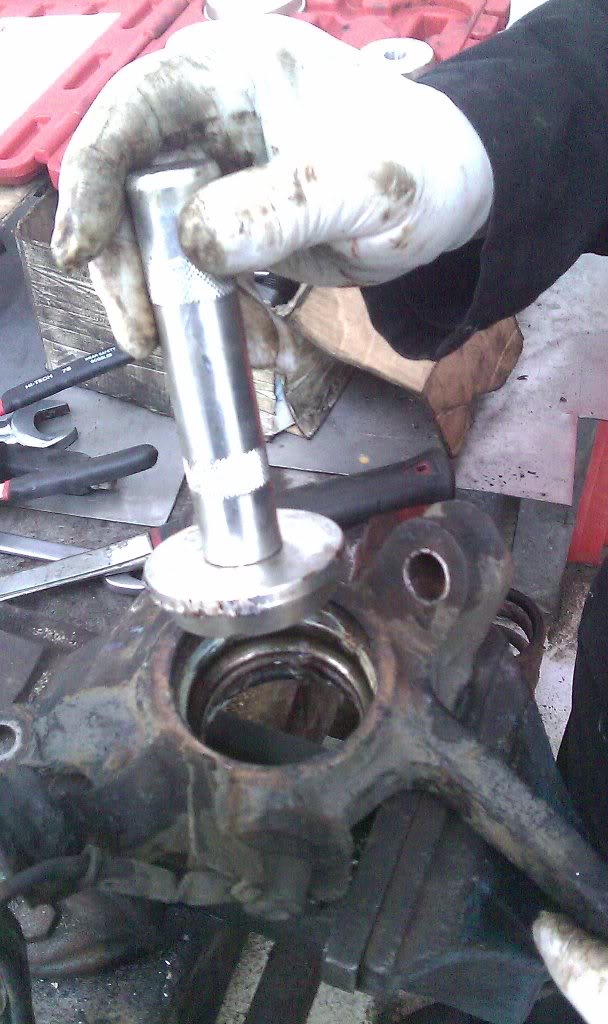
- Using the press, press the new bearing in and do the above steps in the reverse order
 05-12-10, 03:13 AM
#2
Driver
Thread Starter
iTrader: (2)
Join Date: Aug 2009
Location: Bridgeport,CT/Scotland,UK
Posts: 159
Likes: 0
Received 2 Likes
on
2 Posts
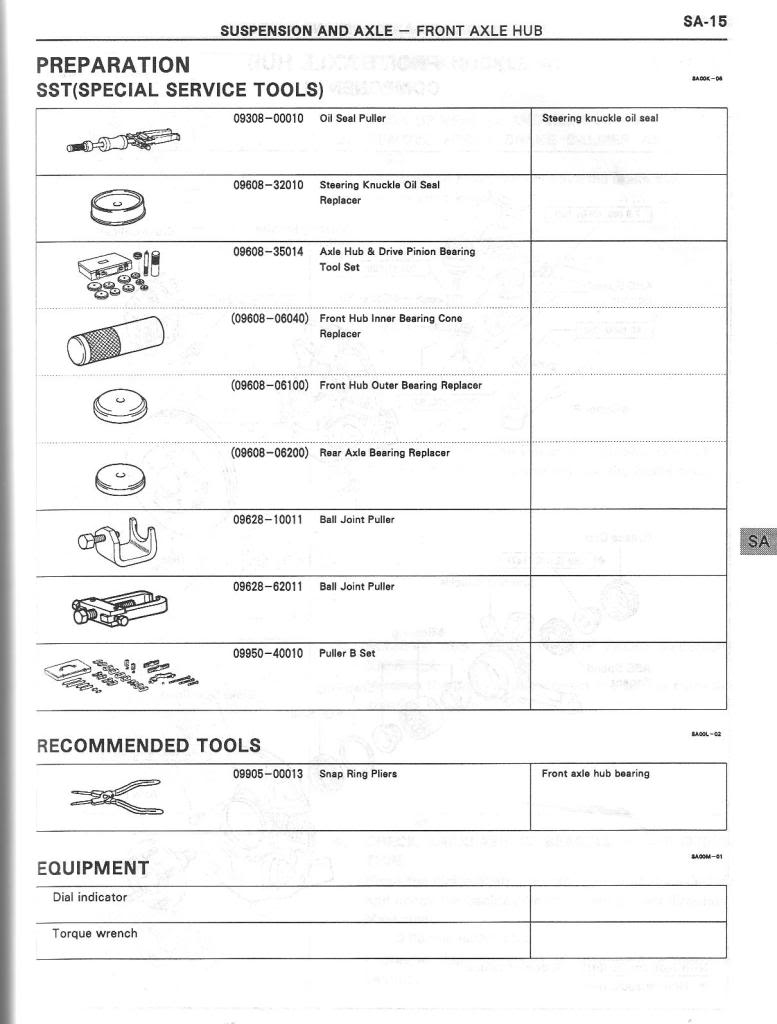
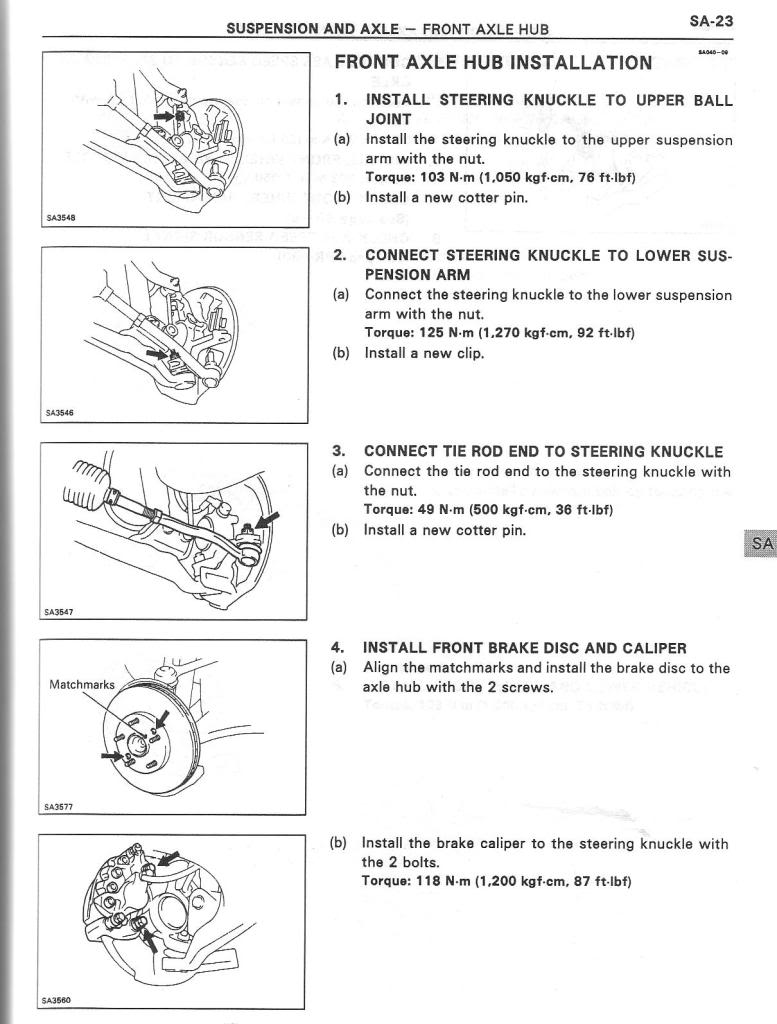
Here is the list of all the steps/instructions with images along with torque settings for the various nuts from the workshop manual.


Cheers
Cheers
The following users liked this post:
n1ck (06-20-18)
05-12-10, 03:15 AM
#3
Driver
Thread Starter
iTrader: (2)
Join Date: Aug 2009
Location: Bridgeport,CT/Scotland,UK
Posts: 159
Likes: 0
Received 2 Likes
on
2 Posts
Here goes the coloured pics from my work 

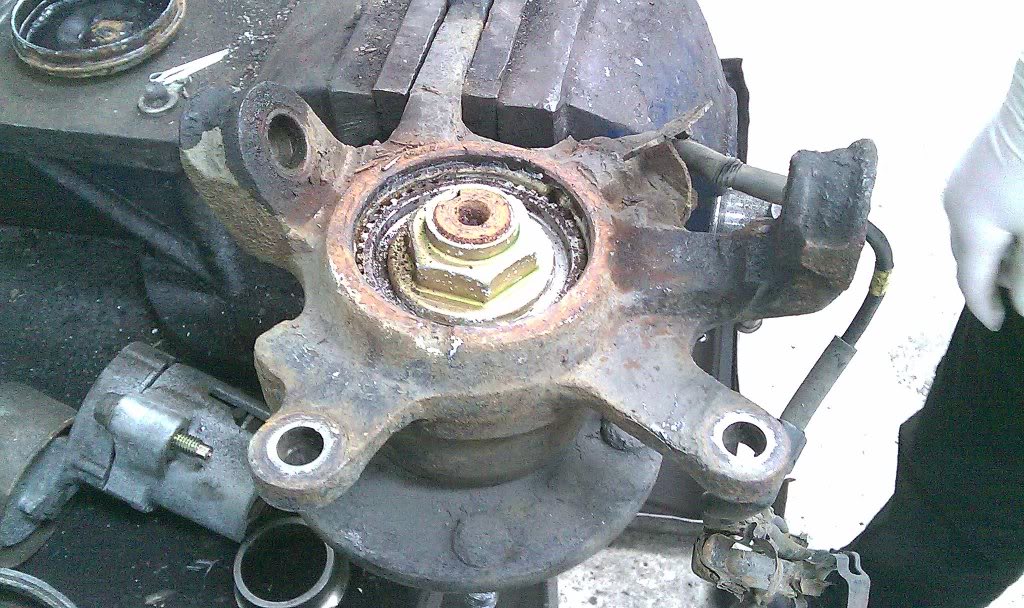
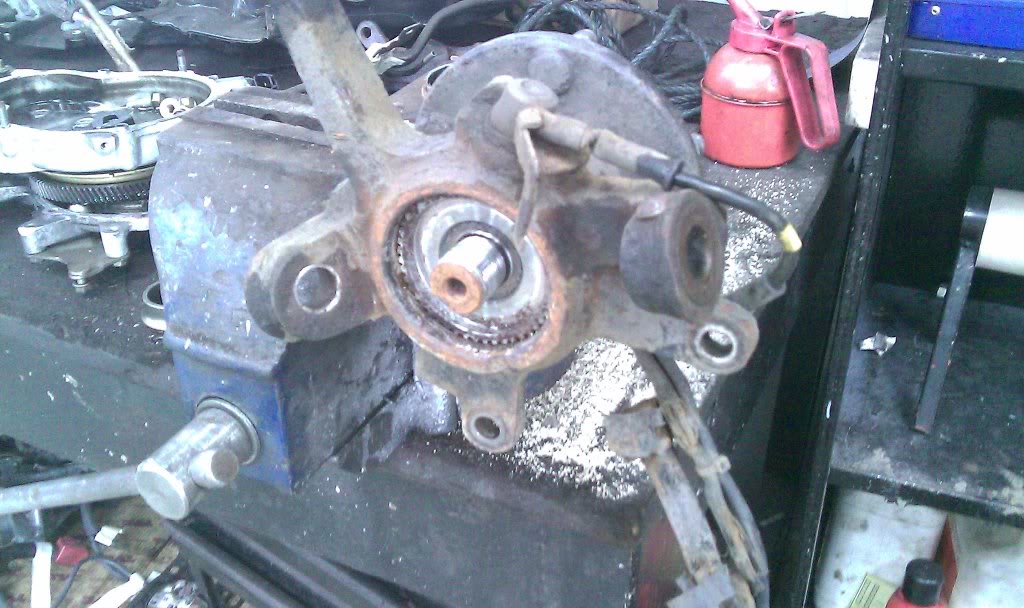
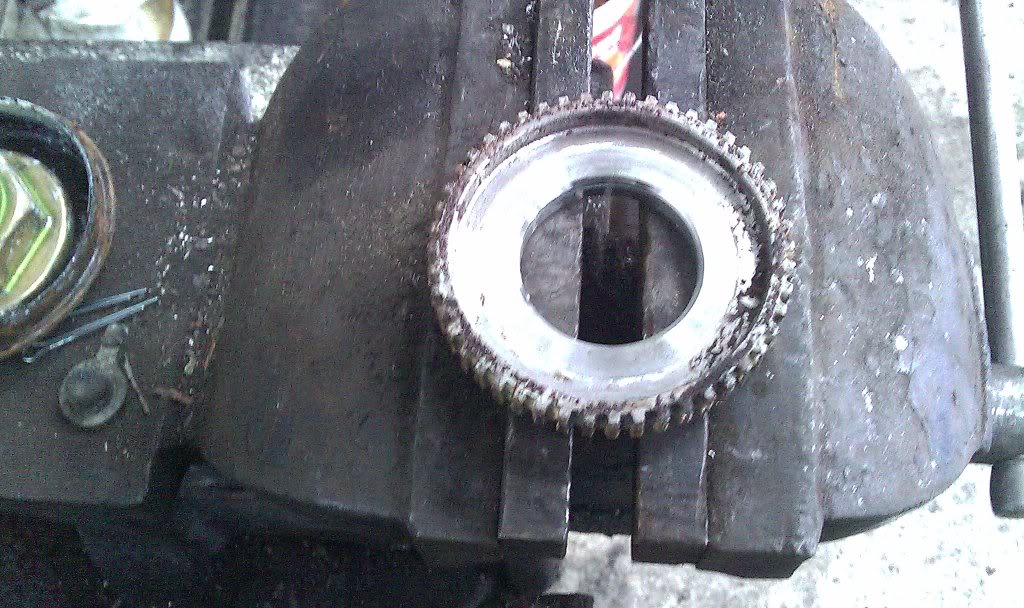

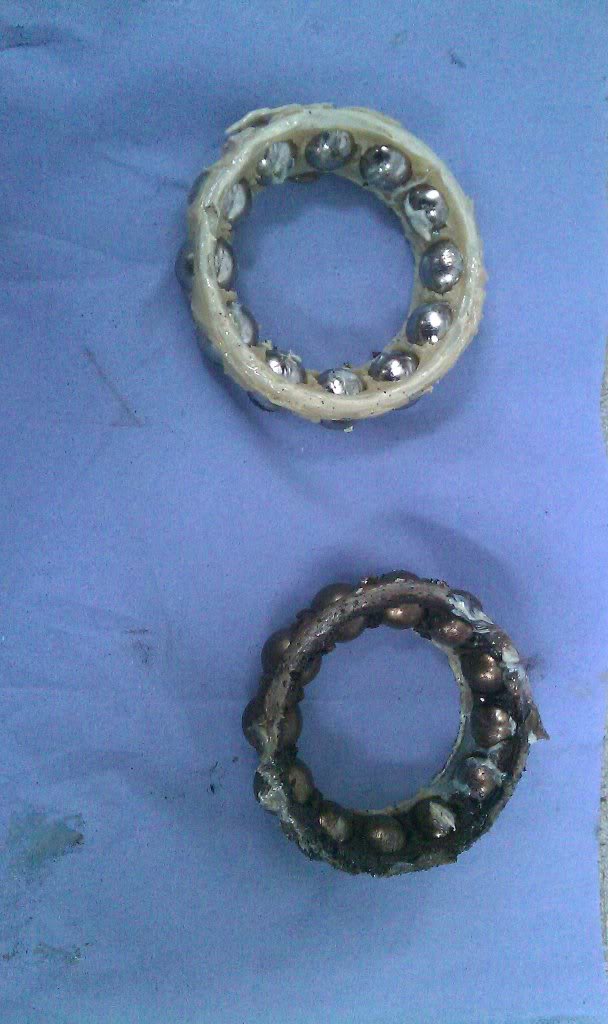
You can clearly see here how this bearing has deteriorated. Looks like some water was seeping in and corroded the bearings and the grease looks dirty too ...

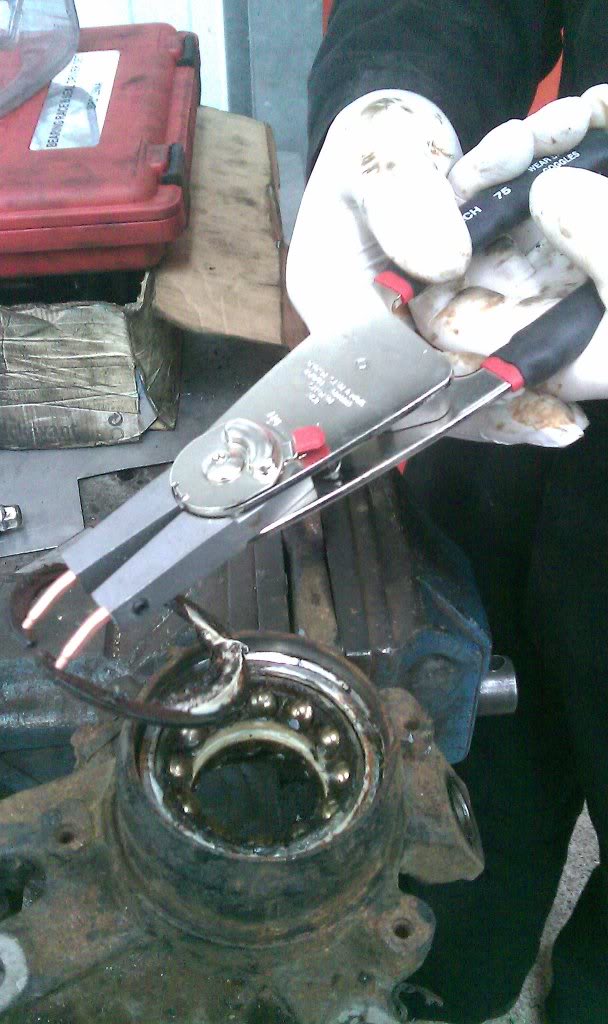

Look at the difference between the n/s and o/s front bearings (the offside one was faulty)

You can clearly see here how this bearing has deteriorated. Looks like some water was seeping in and corroded the bearings and the grease looks dirty too ...
Look at the difference between the n/s and o/s front bearings (the offside one was faulty)
The following users liked this post:
n1ck (06-20-18)

 05-12-10, 01:12 PM
#7
Driver
Thread Starter
iTrader: (2)
Join Date: Aug 2009
Location: Bridgeport,CT/Scotland,UK
Posts: 159
Likes: 0
Received 2 Likes
on
2 Posts
Thank you folks. I think due to the age of our cars, wheel bearings would become faulty and replacing them would become a usual thing. So though this post might be helpful for others getting this done.
Trending Topics
05-12-13, 08:59 PM
#9

Did the job today on my front left (150K miles). Actually didn't even need to do it, noise I was hearing wasn't from bearings, but oh well. Took 5-6 hours with two people without a press. Lot's of tinkering with different pulls, acetylene to heat and remove the old inner races. This is no job for the casual "I can change my brake pad" person unless they have all the tools and muscle handy.
This is definitely a 8 or 9 out of 10 on the difficulty scale. If you have someone with experience and have a pneumatic press and the specific Toyota SSTs (although you can do it without them, cases proven) it wouldn't be so bad.
Thanks for the manual sheets and the pictures.
Also in case anyone is curious, the axel lock nut is 32mm (big sucker!)
Last edited by ISFFUN; 05-12-13 at 09:04 PM.
 05-12-14, 01:59 PM
#12
Driver School Candidate

Join Date: Dec 2012
Location: CA
Posts: 13
Likes: 0
Received 0 Likes
on
0 Posts
Edinlexv8
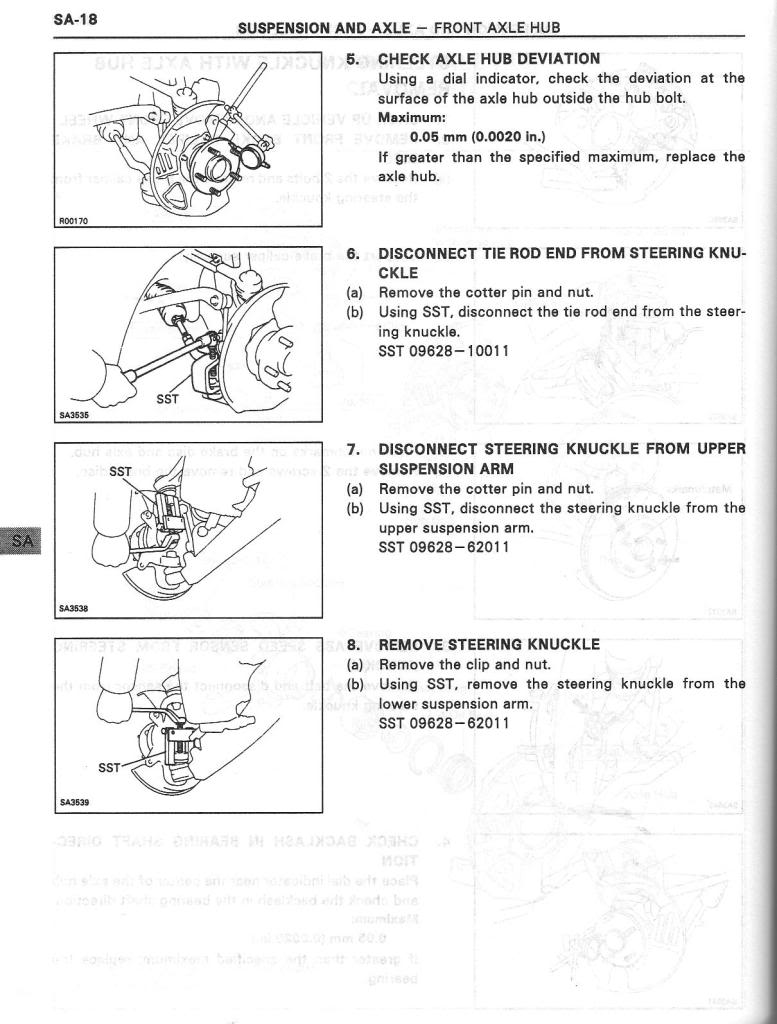
Great posting. I printed the SA pages and read them carefully. I have done bearings on my old Mercedes before but this is much more (Unnecessarily ) complicated. (Warum einfag wenn es compliziert auch geht?). I got as far as looking at the break disk and the five studs and the two threaded holes next to the studs. But looking from the back side while turning the disk by hand, I do not see the head of those two screws, which the instructions say to take out.(P. SA 17, 2 d) Could you give us a clarification on this?
Great posting. I printed the SA pages and read them carefully. I have done bearings on my old Mercedes before but this is much more (Unnecessarily ) complicated. (Warum einfag wenn es compliziert auch geht?).
I got as far as looking at the break disk and the five studs and the two threaded holes next to the studs. But looking from the back side while turning the disk by hand, I do not see the head of those two screws, which the instructions say to take out.(P. SA 17, 2 d) Could you give us a clarification on this?
Last edited by mouse23; 05-12-14 at 02:14 PM.
 05-12-14, 02:37 PM
#14
Edinlexv8
Great posting. I printed the SA pages and read them carefully. I have done bearings on my old Mercedes before but this is much more (Unnecessarily ) complicated. (Warum einfag wenn es compliziert auch geht?). I got as far as looking at the break disk and the five studs and the two threaded holes next to the studs. But looking from the back side while turning the disk by hand, I do not see the head of those two screws, which the instructions say to take out.(P. SA 17, 2 d) Could you give us a clarification on this?
Great posting. I printed the SA pages and read them carefully. I have done bearings on my old Mercedes before but this is much more (Unnecessarily ) complicated. (Warum einfag wenn es compliziert auch geht?).
I got as far as looking at the break disk and the five studs and the two threaded holes next to the studs. But looking from the back side while turning the disk by hand, I do not see the head of those two screws, which the instructions say to take out.(P. SA 17, 2 d) Could you give us a clarification on this?I hope I never have to do this.......
Last edited by Studiogeek; 05-12-14 at 08:49 PM.
05-12-14, 06:56 PM
#15
Just had the right rear done on my 96 SC400. Front doesn't look any harder to do, but front hub is alot cheaper, if you have to replace it. Any of these press in types of bearings can be a bit fun. Oh for the good ole days when you just pulled the hub off & knocked the old bearings & races out & put the new ones back in, in about 20 minutes. LOL!
