SC400 Koyo Radiator Install w/Lots of Pics
 07-05-06, 06:03 PM
#1
Well after living with the common hairline cracks in my radiator for a while now I've had enough and decided to go and get a new radiator. Not wanting this to happen again in the future I decided not to to go with another plastic unit, be it OEM or Koyo replacements. I considered getting a metal replacement for my SC400 that would have the built in transmission cooler from various online sources, but opted to go one up and get the Koyo Aluminum Racing unit for a Toyota Supra Turbo having read a few posts and seeing a few pics of them installed in SC's. I couldn't really get any definite answers for installation on an SC400 so I decided to just dive in.
The Supra radiator only comes for manual transmission cars, therefore no built in trans. cooler. I went and got a Hayden model 678 Transmission Cooler (nearly identical to the TRD trans. cooler for Toyota trucks) that measures 3/4" x 7 1/2" x 11" after measuring that was about as big as will fit in front of the wheel well, my desired mounting location for the obvious cooling benefits of the increased airflow and distance from other heat sources such as the radiator, engine bay, etc. Unfortunately I didn't check before leaving the store and was missing some mounting hardware and hose from the box. Oh well. After removing the front bumper, staring for a while, doing a few test fits and mock ups I noticed that the cooler will fit perfectly where the factory power steering cooler is mounted on the engine fan fluid cooler.
Power Steering Cooler in it's original position.

Moved behind Engine Fan Fluid Cooler.

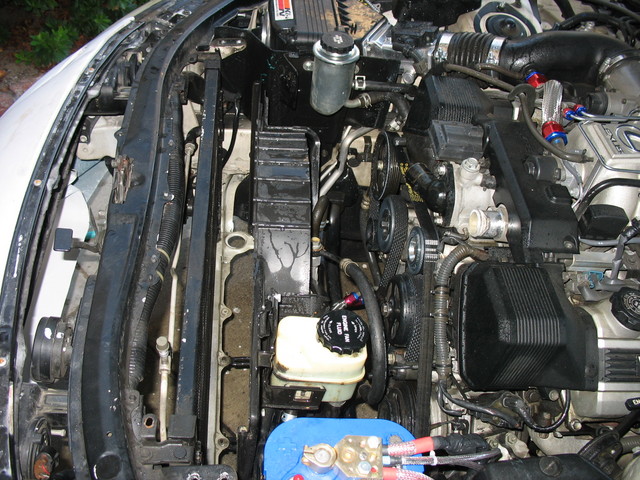
I unbolted the power steering cooler from it's mount and moved it behind its original location. After a little finessing of the fan cooler hard lines and a little ingenuity its a perfect fit. I had to make my own mounting brackets out of these pre-drilled steel strips I had laying around used for mounting recessed lighting I think. I had to drill a hole about an inch over from the original holes on the trans. cooler to use the factory supports, but in the end everything bolts together and is very secure. This is the most "factory look" install location I could figure out and with the bumper on it is virtually impossible to tell if anything was done. It looks like it was made to go there.
Hayden 678 Trans. Cooler with mounting brackets. Note OEM P/S cooler bracket on the left.

Trans. Cooler bracket bolted to existing bolt holes.

Now for the plumbing. After looking at the space constraints I decided against using just rubber tubing and went with 3/8" hard line to run the ATF over to the cooler. This is significantly larger than standard brake hard line and it is very hard to make tight bends in it. Using the hard line bender bought at the auto parts store was quite a chore, but with a lot of patience and two sore hands I got what i wanted in the end. I would have like to go with AN fittings, but they cost a bit more than my budget allows so I used few inches of rubber hose with a stainless steel sleeving kit on the ends. I wanted to make sure the lines didn't touch anything so I ended up using some foam/rubber water heater pipe insulation from the local hardware store. I cut it to size, glued and zip-tied it in key places where the lines may come it contact with other objects. Connecting the lines is pretty straightforward. Disconnect original lines, connect new lines.
Trans. Cooler mounted and plumbed.

Another Angle

The Supra radiator only comes for manual transmission cars, therefore no built in trans. cooler. I went and got a Hayden model 678 Transmission Cooler (nearly identical to the TRD trans. cooler for Toyota trucks) that measures 3/4" x 7 1/2" x 11" after measuring that was about as big as will fit in front of the wheel well, my desired mounting location for the obvious cooling benefits of the increased airflow and distance from other heat sources such as the radiator, engine bay, etc. Unfortunately I didn't check before leaving the store and was missing some mounting hardware and hose from the box.
Oh well. After removing the front bumper, staring for a while, doing a few test fits and mock ups I noticed that the cooler will fit perfectly where the factory power steering cooler is mounted on the engine fan fluid cooler.Power Steering Cooler in it's original position.
Moved behind Engine Fan Fluid Cooler.
I unbolted the power steering cooler from it's mount and moved it behind its original location. After a little finessing of the fan cooler hard lines and a little ingenuity its a perfect fit. I had to make my own mounting brackets out of these pre-drilled steel strips I had laying around used for mounting recessed lighting I think. I had to drill a hole about an inch over from the original holes on the trans. cooler to use the factory supports, but in the end everything bolts together and is very secure. This is the most "factory look" install location I could figure out and with the bumper on it is virtually impossible to tell if anything was done. It looks like it was made to go there.
Hayden 678 Trans. Cooler with mounting brackets. Note OEM P/S cooler bracket on the left.
Trans. Cooler bracket bolted to existing bolt holes.
Now for the plumbing. After looking at the space constraints I decided against using just rubber tubing and went with 3/8" hard line to run the ATF over to the cooler. This is significantly larger than standard brake hard line and it is very hard to make tight bends in it. Using the hard line bender bought at the auto parts store was quite a chore, but with a lot of patience and two sore hands I got what i wanted in the end. I would have like to go with AN fittings, but they cost a bit more than my budget allows so I used few inches of rubber hose with a stainless steel sleeving kit on the ends. I wanted to make sure the lines didn't touch anything so I ended up using some foam/rubber water heater pipe insulation from the local hardware store. I cut it to size, glued and zip-tied it in key places where the lines may come it contact with other objects. Connecting the lines is pretty straightforward. Disconnect original lines, connect new lines.
Trans. Cooler mounted and plumbed.
Another Angle
Last edited by XxSC400xX; 02-17-07 at 01:48 PM.
 07-05-06, 06:14 PM
#2
The transmission cooler is taken care of, now it's time to removed the old cracked radiator and install the beautiful Koyo radiator. First make sure the car is cooled off. If not let it sit for a good hour or two. I started by removing the original reservoir tank, dumping out the fluid and capping the return fitting on the engine block near the thermostat housing as it is no longer needed with the new overflow tank. The easiest way to go is to get an overflow tank from a SC300. I had one from a early eighties Toyota. It works, but it takes more effort to find a place to put it and mount it securely. To gain access to under the engine bay the plastic guard underneath will need to be removed, obviously the car will need to be jacked up and placed on stands or driven up on ramps. I used ramps because I have them and I'm lazy. To remove the bottom cover just get a 10mm socket, get under the car and get to work. Next drain the radiator as much as possible. Either open the white plastic drain plug on the bottom of the radiator or disconnect the lower radiator hose. Either will work, but being patient and waiting for the fluid to drain out of the drain plug is the cleaner way to go. When its done draining remove both upper and lower radiator hoses completely from the engine bay so they wont get in the way. Remove the radiator hold downs and set them aside, making sure not to lose the rubber grommets that go with them. I almost lost one by being careless. If you are going with electric fans just remove the hoses for the hydrulic fan and pull the whole thing out. I wanted to keep the stock fan assembly so removal required me to first unbolt the fan and shroud from the top and bottom of the radiator. After that it should just pull out with a little wiggling and pulling the fan assembly back to clear the lower water neck.
New Koyo Radiator, Distilled Water, Toyota Coolant, Redline Water Wetter and Stainless Sleeved OEM Radiator Hoses.

To keep the stock fan the shroud must be removed and modified to fit the new radiator. The plastic shroud is held on the fan assenbly by four bolts facing the front of the car and one facing the engine near the engine fan fluid reservoir. There is also a little clip holding oil lines, this is easier to reach from under the car. Once the shroud is removed and placed on the Koyo radiator it's pretty obvious how it needs to be modified to fit. A little trimming around the radiator hoses, temperature probe and the sides with a Dremel and a cutoff bit is required to get it fo fit snugly. I also used several sizes of drum sanders to get them round and looking nice.
Trimming Around Temp. Probe

Trimming Around Water Neck
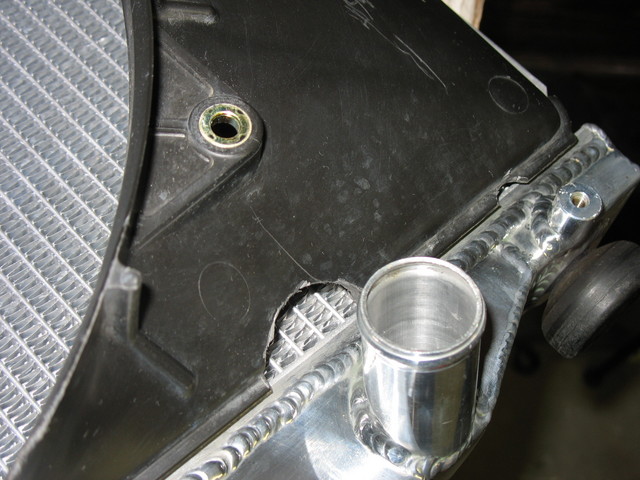
The Koyo radiator core is about an inch shorter than the OEM Radiator so some type of spacer is required for it to fit. Some people have gotten another set of the rubber spacer already there and stacked them, some have used short bits of rubber hose and modified the original spacers. I happened to have some old control arm bushings taken off my '88 civic years ago and they were a perfect fit. They slipped snugly on the radiator and sit right on top of the original bushings.

Re-install the fan shroud and then drop in the new radiator. With the Koyo in the fan assembly mounting locations are slightly off because of the slightly different dimensions of the Koyo. With a little careful pushing and pulling the top bolts line up fairly well. Be careful installing the bolts, as it is easy to cross thread them into the aluminum. Unfortunately the bottom mounts dont line up and are off by about 1/4", but with the hydraulic fan behind it is is held firmly in place. (Actually it seems to be held in more securely than the original one.) When test fitting the radiator hoses I noticed a small problem, the water necks are about 1/8" smaller than what is normally an SC400. Not sure if this would be the same on a 1/2JZ equipped SC300. Rather than just attempting to overtighten the clamps, I had the idea to stretch a piece of a bicycle inner-tube over them. I needed to use two layers to ensure a snug, leak free fit.

With everything connected, tightened down and ready to go it's time to start flushing out the old coolant. Although this step isn't exactly nesscessary, it is highly recommended in order to keep everything clean and working properly. For anyone who hasn't done this before it it very easy, yet somewhat time consuming to do a thorough job. Required is alot of STEAM DISTILLED WATER. I bought 10 gallons at Wal-Mart for something like sixty cents each, and ended up using all of it. Since the radiator is already empty, start filling with distilled water until it's full, start the car and let it run for 15-20 minutes with the climate control set to MAX HOT to circulate water throught the system. With the engine running and the radiator cap off, let all the air bubbles make their way out while you contemplate the price of gasoline. Once the engine is up to operating temperature and there are no more air bubbles coming out turn the car off and let it sit and cool off. After about an hour or two it should be cool enough to drain again without seriously scalding yourself. Drain, fill, repeat as nesscessary until the water comes out clean. This will take many times because the engine and heater core still holds probably 75% of the old fluid after it's been drained.
New Koyo Radiator, Distilled Water, Toyota Coolant, Redline Water Wetter and Stainless Sleeved OEM Radiator Hoses.
To keep the stock fan the shroud must be removed and modified to fit the new radiator. The plastic shroud is held on the fan assenbly by four bolts facing the front of the car and one facing the engine near the engine fan fluid reservoir. There is also a little clip holding oil lines, this is easier to reach from under the car. Once the shroud is removed and placed on the Koyo radiator it's pretty obvious how it needs to be modified to fit. A little trimming around the radiator hoses, temperature probe and the sides with a Dremel and a cutoff bit is required to get it fo fit snugly. I also used several sizes of drum sanders to get them round and looking nice.
Trimming Around Temp. Probe
Trimming Around Water Neck
The Koyo radiator core is about an inch shorter than the OEM Radiator so some type of spacer is required for it to fit. Some people have gotten another set of the rubber spacer already there and stacked them, some have used short bits of rubber hose and modified the original spacers. I happened to have some old control arm bushings taken off my '88 civic years ago and they were a perfect fit. They slipped snugly on the radiator and sit right on top of the original bushings.
Re-install the fan shroud and then drop in the new radiator. With the Koyo in the fan assembly mounting locations are slightly off because of the slightly different dimensions of the Koyo. With a little careful pushing and pulling the top bolts line up fairly well. Be careful installing the bolts, as it is easy to cross thread them into the aluminum. Unfortunately the bottom mounts dont line up and are off by about 1/4", but with the hydraulic fan behind it is is held firmly in place. (Actually it seems to be held in more securely than the original one.) When test fitting the radiator hoses I noticed a small problem, the water necks are about 1/8" smaller than what is normally an SC400. Not sure if this would be the same on a 1/2JZ equipped SC300. Rather than just attempting to overtighten the clamps, I had the idea to stretch a piece of a bicycle inner-tube over them. I needed to use two layers to ensure a snug, leak free fit.
With everything connected, tightened down and ready to go it's time to start flushing out the old coolant. Although this step isn't exactly nesscessary, it is highly recommended in order to keep everything clean and working properly. For anyone who hasn't done this before it it very easy, yet somewhat time consuming to do a thorough job. Required is alot of STEAM DISTILLED WATER. I bought 10 gallons at Wal-Mart for something like sixty cents each, and ended up using all of it. Since the radiator is already empty, start filling with distilled water until it's full, start the car and let it run for 15-20 minutes with the climate control set to MAX HOT to circulate water throught the system. With the engine running and the radiator cap off, let all the air bubbles make their way out while you contemplate the price of gasoline. Once the engine is up to operating temperature and there are no more air bubbles coming out turn the car off and let it sit and cool off. After about an hour or two it should be cool enough to drain again without seriously scalding yourself. Drain, fill, repeat as nesscessary until the water comes out clean. This will take many times because the engine and heater core still holds probably 75% of the old fluid after it's been drained.
07-05-06, 06:22 PM
#3
Here's what it looks like when finished. I used a Greddy Type S radiator cap because I felt that the OEM cap was a bit loose and didn't know how old it was.

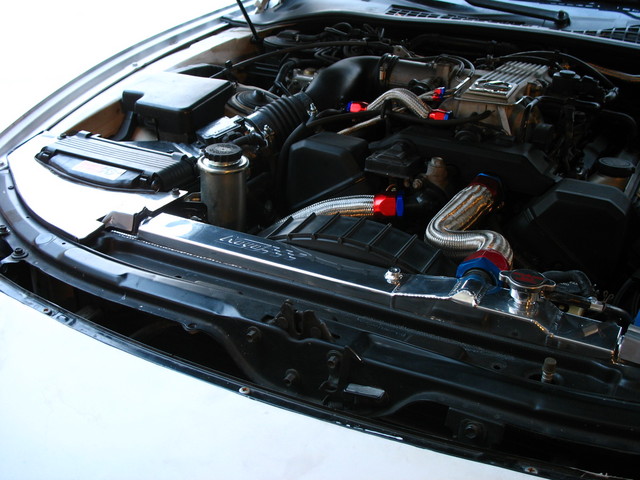
The car does run a bit cooler. The temp. needle used to be right at the 3 o'clock position, now it's right below that. Overall I'm very satisfied with the quality of Koyo Radiators. The install went fairly easily, as long as you know what you need and have all the parts together first before getting started. Although this mod can be done in a day, I would set aside a full weekend to get it done right.
The car does run a bit cooler. The temp. needle used to be right at the 3 o'clock position, now it's right below that. Overall I'm very satisfied with the quality of Koyo Radiators. The install went fairly easily, as long as you know what you need and have all the parts together first before getting started. Although this mod can be done in a day, I would set aside a full weekend to get it done right.
07-05-06, 06:44 PM
#4
Lead Lap

Join Date: Nov 2005
Location: NY
Posts: 573
Likes: 0
Received 0 Likes
on
0 Posts
damn i hate you. thats beautiful radiator. my car was overheating for a week straight, so i needed a radiator ASAP. i ended up getting an all metal one w/ tranny cooler that fit like a glove for 175. if i had the time i would have gone with this koyo. your car probly advanced timing a bit with the better cooling and water wetter. where did you get the hoses? nice job and thanks for the pictures. i may have to end up doing this one day.
 07-05-06, 09:25 PM
#6
Originally Posted by jtucci
my car was overheating for a week straight, . . . . where did you get the hoses?


Trending Topics
 10-23-10, 10:33 AM
#11
Driver
Join Date: Mar 2010
Location: Maine
Posts: 115
Likes: 0
Received 0 Likes
on
0 Posts
i need a new radiator, was wondering what the main difference between the supra koyo radiator and the koyo radiator for the sc400 is? if i have not turbo'd or supercharged my sc yet, would i need to replace the radiator again if i buy the koyo for the sc400?
01-03-11, 06:21 AM
#12
Driver School Candidate
Join Date: Dec 2010
Location: FL
Posts: 49
Likes: 0
Received 0 Likes
on
0 Posts
The transmission cooler is taken care of, now it's time to removed the old cracked radiator and install the beautiful Koyo radiator. First make sure the car is cooled off. If not let it sit for a good hour or two. I started by removing the original reservoir tank, dumping out the fluid and capping the return fitting on the engine block near the thermostat housing as it is no longer needed with the new overflow tank. The easiest way to go is to get an overflow tank from a SC300. I had one from a early eighties Toyota. It works, but it takes more effort to find a place to put it and mount it securely. To gain access to under the engine bay the plastic guard underneath will need to be removed, obviously the car will need to be jacked up and placed on stands or driven up on ramps. I used ramps because I have them and I'm lazy. To remove the bottom cover just get a 10mm socket, get under the car and get to work. Next drain the radiator as much as possible. Either open the white plastic drain plug on the bottom of the radiator or disconnect the lower radiator hose. Either will work, but being patient and waiting for the fluid to drain out of the drain plug is the cleaner way to go. When its done draining remove both upper and lower radiator hoses completely from the engine bay so they wont get in the way. Remove the radiator hold downs and set them aside, making sure not to lose the rubber grommets that go with them. I almost lost one by being careless. If you are going with electric fans just remove the hoses for the hydrulic fan and pull the whole thing out. I wanted to keep the stock fan assembly so removal required me to first unbolt the fan and shroud from the top and bottom of the radiator. After that it should just pull out with a little wiggling and pulling the fan assembly back to clear the lower water neck.
New Koyo Radiator, Distilled Water, Toyota Coolant, Redline Water Wetter and Stainless Sleeved OEM Radiator Hoses.
To keep the stock fan the shroud must be removed and modified to fit the new radiator. The plastic shroud is held on the fan assenbly by four bolts facing the front of the car and one facing the engine near the engine fan fluid reservoir. There is also a little clip holding oil lines, this is easier to reach from under the car. Once the shroud is removed and placed on the Koyo radiator it's pretty obvious how it needs to be modified to fit. A little trimming around the radiator hoses, temperature probe and the sides with a Dremel and a cutoff bit is required to get it fo fit snugly. I also used several sizes of drum sanders to get them round and looking nice.
Trimming Around Temp. Probe
Trimming Around Water Neck
The Koyo radiator core is about an inch shorter than the OEM Radiator so some type of spacer is required for it to fit. Some people have gotten another set of the rubber spacer already there and stacked them, some have used short bits of rubber hose and modified the original spacers. I happened to have some old control arm bushings taken off my '88 civic years ago and they were a perfect fit. They slipped snugly on the radiator and sit right on top of the original bushings.
Re-install the fan shroud and then drop in the new radiator. With the Koyo in the fan assembly mounting locations are slightly off because of the slightly different dimensions of the Koyo. With a little careful pushing and pulling the top bolts line up fairly well. Be careful installing the bolts, as it is easy to cross thread them into the aluminum. Unfortunately the bottom mounts dont line up and are off by about 1/4", but with the hydraulic fan behind it is is held firmly in place. (Actually it seems to be held in more securely than the original one.) When test fitting the radiator hoses I noticed a small problem, the water necks are about 1/8" smaller than what is normally an SC400. Not sure if this would be the same on a 1/2JZ equipped SC300. Rather than just attempting to overtighten the clamps, I had the idea to stretch a piece of a bicycle inner-tube over them. I needed to use two layers to ensure a snug, leak free fit.
With everything connected, tightened down and ready to go it's time to start flushing out the old coolant. Although this step isn't exactly nesscessary, it is highly recommended in order to keep everything clean and working properly. For anyone who hasn't done this before it it very easy, yet somewhat time consuming to do a thorough job. Required is alot of STEAM DISTILLED WATER. I bought 10 gallons at Wal-Mart for something like sixty cents each, and ended up using all of it. Since the radiator is already empty, start filling with distilled water until it's full, start the car and let it run for 15-20 minutes with the climate control set to MAX HOT to circulate water throught the system. With the engine running and the radiator cap off, let all the air bubbles make their way out while you contemplate the price of gasoline. Once the engine is up to operating temperature and there are no more air bubbles coming out turn the car off and let it sit and cool off. After about an hour or two it should be cool enough to drain again without seriously scalding yourself. Drain, fill, repeat as nesscessary until the water comes out clean. This will take many times because the engine and heater core still holds probably 75% of the old fluid after it's been drained.
01-03-11, 05:53 PM
#13
Lexus Test Driver
iTrader: (1)
Join Date: Aug 2001
Location: New York
Posts: 1,529
Likes: 0
Received 0 Likes
on
0 Posts
 01-13-11, 05:50 PM
#15
Driver School Candidate
Join Date: Dec 2010
Location: FL
Posts: 49
Likes: 0
Received 0 Likes
on
0 Posts
a quick search revealed this: http://www.discountautoradiator.com/...al:0)&Ntt=koyo
Thanks for the link partner I appreciate it. Is this an all aluminum radiator!? I know some just have an aluminum core with a plastic tank.