LX 570 3rd row seating removal
 07-21-12, 06:12 PM
#1
Rookie
Thread Starter

I will be back to edit this late, little pressed for time today,
Undo the plastic casing by slowly wiggling it loose. They are all clipped on. Don’t force it too much, they will come off.
Put the seat up on so it locks onto the wall. This way, when you unscrew everything, seat won’t fall or move and damaging anything or falling on you.
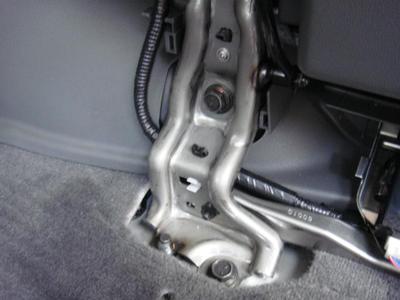
Unscrew and remove the 4, 14mm screws.
Make sure you have support before you release the seat by lowering it just a little so it will unhook from the wall mount.
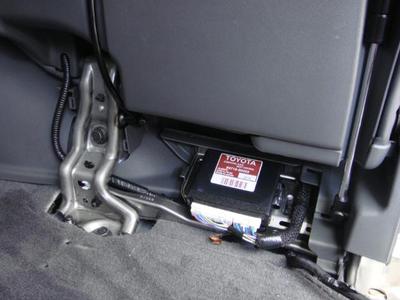
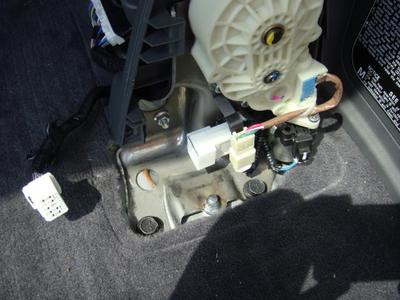
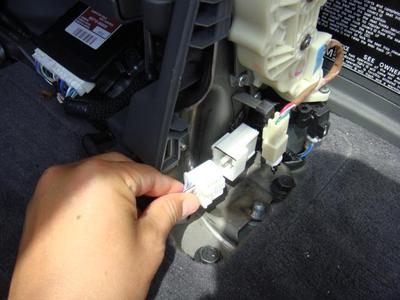
Unplug the wiring harness and remove the seat.
I will be back another time to show you how I covered up all the areas. Very simple and cheap. No need to cover the whole back compartment. Just parts of it and you can use the original cargo mat to cover the rest.
Undo the plastic casing by slowly wiggling it loose. They are all clipped on. Don’t force it too much, they will come off.
Put the seat up on so it locks onto the wall. This way, when you unscrew everything, seat won’t fall or move and damaging anything or falling on you.
Unscrew and remove the 4, 14mm screws.
Make sure you have support before you release the seat by lowering it just a little so it will unhook from the wall mount.
Unplug the wiring harness and remove the seat.
I will be back another time to show you how I covered up all the areas. Very simple and cheap. No need to cover the whole back compartment. Just parts of it and you can use the original cargo mat to cover the rest.

The following users liked this post:
fosterelli (11-22-17)
12-15-12, 04:39 PM
#2
Driver School Candidate

Thanks Norboo ... this was an extremely helpful post. I followed the instructions & was pleasantly surprised to finish it in about 1 hr for disassembly (I was rather worried I'd break stuff, so was very patient at wiggling as you mentioned). I am working on cleaning up things & putting some cover on.
I took some detailed photos of the process & will try to find time to upload it shortly so that others who might want to do the same can get inspired to try. It was not too difficult & ABSOLUTELY worth the effort for reclaimed space. I promise :-)
I took some detailed photos of the process & will try to find time to upload it shortly so that others who might want to do the same can get inspired to try. It was not too difficult & ABSOLUTELY worth the effort for reclaimed space. I promise :-)
12-15-12, 06:34 PM
#3
Driver School Candidate
Norboo's pictures are very clear but thought I would point out some details :
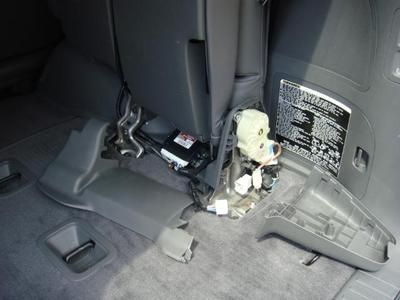
(1) There is a clip on plastic moulding where cable is embedded (see pic), and you need to remove it before lifting chair UP and OUT (after removing the 4 bolts).
http://www.flickr.com/photos/9112751...in/photostream
(2) The wires with connectors should be tucked away so you will not accidentally crush them when boot is loaded up ! I simply placed them in the gaps & had plywood over it.
http://www.flickr.com/photos/9112751...in/photostream
http://www.flickr.com/photos/9112751...in/photostream
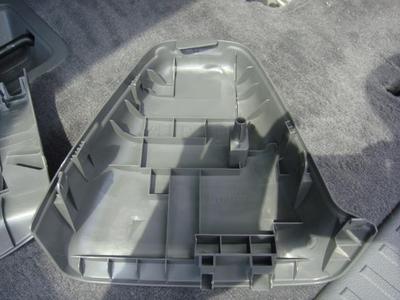
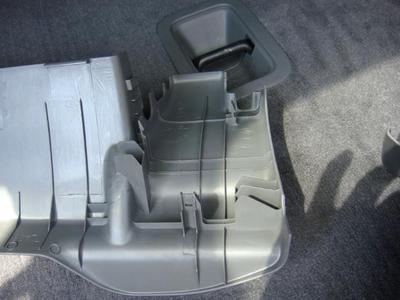
(3) The base is not perfectly flat bed & I place a piece of wood just behind 2nd row seats to level it. Then threw the rubber tray I saved from my beloved Landcruiser ... not a perfect fit but I do alot of fishing, so the occasional spill is inevitable.
http://www.flickr.com/photos/9112751...in/photostream
I'm really glad I invested the 2hrs to reclaim the boot :-) It is less intimidating than it looks, just mind your fingers please with the rather sharp metal pieces.
Enjoy !
ps. I tried using the embed pictures ... but it does not show for some reason ... :-(, so I left the URL links directly.
(1) There is a clip on plastic moulding where cable is embedded (see pic), and you need to remove it before lifting chair UP and OUT (after removing the 4 bolts).
http://www.flickr.com/photos/9112751...in/photostream
(2) The wires with connectors should be tucked away so you will not accidentally crush them when boot is loaded up ! I simply placed them in the gaps & had plywood over it.
http://www.flickr.com/photos/9112751...in/photostream
http://www.flickr.com/photos/9112751...in/photostream
(3) The base is not perfectly flat bed & I place a piece of wood just behind 2nd row seats to level it. Then threw the rubber tray I saved from my beloved Landcruiser ... not a perfect fit but I do alot of fishing, so the occasional spill is inevitable.
http://www.flickr.com/photos/9112751...in/photostream
I'm really glad I invested the 2hrs to reclaim the boot :-) It is less intimidating than it looks, just mind your fingers please with the rather sharp metal pieces.
Enjoy !
ps. I tried using the embed pictures ... but it does not show for some reason ... :-(, so I left the URL links directly.
The following users liked this post:
fosterelli (11-22-17)
 02-04-13, 04:32 PM
#5
03-08-13, 04:57 PM
#6
Driver School Candidate
03-09-13, 03:24 AM
#7
Pole Position
I agree with the others and the 2013 is identical to the more early models.
Great tutorial.
I know the LX570 motorized seats are made to provide maximum ease of use but I do miss the manual seats of my LX470 which could be removed and reinstalled in only a few minutes. Sometimes a step forward can also be a step backwards.
Great tutorial.
I know the LX570 motorized seats are made to provide maximum ease of use but I do miss the manual seats of my LX470 which could be removed and reinstalled in only a few minutes. Sometimes a step forward can also be a step backwards.
Last edited by ggebhardt; 03-09-13 at 04:02 AM.
The following users liked this post:
CHOW88 (11-12-17)
Trending Topics
02-05-14, 12:47 PM
#8

Thanks for the pictures Tarponcast. I am getting ready to do the same with my 09 lx 570. Was the rubber mat you used a factory or an aftermarket mat and was it for a newer Landcruiser(2008-2014) or the previous model (1998-2007)? Thanks for your help.
02-18-14, 04:26 AM
#9
Rookie
Thread Starter
Norboo's pictures are very clear but thought I would point out some details :
(1) There is a clip on plastic moulding where cable is embedded (see pic), and you need to remove it before lifting chair UP and OUT (after removing the 4 bolts).
http://www.flickr.com/photos/9112751...in/photostream
(2) The wires with connectors should be tucked away so you will not accidentally crush them when boot is loaded up ! I simply placed them in the gaps & had plywood over it.
http://www.flickr.com/photos/9112751...in/photostream
http://www.flickr.com/photos/9112751...in/photostream
(3) The base is not perfectly flat bed & I place a piece of wood just behind 2nd row seats to level it. Then threw the rubber tray I saved from my beloved Landcruiser ... not a perfect fit but I do alot of fishing, so the occasional spill is inevitable.
http://www.flickr.com/photos/9112751...in/photostream
I'm really glad I invested the 2hrs to reclaim the boot :-) It is less intimidating than it looks, just mind your fingers please with the rather sharp metal pieces.
Enjoy !
ps. I tried using the embed pictures ... but it does not show for some reason ... :-(, so I left the URL links directly.

It really is an easy task. As I recall, first side took me about 30 minutes. Other side only took about 10 minutes. Defiantly worth doing.
02-18-14, 03:09 PM
#10
Norboo, How do you remove the plastic covers from the base of the seats. I tried to wiggle them but they did not want to move and I did not want to force them or break something. Thanks in advance.
Last edited by charliecla; 02-18-14 at 03:10 PM. Reason: spelling
02-20-14, 07:48 PM
#11
Rookie
Thread Starter
They are on tight to prevent any play or rattle. Work your fingers under the plastic covers, start to pull starting from one side and move few inches and pull…etc…you will feel clips coming undone. They are hard to break so, you can use some force.
Last edited by Norboo; 02-25-14 at 03:05 PM.
02-20-14, 07:53 PM
#12
Rookie
Thread Starter
Side note: I took a Ziplock bag pre-labeled “LX570 3rd row seating parts”. Once done, I put all parts in there along with the 14mm socket and zip tied it to the seat.
02-01-15, 08:07 AM
#15
Driver School Candidate

Join Date: Feb 2015
Location: California
Posts: 2
Likes: 0
Received 0 Likes
on
0 Posts
Does anyone know of a Youtube showing the removal (de-installation) of the third row seats?
AND once they're removed, where did you get a cargo mat to fit without having to special order?
AND once they're removed, where did you get a cargo mat to fit without having to special order?