How to replace rear combination lens
 11-26-12, 03:06 PM
#1
Driver School Candidate
Thread Starter

Join Date: Apr 2010
Location: Alberta
Posts: 41
Likes: 0
Received 0 Likes
on
0 Posts
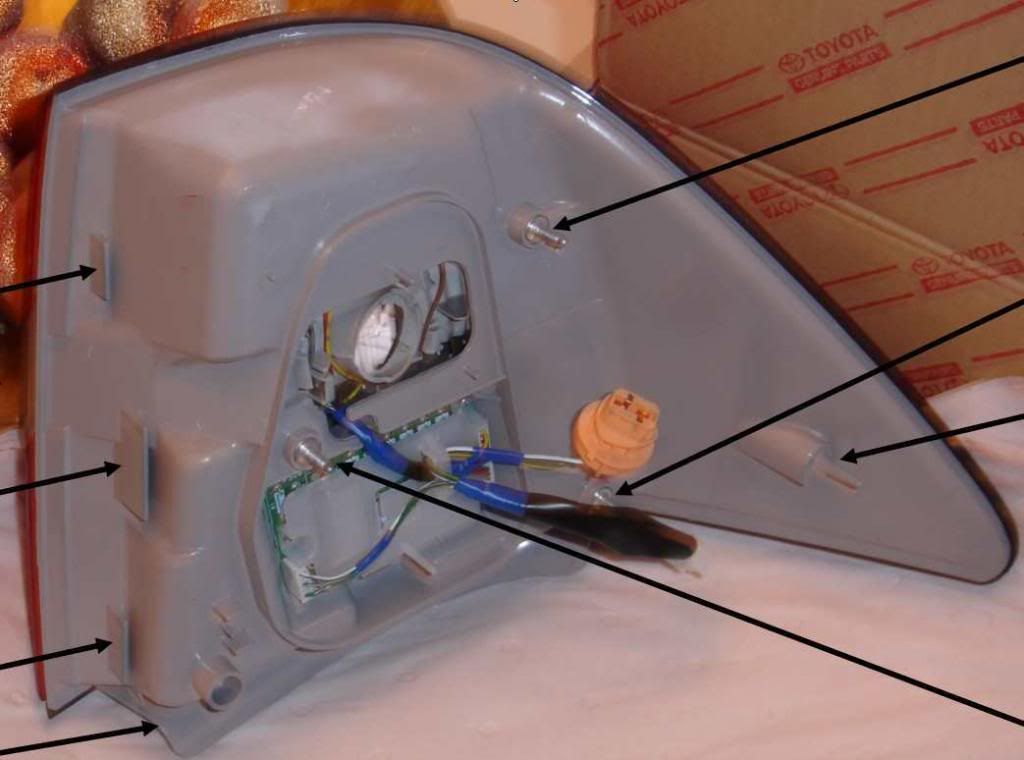
While backing up our 2005 LS430 to put it into winter storage in our garage, I hit the corner of a table and punched a hole in the driver's side rear combination lens -- the lens that is on the rear quarter, not on the trunk lid.
I have the replacement lens sitting right in front of me. There are three threaded connectors and some plastic hinges on the lens that look to me to be the points that secure the lens to the vehicle.
I haven't yet looked in the trunk to see how the job might be done. I wanted to post here first to learn the proper steps to replace that lens.
What is the proper procedure to replace the driver's side rear combination lens?
Thanks very much for the help.
 11-26-12, 04:19 PM
#2

This should be very simple. Pop the trunk, and unscrew the 3 threaded plastic fitting that secure the lens to the car body. Not sure about the LS, but the GS's have 2 hidden screws along the seam where the trunk side (inner) of the light assembly and the body side (outer) of the light fixtures come together. They each have a circular cap with a spot for a small flat blade screwdriver to pop the caps off to expose a 10mm / phillips screw. After you loosen all those, the light assembly should pull out enough so that you can disconnect the electrical connector. Now set the old and new light assemblies next to each other and transfer all the light bulbs from the old assembly to the new one. They should twist to release them from the housing. After that, re-connect the electrical, and pop the new assembly into the car. (Tip) make sure all the 3 threaded shafts are fully inserted, and the 2 bolt holes along the trunk seam are aligned, and start all 5 bolts before you tighten any bolt completely. Hope this helps!
11-27-12, 08:37 AM
#3
Driver School Candidate
Thread Starter
Join Date: Apr 2010
Location: Alberta
Posts: 41
Likes: 0
Received 0 Likes
on
0 Posts
This should be very simple. Pop the trunk, and unscrew the 3 threaded plastic fitting that secure the lens to the car body. Not sure about the LS, but the GS's have 2 hidden screws along the seam where the trunk side (inner) of the light assembly and the body side (outer) of the light fixtures come together. They each have a circular cap with a spot for a small flat blade screwdriver to pop the caps off to expose a 10mm / phillips screw. After you loosen all those, the light assembly should pull out enough so that you can disconnect the electrical connector. Now set the old and new light assemblies next to each other and transfer all the light bulbs from the old assembly to the new one. They should twist to release them from the housing. After that, re-connect the electrical, and pop the new assembly into the car. (Tip) make sure all the 3 threaded shafts are fully inserted, and the 2 bolt holes along the trunk seam are aligned, and start all 5 bolts before you tighten any bolt completely. Hope this helps!

If any LS430 owners could chime in with their experience doing this change-out I'd really appreciate it.
 11-27-12, 07:17 PM
#5
Driver School Candidate
Thread Starter
Join Date: Apr 2010
Location: Alberta
Posts: 41
Likes: 0
Received 0 Likes
on
0 Posts
Experience is the greatest teacher and I want to learn from your experience, so could you please tell me (and other members) the steps so that I can perform the job without breaking anything in the process?

Thanks.
05-02-13, 03:10 PM
#6
Driver School Candidate
Thread Starter
Join Date: Apr 2010
Location: Alberta
Posts: 41
Likes: 0
Received 0 Likes
on
0 Posts
We took the Lexus out of winter storage today and I'm now finally in the process of replacing the driver's side rear combination lens.
I opened the little door that allows one easy access to the lamp and I can see two of the securing nuts, but I cannot see the third, let alone turn it.
I'm in the process of removing the inner felt-like cardboard liner, but I don't know how to remove the upper securing hook for the cargo net. Does it just pull straight out, or what?
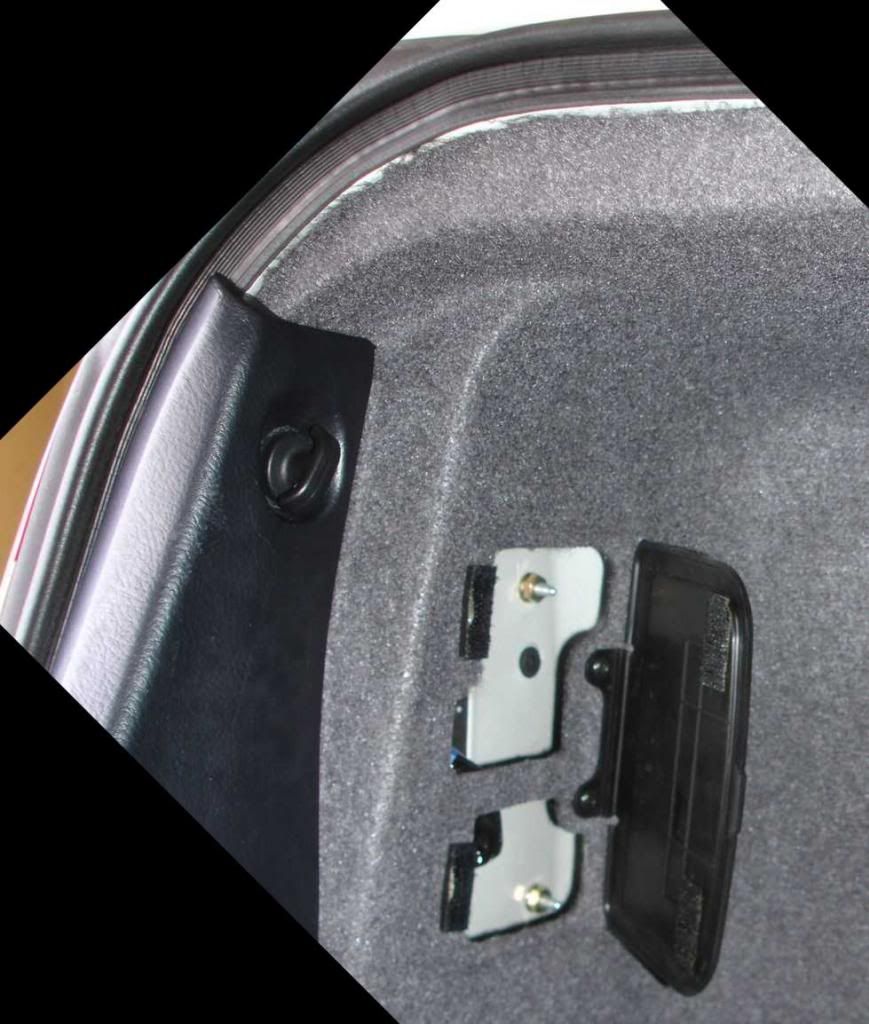
Does the entire black plastic strip have to be removed, or does the removal of the hook on just one end allow the felt/cardboard liner to slide out from underneath it?
Thanks for any help on replacing the lens.
05-02-13, 04:07 PM
#7
Driver School Candidate
Thread Starter
Join Date: Apr 2010
Location: Alberta
Posts: 41
Likes: 0
Received 0 Likes
on
0 Posts
Well, it is indeed possible to remove the three nuts using that little window for access, but you have to be a circus contortionist and also hold your mouth exactly the right way to be successful.
The job took me a total of about an hour trying to get my hands at the right angle and my mouth in just the right position. If I had to do it again I could probably do it in about 15 minutes.
The job took me a total of about an hour trying to get my hands at the right angle and my mouth in just the right position. If I had to do it again I could probably do it in about 15 minutes.
Trending Topics
05-03-13, 04:30 PM
#9
Lexus Test Driver

yup, easy job.
as a SECRET bonus - you can access inside the rear bumper thru the opening... to replace rear parking sensor if need be. otherwise shops charge to take off the bumper completely - there's no way to reach from the bottom (as with front sensors)
as a SECRET bonus - you can access inside the rear bumper thru the opening... to replace rear parking sensor if need be. otherwise shops charge to take off the bumper completely - there's no way to reach from the bottom (as with front sensors)
05-04-13, 06:27 AM
#10
Driver School Candidate
Thread Starter
Join Date: Apr 2010
Location: Alberta
Posts: 41
Likes: 0
Received 0 Likes
on
0 Posts
As far as I could tell, the hook just free-wheels in either direction, forever. I pulled outward on it as I rotated it and .......... still no satisfaction.
I think the thing just pulls out, but I did not want to break it, so before having to buy a new one from Lexus and at that time finding out the correct way I should have removed the broken one, I thought I'd get advice first.
I think the thing just pulls out, but I did not want to break it, so before having to buy a new one from Lexus and at that time finding out the correct way I should have removed the broken one, I thought I'd get advice first.

Thread
Thread Starter
Forum
Replies
Last Post