***LS430 DIY Blacked out conversion w/ projector & leds**
 10-22-09, 11:15 AM
#1
Here is a write up on my recent Do it yourself Lexus LS430 Headlight conversion.
So I took the plunge on doing this exhausting modification to my headlights.
Modifications include;
Double Projector, black housing, clear corners and 45 leds on each side.
I had previously placed my ES300 headlights in the oven, so, I had no fear in doing so on these.
The one thing I did ponder for some time was the electrical and to make sure those led�s lit up.
I�m quite the novice to these type of things, but once you get started, you just gotta figure out how to finish!")
Comments good or bad are welcomed, Perhaps there was an easier way for those mcgyvers out there...........nevertheless, here ya go.
Tools and product needed:
Dremel (with cutters, sanders and drill)
Safety goggles
Black erasable marker
10mm socket
Mini zip ties
Screwdrivers
Chrome door trim
Razorblade
Krazyglue
Prismatic lighting panel (lowes or home depot 8 bucks)
Black electrical tape
Black spray paint (the one that bonds to plastic)
Clear Silicone (w caulk gun)
Chrome tape
_________________________________________
2 projectors
100 5mm leds (your choice in color)
Time: 13 hours for first headlight. 41/2 for second (you get fast after doing first one)
Start by removing headlight from car.
3 10mm bolts to get one side of bumper off and 3 10mm to get Headlight out.

These are the 5mm pre-wired led�s. they have built in resistors and are 12v application.

So I took the plunge on doing this exhausting modification to my headlights.
Modifications include;
Double Projector, black housing, clear corners and 45 leds on each side.
I had previously placed my ES300 headlights in the oven, so, I had no fear in doing so on these.
The one thing I did ponder for some time was the electrical and to make sure those led�s lit up.
I�m quite the novice to these type of things, but once you get started, you just gotta figure out how to finish!
Comments good or bad are welcomed, Perhaps there was an easier way for those mcgyvers out there...........nevertheless, here ya go.
Tools and product needed:
Dremel (with cutters, sanders and drill)
Safety goggles
Black erasable marker
10mm socket
Mini zip ties
Screwdrivers
Chrome door trim
Razorblade
Krazyglue
Prismatic lighting panel (lowes or home depot 8 bucks)
Black electrical tape
Black spray paint (the one that bonds to plastic)
Clear Silicone (w caulk gun)
Chrome tape
_________________________________________
2 projectors
100 5mm leds (your choice in color)
Time: 13 hours for first headlight. 41/2 for second (you get fast after doing first one)
Start by removing headlight from car.
3 10mm bolts to get one side of bumper off and 3 10mm to get Headlight out.
These are the 5mm pre-wired led�s. they have built in resistors and are 12v application.
 10-22-09, 11:16 AM
#2
This is the material used to insert leds. it has small pockets on backside, perfect for drilling your hole for led snug fit.

Now we make stencils out of this

Now dremel and cut out drawing

Make sure it lines up good


close up

with a erasable marker, you mark where how your gonna line up the leds

now smoothe out edges

the edges get pretty rough due to the melting plastic as you cut them
so, using the dremel sander to smoothe things out

here is the rough draft

Now we make stencils out of this
Now dremel and cut out drawing
Make sure it lines up good
close up
with a erasable marker, you mark where how your gonna line up the leds
now smoothe out edges
the edges get pretty rough due to the melting plastic as you cut them
so, using the dremel sander to smoothe things out
here is the rough draft
10-22-09, 11:16 AM
#3
After all edges are fined down, I wrapped them in chrome plastic trim for a fuller look.

Time to cut holes. As Ideal as it would be to get a 5mm bit and just drill to perfection�..
The problem I found with that is that the plastc brakes as its too much to handle.
So, I got the smallest bit and drilled all holes first. Secondly, I edged them individually
So that the led fits snug.

secure all leds in place
and of course I couldn�t have done it without my little helper

while your in here chrome tape will cover the holes from taking the orange reflectors off

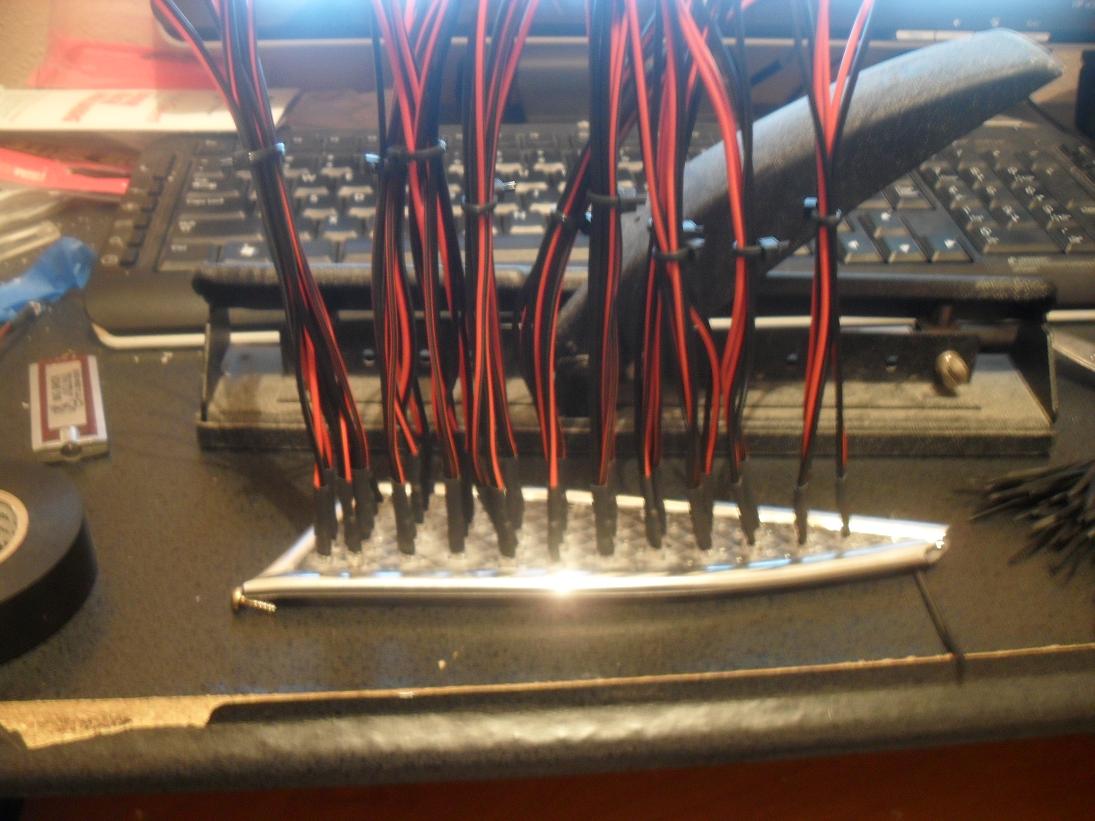
coming together. As you can see the wires do bunch up to quite a bit, so I made a window
to go towards the back

Here you can see all black are connected with extension to reach your power source and
Braded at the tip

after extending all wires and separating them positive and negative, you can drill hole
and zip tie the bunch like so

Time to cut holes. As Ideal as it would be to get a 5mm bit and just drill to perfection�..
The problem I found with that is that the plastc brakes as its too much to handle.
So, I got the smallest bit and drilled all holes first. Secondly, I edged them individually
So that the led fits snug.
secure all leds in place
and of course I couldn�t have done it without my little helper
while your in here chrome tape will cover the holes from taking the orange reflectors off
coming together. As you can see the wires do bunch up to quite a bit, so I made a window
to go towards the back
Here you can see all black are connected with extension to reach your power source and
Braded at the tip
after extending all wires and separating them positive and negative, you can drill hole
and zip tie the bunch like so
10-22-09, 11:17 AM
#4
Pre heat oven to 350 degrees and let it warm up for at least 15 min.
Turn oven off and wait 2 minutes.
Now stick headlight in oven using a foiled pan.
Leave it in for at least 10 minutes.
Take out and easily seperates.

now exposing what were going to paint

test fit projector

mask off for painting

I went the easy way on this and sprayed it with black spray (bond to plastic kind)
Originally wanted black chrome, but that�s 10 days to get back and didn�t have the down time that it takes.
Ok, so here is first coat

Remove the non projector highbeam housing

and make small adjustments where needed for projector install

now we are ready to mount black housing back together for sealing

back in the oven. Same as above. 10 to 12 minutes to let adhesive mend back to place

Turn oven off and wait 2 minutes.
Now stick headlight in oven using a foiled pan.
Leave it in for at least 10 minutes.
Take out and easily seperates.
now exposing what were going to paint
test fit projector
mask off for painting
I went the easy way on this and sprayed it with black spray (bond to plastic kind)
Originally wanted black chrome, but that�s 10 days to get back and didn�t have the down time that it takes.
Ok, so here is first coat
Remove the non projector highbeam housing
and make small adjustments where needed for projector install
now we are ready to mount black housing back together for sealing
back in the oven. Same as above. 10 to 12 minutes to let adhesive mend back to place


Trending Topics
10-22-09, 05:08 PM
#12
Lead Lap
iTrader: (3)
Join Date: Dec 2006
Location: Seattle/JPN
Posts: 533
Likes: 0
Received 0 Likes
on
0 Posts
Great job!!! Is the light really that pink? That would attract popo
I did mine at 225 degree oven for 20min, the light came apart with ease. I've also used couple 2x4 soaked (water) under neath the light to prevent plastic from melting.
Your car is very clean!
I did mine at 225 degree oven for 20min, the light came apart with ease. I've also used couple 2x4 soaked (water) under neath the light to prevent plastic from melting.
Your car is very clean!
10-22-09, 05:42 PM
#13
thanks bro. I'll get some pics.
thank you
I need to get some bulbs for the projector that are non drl. or turn drl off, anyone?
yes its the same color.
ive been riding low beam and fog the same color for months now and no popo
I even passed a popo twice at night with my leds on and my fogs only (no headlights) and they didnt mess w me.
I need to get some bulbs for the projector that are non drl. or turn drl off, anyone?
ive been riding low beam and fog the same color for months now and no popo
I even passed a popo twice at night with my leds on and my fogs only (no headlights) and they didnt mess w me.


