DIY 91' LS 400 Recovering front seats
 11-26-11, 08:30 AM
#1
Rookie
Thread Starter

Join Date: Feb 2011
Location: AZ
Posts: 70
Likes: 0
Received 0 Likes
on
0 Posts
OK here goes guys. This DIY will be a bit strange, due to the limits of 5 pictures per response, so I will be responding to myself to get everything in. Also some of the pictures are a bit fuzzy, im not a great photographer, and camera is not the best. Anyway here we go!!
Before you start make sure to raise the headrest to the fully up position. Make sure u have plenty of room to get the seats out of the car. The 3 bolts and one nut that need to be removed to get the seat out are covered by carpet covered pieces
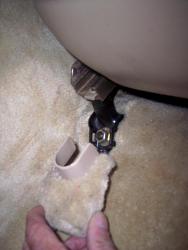
Remove the back ones first by putting the seat in the fully forward position, then put it all the way back and remove the front bolts.
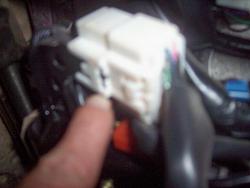
Tilt the seat back and disconnect the large white connector under the seat
Then take the seat out of the car. I did the recovering in my livingroom with a large sheet on the floor.
Next you need to pull the skirting off the bottom of the seat. Pull the seat adjustment buttons off by pulling evenly on each side of the buttons and they will pop off. then you lay the seat on its side, not the side where u took off the buttons because u will break the posts for the switches. Look under the seat and u will see phillips head scres that hold the skirting on
There are also 3 connecting posts on the skirt, 2 by the switches and 1 at the back, be careful not to breat them. Also there are 2 screws on the switch plate.
Next take off the headrest by pressing firmly down on the gromets that surround the headrest posts and pull up on the headrest, this is best done with 2 people, 1 pressing down on the gromet, and one pulling up on the headrest.
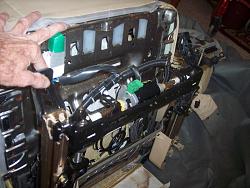
Next rock the seat forward so that you can see the bottom of the seat back, and u will see to screws that hold the back panel on, remove them and then rock the back panel side to side as well as pulling down and the back will come loose
Now it gets interesting. You will see 4 cables and connectors in the seat back. 2 are on the left side, 1 goes up to the top of the seat back and 1 goes over to the right. all these need to be disconnected. In my car there was an unused connector that is white, im guessing this is for an option that I dont have like heated seats, also you will have to cut the cable ties that hold some of the wires in place
[ATTACH][ATTACH]229112
[/ATTACH][/ATTACH]
Before you start make sure to raise the headrest to the fully up position. Make sure u have plenty of room to get the seats out of the car. The 3 bolts and one nut that need to be removed to get the seat out are covered by carpet covered pieces

Remove the back ones first by putting the seat in the fully forward position, then put it all the way back and remove the front bolts.
Tilt the seat back and disconnect the large white connector under the seat

Then take the seat out of the car. I did the recovering in my livingroom with a large sheet on the floor.
Next you need to pull the skirting off the bottom of the seat. Pull the seat adjustment buttons off by pulling evenly on each side of the buttons and they will pop off. then you lay the seat on its side, not the side where u took off the buttons because u will break the posts for the switches. Look under the seat and u will see phillips head scres that hold the skirting on

There are also 3 connecting posts on the skirt, 2 by the switches and 1 at the back, be careful not to breat them. Also there are 2 screws on the switch plate.
Next take off the headrest by pressing firmly down on the gromets that surround the headrest posts and pull up on the headrest, this is best done with 2 people, 1 pressing down on the gromet, and one pulling up on the headrest.
Next rock the seat forward so that you can see the bottom of the seat back, and u will see to screws that hold the back panel on, remove them and then rock the back panel side to side as well as pulling down and the back will come loose
Now it gets interesting. You will see 4 cables and connectors in the seat back. 2 are on the left side, 1 goes up to the top of the seat back and 1 goes over to the right. all these need to be disconnected. In my car there was an unused connector that is white, im guessing this is for an option that I dont have like heated seats, also you will have to cut the cable ties that hold some of the wires in place
[ATTACH][ATTACH]229112
[/ATTACH][/ATTACH]
 11-27-11, 05:40 AM
#3
Rookie
Thread Starter
Join Date: Feb 2011
Location: AZ
Posts: 70
Likes: 0
Received 0 Likes
on
0 Posts
So at this point you will need to remove the seat back from the bottom. All the wires in the seat back will need to be pulled through the lower left of the seat back. This is going to seem impossible, but go slowly and pull from the bottom as u push from the top. To make it easier u can cut the seat cover off around where the cables come out of the seat back. Dont try to pull it through the bottom of the seat just yet, just get it out of the seat back.

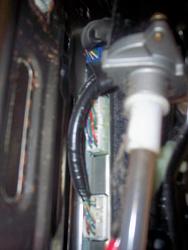
Now you need to seperate the seat back from the bottom, There are 4 bolts, 2 on each side.

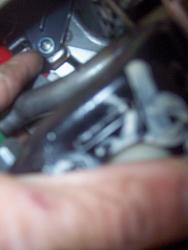
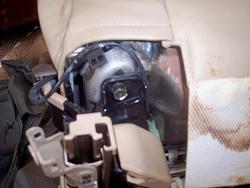
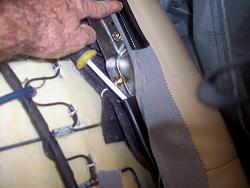
Now you need to seperate the bottom cushion from the base. There are 4 main plugs as well as the seat belt connector. 3 of the connectors are in the center area, its a bit hard to get at the release buttons on the connectors, i used a long smaller screw driver to depress the release clip as i gently pulled on the wires to the connector.
The second white connector is toward one of the sides, and its really hard to get at the release clip. I have a pair of thin curved pliers that I slipped over the top of the connector and was finally able to get at this release clip while pushing on the taped portion of the wires that came out of the connector.
Next you need to remove the 4 bolts that attach the bottom cushion from the base.

Now you need to seperate the seat back from the bottom, There are 4 bolts, 2 on each side.

Now you need to seperate the bottom cushion from the base. There are 4 main plugs as well as the seat belt connector. 3 of the connectors are in the center area, its a bit hard to get at the release buttons on the connectors, i used a long smaller screw driver to depress the release clip as i gently pulled on the wires to the connector.


The second white connector is toward one of the sides, and its really hard to get at the release clip. I have a pair of thin curved pliers that I slipped over the top of the connector and was finally able to get at this release clip while pushing on the taped portion of the wires that came out of the connector.
Next you need to remove the 4 bolts that attach the bottom cushion from the base.
 11-27-11, 05:57 AM
#4
Rookie
Thread Starter
Join Date: Feb 2011
Location: AZ
Posts: 70
Likes: 0
Received 0 Likes
on
0 Posts
You will also see the seat belt wire in the above picture. here is another picture of the base to cusion bolts.
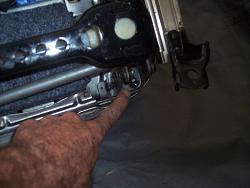
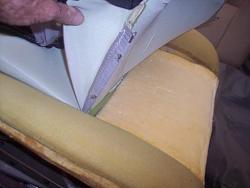
Here as you seperate the base from the bottom cushion you need to feed the cables from the seat back through the bottom cushion, again if needed you can cut the bottom cover around that area to make it easier to pull them through.
So you now have the seat back, bottom cushion and base seperated. The base can be put aside until you need to put everything back together.
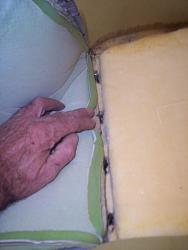
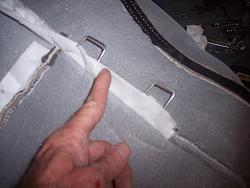
Ok, so now we need to remove the old covers. Lexus used both the standard hog rings and rods through sleves in the cover, they also used plastic parts sewed into the edges of the covers. Start with the seat bottom, you will need to get all the outer edges released so you can get at the rods and hog rings toward the center of the cusion.
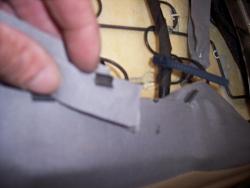
There are also clips on the plastic pieces that hold then into the channels. You can see in one of the above pictures that I used a screw driver to pry the plastic out of the channels. You can also see the clips used to hold some of the fabric to areas on the seat bottom.

Here as you seperate the base from the bottom cushion you need to feed the cables from the seat back through the bottom cushion, again if needed you can cut the bottom cover around that area to make it easier to pull them through.
So you now have the seat back, bottom cushion and base seperated. The base can be put aside until you need to put everything back together.
Ok, so now we need to remove the old covers. Lexus used both the standard hog rings and rods through sleves in the cover, they also used plastic parts sewed into the edges of the covers. Start with the seat bottom, you will need to get all the outer edges released so you can get at the rods and hog rings toward the center of the cusion.


There are also clips on the plastic pieces that hold then into the channels. You can see in one of the above pictures that I used a screw driver to pry the plastic out of the channels. You can also see the clips used to hold some of the fabric to areas on the seat bottom.
11-27-11, 06:22 AM
#5
Rookie
Thread Starter
Join Date: Feb 2011
Location: AZ
Posts: 70
Likes: 0
Received 0 Likes
on
0 Posts
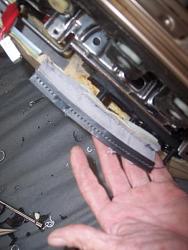
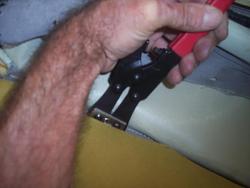
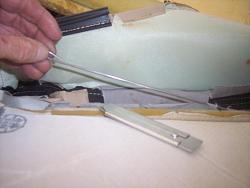
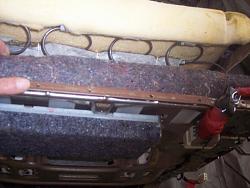
OK, so now you have all the edges released. You will need to have a really good pair of wire cutters, and a strong grip to be able to cut the hog rings that hold the rods in the sleeves to the cushion. Peel up the edges of the cover and start from the outer edges cutting the hog rings to release the rods. I went to ACE hardware and got a pair of really good cutters, you can see them in the picture below, wire cutters were simply not strong enough.
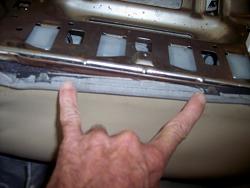
There is only one place that the cover is hog ringed to the actual springs, it is in the center of the seat bottom, you can see it here.
Everwhere else there are rods embedded in the foam that are hog ringed to the cover.
For all the hog rings that are attached to the rods in the foam cut them from the top, pulling the foam aside so you get good access to the hog ring. For the ones that attach to the springs its best to cut them from the underside. Once the cover is off you need to get all the rods out of the sleeves to use in the new cover. I used a razor to cut the sleeves so I could get the rods out.
Now you are ready to put the new cover on. Turn it inside out, put all the rods into the sleeves. This is where I had to get creative because the new covers did not have the plastic at the edges. All that was there were more sleeves. What i did was drill holes into the channels where the plastic would have gone, and cut up a clothes hanger to use as rods in the outer edge sleeves.
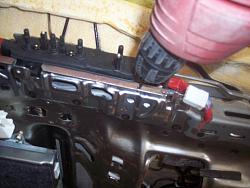
The metal is not hardend so the drilling went pretty fast. Drill holes into the channels on all 3 sides.

There is only one place that the cover is hog ringed to the actual springs, it is in the center of the seat bottom, you can see it here.

Everwhere else there are rods embedded in the foam that are hog ringed to the cover.

For all the hog rings that are attached to the rods in the foam cut them from the top, pulling the foam aside so you get good access to the hog ring. For the ones that attach to the springs its best to cut them from the underside. Once the cover is off you need to get all the rods out of the sleeves to use in the new cover. I used a razor to cut the sleeves so I could get the rods out.

Now you are ready to put the new cover on. Turn it inside out, put all the rods into the sleeves. This is where I had to get creative because the new covers did not have the plastic at the edges. All that was there were more sleeves. What i did was drill holes into the channels where the plastic would have gone, and cut up a clothes hanger to use as rods in the outer edge sleeves.

The metal is not hardend so the drilling went pretty fast. Drill holes into the channels on all 3 sides.
11-27-11, 07:03 AM
#6
Rookie
Thread Starter
Join Date: Feb 2011
Location: AZ
Posts: 70
Likes: 0
Received 0 Likes
on
0 Posts
This picture shows the spacing that I used on the channel holes.
Now you are ready to start attaching the cover to the seat bottom. Start with the center of the seat, where the cover is attached to the actual springs. Using one hand to push the sleeve with the rod in it from the topthrough the opening in the foam so that you can hog ring it from the bottom. After you have 2 hog rings in the center in place check the alingment on the front to make sure that seam is centered, then hog ring the last 2. After that is done, check the alignment again, making sure that the sleeved rods for the side sleeves are easily able to lay into the seams in the foam. Do one side at a time, hog ringing it from the top. Make sure that the hog rings are fully compressed, and that you have "Cought" the rod in the foam. Once you have one side done check the alignmentfront to back, then pull the cover over the front edge and side. then you need to pull the cover back to make the seam in the front tight around the corner. Repeat this process for the other side. At this point the center section of the bottom should be done. You may see a few wrinkles, but they should be pretty minor as long as u "Caught" all of the rods in the foam. Smaller wrinkles will settle out once the seat is installed and some heat from the sum tightens them. Now you want to hog ring the outer edges, as you go along pull the edges down tight. I found that when i had them tight the sleeved rod would go into the channel and I hog ringed through the leather right at the bottom seam and the holes that I drilled in those channels. For the back of the seat bottom I hog ringed to various rods and springs that I could get to. And now u should have a really good looking seat bottom!!!
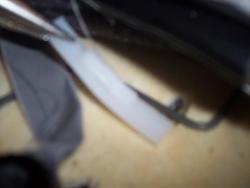
OK, now on to the seat back. Starting at the edges cut all the hog rings and fold the edges up. At the bottom you will see that a rubber cord comes out of the center sleeve and is hog ringed to a frame rod, cut it loose. Then proceed to cut hog rings from the sides moving toward the top. at the top of the seat back, where it comes over the top are 2 rubber channels that slip over a part of the frame. Use a screw driver to pry them loose.

Now the cover will be mostly loose from the bottom, but it is still attached at the top. There are 4 plastic clips that slip through unique rods at the top of the seat. The foam will be loose from the seat fram at this point so you can pull it up off the frame partially to get at these clips.
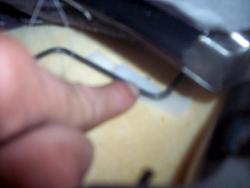
I used needle nose pliers to pull them out. The rods up there have a "U" shape, that comes thru the sleeve and pushes through the foam to allow the plastic clips to be inserted.
Now the seat back cover will come off and you can start to install the new cover.

Now you are ready to start attaching the cover to the seat bottom. Start with the center of the seat, where the cover is attached to the actual springs. Using one hand to push the sleeve with the rod in it from the topthrough the opening in the foam so that you can hog ring it from the bottom. After you have 2 hog rings in the center in place check the alingment on the front to make sure that seam is centered, then hog ring the last 2. After that is done, check the alignment again, making sure that the sleeved rods for the side sleeves are easily able to lay into the seams in the foam. Do one side at a time, hog ringing it from the top. Make sure that the hog rings are fully compressed, and that you have "Cought" the rod in the foam. Once you have one side done check the alignmentfront to back, then pull the cover over the front edge and side. then you need to pull the cover back to make the seam in the front tight around the corner. Repeat this process for the other side. At this point the center section of the bottom should be done. You may see a few wrinkles, but they should be pretty minor as long as u "Caught" all of the rods in the foam. Smaller wrinkles will settle out once the seat is installed and some heat from the sum tightens them. Now you want to hog ring the outer edges, as you go along pull the edges down tight. I found that when i had them tight the sleeved rod would go into the channel and I hog ringed through the leather right at the bottom seam and the holes that I drilled in those channels. For the back of the seat bottom I hog ringed to various rods and springs that I could get to. And now u should have a really good looking seat bottom!!!
OK, now on to the seat back. Starting at the edges cut all the hog rings and fold the edges up. At the bottom you will see that a rubber cord comes out of the center sleeve and is hog ringed to a frame rod, cut it loose. Then proceed to cut hog rings from the sides moving toward the top. at the top of the seat back, where it comes over the top are 2 rubber channels that slip over a part of the frame. Use a screw driver to pry them loose.

Now the cover will be mostly loose from the bottom, but it is still attached at the top. There are 4 plastic clips that slip through unique rods at the top of the seat. The foam will be loose from the seat fram at this point so you can pull it up off the frame partially to get at these clips.


I used needle nose pliers to pull them out. The rods up there have a "U" shape, that comes thru the sleeve and pushes through the foam to allow the plastic clips to be inserted.

Now the seat back cover will come off and you can start to install the new cover.
11-27-11, 07:28 AM
#7
Rookie
Thread Starter
Join Date: Feb 2011
Location: AZ
Posts: 70
Likes: 0
Received 0 Likes
on
0 Posts
The seat back cover is a bit easier than the bottom. Insert all of the rods that you took put of the old cover. You need to route the rubber cord up the center sleeve, and at the top of the rubber cord is a metal loop that the crossing rod will go through to hold the rubber cord in place. Use a razor to cut a hole in the crossing sleve and when u slide that rod through "Catch" the loop at the hole. The "U" shaped rods that the plastic clips go on can be really hard to get into the sleeves at the top of the cover. In my case I was able to slide the rode into the sleeve, streaching the sleeve, about 3/4 of the way into the sleeve. Both of the "U" shaped portions of the rod were into the sleeve, but not far enough down to be positioned right, so I had to cut into the sleeve to allow the "U" shaped portion of the rod to come thru the sleeve and release pressure on the sleeve, that allowed me to slide the rods into the correct position. These "U" shaped portions of the upper rod are also the only ones that go through the foam, and the openings in the foam determine the correct position of those rods in thier sleeves.Then with the foam still loose from the seat back frame slip the top portion of the cover over the the top of the foam. U will need to pull it down to get the "U" rods to the openings in the foam. Once they are positioned correctly you push from the front to get the "U" portion of the rod through the foam, then slip the plastic clips through them, attaching the cover to the foam. Now all you do is hog ring the rest of the sleeved rods as well as pulling the rubber rod firmly down and hog ringing it to the seat frame at the bottom.
All that is left now is to put everything back together, and you just reverse the process. the only things to be aware of is that when you go to get the wire harness frome the seat base through the bottom cusion and into the seat back, do it BEFORE you attach the seat back to the bottom. Again you have to push from one side, and pull from the other to get it through.
Well Im am sure that I have forgotten some things, but this should be enough for you to get this job done. I encourage all that use this DIY to add responses that will help others in this job when you find omissions or can add valuable tips.
In closing take a look at this 1970 GS45 that I restored, It was the first car that I did all of the restoration myself

Trending Topics


 10-27-15, 03:14 AM
#12

This is good, I wish on some pics you would step back a few more feet and show the whole seat a bit better.
For us older ones its just difficult to see where that area is on the complete seat.
For us older ones its just difficult to see where that area is on the complete seat.

Thread
Thread Starter
Forum
Replies
Last Post
super400
SC- 1st Gen (1992-2000)
1
07-08-17 09:22 PM
7schulz
LS - 1st and 2nd Gen (1990-2000)
9
05-11-10 04:18 AM